background image


6


INSTALLATION


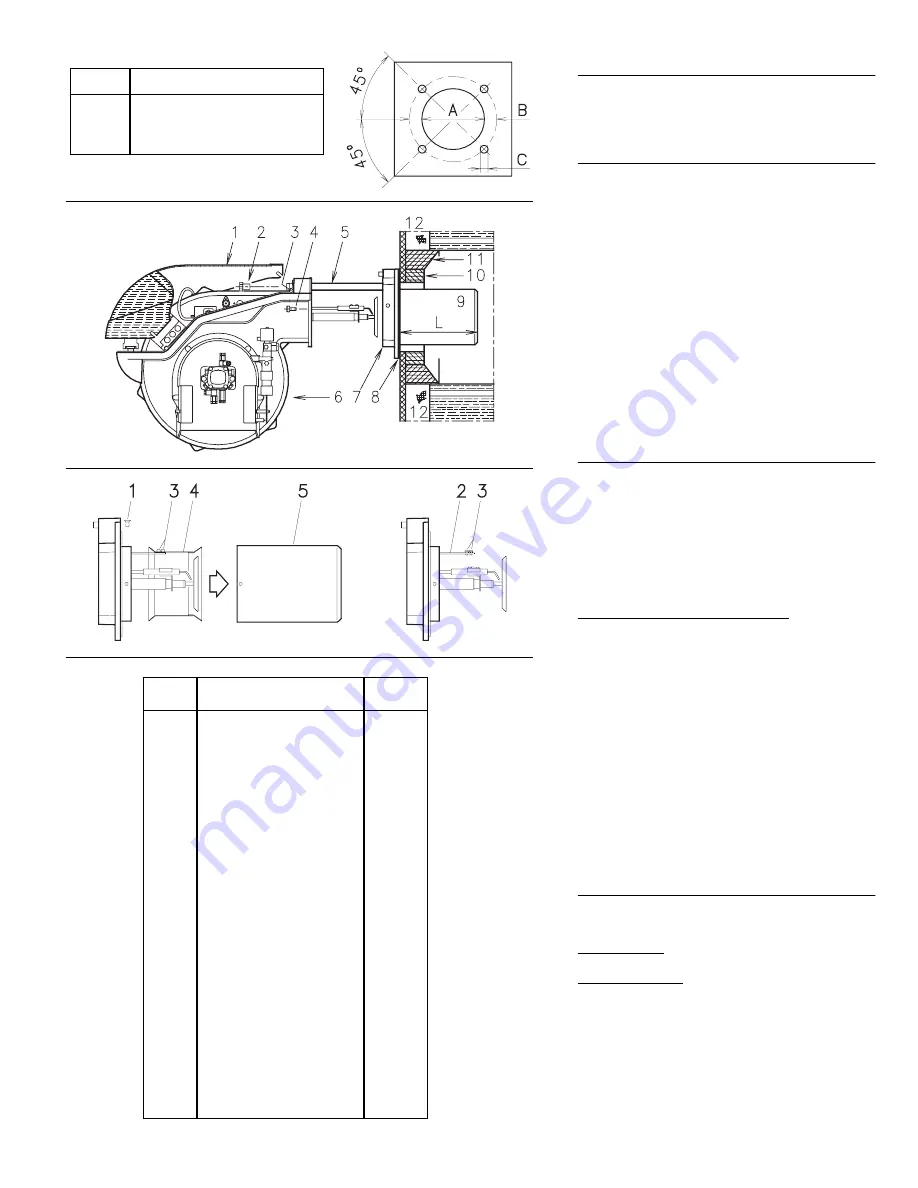
BOILER PLATE (A)


Drill the combustion chamber mounting plate as
shown in (A). The position of the threaded holes can
be marked using the burner gasket supplied with the
burner.


BLAST TUBE LENGTH (B)


The length of the blast tube must be selected accord-
ing to the indications provided by the manufacturer of
the boiler, and it must be greater than the thickness of
the boiler door complete with its insulation. The range
of lengths available, L (inch), is as follows:

Blast tube 9): 

RL 70

RL 100

RL 130

• short

9


27/32


9


27/32


9


27/32


• long (with the kit)

15


5/32


15


5/32


15


5/32


For boilers with front flue passes 12) or flame inversion
chambers, protective insulation material 10) must be
inserted between the boiler's refractory 11) and the
blast tube 9).
This protective insulation must not compromise the ex-
traction of the blast tube.
For boilers having a water-cooled front, the insulation
10)-11)(B) is not required unless it is required by the
boiler manufacturer.


SECURING THE  BURNER TO THE  BOILER  (B)


Disassemble the blast tube 9) from the burner 6) by
proceeding as follows:
- Loosen the four screws 3) and remove the cover 1).
- Remove the screws 2) from the two slide bars 5).
- Remove the two screws 4) fixing the burner 6) to the

flange 5).

- Withdraw the blast tube 9) complete with flange 7)

and slide bars 5).

COMBUSTION HEAD CALIBRATION 
At this point check, for model RL 130, whether the
maximum delivery of the burner in high fire operation
is contained in area B or in area C of the firing rate. 
See page 5. 
If it is in area B then no operation is required.
If, on the other hand, it is in area C:
- Unscrew the screws 1)(C) and disassemble the

blast tube 5).

- Unscrew the screws 3) and remove the shutter 4).
- Tighten the screws 3) on the rod 2).
- Now refit the blast tube 5) and the screws 1).

Once this operation has been carried out (if  required),
secure flange 7)(B) to the boiler plate inserting the
supplied gasket 8). Use the 4 screws provided after
having protected the thread with an antiseize product
(high-temperature grease, compounds, graphite). The
burner-boiler seal must be airtight.


CHOICE OF NOZZLES FOR LOW AND HIGH FIRE 


Both nozzles must be chosen from among those listed
in Table (D).
The first nozzle determines the delivery of the burner
at low fire.
The second nozzle works in combination with the low
fire nozzle to determine the delivery of the burner at
high fire.
The total deliveries of low and high fire must be con-
tained within the value range indicated on page 3.
Use nozzles with a 60° spray angle at the recommend-
ed pressure of 174 PSI.

(A)

inch

A

B

C

RL 70

7

9/32

10

27/32

“ - 12

13/16

1/2 

W

RL 100

7

9/32

10

27/32

“ - 12

13/16

1/2 

W

RL 130

7

9/32

10

27/32

“ - 12

13/16

1/2 

W

Nozzle

size

GPH

MBtu/hr
174 PSI

145 PSI

174 PSI

203 PSI

5.0
5.5
6.0
6.5
7.0
7.5
8.0
8.3
8.5
9.0
9.5

10.0
10.5
11.0
12.0
12.3
13.0
13.8
14.0
15.0
15.3
16.0
17.0
17.5
18.0
19.0
19.5
20.0
21.5
22.0

6.15
6.76
7.40
8.00
8.61
9.22
9.86

10.21
10.47
11.08
11.69
12.30
12.94
13.54
14.76
15.15
16.01
17.00
17.23
18.48
18.83
19.69
20.94
21.55
22.16
23.38
24.01
24.62
26.48
27.09

6.79
7.46
8.17
8.84
9.51

10.18
10.85
11.27
11.56
12.23
12.90
13.58
14.28
14.95
16.30
16.71
17.64
18.73
19.02
20.37
20.78
21.74
23.09
23.76
24.46
25.81
26.48
27.15
29.20
29.86

7.40
8.13
8.87
9.60

10.34
11.08
11.81
12.26
12.55
13.29
14.06
14.76
15.50
16.23
17.71
18.16
19.18
20.27
20.65
22.16
22.57
23.63
25.10
25.84
26.58
28.05
28.79
29.52
31.73
32.47

951

1044
1144
1238
1331
1425
1519
1578
1618
1712
1806
1901
1999
2093
2282
2339
2470
2622
2663
2852
2909
3044
3233
3326
3424
3613
3707
3801
4088
4180

(B)

(C)

D455

D2326

D690

(D)

Содержание RL 100/2

Страница 1: ...Installation use and maintenance instructions Light Oil Burners RL 70 2 100 2 130 2 Low High Operation C6505052 ...

Страница 2: ...rates according to air density 16 Siemens LAL control sequence of operations 17 Siemens LAL control troubleshooting guide 18 Start up report 19 N B Figures mentioned in the text are identified as follows 1 A part 1 of figure A same page as text 1 A p 4 part 1 of figure A page number 4 WARNING Do not store flammable or hazardous materials in the vicinity of fuel burning appliances Improper installa...

Страница 3: ...ain power supply 10 V Ph Hz 208 230 460 575 3 60 Fan motor rpm W HP V A 3400 1100 1 5 208 230 460 575 4 8 2 8 2 3 3400 1800 2 5 208 230 460 575 6 7 3 9 3 2 3400 2200 3 208 230 460 575 8 8 5 1 4 1 Ignition trasformer V1 V2 I1 I2 120 V 2 x 5 kV 3 7 A 35 mA Pump delivery 174 Psi pressure range GPH PSI 34 3 145 290 52 5 145 290 Electrical power consumption W max 1400 2200 2600 Electrical protection NE...

Страница 4: ...shbutton lights up it in dicates that the burner is in lock out To reset press the pushbutton MOTOR TRIP release by pressing the pushbutton on thermal relay PACKAGING WEIGHT B Approximate measurements The burner is shipped on a skid Outer dimensions of packaging are indicated in B The weight of the burner complete with packaging is indicated in table B MAX DIMENSIONS C Approximate measurements The...

Страница 5: ...e calibration of the combustion head as explained on page 6 Important the FIRING RATE area values have been obtained considering an ambient temperature of 68 F 20 C and an atmospheric pressure of 394 WC approx 329 ft above sea level and with the combustion head ad justed as shown on page 7 Note The FIRING RATE areas given in figure A have been reduced by 10 with respect to the maximum range that c...

Страница 6: ... shutter 4 Tighten the screws 3 on the rod 2 Now refit the blast tube 5 and the screws 1 Once this operation has been carried out if required secure flange 7 B to the boiler plate inserting the supplied gasket 8 Use the 4 screws provided after having protected the thread with an antiseize product high temperature grease compounds graphite The burner boiler seal must be airtight CHOICE OF NOZZLES F...

Страница 7: ... The nozzle for low fire operation is the one lying be neath the firing electrodes Fig B Make sure that the electrodes are positioned as shown in Figure B Finally remount the burner 3 C to the slide bars 2 and slide it up to the flange 5 keeping it slightly raised to prevent the flame stability disk from pressing against the blast tube Tighten the screws 1 on the slide bars 2 and screws 4 fixing t...

Страница 8: ... A H Pump Foot valve height difference L Piping length Ø Inside pipe diameter 1 Burner 2 Pump 3 Filter 4 Manual on off valve 5 Suction line 6 Foot valve 7 Return line HYDRAULIC CONNECTIONS B The pumps are equipped with a by pass that connects return line and suction line The pumps are installed on the burner with the by pass closed by screw 6 A p 12 It is therefore necessary to connect both hoses ...

Страница 9: ...an be considered to be primed when the light oil starts coming out of the screw 3 Stop the burner switch 1 C p 12 set to OFF and tighten the screw 3 The time required for this operation depends upon the diameter and length of the suction tubing If the pump fails to prime at the first starting of the burner and the burner locks out wait approx 15 seconds reset the burner and then repeat the startin...

Страница 10: ...vant screw 5 A p 11 Low fire air damper Keep the burner operating at low fire by setting the switch 2 C to the low position Opening of the air damper 6 B must be adjusted in proportion to the selected nozzle the index 1 A must be aligned with the notch 2 A specified in table D This adjust ment is achieved by turning the hex element 2 B in rh direction sign the opening is reduced in lh direction si...

Страница 11: ...served inside the pump use a separate pump to suck out any water and other impurities that may have deposited on the bottom of the tank Fan Check to make sure that no dust has accumulated inside the fan or on its blades as this condition will cause a reduction in the air flow rate and produce incomplete combustion Combustion head Check to make sure that all the parts of the combustion head are in ...

Страница 12: ...ng 9 and filter 10 and is then sprayed out through the nozzle igniting when it comes into contact with the spark This is the low fire flame If the high fire control device is closed or has been re placed by with a jumper wire the high fire solenoid valve 11 is opened and the fuel enters the valve 12 and raises the piston which opens two passages one to piping 13 filter 14 and the high fire nozzle ...

Страница 13: ...ng of the thermal over load Key to Layout A CMV Motor contactor DA Control box FR Photocell I1 Switch burner off on I2 Switch low high fire operation MV Fan motor MB Burner terminal strip P Air pressure switch TA Ignition transformer TB Burner ground earth connection V1 Low fire solenoid valve V2 High fire solenoid valve VS Safety solenoid valve RT Thermal relay D2872 Continuous fan operation Chan...

Страница 14: ...TE The setting of the thermal overload must be according to the total burner amperage draw Burners RL 70 100 130 leave the factory preset for 208 230V power supply If 460V power supply is used change the motor connection from delta to star and change the setting of the thermal overload The RL 70 100 130 burners have been type approved for intermittent operation This means they should compulsorily ...

Страница 15: ...MV Motor contactor DA Control box FR Photocell I1 Switch burner off on I2 Switch low high operation MV Fan motor MB Burner terminal strip P Air pressure switch TA Ignition transformer TB Burner ground earth connection V1 low fire solenoid valve V2 high fire solenoid valve VS Safety solenoid valve RT Thermal relay A Factory Wiring Diagram RL70 130 three phase with remote control panel D2429 ...

Страница 16: ...ner s delivery must be reduced A reduction in delivery is accompanied by a reduction of the pressure in the combustion chamber Qr reduced delivery H1r reduced pressure Example a 5 delivery reduction Qr Q x 0 95 H1r H1 x 0 95 2 Steps 2 5 must now be repeated using the new Qr and H1r values Important the combustion head must be adjusted in respect to the equivalent delivery Qe Qe Q F MBtu hr H3 H2 x...

Страница 17: ...re ignition time short Z connected to terminal 16 t4 Interval between voltage at terminals 18 and 20 t5 Air damper running time to OPEN position t6 Air damper running time to low flame position MIN t7 Permissible after burn time t8 Interval to the OPEN command for the air damper LAL 2 25 t1 t2 t3 t4 18 4 2 12 t5 t6 t7 t8 optional optional 12 4 A D2870 Siemens LAL control ...

Страница 18: ...l 5 are opened Extraneous light Lock out during or after completion of the control program Examples Flame not extinguished Leaking fuel valves Faulty flame supervision circuit Interruption of startup sequence Terminals 6 7 and 15 remain under voltage until fault has been corrected Lock out Defect in the flame supervision circuit faulty flame signal extraneous light Interruption of startup sequence...

Страница 19: ... Fire High Fire High Fire High Fire High Fire High Fire OIL OPERATION Oil supply pressure Oil suction pressure Control Power Supply Burner Firing Rate Low Fire Flame Signal High Fire Flame Signal Low Fire Nozzle Size High Fire Nozzle Size CO2 Low Fire O2 Low Fire CO Low Fire NOX Low Fire Net Stack Temp Low Fire Comb Efficiency Low Fire Overfire Draft Smoke number High Fire High Fire High Fire High...

Страница 20: ...Represented By Power Equipment Company 2011 Williamsburg Road Richmond VA 23231 Ph 804 236 3800 Fx 804 236 3882 www peconet com ...

Отзывы: