background image

918-I Heavy Duty Roll Grooving Machine

Ridge Tool Company

9

Do not reach inside of pipe. Keep hands

away from sharp edges and burrs on end of pipe.

NOTE! Do not overfeed upper groove roll. Maintain con-

stant even downward pressure, pausing to allow
one pipe revolution per quarter stroke of the
pump handle.

3. When the depth adjustment knob contacts the ma-

chine casting, allow two complete pipe revolutions
to even out groove depth.

4. Release foot switch and retract upper groove roll by

placing the pump release lever in the RETURN posi-
tion (toward operator).

5. Check groove diameter before proceeding with addi-

tional grooves.

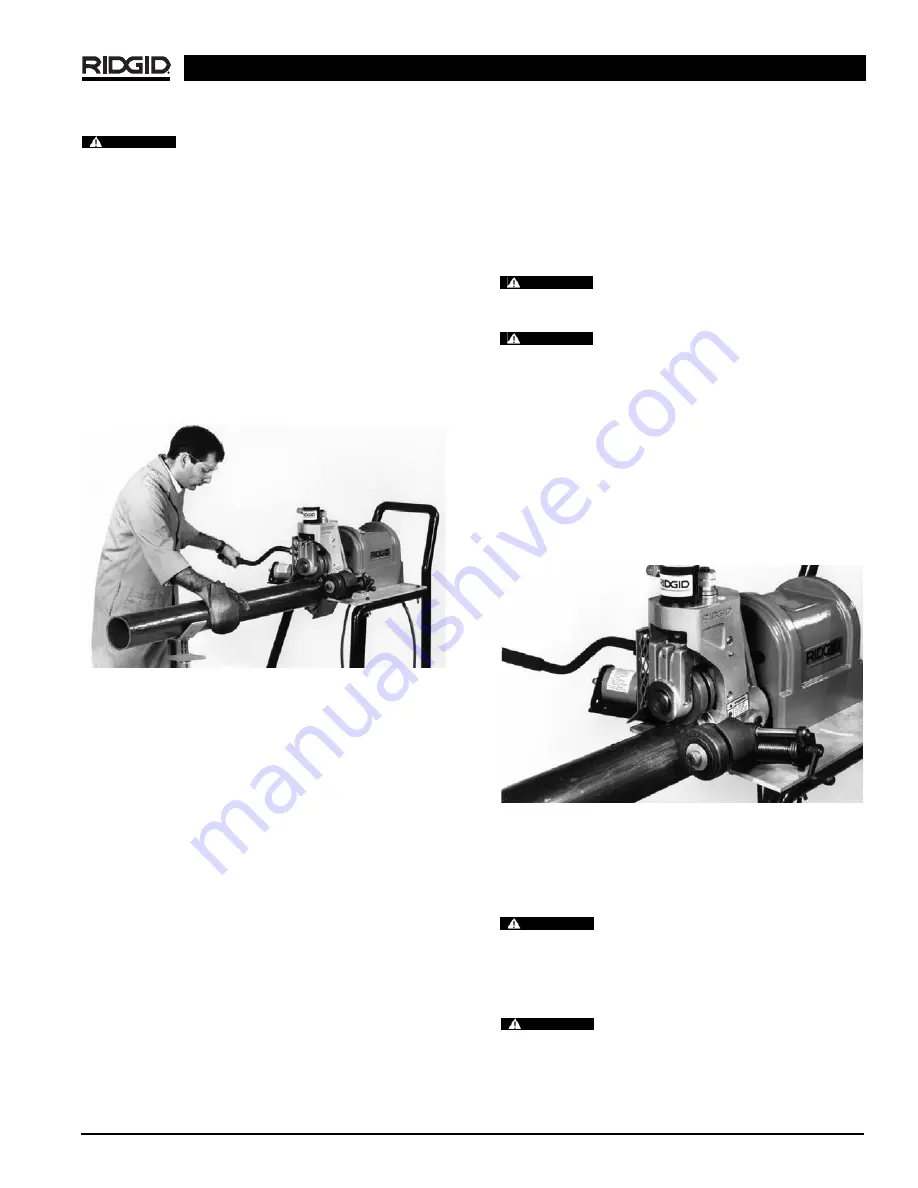
Figure 9 – Grooving Pipe While Exerting Light Hand

Pressure Toward Operator

NOTE! Groove diameter should be measured using a di-

ameter tape. To decrease groove diameter (in -
crease groove depth), rotate the index depth ad-
justment knob one mark counter-clockwise. To in -
crease groove diameter (decrease groove depth),
rotate the depth adjustment knob clockwise.

Roll Grooving Tips with Model 918-I

1. If pipe tends to “walk off” drive roll, increase offset di-

mension 

(Figure 7).

2. If drive roll flange shaves pipe end, decrease offset di-

mension.

3. If pipe end flare is excessive, lower pipe end to level

with roll groover.

4. If pipe wobbles and/or “walks off” drive roll, raise pipe

end to level with roll groover.

5. Short lengths of pipe (under three feet) may require

slight pressure to maintain the 

1

/

2

degree offset di-

mension.

Grooving Short Lengths of Pipe

Without Stabilizer

1. Properly set-up pipe to ensure pipe is level and square

on the shoulder of the drive roll.

2. When grooving, exert pressure on the pipe towards

the operator 

(Figure 9).

Do not attempt to groove any pieces of

pipe shorter than 8

(See Chart A). Increases risk of fingers

being crushed in the grooving rolls.

Do not reach inside of pipe. Keep hands

away from sharp edges and burrs on end of pipe.

With Stabilizer

NOTE! Once stabilizer is adjusted for a selected pipe

diameter and wall thickness, it does not have to
be readjusted.

1. Properly set up pipe to ensure pipe is level and square

on the shoulder of the drive roll.

2. Engage hydraulic pump and bring groove roll (upper

roll) down until it contacts outside diameter of the
pipe.

3. Tighten down stabilizer roll until roll contacts outside di-

ameter of the pipe. Continue to tighten stabilizer one
full turn after making contact on outside diameter of

pipe 

(Figure 10).

Do not reach across pipe to adjust stabilizer.

NOTE! If pipe “walks off” of drive shaft during the roll

grooving operation, the stabilizer will need to be
further tightened 

1

/

2

turn.

Do not use the pipe stabilizer on 8

or

short  er workpieces. Increases risk of fingers being crushed
in the grooving rolls.

WARNING

WARNING

Figure 10 – Adjusting Pipe Stabilizer

WARNING

WARNING

WARNING

Содержание 64977

Страница 1: ...anual carefully before using this tool Failure to understand and follow the contents of this manual may result in electrical shock fire and or serious personal injury 99 Washington Street Melrose MA 0...

Страница 2: ...e an outdoor extension cord marked W A or W These cords are rated for outdoor use and reduce the risk of elec trical shock Keep all extension cord connections dry and off the ground Do not touch plugs...

Страница 3: ...Safety Using this machine without a foot switch increases the risk of serious injury A foot switch provides better control by letting you shut off the motor by removing your foot If clothing should be...

Страница 4: ...n groove the following pipe 2 6 Schedule 10 and 40 8 12 Schedule 10 and 8 Schedule 40 With additional roll sets the groover can also be adapted to groove the following 2 6 copper tubing Types K L M DW...

Страница 5: ...s mounting plate 8 Place the pump mounting plate over the hole and slot on the left side of the 918 I left side as you look at the front of the 918 I From the bottom of the base plate insert the 3 8...

Страница 6: ...e pipe with pipe stands See Chart A for maximum lengths with one 1 stand Failure to properly support the pipe can result in the unit tipping or the pipe falling 5 Make sure switch is in the OFF positi...

Страница 7: ...g max imum and minimum O D at 90 degrees apart 3 All internal or external weld beads flash or seams must be ground flush at least 2 inches back from pipe end NOTE Do not cut flats on gasket seat area...

Страница 8: ...oll should only touch the pipe surface Care must be taken not to penetrate pipe surface with upper roll by applying excessive pressure 2 Turn down the indexed depth adjustment knob clock wise until it...

Страница 9: ...ipe end to level with roll groover 5 Short lengths of pipe under three feet may require slight pressure to maintain the 1 2 degree offset di mension Grooving Short Lengths of Pipe Without Stabilizer 1...

Страница 10: ...n motor and transmission cover Use 3 16 hex key to loosen the two screws on the front half of the transmission coupling Figure 13 Figure 13 Loosen the Two Screws on the Transmission Coupling Use the s...

Страница 11: ...key to loosen the two screws on the front half of the transmission coupling Figure 13 Use the spanner wrench to loosen and remove the drive shaft retaining nut Figure 14 Pull the drive shaft assembly...

Страница 12: ...Figure 15 Remove the front half of the coupling Assemble proper drive roll to drive shaft two piece style with draw bolt hand tight Insert two piece drive shaft assembly into 918 I Manually rotate the...

Страница 13: ...56 750 469 12 531 000 110 025 025 Table II Pipe Maximum and Minimum Wall Thickness NOTE All Dimensions are in Inches CARBON STEEL OR STAINLESS STEEL ALUMINUM PIPE OR TUBE PIPE OR TUBE PVC PIPE Pipe Si...

Страница 14: ...ing roll feed rate too slow Pipe support stand rollers not in correct location for pipe size Pipe wall maximum thickness exceeded Wrong rolls Pipe material too hard Adjustment nut not set Maximum pipe...

Страница 15: ...ble III Troubleshooting cont PROBLEM CAUSE CORRECTION Pipe raises or tends to tip groover over back wards Pump not delivering oil cylinder does not advance Pump handle operates with spongy action Cyli...

Страница 16: ...r source before performing maintenance or making any adjustments Hydraulic Fluid Level Remove the reservoir filler cap Figure 18 The oil level should come to the fill line when the pump is resting on...

Страница 17: ...ne should be taken to a RIDGID Independent Authorized Service Center or returned to the factory All repairs made by Ridge service facilities are warranted against defects in material and workmanship W...

Страница 18: ...Printed in U S A 11 12 999 998 676 10 EC39404 Rev B 99 Washington Street Melrose MA 02176 Phone 781 665 1400 Toll Free 1 800 517 8431 Visit us at www TestEquipmentDepot com...

Отзывы:

Похожие инструкции для 64977