background image

RIDEMAKERZ.COM

1-866-58-RIDEZ (74339)

RIDESOUNDZ  7

ridesoundz

TM

monster

street

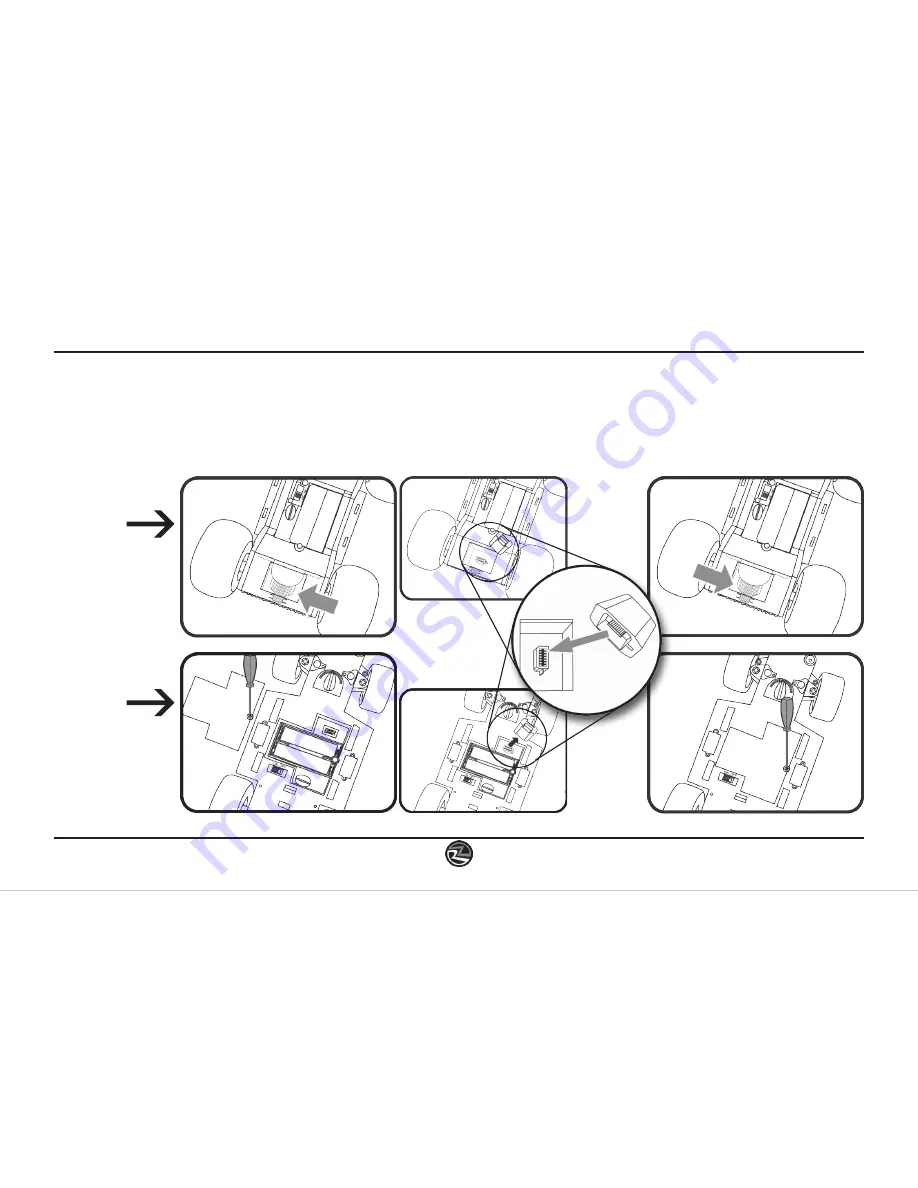
Remove RIDESOUNDZ compartment 

cover by sliding it to the left and 

pulling up.

Insert the RIDESOUNDZ into the port on the RIDE 

chassiz and press in firmly until the RIDESOUNDZ 

has been inserted fully into the port.

Replace the RIDESOUNDZ compartment 

cover inserting it and sliding it to the 

right until it locks.

The RIDESOUNDZ port 

is located between 

the front tires in the 

Monster chassiz.

The RIDESOUNDZ port 

is located inside the 

battery compartment in 

the Street chassiz.

FRONT

Содержание RIDE

Страница 1: ...RIDEMAKERZ COM 1 866 58 RIDEZ 74339 RIDE MANUAL OWNERZ NAME PIT CHALLENGE TIME MAKE MODEL BUMPER TO BUMPER ...

Страница 2: ...ights which may very from state to state RIDEMAKERZ gladly accepts returns for exchange or refund within 30 days Please save your receipt return it to a RIDEMAKERZ SHOP or ship your return to our RIDEMAKERZ Garage located at 111 Pacifica Suite 110 Irvine CA 92618 Product must be carefully packed and shipped pre paid and insured Thanks for becoming a RIDEMAKERZ Customizer Now that you have your own...

Страница 3: ... NEVER drive your RIDE on the street or in a parking lot that is in use DO NOT pick up or touch the vehicle when it is in motion Keep fingers hair and loose clothing away from the wheels when the vehicle is in operation Don t drive your RIDE in sand or through water or snow Avoid head on collisions with walls or hard surfaces Don t collide with humans or animals to prevent injury Don t store your ...

Страница 4: ...tteries and discard properly Install 4 new alkaline batteries Follow directions inside the battery compartment Install the rechargeable Ni Cd battery pack sold separately and attach the wire connector plug from the vehicle to the battery pack Twist the locking tab to the locked position to hold the battery firmly in place OR TRANSMITTER BATTERY INSTALLATION street Remove the the battery compartmen...

Страница 5: ... off the protective door on the battery box Remove old batteries and install 6 new alkaline batteries Lock oval latch Install the rechargeable Ni Cd battery pack sold separately and attach the wire connector plug from the vehicle to the battery pack Twist the locking tab to the locked position to hold the battery pack firmly in place OR TRANSMITTER BATTERY INSTALLATION Remove the the battery compa...

Страница 6: ...hree of them can be set on the three 27 MHz BANDS and the last one would have to be a 49 MHz chassiz Or if you have six RIDEZ three of them can be 27 MHz chassiz and three of them can be 49 MHz chassis in order for all six of them to work independently NOTE Radio control operation is susceptible to interference Large metal objects such as chain link fences light poles power lines or vehicles can c...

Страница 7: ... into the port on the RIDE chassiz and press in firmly until the RIDESOUNDZ has been inserted fully into the port Replace the RIDESOUNDZ compartment cover inserting it and sliding it to the right until it locks The RIDESOUNDZ port is located between the front tires in the Monster chassiz The RIDESOUNDZ port is located inside the battery compartment in the Street chassiz FRONT ...

Страница 8: ...damaging your RIDE screw in only until there is some resistance 5 Now partially tighten the screw located diagonally from your first one For instance if you started with the right front screw continue by screwing the left rear screw 6 Continue to the next two screws screw ing them in until there is resistance 7 Now you can screw all the screws in until firm Don t over tighten You can easily swap o...

Страница 9: ...CHING WHEELZ AND TREADZ TO RIDE 1 Start with the front of the WHEEL facing you 2 Place the wheel onto your RIDE by pressing it onto the wheel hub 3 Use your palm to apply equal pressure onto the WHEEL until you hear it snap onto the hub CHANGING WHEELZ AND TREADZ 1 With you thumb apply pressure to the back side of your TREAD 2 Once TREAD pops off press your thumb into the center of the backside of...

Страница 10: ... damaging your RIDE screw in only until there is some resistance 5 Now partially tighten the screw located diagonally from your first one For instance if you started with the right front screw continue by screwing the left rear screw 6 Continue to the next two screws screw ing them in until there is resistance 7 Now you can screw all the screws in until firm Don t over tighten You can easily swap ...

Страница 11: ...ill hear your WHEEL snap in place ATTACHING WHEELZ AND TREADZ TO RIDE 1 Start with the front of the WHEEL facing you 2 Place the wheel onto your RIDE by pressing it onto the wheel hub 3 Use your palm to apply equal pressure onto the WHEEL until you hear it snap onto the hub CHANGING WHEELZ AND TREADZ 1 With you thumb apply pressure to the back side of your TREAD 2 Once TREAD pops off press your th...

Страница 12: ...ILD YOUR RIDE TM You can trick it out with bumper to bumper accessories It s eazy with built in hood and rooftop magnets Plus each chassiz is equipped with slots on the front rear and sides where accessories are easily placed and switched out MAGNETS Conforms to ASTM F963 07 ...

Страница 13: ...RIDEMAKERZ COM 1 866 58 RIDEZ 74339 ACCESSORIES 13 Slots are located along the perimeter of each chassiz Each accessory has tabs that slide into the slots to hold them in place SLOTS TABS ...

Страница 14: ...oystick A BACKWARD RIGHT TURN Move Joystick B RIGHT while RIDE is in motion LEFT TURN Move Joystick B LEFT while RIDE is in motion Make sure the vehicle and transmitter are switched ON Fold out and fully extend the antenna on the transmitter STREET BAND 1 2 3 ON OFF driving YOUR RIDE 14 CONTROLS MONSTER This controller works differently The left toggle switch operates the left side of your RIDE Th...

Страница 15: ...ry pack install the pack and attach the wire connector plug from the vehicle to the bat tery back Rotate the locking tab counterclockwise until it locks in place If the battery case is not seated and locked properly the case could become loose which will result in power loss Replace the battery compartment cover and tighten the safety screw There could be several reasons for this If your R C RIDE ...

Страница 16: ... properly seated and locked and the contacts are no longer making proper contact Remove the battery compartment cover using a Phillips head screwdriver unlock the battery case turning the tab clockwise to loosen the battery case Remove the case and reinsert it firmly If you have a rechargeable Ni Cd battery pack reconnect the connection cables from the Ni Cd battery pack and the vehicle Turn the l...

Страница 17: ...or optimal range The driving surface may also affect your vehicle s performance DO NOT operate your vehicle thru water sand snow thick carpet or in the rain A hard impact may have jarred and loosened the RIDESOUNDZ In Street chassis remove the battery compartment cover The RIDESOUNDZ cartridge is located next to the battery case In Monster chassiz remove the RIDESOUNDZ compartment cover located in...

Страница 18: ...RIDEMAKERZ COM 1 866 58 RIDEZ 74339 ...

Отзывы: