Ricoh MP3003 Скачать руководство пользователя страница 25

25 

© 2012 Ricoh Americas Corporation. All Rights Reserved. 

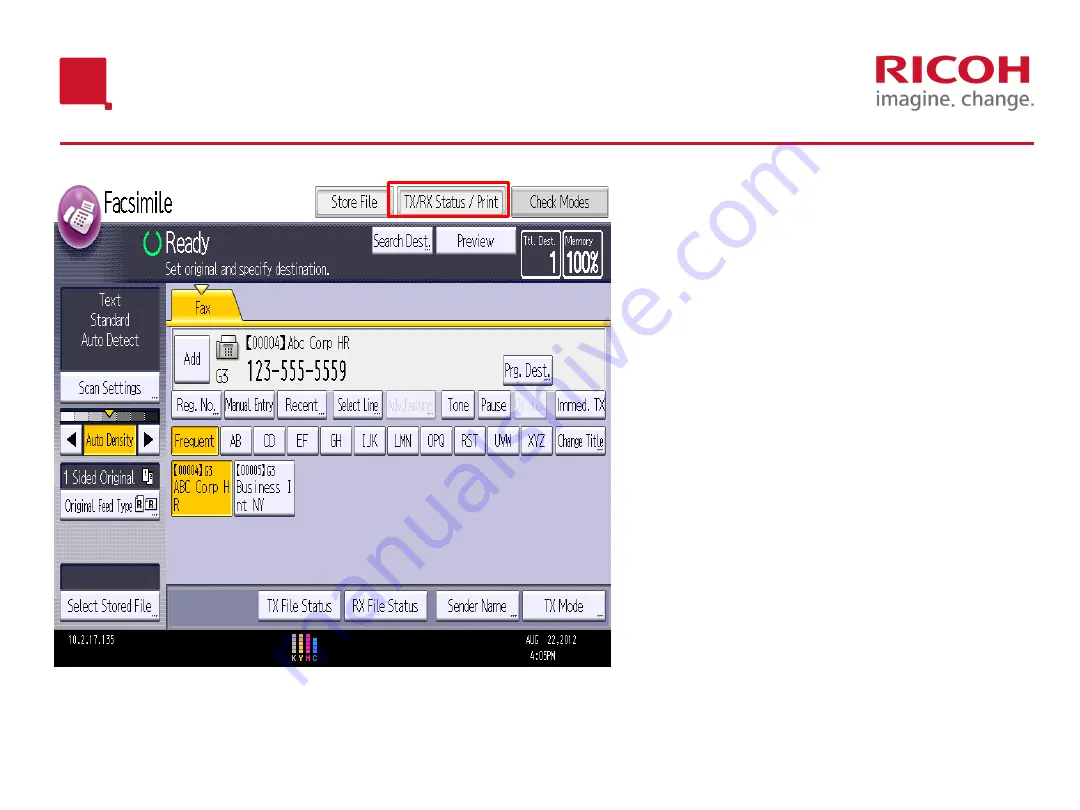
Cancelling Fax Stored to Memory 

1.Press the 

[Facsimile]

 button on the control 

panel of your Ricoh device. 
 
2.Select 

[TX/RX Statue/Print] 

 
3.Select 

[Check/Stop Transmission File]

 
4. A list of all fax messages that are in 
standby mode (waiting to be sent) will 
appear. 
 
5.Select the transmission that you wish to 
cancel by touching it. 
 
6.Select 

[Stop Transmission], 

then select 

[OK]

 
7. Select 

[Exit] 

 
8. Select 

[Exit] 

again. 


Содержание MP3003

Страница 1: ...DURHAM COLLEGE UOIT Ricoh Copier Training January 2014...

Страница 2: ...Panel 2 Setting originals Loading paper trays 3 Copier features 4 Fax features 5 Scan features 6 Printing 7 Clearing Misfeeds and Maintenance 8 Changing Toner At the end please feel free to ask questi...

Страница 3: ...RICOH MODELS 3 2012 Ricoh Americas Corporation All Rights Reserved 8300DN 5210DN 5210SF PRO 8100 MPC3003 MP4002...

Страница 4: ...4 2012 Ricoh Americas Corporation All Rights Reserved Home Screen Button User Tools Counter Stop Start Simple Screen Simplified Display Reset Clear Modes Login Logout Check Status Sample Copy Energy S...

Страница 5: ...Operation Panel MP4002 5 2012 Ricoh Americas Corporation All Rights Reserved...

Страница 6: ...Operation Panel MP5210 6 2012 Ricoh Americas Corporation All Rights Reserved Program Interrupt Energy Saver Clear modes Simplified Clear stop Login log out Sample Copy Start...

Страница 7: ...ng Originals MPC3003 MP4002 7 2012 Ricoh Americas Corporation All Rights Reserved Place up to 100 originals face up In descending order When using the glass place originals face up in the upper left c...

Страница 8: ...Setting Originals MP5210 8 2012 Ricoh Americas Corporation All Rights Reserved 50 sheet Automatic Reversing Document Feeder ARDF...

Страница 9: ...ays 9 2012 Ricoh Americas Corporation All Rights Reserved Standard 500 sheet paper trays Tray 1 Letter Tray 2 Letter Tray 3 Legal Tray 4 Tabloid 11x17 Bypass Tray For special paper 100 sheet capacity...

Страница 10: ...Copier Features...

Страница 11: ...Home Screen 11 2012 Ricoh Americas Corporation All Rights Reserved Select the Copier button or select the Home button which shows you this screen...

Страница 12: ...MP C3003 12 2012 Ricoh Americas Corporation All Rights Reserved...

Страница 13: ...13 2012 Ricoh Americas Corporation All Rights Reserved MP4002 MP5210 Black White...

Страница 14: ...riginal size is the exact same size as the paper you have loaded in one of your paper trays The device will correctly select the paper tray Manually select your paper size using the touch screen if yo...

Страница 15: ...15 2012 Ricoh Americas Corporation All Rights Reserved MP5210 Manually select paper tray...

Страница 16: ...ge Features Scaling copies may be Adjusted using AUTO Reduce Enlarge Pressing the or changes the reproduction ratio in increments of 1 Selecting Number Keys allows you to input your reproduction ratio...

Страница 17: ...17 2012 Ricoh Americas Corporation All Rights Reserved Auto Reduce Enlarge...

Страница 18: ...d is the default setting To temporarily remove this setting and make single sided copies Depress this button Use 2 sided to 2 sided to have double Sided originals copied double sided Use 1 sided Comb...

Страница 19: ...19 2012 Ricoh Americas Corporation All Rights Reserved Finishing Options...

Страница 20: ...Fax Features...

Страница 21: ...21 2012 Ricoh Americas Corporation All Rights Reserved Home Screen...

Страница 22: ...fax number or choose an abstract pre programmed Insert your original face up in the feeder and press Start Your fax will be stored and sent Ricoh MFP can send your fax photocopy and or scan another do...

Страница 23: ...ns 1 Press the Facsimile button on the control panel of your Ricoh device 2 Enter a fax number 3 Select Add 4 Enter the next fax destination 5 Repeat steps 2 4 until all fax destinations have been ent...

Страница 24: ...2 Press the Facsimile button on the control panel of your Ricoh device 3 Select 2 Sided Original 4 Select start 2 sided scanning from 2nd Sheet if your fax includes a single sided cover sheet then se...

Страница 25: ...ntrol panel of your Ricoh device 2 Select TX RX Statue Print 3 Select Check Stop Transmission File 4 A list of all fax messages that are in standby mode waiting to be sent will appear 5 Select the tra...

Страница 26: ...Rights Reserved Transmission Verification 1 Press the Facsimile button on the control panel of your Ricoh device 2 Select TX File Status 3 Use Prev and Next to scroll through the list of successful tr...

Страница 27: ...Scanner Features...

Страница 28: ...28 2012 Ricoh Americas Corporation All Rights Reserved Scanner MPC3003 MP4002 Select the Scanner button or select the Home button which shows you this screen...

Страница 29: ...29 2012 Ricoh Americas Corporation All Rights Reserved Place up to 100 originals face up in the Document Feeder or face down on the glass lined up with the upper left corner Placement of Originals...

Страница 30: ...Corporation All Rights Reserved Your scanner will be defaulted to Scan to Email Choose your Destination from the pre programmed address book or manually enter your scan destination by touching Manual...

Страница 31: ...Dest Press Name Use the keyboard that appears to key in the name or the first few letters then select OK Press Start Search and select the desired email address from the list of matching entries that...

Страница 32: ...Printing Features...

Страница 33: ...33 2012 Ricoh Americas Corporation All Rights Reserved Printing MP C3003 PCL 6 In the application that you are using click on File Print Then select your Ricoh printer and click on Properties...

Страница 34: ...etailed Setting tab offers more options Job Type default is Normal see other options in slides to follow Orientation Portrait or Landscape rarely needs adjustment Colour Mode default is black white Ch...

Страница 35: ...enu Orientation Portrait or Landscape rarely needs adjustment Colour Mode default is black white select from dropdown to choose Colour Reduce Enlarge Select Zoom to manually select a percentage or sel...

Страница 36: ...e defaulted to Auto Tray Select Paper Type can be selected from dropdown arrow and Output Tray may be changed if desired You may also scroll down The side bar to choose to create Banner Pages Front Ba...

Страница 37: ...2 to 16 pages on one sheet changing the page order drawing a border Duplex 2 Sided and Booklet 2 sided is the default setting To temporarily remove this setting and print single sided select Off in th...

Страница 38: ...poration All Rights Reserved Printing Detailed Settings Finishing Collate will be defaulted to Printer Collate Select Staple dropdown to choose the staple Position that you desire Punch and Fold featu...

Страница 39: ...ows you to add a watermark Several presets are available You can select the size angle font and style You can select first page only Print Watermark must be turned on for it to print When the file is...

Страница 40: ...evice After sending The document the device does not output until you enter a numeric password to print it In Job Type select Locked Print then click Details Enter your user ID Name or First Name with...

Страница 41: ...ation All Rights Reserved Printing Locked Print Confidential Print cont d When at the device press the Home button then Printer on the display Press Print Jobs Select your file in the list displayed o...

Страница 42: ...rompts or press the Home button on the left side of the control panel the Printer on the display Press Job Reset Press Reset the Job then press Yes to confirm Note The print job does not stop immediat...

Страница 43: ...Clearing Misfeeds Maintenance...

Страница 44: ...d B doing a front and back motion with the blue lever will help feed the sheet out of roller B Always remove the misfed paper in the same direction as the feed rollers DO NOT PULL SIDEWAYS AS THE PAPE...

Страница 45: ...45 2012 Ricoh Americas Corporation All Rights Reserved Sections B end of and C Pull misfed paper out SLOWLY Section Z two sided area Clearing Misfeed cont d...

Страница 46: ...46 2012 Ricoh Americas Corporation All Rights Reserved End of Section C Section D Clearing Misfeed MP4002 cont d...

Страница 47: ...47 Section R Finisher Clearing Misfeed cont d...

Страница 48: ...48 2012 Ricoh Americas Corporation All Rights Reserved Section P Turn the blue knob to slide the original out Clearing Misfeed cont d...

Страница 49: ...12 Ricoh Americas Corporation All Rights Reserved Clearing Misfeeds MP5210 Misfeeds Follow the indications on screen The left side shows in which section the misfeed is and the right side how to acces...

Страница 50: ...ghts Reserved Section B Press on the push button to open the front panel Clearing Misfeeds MP5210 Always remove the misfed paper in the same direction as the feed rollers DO NOT PULL SIDEWAYS AS THE P...

Страница 51: ...1 2012 Ricoh Americas Corporation All Rights Reserved Other Misfeed locations 5210 Section B SLOWLY remove the misfed paper Opening the rear panel gives you access to Sections B continued and Z duplex...

Страница 52: ...orporation All Rights Reserved Misfeed cont d 5210 Section Z Pull delicately to exit the sheet The green lever located inside the rear panel is used to adjust roller pressure for envelope printing mus...

Страница 53: ...Changing Toner...

Страница 54: ...ights Reserved Changing Toner MPC3003 Open the front panel and remove the empty cartridge Shake the NEW cartridge vertically and insert it into the unit with the arrow on top as shown in Fig 3 DO NOT...

Страница 55: ...55 2012 Ricoh Americas Corporation All Rights Reserved Changing Toner MP4002 Open the front panel and remove the empty cartridge...

Страница 56: ...l Rights Reserved Changing Toner MP4002 cont d Shake the new cartridge SLOWLY shown inside the panel and insert it into the unit Push the unit back in making sure it is engaged DO NOT REMOVE THE EMPTY...

Страница 57: ...57 2012 Ricoh Americas Corporation All Rights Reserved Changing Toner MP5210...

Страница 58: ...58 2012 Ricoh Americas Corporation All Rights Reserved Open the front panel and remove the empty cartridge Shake the NEW cartridge and insert it into the unit Changing Toner MP5210...

Страница 59: ...Questions...

Страница 60: ...Thank you...

Страница 61: ......

Отзывы: