Ricoh Gestetner 3240 Скачать руководство пользователя страница 25

WHAT TO DO IF

SOMETHING GOES

WRONG

nb-4

25

Содержание Gestetner 3240

Страница 1: ...WHERE IS IT WHAT IS IT nb 2 1...

Страница 2: ...nb 2 2...

Страница 3: ...are delivered here 3 3 bin sorter Option Sorts stacks copied printed papers 4 Finisher Option Sorts stacks and staples copied printed papers 5 1500 sheet tray unit Option Holds 1500 sheets of paper 6...

Страница 4: ...EXTERIOR AND INTERIOR PART NAMES nb 2 1 2 3 4 5 6 7 8 13 14 15 9 10 11 12 EXTERIOR AND INTERIOR PART NAMES 4...

Страница 5: ...ss the inside of the machine 7 Unit for two sided copies prints Duplex unit Makes two sided copies prints 8 Paper tray Holds 500 sheets of copy paper 9 Bypass tray Use to copy print onto OHP sheets ad...

Страница 6: ...dance key Shows guidance for functions 4 Touch Panel Display 5 Program key Press to select the program mode 6 Job Recall key Use to recall your previous copy settings 7 Clear Modes Low Power Mode key...

Страница 7: ...e en tered While copying press to stop copying 11 Enter key Use to enter data in selected modes 12 Number keys Use to enter the desired number of copies and data for selected modes 13 Copy key Use to...

Страница 8: ...nd various messages The status area is blank when in Printer mode and off line Numeric Keypad Use to enter numbers and control how the machine functions Control Keys Other keys used when printing and...

Страница 9: ...nstalled Press the Printing Scanner key The on line status screen will appear as below In this screen shot access priority is share Scanner Mode Scanner kit option must be installed Press the Printer...

Страница 10: ...nb 2 OPERATION PANEL 10...

Страница 11: ...BASICS nb 3 11...

Страница 12: ...n 140 seconds u Please wait ap pears on the display 3 After warm up v Ready ap pears on the display When The Display Is Off And The Clear Modes Low Power Mode Key Is Lit The machine is in Low Power mo...

Страница 13: ...ted For A User Code 1 The display instruct you to input your user code 2 Enter your user code 6 digits using the Number keys If you make a mistake touch the C key or press the Clear Stop key and enter...

Страница 14: ...screen on page 9 Depending on the machine configuration it may not be possible to use this function while another job is still running To Use The Scanner 1 Press the Printer Scanner key The machine wi...

Страница 15: ...rrent print jobs the screen will change immediately If the machine is printing however the screen will change as soon as the current print job has finished Any other queued print jobs will be temporar...

Страница 16: ...ng To Another Mode 1 Make sure the machine is in Cop ier mode Press the Printer Scanner key to enter Printer mode 2 Touch On line Off line nb 3 SWITCHING BETWEEN THE COPIER PRINTER AND SCANNER FUNCTIO...

Страница 17: ...Change in the mode op tions Touch either Share Scanner only Printer Priority or Printer only Touch Exit 7 Touch Preve Menu three times 8 Touch On line Off line to return to the printer on line screen...

Страница 18: ...r interrupt operation has finished and the auto clear time has elapsed the machine goes back tothe operation it was doing before you interrupted it For more about the configuration settings The follow...

Страница 19: ...nals between 40 and 52 g m2 11 and 14 lb the document feeder must be set to Thin Paper mode See the Copy Reference Originals larger than A3 11 x 17 Originals smaller than A5 51 2 x 81 2 Paper with any...

Страница 20: ...r the optional platen cover or the optional document feeder SETTING A STACK OF ORIGINALS IN THE OPTIONAL DOCUMENT FEEDER ADF You can insert a stack of originals one sided or two sided of the same size...

Страница 21: ...o the original size 5 Set the originals into the docu ment feeder until the Insert Original indicator goes off When using the machine as a scan ner originals can be set either face down and face up Th...

Страница 22: ...2 Confirm that the Insert Original indicator is lit before setting the originals 3 Confirm that no previous originals remain on the exposure glass 4 Adjust the guide to the original size 5 Set the ori...

Страница 23: ...iginal The original is auto matically fed and copied If you have set more than two origi nals the Auto Feed indicator is not lit after the last original is fed In this case press the Start key again a...

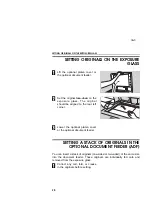
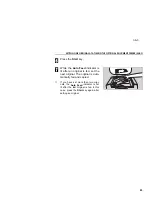
Страница 24: ...nb 3 SETTING ONE ORIGINAL AT A TIME IN THE OPTIONAL DOCUMENT FEEDER SADF 24...

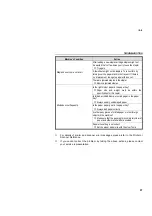
Страница 25: ...WHAT TO DO IF SOMETHING GOES WRONG nb 4 25...

Страница 26: ...key and messages are displayed Follow the instructions on the display Paper runs out Load paper f is displayed Add toner i is displayed Add staples Y is displayed Remove misfed paper Z is displayed k...

Страница 27: ...ht must be within the specification for this copier Is folded wrinkled damp or curled paper in the paper tray Always use dry undamaged paper Is the paper properly set in the paper tray Always load pap...

Страница 28: ...such as carbon or silver coating Thermal paper art paper Thin paper that has low stiffness Notes For Paper Load paper with the copy side down in the 500 sheet trays and with the copy side up in the la...

Страница 29: ...er In The Paper Tray 1 Pull out the paper tray until it stops 2 Load paper in the paper tray Do not stack paper above the limit mark inside the paper tray 3 Push the tray in until it stops nb 4 LOADIN...

Страница 30: ...key will blink while the bottom plate is moving down If the key is lit or blinking proceed to step 2 2 After the Down key stops blinking and lights open the cover 3 Load paper into the tray not more...

Страница 31: ...dding toner do not turn off the main switch If you do your copy settings are cleared NOTE Before setting the new toner bottle shake it well at least 5 or 6 times NOTE Do not remove the toner cap of th...

Страница 32: ...the staples fall into pieces 1 Open the front door of the fin isher 2 You can find a sticker with i at the top explaining how to add a staple cartridge inside the front door as shown in the illustrat...

Страница 33: ...misfeeds make sure that all units and levers are returned to their original positions and all covers are closed NOTE Do not touch originals in the optional document feeder when a pa per misfeed occurs...

Страница 34: ...how to re move misfed paper inside the front cover as shown in the illus tration 3 Remove misfed paper following the instructions on the sticker Misfeed In The Large Capacity Tray 1 Swing out the tra...

Страница 35: ...1 Open the front door of the op tional finisher 2 You can find a sticker with Y at the top explaining how to re move misfed paper inside the front door as shown in the illus tration 3 Remove misfed p...

Страница 36: ...d in the instructions on the sticker inside the fin isher s cover After loading a new staple cartridge staples might not be ejected the first few times you try to use the stapler 1 Open the front door...

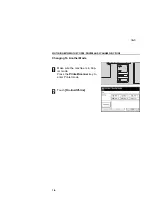
Страница 37: ...CHANGING SETTINGS nb 5 37...

Страница 38: ...ng sizes Metric version Inch version A3 B4 A4 B5 A5 81 2 x 11 11 x 17 81 2 x 14 81 2 x 11 51 2 x 81 2 A3 A4 A5 51 2 x 81 2 is not available when using 3 bin sorter 1 Pull the paper tray out until it s...

Страница 39: ...ack paper over the limit mark 6 While pressing the release lever on the front guide slide the front and rear guides to the paper size you want to use 7 Select the paper size by adjusting the paper siz...

Страница 40: ...Tools key 4 Touch the Basic Settings key 5 Touch the Next key three times to reach the paper size setting menu 6 In the Tray 1 F F4 Paper Size Setting menu the present size setting is displayed Touch...

Страница 41: ...2 x 81 2 8 x 10 11 x 15 10 x 14 8 x 101 2 8 x 10 B4 When using 3 bin sorter 51 2 x 81 2 is not displayed 1 Follow steps 1 to 6 on pages 38 and 39 2 Select by adjusting the paper size selector on the...

Страница 42: ...ize setting is displayed Touch the Change key Select the new paper size by touching a key Then touch the Exit key asterisk is displayed on the key for paper sizes that cannot be detected in some modes...

Страница 43: ...14 8 x 101 2 8 x 10 A3 B4 A4 8 x 13 81 2 x 13 81 4 x 13 1 Follow steps 1 to 6 on pages 38 and 39 2 Press the User Tools key 3 Touch the Basic Settings key 4 Touch the Next key three times to reach th...

Страница 44: ...tion panel beeper Copy count display Set date Set time Auto Reset Low Power Timer Auto Off Timer Paper Type Display for each tray Tray 1 Paper Size Setting Tray 1 F F4 Paper Size Setting Paper Size Se...

Страница 45: ...s following the instruction on the display Next Use to go to the next page Prev Use to go back to the previous page Exit Touch this key after entering the new data In the User Tools Main Menu touch to...

Страница 46: ...returns to standby automatically a while after every job You can change the delay from 0 no Auto Reset to 180 seconds Default 30 seconds Low Power Timer U S model The copier will automatically enter a...

Страница 47: ...for this copier has three positions press it all the way and hold for 1 2 seconds In Auto Off mode power consumption is reduced from less than 0 20kW standby to less than 0 04W This function is availa...

Страница 48: ...r on the back side of the tray asterisk is displayed on paper size keys that cannot be used by Auto Paper Select Tray 1 F F4 Paper Size Setting Select if you want to use 81 2 x 13 8 x 13 or 81 4 x 13...

Страница 49: ...Auto Reduce Enlarge modes as F size 81 2 x 13 81 4 x 13 or 8 x 13 Default 81 2 x 13 ADF Thin Paper Mode Use when changing the type of originals to be fed into the optional document feeder Select when...

Страница 50: ...Up to 20 user codes 6 digits can be registered When changing user codes the number of copies made under the old code is added to that made under the new user code When deleting user codes the number o...

Страница 51: ...c version If your machine is the metric version Auto Stamping cannot be used as a default setting You can cancel this setting and use this function A3 11 x 17 Double Count When you use A3 11 x 17 pape...

Страница 52: ...nb 5 SERVICE REPRESENTATIVE SETTINGS 52...

Страница 53: ...APPENDIX nb 6 53...

Страница 54: ...o maintain high copy quality clean the following parts and units regularly with a damp cloth and wipe them with a dry cloth Exposure glass Platen cover Document Feeder Option Feed in unit Belt nb 6 MA...

Страница 55: ...switch If you do your settings are cleared Before setting the new toner shake it well at least 5 or 6 times Do not remove the inner cap of the new toner bottle When Removing Misfed Paper Since some pa...

Страница 56: ...e originals Do not lift the document feeder until the last original has been completely fed out Do not press down or hold originals after inserting them Do not press any parts of the document feeder s...

Страница 57: ...down in the 500 sheet trays and with the copy print side up in the large capacity tray If papers are curled try turning the copy print paper over in the tray If there is no improvement change the copy...

Страница 58: ...ty areas Areas with corrosive gasses Places higher than 2 000 m above sea level Places where the machine might be subjected to frequent strong vibration Locations directly exposed to cool air from an...

Страница 59: ...clearance as shown With the optional finisher nb 6 More than 50 cm or 19 7 More than 39 cm or 15 4 More than 70 cm or 27 6 More than 10 cm or 4 0 More than 72 cm or 28 4 More than 70 cm or 27 6 More t...

Страница 60: ...paper should be fanned to get air between the sheets and any curls should be corrected before loading Post cards should be fed from the bypass tray It is recommended to feed one post card at a time Co...

Страница 61: ...r low temperature and low humidity conditions store paper in a vinyl bag Do not store paper where it will be exposed to heat Store on a flat surface Use older stock first Do not lay heavy objects on p...

Страница 62: ...nb 6 USE AND STORAGE OF SUPPLIES 62...

Страница 63: ...SPECIFICATIONS nb 7 63...

Страница 64: ...ng speed 40 copies minute A4 81 2 x 11 in Full Size mode Warm up time less than 140 seconds 20 C 68 F Refer the Copier Reference for details PRINTER Resolution 300 400 600 dpi 400dpi is available only...

Страница 65: ...ding to ISO 7779 at the operator position Dimensions Width Depth Height with platen cover copy tray and paper tray unit 1 150 mm 45 3 655 mm 25 8 1 024 mm 40 4 with document feeder finisher and paper...

Страница 66: ...30 25 A3 lengthwise A4 lengthwise sideways A5 lengthwise sideways B4 lengthwise B5 lengthwise sideways B6 lengthwise sideways ARDF 2 sided originals ADF 1 sided originals SADF Single copies mode ARDF...

Страница 67: ...DC 24V from the main body Power consumption 48 W Weight 35 kg 77 2 lb Dimensions W x D x H 671 x 514 x 950 mm 26 5 x 20 3 x 37 5 Specifications are subject to change without notice nb 7 Top a 6 3 mm b...

Страница 68: ...0 sheets A4 80g m2 3rd bin 250 sheets A4 80g m2 Power consumption 30 W Power source DC 24V DC5V from the main body Dimensions W x D x H 468 x 483 x 490 mm 18 5 x 19 1 x 19 4 maximum Weight 13 kg Speci...

Страница 69: ...2 x 390 mm 24 5 x 24 9 x 15 4 Specifications are subject to change without notice 1500 SHEET TRAY UNIT OPTION Paper size See page 43 Paper weight 52 105 g m2 14 lb 28 lb Paper capacity 1 500 sheets 50...

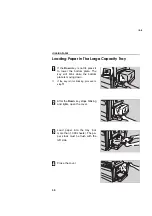
Страница 70: ...nb 7 1500 SHEET TRAY UNIT OPTION 70...

Страница 71: ...INDEX 71...

Страница 72: ...Power Timer 46 Operation panel beeper 46 Original F F4 Size Setting 49 Output Trays 47 Paper Size SettingTray 2 3 and 4 option 48 Paper Tray Priority 49 Paper Type Display 48 Set date Set time 46 Set...

Страница 73: ...aper changing size in the 1st tray 38 paper loading 28 30 platen cover 5 PRINTER 64 Printer Mode 9 Program key 6 S SADF 22 23 SAFETY INFORMATION iv SCANNABLE AREA 57 SCANNER 65 Scanner Mode 9 Set date...

Отзывы: