background image

FCU

Point-to-Point Diagram
Model: IF2

AC Line
DC Line

Signal Direction

Active High

Active Low

Voltage

Symbol Table


[    ]

Issued on: March 31, 1997
Revision 1.0
Subject to change

PCIF

CN1

5

1

2

345

 6

CN4

1

2

345

 6

TXD

COM2

SCLK

CTS

RTS

RXD

12

3

4

5
6

7

8

9
1

0

CN5

VIDEO

COM3

+24V

CLOCK

READ

DLC

SP

+12V

+5V

COM2

CIS

PSU

CN9

COM1

COM3

COM3

+24V

+24V

COM2

-12V

Not used

+5V

12

3

4

5
6

7

8

9

CN2

12

3

4

5
6

7

8

9

CN6

/SB1ON [

 5]

SID

/RESET

/SB2ON [

 5]

SOD

+5V

COM1

SCK

12

3

4

56

7

8

OPU

CN2

8

7

6

5

432

1

CN8

1

2

34

56

7

TX Motor

+24V

Not used

TXA

+24V

/TXB

TXB

/TXA

CN1

4

Speaker

COM1

Speaker Out

NCU

CN7

CN1

Not used

Not used

OFCHK2 [

 5]

NCURX

OFCHK1 [

 5]

CSEL1 [

 5]

NCUTX

RSEL [

 5]

CSEL0 [

 5]

DOSW [

 5]

TONE

PDIAL [

 5]

EXTDI [

 5]

COM2

/FRING

RY1ON [

 5]

COM3

COM1

+24V

+5V

1

2

3

4

5

6

7

8
9
1

01

1

1

21

3

1

41

5

1

6

1

71

8

1

92

0

19
20

17

18

15

16

13

14

11
12

9
1

0
7

8

5
6

3

4

1

2

CN3

31 32

1

2

3

4

5

6

7

8
9
1

01

1

1

21

3

1

41

51

6

1

71

8

1

92

0

2

12

22

3
2

4

2

5

2

62

7

2

82

9

3

0

CN4

31 32

1

2

3

4

5

6

7

8
9
1

0

1

11

2

1

31

41

51

6

1

7

1

81

92

0

2

12

2

2

3
2

4

2

52

62

7

2

82

9

3

0

CN5

1

234

5
 6

A

D

C

+24V

+24V

B

12

CN1

1

12

COM3

+24V

CN5

12

3

OUT1 (+24V or COM3)

OUT1 (+24V or COM3)

OUT2 (COM3 or +24V)

Print Head

Carriage

Maintenance

Motor

RX Motor

Carriage Drive

Motor

COM1

+5V

NZ53

NZ37

NZ41

NZ43

NZ47

NZ49

NZ45

NZ39

NZ33

NZ51

NZ35

NZ9

NZ11

NZ13

NZ17

NZ19

NZ23

NZ25

NZ29

NZ31

NZ7

CHY

CHX

NZ27

NZ21

NZ15

H_C1

NZ1

NZ3

NZ5

H_C3

NZ55

NZ28

NZ12

NZ10

NZ8

NZ6

NZ4

NZ2

H_C2

NZ16

NZ22

NZ14

NZ42

NZ38

NZ36

NZ32

NZ30

NZ26

NZ24

NZ20

NZ18

NZ44

H_C4

NZ56

NZ54

NZ52

NZ34

NZ40

NZ46

NZ50

NZ48

CN1

CN2

+5V

ABUSY

APE

ASLCT

AACK

BERROR

P-STROBE

P-INIT

_AUTOFD

_SLCTIN

CD5

CD6

CD7

PRT/FAX

COM1

CD4

CD0

CD1

CD2

CD3

A1
A2

A3

A4

A5

A6

A7

A8

A9
A1
0

B

1

B

2

B

3

B

4

B

5

B

6

B

7

B

8

B

9

B

1

0

A1
A2

A3

A4

A5

A6

A7

A8

A9
A1
0

B

1

B

2

B

3

B

4

B

5

B

6

B

7

B

8

B

9

B

1

0

C

N

1

 -

 C
e

n

tr

o

n

ics In

te

rf

ace

C

N

3

 -

 R
S

232C

CN1

0

COM1

/SB4ON

12

SB4

(Paper End Sensor)

CN1

12

3

4

SB2

(Scan Line Sensor)

SB1

(Document Sensor)

COM1

/SB2ON [

 5]

COM1

/SB1ON [

 5]

CN1 - Centronics Interface

19

STROBE

COM1

1

20

DATA0

COM1

2

21

DATA1

COM1

3

22

DATA2

COM1

4

23

DATA3

COM1

5

24

DATA4

COM1

6

25

DATA5

COM1

7

26

DATA6

COM1

8

27

DATA7

COM1

9

28

ACK

COM1

10

29

BUSY

COM1

11

30

PE

COM1

12

31

SLCT

INIT

13

32

AUTOFEED

ERROR

14

33

Not used

Not used

15

34

COM1

Not used

16

35

Frame Ground

Not used

17

36

+5V

SLCTIN

18

CN3 - RS232C Interface (DB9)

6

Not used

Not used

1

7

TXD

CTS

2

8

RXD

RTS

3

9

Not used

Not used

4

COM2

5

ACH

ACN

GND

CN1

HN

Содержание Fax 680 MP

Страница 1: ...IF2 RICOH FAX680MP SERVICE MANUAL 31 March 1997 Subject to change ...

Страница 2: ...le s Disconnect the PC interface cable s Remove the ink cartridge and place it in the cartridge holder NOTE 1 Do not touch the nozzle section of the ink cartridge This helps prevent the nozzles from clogging 2 Do not touch the wiper blade on the maintenance unit This also prevents the nozzles from clogging 3 Always store an extra cartridge if unpacked in the cartridge holder 4 Ensure the printer e...

Страница 3: ...ET CARTRIDGE 2 3 2 2 4 PRINT HEAD MAINTENANCE UNIT 2 3 2 2 5 INK LOW CONDITION 2 4 2 2 6 PRINTING FAXES AT 300 DPI RESOLUTION 2 5 2 2 7 PROTOCOL REFERENCE 2 6 2 3 PC INTERFACES 2 6 2 3 1 PC PRINTER CENTRONICS INTERFACE 2 6 2 3 2 PC FAX MODEM RS232C SERIAL INTERFACE 2 8 2 4 PCBs 2 10 2 4 1 FCU 2 10 2 4 2 NCU 2 11 3 INSTALLATION PROCEDURE 3 1 3 1 PRECAUTIONS 3 1 3 2 INSTALLING THE MACHINE 3 1 3 3 IN...

Страница 4: ...NTIVE MAINTENANCE 5 1 5 1 PREVENTIVE MAINTENANCE SCHEDULE 5 1 5 1 1 PM TABLE 5 1 6 REPLACEMENT AND ADJUSTMENT 6 1 6 1 EXTERIOR 6 2 6 1 1 TOP COVER ASSEMBLY 6 2 6 1 2 REAR COVER 6 5 6 2 PCBS 6 6 6 2 1 FCU AND NCU 6 6 6 2 2 PSU AND PCIF 6 8 6 3 SCANNER AND PAPER CASSETTE 6 9 6 3 1 MAINTENANCE 6 9 6 3 2 SCANNER AND PAPER CASSETTE ASSEMBLY 6 10 6 4 PRINTER ENGINE 6 13 6 4 1 MAINTENANCE 6 13 6 4 2 REPL...

Страница 5: ...e A4 8 5 x 11 8 5 x 14 Thickness 0 08 0 12 mm Communication Speed ITU T 1 Chart MR compression TTI off Transmission 17 1 s Memorytx Reception 17 1 s Memoryrx 46 4 s Direct rx Protocol T 30 Important Non standard signals NSF and NSS are not compatible with existingRicoh fax machines Coding Scheme MH MR Modem Speed 9600 7200 4800 2400 bps Modulation V 29 QAM V27ter PHM V 21 FM Memory Capacity ITU T ...

Страница 6: ... available Standard Forwarding Not available Standard Number of Quick Dial keys 10 10 Number of Speed Dials 50 50 Number of dialing groups 5 groups 3 groups Keystroke programs Not available Standard Communication features using ID code e g Secured polling closed network Available not compatible with existing models Available not compatible with IF2 Tonal signal transmission Not available Standard ...

Страница 7: ...Available Country code Available Available Error code display Available Available File transfer Not available Available Line error mark Not available Available NCU parameters Available Available Printer mechanism test Not available Available Printer test patterns Available Available Protocol dump list Not available Available RAM display rewrite Available Available RAM dump Available Available RAM ...

Страница 8: ...COMPONENT LAYOUT 31 March 1997 1 4 1 3 COMPONENT LAYOUT H905V001 cdr H905V002 cdr 1 2 3 4 5 6 7 8 9 10 11 12 13 14 15 ...

Страница 9: ...Drives the paper feed mechanism 7 Carriage Drive Motor Drives the print carriage 8 Maintenance Motor Drives the print head cleaning mechanism 9 Carriage Position Sensor Generates a pulse signal to detect the carriage location 10 PSU Supplies dc voltage to the FCU 11 PC I F Interfaces to a host computer throughBi Centronics parallel and RS232C 9 pins serial interfaces 12 OPU Interfaces to operators...

Страница 10: ...rallel port The components are described in more detail in section 2 4 FCU PCIF M68000 FAX ROM 128 kB Printer ROM 128 kB DRAM 128 kB SB4 OPU SB2 SB1 DRAM 512 kB DRAM 1 MB SRAM 8 kB CIS Driver Speaker AFE NCU ADDRESS DATA BUS ADDRESS DATA BUS Driver Driver Driver Carriage Motor Maintenance Motor Rx Motor Inkjet Head SB5 TC35167F FOX2 Serial Interface DSUB 9 pin Centronics Interface 36 pin Buffer Bu...

Страница 11: ...PATH FCU FCU SAF ECM L B CIS TC35167F NCU SAF ECM L B TC35167F FOX2 NCU Printer Engine FCU L B Serial I F TC35167F NCU FCU FOX2 M68000 Centronics I F Printer Engine FCU SAF TC35167F FOX2 Printer Engine CIS Fax Tx Fax Rx PC Fax Tx Rx Printer Copy H905V012 VSD ...

Страница 12: ...arch 1997 1 8 1 6 POWER DISTRIBUTION FCU SB4 OPU SB2 SB1 CIS NCU Carriage Motor Maintenance Motor Rx Motor Inkjet Head Tx Motor PSU 5V DC DC 12V 24V 5V 12V 24V 12V 5V 24V 5V 24V 5V 5V 24V 5V 5V 24V 5V 24V 24V 24V H905V011 VSD ...

Страница 13: ...e original NOTE The pressure applied to the separation plate is adjustable Refer to section 6 1 1 2 1 2 SCANNING Every time the machine scans a document the CIS Contact Image Sensor scans the CIS roller a white roller located on the CIS before scanning the first page to get a base white waveform This white waveform is used for the shading correction that is used while scanning all pages of the doc...

Страница 14: ...C The separation hooks D prevent more than one sheet of paper from being fed into the printer engine When the paper reaches the registration roller E the motor reverses to drive registration and feed out rollers After printing the motor rotates clockwise again to eject the paper from the printer using the ejector F and to move the gear arm B to the standby position The paper end sensor G detects p...

Страница 15: ... to eject an ink drop out of it The nozzles are arranged in a straight line at intervals of 300 inch The black print head has 58 nozzles of which 52 nozzles are for printing The color cartridge has 48 nozzles 16 for each color 2 2 4 PRINT HEAD MAINTENANCE UNIT When the print head needs cleaning the maintenance motor A moves the head cap B up and down towards and away from the print head This actio...

Страница 16: ... the user selects No to the message the machine continues counting ink drops without initializing Therefore the accuracy of the counter is quite important If the user initializes the counter accidentally ink end may only be determined by looking at the print output This may easily happen when the user changes the cartridge from black to color and vise versa NOTE 1 The printer engine has separate c...

Страница 17: ...using the reduction ratio specified by Function 45 The default reduction ratio is 93 2400 2592 Cross Reference Process used for converting main scan resolution horizontal Bit 5 of bit switch C Process used for converting sub scan resolution vertical Bit 6 of bit switch C For best results keep both settings at AND 1 8 mm 1 7 7 mm Line Pairs Line Pairs Dot Pairs Dot Pairs Dot Pairs 300 dpi 300 dpi H...

Страница 18: ...old the machine receives the fax message in memory reception mode 3 Even if the amount of memory falls below the threshold while receiving a fax message the machine continues memory reception 2 3 PC INTERFACES 2 3 1 PC PRINTER CENTRONICS INTERFACE The machine can function as a PCL3 printer or an HP DeskJet500C compatible color printer using the built in Bi Centronics interface Refer to the Operato...

Страница 19: ...ter busy signal In this case the Print command on the PC must be selected again after the machine finishes printing the fax If the machine receives a fax message while printing a data from a host computer the machine receives the message into SAF memory After the machine finishes printing the fax message prints automatically COLOR PRINTING When a color cartridge is installed the machine cannot pri...

Страница 20: ...2400 bps Host Interface Speed 19200 bps maximum Flow Control XON XOFF Interface Cable Straight through double shielded serial RS232 C cable with either DB9 pin and DB25 socket connectors or DB9 pin and DB9 socket connectors NOTE The machine does not come with a serial cable CABLE PIN ASSIGNMENT CLASS 1 INTERFACE The EIA TIA Class 1 PC Fax interface lets the fax application running on the host comp...

Страница 21: ...to receive faxes with this machine using some PC fax applications In such cases the fax machine itself will receive and print the incoming fax message AT COMMANDS Use these commands on the PC to display or adjust various parameters COMMAND ACTION COMMAND ACTION AT FMFR Displays TOSHIBA ATD value AT D ATROMVER Displays the ROM version ATH AT H ATL value Adjusts the speaker volume ATA AT A AT P Not ...

Страница 22: ...PCBs 31 March 1997 2 10 2 4 PCBs 2 4 1 FCU H905D008 BMP ...

Страница 23: ... dither 4 Other Compression and decompression M68000 1 MPU for printer functions FOX2 1 Printer motor control 2 Print head control 3 Parallel port control MEMORY 1 ROM 128 kB EPROM for fax firmware 128 kB EPROM for printer firmware 2 RAM 512 kB DRAM for SAF 128kB ECM 384 kB memory Optional 1 MB DRAM for SAF extension 128 kB DRAM for printer data spooling 8 kB SRAM for fax system and user parameter...

Страница 24: ...ALLING THE MACHINE Refer to the Operator s Manual for the installation environment and how to install and set up the machine and optional memory 3 3 INITIAL PROGRAMMING 3 3 1 PROGRAM AND SETUP ITEMS SERVICE MODE Item Function No Country code and NCU parameters 86 Protocol requirements Germany 81 System Parameter List 82 3 3 2 PROGRAM AND SETUP ITEMS USER MODE Item Function No Clock adjustment 40 L...

Страница 25: ...hone Number List Printing Polling Reservation List Printing Memory File List Printing 40 41 42 43 44 45 46 47 48 49 Date and Time Adjustment Speaker Volume Adjustment Buzzer On Off Print Quality Selection Printer Paper Size Selection Change Reduction Ratio Selection Page Count On Off Programming User Parameters Automatically Printed Reports Selection Display and Report Language Selection 50 51 52 ...

Страница 26: ...3 Font List 4 2 2 COUNTER DISPLAY FUNCTION 80 1 Press the Function key 8 0 then the Yes key The LCD displays the total scan and print counters for 2 seconds Then the machine returns to standby automatically 4 2 3 BIT SWITCH PROGRAMMING FUNCTION 81 1 Press the Function key 8 1 then the Yes key 2 Select a bit switch number 0 to 9 or A to E using the ten key pad or Quick Dial keys A through E then pr...

Страница 27: ...SSWORD 0000 ROM VERSION FAX ROM Version ROS VERSION Printer ROM Version CCITT 61 MAKER CODE 09 COUNTERS TRANSMIT 00003 RECEIVE 00004 SCAN COUNTER 00088 PRINT COUNTER 00132 SETTINGS PRINT DIRECTION SMART BIDIRECTION RECEIVE REDUCTION R AUTO INK CARTRIDGE CHANGE CURRENT 2 CURRENT 1 CURRENT 0 NCU PARAMETER COUNTRY CODE GERMANY BIT SWITCH These are the print counter values when the cartridge was chang...

Страница 28: ...cursor c Move the cursor 3 Press the Stop key to finish 4 2 6 NCU PARAMETERS FUNCTION 86 1 Press the Function key 8 6 2 Select a country using or then press the Yes key The NCU parameters are reset to the selected country s default settings 3 Adjust the NCU parameters if required see section 4 4 for parameter details 4 Press the Stop key to return to standby ADDRESS 0000 02 GERMANY Y LEVL 11 KEY Y...

Страница 29: ...inting head carriage home position 2 After automatic adjustment has been finished fine adjust the carriage home position using the following keys Move to the left by 1 1200 inch Move to the right by 1 1200 inch 3 Press the Stop key to finish the adjustment 4 2 9 ERROR CODE DISPLAY FUNCTION 89 1 Press the Function key 8 9 then the Yes key 2 Scroll through the error codes using the and keys 3 Press ...

Страница 30: ...e record CHFDATA0 1 and 2 Yes Yes No No RTI TTI and CSI Yes Yes No No Quick Speed dial Yes Yes Yes No Groups Yes Yes Yes No Tx Rx counters Yes Yes Yes No Bit switches Yes Yes Yes No NCU parameters Yes Yes Yes No ID code Yes Yes Yes No Password Yes Yes Yes No Communication records for TCR Journal Yes Yes Yes No SAF file Yes Yes Yes Yes Printer engine Yes Yes Yes Yes LEVEL 1 OPERATION 1 Enter the se...

Страница 31: ...t 4 of bit switch 1 0 to 1 LEVEL 3 OPERATION 1 Enter the service mode then use function 81 2 Change the following bit switches in order When the Function key is pressed after the last switch is changed to 1 the machine automatically initializes Bit 4 of bit switch 9 0 to 1 Bit 4 of bit switch 1 0 to 1 LEVEL 4 OPERATION 1 Enter the service mode then use function 81 2 Change the following bit switch...

Страница 32: ...he default setting is 1 2 Not used Do not change the setting 3 Not used Do not change the setting 4 I O rate Tx 0 10 ms 1 20 ms This bit determines the I O rate used in non ECM transmission This setting is available in NSS NSF mode only 5 Not used Do not change the factory setting 6 Password display 0 Disabled 1 Enabled If the customer forgets the password for the Limit Tx function change this bit...

Страница 33: ...ht 4 System initialization 0 Disabled 1 Enabled Refer to section 4 2 13 SYSTEM INITIALIZATION 5 Modem rate fall back when a negative post message is received 0 Disabled 1 Enabled 0 The machine will send the next page at the same modem rate as used in the previous error page In memory transmission an error page is re transmitted 1 The machine will use a lower modem rate for the next page 6 Not used...

Страница 34: ...splay 0 Disabled 1 Enabled 1 The machine displays communication parameters during communication Manually reset this bit to 0 after test communications 7 Echo countermeasure 0 Disabled 1 Enabled 1 When the same code that was sent is received it is ignored 0 The machine will disconnect instead of ignoring echoes Communication Parameters Modem Rate Resolution Coding Paper Size Mode I O Rate 9 9 6 kbp...

Страница 35: ...ory setting 2 CSI transmission 0 Enabled 1 Disabled Do not change the factory setting 3 System initialization level 0 LEVEL 3 or 4 1 LEVEL 2 Refer to section 4 2 13 SYSTEM INITIALIZATION 4 NSS S transmission 0 Enabled 1 Disabled Do not change the factory setting 5 TSI transmission 0 Enabled 1 Disabled Do not change the factory setting 6 NSS RTI transmission 0 Enabled 1 Disabled Do not change the f...

Страница 36: ...or testing The monitor speaker is on all through the communication Be sure to reset this bit after test communications 3 Automatic new polling file list printout 0 Enabled 1 Disabled Same as the Function 48 New Poll Report setting 4 Automatic new file list printout 0 Enabled 1 Disabled Same as the Function 48 New File Report setting 5 Automatic Tx report printout 0 Enabled 1 Disabled Same as the F...

Страница 37: ...t change the factory setting 4 5 Display priority between RTI CSI 0 0 1 0 0 1 1 1 RTI RTIpriority CSI CSIpriority 6 Receiving mode 0 Memory reception 1 Direct reception If the machine doesn t have enough memory to handle received data before starting a reception less than 35 free no optional memory or less than 10 free with optional memory then the machine normally enters direct receiving mode But...

Страница 38: ...1 Phase B C D E This bit determines the start point of counting the communication time BIT SWITCH 7 Bit Function Comments 0 TTI page number 0 Included 1 Not included Same as the Function 46 setting 1 Dialing method 0 DTMF dialing 1 Pulse dialing Same as the Function 47 Line Select setting 2 Not used 3 Dial mode priority 0 Speed dial 1 Keypad dial 0 QUICK KEYPAD is displayed for transmission 1 DIAL...

Страница 39: ...setting 3 Automatic redial 0 Enabled 1 Disabled 0 If the destination is busy the machine automatically redials The number of redial attempts is programmed with function 47 4 5 6 Speaker volume adjustment Min Max 0 1 0 1 0 1 0 1 0 0 1 1 0 0 1 1 0 0 0 0 1 1 1 1 7 FTZ protocol selection 0 Disabled 1 Enabled If the machine is set to Germany or Austria with Function 86 this bit is enabled ...

Страница 40: ... detection 0 Disabled 1 Enabled This function is only available in the following countries Belgium France Spain and Hungary 3 Country tone or IT 2 tone detection 0 Disabled 1 Enabled This function is only available in the following countries France Sweden and Hungary 4 System initialization 0 Disabled 1 Enabled Refer to section 4 2 13 SYSTEM INITIALIZATION 5 Scan threshold selection 0 Automatic 1 ...

Страница 41: ... 1 1 B 1 1 0 0 C 4 to 7 Black threshold level Same as above BIT SWITCH B Bit Function Comments 0 Halftone contrast adjustment 0 Disabled 1 Enabled If this bit is set to 1 halftone contrast can be adjusted manually using bits 3 to 7 below 1 Not used 2 Not used 3 to 7 Halftone contrast control value Bit switch B bit 0 should set to 1 before using these bits Bit 7 is a sign bit If bit 7 0 the sign is...

Страница 42: ...irection Bi direction is faster than Smart Bi direction but the image quality is not as good Uni direction is slow but image quality is good SMART This is a sample image This is a text line only Hello I am a FOX 1st line 52 nozzle lines 2nd line 52 nozzle lines 3rd line 52 nozzle lines 4th line 52 nozzle lines 5th line 52 nozzle lines Printed Paper ABCDEFGHIJKL MNOPQRSTU 123456789 BI UNI SMART If ...

Страница 43: ...ange the factory setting 4 Not used Do not change the factory setting 5 Not used Do not change the factory setting 6 Not used Do not change the factory setting 7 Not used Do not change the factory setting BIT SWITCH E Bit Function Comments 0 ECM in transmission 0 Enabled 1 Disabled Same as the function 47 ECM setting 1 Not used Do not change the setting 2 Number of RCPs 0 6 RCPs 1 9 RCPs This bit ...

Страница 44: ...BIT SWITCHES 31 March 1997 4 20 Bit Function Comments 7 ECM in reception 0 Enabled 1 Disabled Same as the function 47 ECM setting ...

Страница 45: ...RDT0 Do not change the setting 08 RDT1 Non detectable ring frequency used for the pulse immunity test in some countries 1000 5N Hz 0 127 N 09 DLST Time from OH Relay ON to dialing the first digit 160N ms 0 127 N 10 RPST Time from dialing end to the start of CED detection 2 56N ms 0 127 N 11 BRKT Break time in pulse dialing mode N ms 0 127 N 12 MAKT Make time in pulse dialing mode Calculation 1 ms ...

Страница 46: ... 15 25 21 60 Hungary 10 75 45 75 45 1 4 16 20 22 67 Israel 13 78 49 62 27 1 4 16 25 22 62 Poland 10 67 30 38 25 1 4 16 25 22 67 Russia 13 76 51 77 38 1 4 16 25 22 67 Country MAKT MINP PAUT DTON DTOF DTLV REDT REDC RSTO BRIT Austria 40 45 46 20 20 6 25 3 50 12 Belgium 33 37 26 20 20 6 25 3 50 12 Denmark 33 30 26 14 14 9 25 3 50 12 Finland 40 50 60 14 14 6 25 3 50 12 France 33 45 101 16 16 6 30 3 24...

Страница 47: ...ely including the clock Default settings E000 85 h E001 09 h E002 19 h Refer to section 4 2 13 E003 E005 Total scan counter If the counter value is 123456 E003 56 BCD E004 34 BCD E005 12 BCD E006 E008 Total print counter same format as the Total scan counter E00C E014 The print counter values when the ink cartridge was changed same format as the Total scan counter E00C E00E h CURRENT0 last time E0...

Страница 48: ...addresses after the final character E049 E05C CSI E049 1st character ASCII E04A 2nd character ASCII E05C 20th character ASCII Even if the CSI is not 20 characters long CSI characters are stored from E035 h and FF h is stored in addresses after the final character E05D E05E Password for the Limit Tx function If password is 1234 E05D 12 BCD E05E 34 BCD E05F E06D Bit Switches E05F h Bit switch 0 E060...

Страница 49: ...S 12 E3A4 E3B3 S 59 Dial number format 0 0 h 1 1 h 2 2 h 3 3 h 4 4 h 5 5 h 6 6 h 7 7 h 8 8 h 9 9 h 0 A h B h C h Pause E h E3B4 E485 Stored dial numbers for Quick Dials A J Each stored number consists of 21 bytes as follows 1st byte Flag refer to the 1st byte of the programmed Speed Dial format 2nd byte to 20 th byte Programmed tel no refer to the 2nd to 15th byte of the programmed Speed Dial form...

Страница 50: ...he last fax reception If error code is 0 21 E9C9 21 BCD E9CA 00 BCD Do not change the data E9DA E9DB The latest error code detected in the last fax transmission If error code is 0 08 E9DA 08 BCD E9DB 00 BCD Do not change the data E9DC EA1B Latest 32 error codes The format is the same as above E9DC E9DD 1st error code E9DE E9DF 2nd error code EA1A EA1B 32nd error code EA31 EA32 Polling ID code If I...

Страница 51: ...Hex EA3E BRKT Hex EA3F MAKT Hex EA40 MINP Hex EA41 PAUT Hex EA42 DTON Hex EA43 DTOF Hex EA44 DTLV Hex EA45 REDT Hex EA46 REDC Hex EA47 RST0 Hex EA48 BRIT Hex Refer to section 4 4 for definitions Country Codes 00 h Austria 01 h Belgium 03 h Denmark 04 h Finland 05 h France 06 h Germany 07 h Ireland 08 h Italy 0A h Holland 0B h Norway 0D h Spain 0E h Sweden 0F h Switzerland 10 h U K 12 h Greece 13 h...

Страница 52: ...ricate I Inspect Item EM 5K 10K Note Scanner ADF Document Sensor I Roller Bushings I Separation Pad C C R Alcohol Adjust the separation pressure if required Feed Roller C C Alcohol CIS Roller C Alcohol CIS C Dry cloth or alcohol Printer Roller Bushings I Cartridge Shaft C Alcohol Encoder C Alcohol Maintenance Unit C Alcohol Paper Feed Roller C C Alcohol Cassette Cork Pad C C Alcohol ...

Страница 53: ...ect the power cord Disconnect the telephone cable s Disconnect the PC interface cable s Remove the ink cartridge and place it into the cartridge holder NOTE 1 Do not touch the nozzle section of the ink cartridge This helps prevent the nozzles from clogging 2 Do not touch the wiper blade on the maintenance unit This also prevents the nozzles from clogging 3 Always store an extra cartridge if unpack...

Страница 54: ...LATE 1 Open the top cover A 2 Remove the ADF upper guide plate B 1 tapping screw left and 2 screws 1 harness and the part C 1 tapping screw 3 Remove the top cover assembly D 1 harness as shown Slightly lift up the left side first then slide the cover to the right H905R501 cdr H905R502 cdr A B C D ...

Страница 55: ... previous section 2 Slide out the separation pad assembly A 3 If required adjust the separation pressure using the black pin B as shown The illustration shows the default setting Push it in to increase the pressure 4 Remove the sensor holder C 1 tapping screw then replace the ADF sensor assembly D H905R503 cdr H905R505 cdr D C A A 4 notches B ...

Страница 56: ...he hooks 4 Remove the inner cover E 4 screws NOTE 1 Release the hooks F and G at the front edge of the inner cover 2 Adjust the position of blue lever H so it does not interfere with the inner cover 3 At assembly be sure that the lower edge of the inner cover I goes under the carriage guide rail J and the flat cables D and the cable supporter C are put back correctly Also check that the carriage m...

Страница 57: ...31 March 1997 EXTERIOR 6 5 Replacement Adjustment 6 1 2 REAR COVER 1 Remove the rear cover A 3 screws the screw at the lower right corner is long The others are short H905R509 cdr A ...

Страница 58: ...de the opening D 3 Place the machine as shown and remove the bottom cover assembly E 13 harnesses do not disconnect the one connecting the FCU and the NCU 4 screws 2 screws at the machine s front are short the others are long E 4 Remove the paper tray F from the bottom cover assembly 5 Remove the FCU 4 screws 1 harness and the NCU 3 screws 1 harness NOTE When replacing the FCU make sure to turn on...

Страница 59: ...N3 JP24 CN5 CN6 S LINE TEL FCU CN3 CN12 CN9 CN15 CN1 CN5 CN6 CN8 CN7 BT1 ON CN4 ROM FAX ROM Printer CN14 CN13 JP1 PSU CN2 PCIF CN4 PCIF CN2 CIS Paper End Sensor CN10 Operation Panel Tx Motor Speaker Print Head Carriage Carriage Motor Maintenance Motor CN11 Rx Motor Battery Switch H905R012 vsd ...

Страница 60: ...ttom cover assembly with the FCU and the NCU see section 2 1 If possible instead of doing this disconnect the harnesses from CN1 CN9 and CN15 3 Remove the PSU PCIF assembly A 2 screws 4 Remove the PCIF B from the PSU assembly 4 screws and 2 hexagonal screws for the serial interface H905R513 cdr A B ...

Страница 61: ... be partially darker 1 Open the top cover 2 Clean the CIS roller A the feed roller B and the CIS exposure glass C using a cloth moistened with alcohol CLEANING THE PAPER FEED COMPONENTS Whenever the scanner and the paper cassette assembly has been removed clean the paper feed rollers 2 rollers on 1 shaft and the cork pads on the cassette bottom plate Refer to section 3 2 for how to remove the scan...

Страница 62: ... see section 2 1 3 Remove the scanner and the paper cassette assembly A 2 screws NOTE When replacing the assembly make sure of the following The pin B must go into the guide C correctly The positioning plates D must go into the guides E The frame must sit correctly on the positioning pins NOTE Clean the paper feed rollers and cork pads on the cassette bottom plate using alcohol whenever the assemb...

Страница 63: ...CIS or the paper end sensor has been removed from the machine 1 Remove the scanner and paper cassette assembly see section 3 1 2 Remove the CIS A 2 screws 1 harness NOTE When replacing the CIS A be sure that the dents B go into the openings C in the CIS The upper front edge of the CIS D must not be lower than the CIS frame surface Otherwise document jams occur at this point 3 Remove the paper end ...

Страница 64: ...ve the Tx motor A 2 screws CIS ASSEMBLY CIS ROLLER AND PAPER CASSETTE 1 Remove the scanner and paper cassette assembly see section 3 1 2 Remove the CIS roller A 2 E rings 1 gear 2 bushings 3 Remove the rollers as shown 4 Remove the CIS assembly B 4 screws 5 Remove the paper cassette C 2 screws H905R518 cdr H905R519 cdr C A B A ...

Страница 65: ...p cover assembly see section 1 1 and the inner cover see section 1 2 2 Remove the carriage shaft A as shown NOTE 1 Release the lock at the right end B of the shaft first 2 Remove the carriage drive belt C from two belt holders on the carriage 3 Be sure not to damage the encoder D a thin metal plate with lots of slits located below the carriage shaft 4 Be careful not to touch the print head E 3 Cle...

Страница 66: ...er F 5 Put the encoder on a sheet of paper and drop alcohol all along it NOTE 1 Do not wipe the encoder using cloth If the slots on the encoder are clogged with dust the carriage may not move correctly 6 Replace the encoder F H905R523 cdr H905R524 cdr F ...

Страница 67: ...ot lock them yet 10 Lock the left end H of the shaft 11 Be sure that the encoder D goes into the sensor slot I under the carriage and that the carriage is correctly placed on the guide rail J then lock the right end of the shaft 12 Insert the carriage drive belt to the belt holders on the carriage 13 Replace the inner cover and the top cover 14 Turn on the machine and align the print head function...

Страница 68: ...PRINTER ENGINE 31 March 1997 6 16 MAINTENANCE UNIT 1 Open the top cover and move the carriage to the left 2 Clean the maintenance unit A with drops of alcohol H905R527 cdr A ...

Страница 69: ...1 1 the inner cover see section 1 2 and the rear cover see section 1 3 2 Remove the bottom cover assembly with the FCU and the NCU see section 2 1 3 Remove the scanner and the paper cassette assembly see section 3 2 4 Remove the printer engine assembly A 4 hooks NOTE If the ejectors B come off the shaft put them back as shown H905R526 cdr B A ...

Страница 70: ...RIAGE DRIVE MOTOR 1 Remove the printer engine assembly as explained in section 6 4 2 2 Remove the carriage and the carriage shaft as explained in section 6 4 1 NOTE Do not forget to remove the carriage before going on to the next step otherwise the encoder plate and or the encoder holders will be damaged 3 Remove the front frame A 2 hooks H905R530 cdr H905R531 cdr A B A ...

Страница 71: ...31 March 1997 PRINTER ENGINE 6 19 Replacement Adjustment 4 Remove the carriage drive motor B 2 screws ...

Страница 72: ...lever 1 hook MAINTENANCE UNIT 1 Remove the printer engine assembly and the release lever as explained above 2 Remove the left side frame A 1 hook 3 Remove the right side frame B 1 hook NOTE The left and right frames hold the rollers carriage guide rail and bottom frame Be sure to put back the frames so that they hold these parts correctly H905R532 cdr H905R533 cdr H905R534 cdr A A B ...

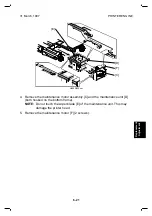
Страница 73: ... 4 Remove the maintenance motor assembly C and the maintenance unit D both hooked on the bottom frame NOTE Do not touch the wiper blade E of the maintenance unit This may damage the printer head 5 Remove the maintenance motor F 2 screws H905R535 cdr E D F C ...

Страница 74: ...object Press START COPY twice then copying starts QUICK KEYPAD DIAL KEYPAD SET DOCUMENT Copy test White copy or Black copy Horizontal white lines Vertical black lines Copy test end Ink nozzle test Clean CIS roller Dark copy as a whole Adujust slice level bit sw9 5 A B Replace CIS Check FCU CIS flat cable connection Normal Replace CIS Set flat cable correctly Replace SB1 SB2 Clean CIS roller and CI...

Страница 75: ...nk cartridge Function 53 Clean the ink nozzle using a soft dry anti static cloth with drops of alcohol Clean ink head maintenance rubber and rubber cap using a cloth with sufficient alcohol to prevent a blocked nozzle Install ink cartridge and select NO in NEW INK Y N Remove ink cartridge Function 53 Install new ink and select YES in NEW INK Y N Check flat cable is set perfectly Perfectly set Set ...

Страница 76: ... RY 10N when On Hook button pressed Check motor drive pulses Check telephone line Check FCU NCU harness Check NCU Change FCU OK OK Change FCU Change FCU Change Tx motor Signal change high to low Check FCU NCU harness Check NCU Change defective parts Adjust volume OK Check telephone line Check NCU Change defective parts Copy test Test end Test again Test again Test again Test again Test again Chang...

Страница 77: ...ce defective parts Replace FCU Ink Nozzle test Copy test Transmission test Reception test Print module error Paper in the cassette Set paper in the cassette Check SB4 sensor and harness connector OK Replace SB4 sensor ass y Original in the ADF SB1 2 sensor ass y check OPU PCB check FCU OPU harness check OK Replace defective parts Replace FCU Remove original Replace FCU LCD display error NG Good Ye...

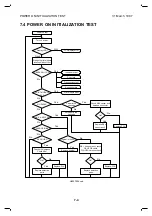
Страница 78: ...ical pulse at pin 4 using oscilloscope signal opsd from FCU Pulse Replace OPU Replace FCU Check FCU PSU harness Check FCU OPU harness Fixed Replace FCU OPU harness Check PSU output 24V 5V 12V Fixed Replace PSU Disconnect FCU OPU harness from OPU check pin 6 Reset from the FCU using an oscilloscope Low Replace FCU Replace OPU Abnormal characters in LCD Power on test No No No Yes Yes Yes Yes Yes No ...

Страница 79: ... 6 7 6 RECEPTION TEST Reception test Select FAX Mode Auto receive Check telephone line Check NCU Check FCU NCU harness Test end Yes No Call from another fax OK Transmission test Change defective parts Test again Yes No H905T006 vsd ...

Страница 80: ...elf test 1 Not working check carriage motor harness 2 Works abnormally Check encoder sensor or check flat cable connection 3 Clean carrier shaft using alcohol No No Yes Yes Carriage motor works abnormally Remove hardened ink in maintenance unit using alcohol change maintenance unit or check CN11 connection Power on test Yes Replace FCU No 1 Not working check carrier moving motor harness 2 Works ab...

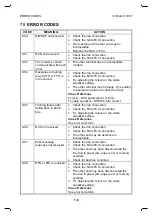
Страница 81: ...vel NCU parameter 01 LEVL Tx cable equalizer BITSW8 bits 0 and 1 0 05 Training failure after falling back to 2400 bps Check the line connection Check the NCU FCU connection Try adjusting the tx level or the cable equalizer setting Cross Reference See error code 0 04 0 06 DCS not received Check the line connection Check the NCU FCU connection The other end may be defective or incompatible 0 07 Post...

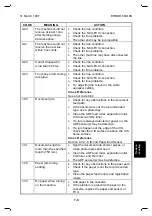
Страница 82: ...00 Document jam Check for any obstructions in the document feed path If the document is not the recommended type use a photocopy Clean the ADF feed roller separation roller CIS roller and R2 roller If a jam is always detected at power on the ADF sensor s may be defective If a jam happens at the edge of the CIS check that the CIS surface is above the CIS frame surface Cross Reference Section 6 3 2 ...

Страница 83: ... 71 Top cover was open during printing Close the top cover If the problem still exists replace the OPU 2 10 The modem can not enter the receiving condition Turn off the machine and turn it back on If the problem still exists replace the FCU 2 12 The clock can not be generated while data is transmitted from the modem Turn off the machine and turn it back on If the problem still exists replace the F...

Страница 84: ...3 OUT1 24V or COM3 OUT1 24V or COM3 OUT2 COM3 or 24V Print Head Carriage Maintenance Motor RX Motor Carriage Drive Motor COM1 5V NZ53 NZ37 NZ41 NZ43 NZ47 NZ49 NZ45 NZ39 NZ33 NZ51 NZ35 NZ9 NZ11 NZ13 NZ17 NZ19 NZ23 NZ25 NZ29 NZ31 NZ7 CHY CHX NZ27 NZ21 NZ15 H_C1 NZ1 NZ3 NZ5 H_C3 NZ55 NZ28 NZ12 NZ10 NZ8 NZ6 NZ4 NZ2 H_C2 NZ16 NZ22 NZ14 NZ42 NZ38 NZ36 NZ32 NZ30 NZ26 NZ24 NZ20 NZ18 NZ44 H_C4 NZ56 NZ54 NZ...

Отзывы: