background image

Placing Originals

16

1

E

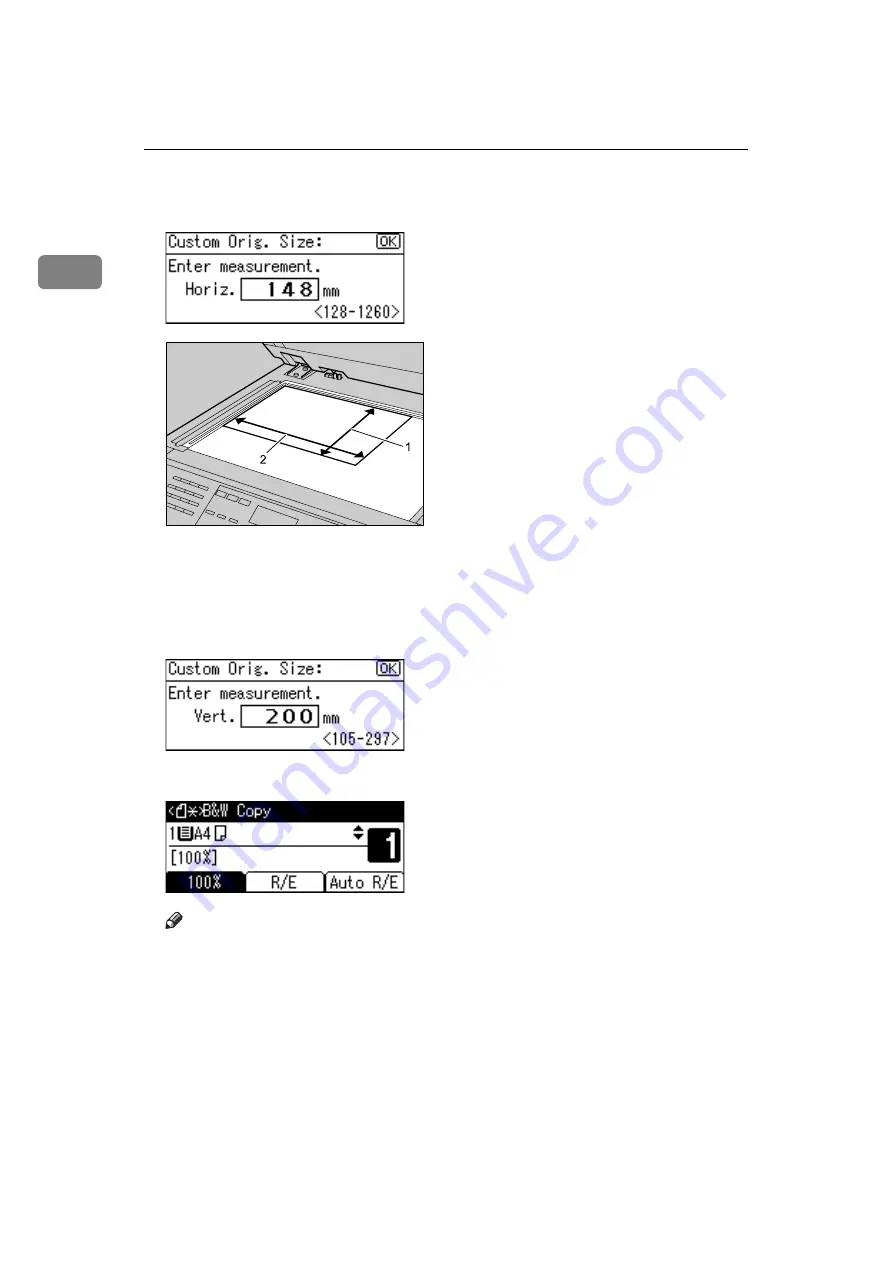
Enter the horizontal size of the original (Horiz.) with the number keys, and
then press the 

{

OK

}

 key.

1 Vertical size
2 Horizontal size

F

Enter the vertical size of the original (Vert.) with the number keys, and then
press the 

{

OK

}

 key.

G

Place the originals, and then press the 

{

Start

}

 key. 

Note

This function is not available in Auto Paper Select mode.

To change the value you entered, press the 

{

Clear/Stop

}

 key, and then enter

the value again.

To cancel the size you have set, press the 

{

Clear Modes

}

 key.

ALZ054S

Содержание Aficio MP C1800

Страница 1: ...anual carefully before you use this machine and keep it handy for future reference For safe and correct use be sure to read the Safety Information in About This Machine before using the machine Placing Originals Copying Colour Copying Appendix 1 2 3 4 ...

Страница 2: ...uracy If you have any questions concerning the legality of copying or printing cer tain items consult with your legal advisor The colour samples in this manual may differ slightly from the colours of actual copies Colours on colour keys or the colour circle may differ slightly from the colours of actual copies This machine is equipped with a function that prevents making counterfeit bank bills Due...

Страница 3: ...s for using the machine how to enter text and how to install the CD ROMs provided Troubleshooting Provides a guide to solving common problems and explains how to replace paper print cartridges and other consumables Copy Reference Explains Copier functions and operations Also refer to this manual for expla nations on how to place originals Facsimile Reference Explains Facsimile functions and operat...

Страница 4: ...For details see Setting Up the Machine Security Reference Be sure to read this manual when setting the enhanced security functions or user and administrator authentication PostScript 3 Supplement Explains how to set up and use PostScript 3 UNIX Supplement For UNIX Supplement please visit our Web site or consult an authorized dealer This manual includes descriptions of functions and settings that m...

Страница 5: ...ired finish See p 59 Selecting a Colour Mode Primary colours Colours can be created by combining the 3 primary colours yellow magenta and cyan Black can be made by combining yellow magenta and cyan however as there might be some slight differences black will be expressed using a black ink Full colour copy Copies using four colours yellow magenta cyan and black AMA013S AMF033S ...

Страница 6: ...iginal is coloured Adjusting Colours You can adjust the colour tone of copies Adjust Colour Adjusts the specific colours yellow red magenta blue cyan and green by mix ing them with adjacent colours in the colour circle See p 66 Colour Adjustment AMF034S AMA014S ...

Страница 7: ...Adjusts the overall colour tone of copies See p 60 Colour Balance Adjusting Images You can adjust image qualities See p 68 Image Adjustment Soft Sharp Adjusts the outline of an image See p 69 Soft Sharp AMA015S AMA016S ...

Страница 8: ...age See p 69 Contrast Background Density Adjusts the background density of an image See p 70 Background Density Adjust U C R Adjusts the amount of black ink to express vividly the black areas in an image See p 70 Adjust U C R AMA017S AMA018S ...

Страница 9: ...ons differ depending on the model and options Reference p 2 Functions Requiring Optional Configurations Reducing Enlarging Originals by Specifying the Paper Size The machine automatically detects the original size and then selects an appro priate reproduction ratio based on the paper size you select Auto Reduce Enlarge See p 42 Auto Reduce Enlarge ...

Страница 10: ...viii Saving Paper The Duplex and Combine functions allow you to save paper Duplex Copies two 1 sided pages or one 2 sided page onto a 2 sided page See p 46 Duplex ...

Страница 11: ...ix One Sided Combine Combines up to four pages of originals onto one side of a sheet See p 49 One Sided Combine GCSHVY7J GCSHVY8J GCSHVYOJ GCSHVYBJ ...

Страница 12: ...x Two Sided Combine Combines up to eight pages of originals onto two sides of one sheet See p 52 Two Sided Combine 1 Front 2 Back 1 Front 2 Back GCSHVY9J GCSHVYAE GCSHVY1E GCSHVY2E ...

Страница 13: ...ee p 29 Copying onto Envelopes Copying onto thick paper See p 28 Copying onto Thick Paper Copying Originals Such as Books Copies bound originals onto one side or both sides of a sheet Series Copies Separately copies the front and back of a 2 sided original or the two facing pages of a bound original onto two sheets See p 55 Series Copies ...

Страница 14: ...nals Such as Books xi How to Read This Manual 1 Symbols 1 Names of Major Options 1 Functions Requiring Optional Configurations 2 Display 3 Reading the Display 3 Using the Keys on the Control Panel 4 1 Placing Originals Originals 5 Sizes and Weights of Recommended Originals 5 Sizes Detectable with Auto Paper Select 6 Missing Image Area 8 Placing Originals 9 Original Orientation 9 Placing Originals ...

Страница 15: ...eset Reduce Enlarge 38 Zoom 39 Auto Reduce Enlarge 42 Sort 44 Duplex 46 One Sided Combine 49 Two Sided Combine 52 Series Copies 55 3 Colour Copying Selecting a Colour Mode 59 Colour Balance 60 Colour Balance Program 62 Registering the Adjusted Colour Balance 62 Changing the Registered Colour Balance 63 Recalling the Registered Colour Balance 63 Deleting the Registered Colour Balance 64 Colour Adju...

Страница 16: ...xiv ...

Страница 17: ...e sure to read these notes They can be found in the Safety Information section of About This Machine Indicates points to pay attention to when using the machine and explanations of likely causes of paper misfeeds damage to originals or loss of data Be sure to read these explanations Indicates supplementary explanations of the machine s functions and instruc tions on resolving user errors This symb...

Страница 18: ... W Required Duplex Colour Required Required 2 Sided Duplex Required Required 1 Sided 2 Sided Combine Series B W Required 1 Sided 2 Sided Combine Series Colour Required Required 2 Sided 1 Sided Combine Series B W Required 2 Sided 1 Sided Combine Series Colour Required Required 2 Sided 2 Sided Combine Series B W Required Required 2 Sided 2 Sided Combine Series Colour Required Required Required Sort ...

Страница 19: ...ote The copy display is set as the default screen when the machine is turned on Reading the Display Initial copy display 1 Displays operational status and messages 2 Displays the current paper tray and selected items that appear in brackets 3 Displays the number of copies set 4 Displays frequently used functions BDV001S ...

Страница 20: ...s R E ap pears in this manual press the centre selection key When the instruction press Auto R E appears in this manual press the right selection key 2 Escape key Press to cancel an operation or return to the previous display 3 OK key Press to set a selected item or entered nu meric value 4 Scroll keys Press to move the cursor to each direction one by one When U T V or W appears in this manual pre...

Страница 21: ...als The following describes recommended paper sizes and non recommended orig inals for the ADF or ARDF Metric version Inch version 1 The optional ARDF is required Note About 30 originals can be placed in the ADF About 50 originals can be placed in the ARDF Original location Original size Original weight Exposure glass Up to A3 ADF or ARDF One sided originals A3L A5KL ADF 52 105 g m2 ARDF 40 128 g ...

Страница 22: ...forated lines Originals with indexes tags or other projecting parts Sticky originals such as translucent paper Thin or highly flexible originals Thick originals such as postcards Bound originals such as books Transparent originals such as OHP transparencies or translucent paper Originals that are still wet with ink or correction fluid Note The original might become dirty if it is written with a pe...

Страница 23: ...ecify the size of the originals If not the image may not be copied properly For details on how to specify the size of the originals see Specifying the Original Size Custom Size Reference p 15 Specifying the Original Size Custom Size Size 11 17L 81 2 14L 81 2 11KL 51 2 81 2KL Original location Exposure glass ADF or ARDF BDV002S BDV003S ...

Страница 24: ...als with a lot of text and drawings Originals which partially contain a solid image Originals which have solid images at their edges Missing Image Area Even if you correctly place originals in the ADF or ARDF or on the exposure glass margins of a few millimeters on all four sides of the original might not be copied 1 0 5 to 4 mm 0 1 to 0 2 inch 2 0 5 to 6 mm 0 1 to 0 3 inch 3 0 5 to 4 mm 0 1 to 0 ...

Страница 25: ...s completely dried Not taking this precaution could cause marks on the exposure glass that will be copied onto paper Note For original sizes you can place on the exposure glass and in the ADF or AR DF see Originals Reference p 5 Originals Original Orientation When using the ADF or ARDF place the original face up When using the exposure glass place the original face down 1 ADF or ARDF 2 Exposure gl...

Страница 26: ... damaged A Lift the exposure glass cover ADF or ARDF Be sure to lift the exposure glass cover ADF or ARDF by more than 30 degrees Otherwise the size of the original might not be detected correctly B Place the original face down on the exposure glass The original should be aligned to the rear left corner Start with the first page to be copied 1 Positioning mark 2 Left scale C Lower the exposure gla...

Страница 27: ...e the machine to detect the size of the original incorrectly or display a paper mis feed message Also be sure not to place originals or other objects on the top cov er Doing so may cause a malfunction ARDF 1 Sensors ADF 1 Sensors Setting should be made when placing custom size originals When placing custom size originals See Specifying the Original Size Custom Size AAI036S ...

Страница 28: ...e limit mark The first page should be on the top 1 Limit mark 2 Document guide Note Straighten curls in the originals before placing them in the ADF or ARDF To prevent multiple sheets from being fed at once fan the originals before placing them in the ADF or ARDF Set the original squarely Reference p 15 Specifying the Original Size Custom Size ALZ022S ...

Страница 29: ...paper tray use this procedure to specify the size of your orig inal from the regular sizes shown on the display A Select the paper tray using U or T B Press the q key C Select Original Size using U or T and then press the OK key D Select Regular Size using U or T and then press the OK key E Select the original size using the scroll keys and then press the OK key F Place the originals and then pres...

Страница 30: ...our original from the regular sizes shown on the display A Select the bypass tray or one sheet bypass tray using U or T B Press the q key C Select Original Size using U or T and then press the OK key D Select Regular Size using U or T and then press the OK key E Select the original size using the scroll keys and then press the OK key F Place the originals and then press the Start key Note This fun...

Страница 31: ...ecting a paper tray use this procedure to specify the size of your orig inal using the number keys Important Paper that has a vertical length of 105 297 mm 4 2 11 6 inches and a horizon tal length of 128 1 260 mm 5 1 49 6 inches can be placed with this function A Select the paper tray using U or T B Press the q key C Select Original Size using U or T and then press the OK key D Select Custom Size ...

Страница 32: ...Enter the vertical size of the original Vert with the number keys and then press the OK key G Place the originals and then press the Start key Note This function is not available in Auto Paper Select mode To change the value you entered press the Clear Stop key and then enter the value again To cancel the size you have set press the Clear Modes key ALZ054S ...

Страница 33: ...iginal using the number keys Important Paper that has a vertical length of 105 297 mm 4 2 11 6 inches and a horizon tal length of 128 1 260 mm 5 1 49 6 inches can be placed with this function A Select the bypass tray or one sheet bypass tray using U or T B Press the q key C Select Original Size using U or T and then press the OK key D Select Custom Size using U or T and then press the OK key ...

Страница 34: ...Enter the vertical size of the original Vert with the number keys and then press the OK key G Place the originals and then press the Start key Note This function is not available in Auto Paper Select mode To change the value you entered press the Clear Stop key and then enter the value again To cancel the size you have set press the Clear Modes key ALZ054S ...

Страница 35: ...thentication LDAP Authentica tion or Integration Server Authentication is set enter your login user name and password so that the machine accepts copy jobs Ask the user adminis trator for the login user name and password A Make sure Ready appears on the screen If any other function is displayed press the Copy key in the centre of the control panel Initial copy display B Make sure no previous setti...

Страница 36: ...Note Always log off when you have finished using the machine to prevent un authorized users from using the machine To stop the machine during a multicopy run press the Clear Stop key To return the machine to its initial state after copying press the Clear Modes key To clear an entered value press the Clear Stop key To switch between pages or selectable functions press the scroll keys BDV013S ...

Страница 37: ...ure to specify the size When paper larger than 433 mm 17 1 inches in size is used the paper may become wrinkled may not be fed into the machine or may cause paper jams Using the Bypass Tray Use the bypass tray to copy onto thick paper envelopes and copy paper that cannot be loaded in the paper trays Important When copying on paper heavier than 104 7 g m2 about 28 lb you need to specify the type an...

Страница 38: ...ide up If the guides are not flush against the paper images might be skewed or pa per misfeeds might occur To support A4L 81 2 11L or larger paper sizes pull out the extender 1 Extender 2 Paper guides D Lower the release lever The bypass tray is selected on the display E Select the size and type of the paper if required BDV005S ALZ024S ALZ039S ...

Страница 39: ...ansparencies as well as pa per that can be loaded in the paper trays Important When copying from the one sheet bypass tray remove copied sheets one by one When copying on OHP transparencies or paper heavier than 104 7 g m2 about 28 lb you need to specify the type and size of paper A Open the bypass tray B Open the one sheet bypass tray The one sheet bypass tray is selected on the display Do not op...

Страница 40: ...sert the pa per print side up until the printer pulls it in E Select the size and type of the paper F Place the originals and then press the Start key G Remove the paper from the one sheet output tray H When your copy job is finished close the one sheet bypass tray and the one sheet output tray When the trays are closed the settings are cleared I Close the bypass tray ALZ040S ALZ044S ...

Страница 41: ...one sheet bypass tray open the one sheet output tray B Insert the paper When using the bypass tray lower the release lever C Press the q key D Select Paper Size using U or T and then press the OK key E Select Regular Size using U or T and then press the OK key F Select the paper size using the scroll keys and then press the OK key G Place the originals and then press the Start key H When the copy ...

Страница 42: ...r When using the bypass tray lower the release lever C Press the q key D Select Paper Size using U or T and then press the OK key E Select Custom Size using U or T and then press the OK key F Enter the horizontal size of the original Horiz with the number keys and then press the OK key G Enter the vertical size of the original Vert with the number keys and then press the OK key H Place the origina...

Страница 43: ...Remove copied sheets one by one When OHP Transparency is selected for the paper type the paper size you can copy is restricted to A4K or 81 2 11K A Open the bypass tray B Open the one sheet bypass tray C Open the one sheet output tray D Position the paper guide according to the size of the OHP transparency and then insert the transparency print side up Be sure to load OHP transparencies in the ori...

Страница 44: ...pe To prevent multiple sheets from being fed at once fan paper before placing it on the tray A Open the bypass tray or one sheet bypass tray When using the bypass tray lift the release lever When using the one sheet bypass tray open the one sheet output tray B Position the paper guide according to the paper size and then insert the thick paper print side up When using the bypass tray lower the rel...

Страница 45: ...y job is finished press the Clear Modes key to clear the settings Note Printing on thick paper is slower than printing on plain paper Copying onto Envelopes When copying onto envelopes select the paper type Important Before loading envelopes use a pen or similar to flatten their edges ALZ050S ALZ051S ...

Страница 46: ...inch Orientation of Originals and Envelopes Originals and envelopes must be placed in the same orientation To minimize waste and time check that originals and envelopes are loaded in the same orientation The illustration shows the correct orientation of originals and envelopes 1 Original 2 Envelope 3 Top 4 Bottom 5 Horizontal size 6 Vertical size BDV009S AMA024S ...

Страница 47: ...se lever When using the one sheet bypass tray open the one sheet output tray C Position the paper guide according to the envelope size and then insert the envelope print side up When using the bypass tray lower the release lever When copying on an envelope that has the flap on the short edge be sure to unfold the flaps and position them opposite to the paper feed direction D Press the q key ALZ041...

Страница 48: ...U or T and then press the OK key F Select Envelope using U or T and then press the OK key G Press Exit H Press the q key I Select Paper Size using U or T and then press the OK key J Select Regular Size using U or T and then press the OK key ...

Страница 49: ...press the Start key M When the copy job is finished press the Clear Modes key to clear the settings N Lift the envelope lever Note When copying on an envelope that has the flap on the short edge select Custom Size in step J enter the horizontal size Horiz and the vertical size Vert of the envelope Do not add the length of the flap ...

Страница 50: ...aking copies in various modes Adjusting Image Density You can adjust the image density in five levels If you want darker or lighter cop ies adjust the image density accordingly A Press the Lighter or Darker key to adjust the image density The density indicator moves AMA009S ...

Страница 51: ...to Delicate tones of photographs and pictures can be reproduced with this mode When copying developed photographs Whencopyingphotographsorpicturesthatareprintedonpaper e g magazines When copying copies or originals generated by colour copiers A Press the Original key to select the original type The indicator of the selected original type goes on Upper indicator Text Lower indicator Photo AMA010S ...

Страница 52: ...of 100 Metric version Inch version Auto Paper Select The machine selects a suitable size of paper automatically based on the original size and the reproduction ratio A Make sure that Auto Paper Select is selected Note If Auto Paper Select is not selected select Auto Paper Select by using U or T Paper placed in the bypass tray or one sheet bypass tray will not be select ed with Auto Paper Select Or...

Страница 53: ...larging onto A3 or B4 JIS or 11 17 or 81 2 14 size paper In this case place your original in the L orientation Note This function works when Auto Paper Select or Auto Reduce Enlarge is se lected See Auto Paper Select and Auto Reduce Enlarge The default setting for Auto Tray Switching is On You cannot use the Rotat ed Copy function if this setting is changed to Off For details about Auto Tray Switc...

Страница 54: ...on how the original is scanned When the original is set on the exposure glass the upper left corner will be the base point When it is set in the ADF or ARDF the bottom left cor ner of the original will be the base point Shown below are the resulting copy images that differ depending on how the original is scanned 1 Base point when placing on the exposure glass 2 Base point when placing in the ADF ...

Страница 55: ... OK key D Place your originals and then press the Start key Note You can change reproduction ratios shown on the initial display under Re production Ratio in User Tools For details about Reproduction Ratio see Copier Features General Settings Guide Zoom You can change the reproduction ratio in increments of 1 ...

Страница 56: ...e to the desired ratio using U or T C Press Zoom D Specify a ratio using U or T and then press the OK key E Place the original and then press the Start key Pressing U or T changes the ratio in increments of 1 Pressing and hold ing down the relevant key changes the ratio in increments of 10 Note To change the value you specified in step D readjust it using U or T ...

Страница 57: ...io using the number keys A Press R E B Press Zoom C Enter the desired ratio with the number keys and then press the OK key D Place the original and then press the Start key Note To change the value you entered in step C press the Clear Stop key and then enter the value again ...

Страница 58: ...s is useful to copy different size originals to the same size paper If the orientation in which your original is placed is different from that of the paper you are copying onto the machine rotates the original image by 90 degrees and fits it on the copy paper Rotated Copy For example to reduce A3 11 17 L originals to fit onto A4 81 2 11 K paper select a paper tray containing A4 81 2 11 K paper and...

Страница 59: ...press the Start key Reference p 37 Rotated Copy Original location Original size and orientation Exposure glass A3L B4 JISL A4KL B5 JISKL 81 2 13L ADF or ARDF A3L B4 JISL A4KL B5 JISKL A5KL 81 2 13L Original location Original size and orientation Exposure glass 11 17L 81 2 14L 81 2 11KL ADF or ARDF 11 17L 81 2 14L 81 2 11KL 51 2 81 2KL ...

Страница 60: ...ze and type paper but in different orientation KL are required You cannot use the bypass tray with Rotate Sort Sort Copies are assembled as sets in sequential order Rotate Sort Every other copy set is rotated by 90 degrees KL and delivered to the copy tray A Press the Sort key B Select Sort or Rotate Sort using U or T and then press the OK key BDV010S ...

Страница 61: ... q key after all originals are scanned To display the screen in step B select On for Rotate Sort with Copier Fea tures in User Tools Changing the number of sets You can change the number of copy sets during copying Important This function can only be used when the Sort function is turned on A While Copying is displayed press the Clear Stop key B Press Sets C Enter the number of copy sets with the ...

Страница 62: ...or one 2 sided page onto a 2 sided page Important You cannot use the bypass tray or one sheet bypass tray with this function 1 Sided 2 Sided Copies 2 one sided pages on 1 two sided page 2 Sided 2 Sided Copies 1 two sided page onto 1 two sided page ...

Страница 63: ...e orientation in which you place your originals verticalK or horizontalL The table shows the orientation of images on the front and back of copies not the orientation of delivery A Press the Duplex Combine Series key B Select the setting of original and copy type using U or T and then press the OK key BDV007S BDV011S ...

Страница 64: ...When placing an original in the ADF or ARDF set so that the first page is on the top When placing originals on the exposure glass press the q key after all originals are scanned To display the screens in step C and D select Always Specify for Orienta tion with Copier Features in User Tools If Do not Specify is selected pro ceed to step E For details about Orientation see Copier Features General Se...

Страница 65: ...ass tray with this function There are four types of One Sided Combine 1 Sided 2 Pages Combine 1 Side Copies 2 one sided originals to one side of a sheet 1 Sided 4 Pages Combine 1 Side Copies 4 one sided originals to one side of a sheet 2 Sided 1 Page Combine 1 Side Copies 1 two sided original onto one side of a sheet GCSHVY7J GCSHVY8J GCSHVYOJ ...

Страница 66: ... side of a sheet Orientation of originalKL and image position of combine Portrait K originals Landscape L originals Placing originals originals placed in the ADF or ARDF Originals read from left to right Originals read from top to bottom GCSHVYBJ GCSHUY3E GCSHUY4E Combine5 Combine6 ...

Страница 67: ...rt key Note When placing originals on the exposure glass start with the first page to be copied When placing an original in the ADF or ARDF set so that the first page is on the top When placing originals on the exposure glass press the q key after all originals are scanned To display the screen in step C select Always Specify for Orientation with Copier Features in User Tools If Do not Specify is ...

Страница 68: ...here are four types of Two Sided Combine 1 Sided 4 Pages Combine 2 Sides Copies 4 one sided originals to one sheet with two pages per side 1 Sided 8 Pages Combine 2 Sides Copies 8 one sided originals to one sheet with four pages per side 1 Front 2 Back 2 Sided 2 Pages Combine 2 Sides Copies 2 two sided originals onto one sheet with two pages per side GCSHVY9J GCSHVYAE GCSHVY1E ...

Страница 69: ...wo sided originals onto one sheet with four pages per side 1 Front 2 Back A Press the Duplex Combine Series key B Select the combine mode using U or T and then press the OK key C Select the original orientation using U or T and then press the OK key GCSHVY2E BDV011S ...

Страница 70: ...tart with the first page to be copied When placing an original in the ADF or ARDF set so that the first page is on the top When placing originals on the exposure glass press the q key after all originals are scanned To display the screens in step C and D select Always Specify for Orienta tion with Copier Features in User Tools If Do not Specify is selected pro ceed to step E For details about Orie...

Страница 71: ... bypass tray with the Book 1 Sided function See the following table for original and paper sizes when using a 100 ratio with the Book 1 Sided function Metric version Inch version There are two types of Series Copies Book 1 Sided Copies two facing pages of a bound original book to two separate pages Original Paper for 1 sided copy A3L A4K 2 sheets B4 JISL B5 JISK 2 sheets A4L A5K 2 sheets Original ...

Страница 72: ...ach side of a two sided original onto two separate pages A Press the Duplex Combine Series key B Select Series Book Orig or Series 2Sided Orig using U or T and then press the OK key When selecting Series Book Orig proceed to step D BDV011S ...

Страница 73: ...using U or T and then press the OK key E Place the originals and then press the Start key Note To display the screen in step C select Always Specify for Orientation with Copier Features in User Tools If Do not Specify is selected proceed to step D For details about Orientation see Copier Features General Settings Guide ...

Страница 74: ...Copying 58 2 ...

Страница 75: ... This Machine Colour Func tions Colour Adjustments The following two colour modes are available Full Colour Copy Copies by overlaying yellow magenta cyan and black Black White Copy Copies in black regardless of the colour of the original A Press the Full Colour B W key to select the desired colour mode Upper indicator Full Colour Lower indicator B W Reference p iii What You Can Do with This Machin...

Страница 76: ... selected proceed to step C B Select Colour Quality using U or T and then press the OK key C Select Colour Balance using U or T and then press the OK key D Select the colour you want to adjust using U or T and then press the OK key E Adjust the colour balance by pressing Lighter or Darker and then press the OK key F Press the Escape key twice ...

Страница 77: ...initial values will be restored when Auto Clear has been performed when the Clear Modes key has been pressed or when the power has been turned off For explanations about and examples of what you can do with the colour balance function see What You Can Do with This Machine Colour Functions Colour Adjustments Reference p iii What You Can Do with This Machine Colour Functions Colour Adjustments ...

Страница 78: ...adjusted colour balance settings so that you can use them later A Adjust the colour balance B Select Program Colour Balance using U or T and then press the OK key C Select Program using U or T and then press the OK key D Select a program number 1 3 for this setting and then press the OK key The colour balance setting will be registered in the selected number Note If you select the program number k...

Страница 79: ...g U or T and then press the OK key C Select Program using U or T and then press the OK key D Select a program number 1 3 to be changed and then press the OK key E Press Yes Recalling the Registered Colour Balance Applies settings registered in colour balance programs to the copy job A Press the q key When Auto Paper Select is selected proceed to step C B Select Colour Quality using U or T and then...

Страница 80: ... and then press the OK key Note The recalled settings will be deleted and the initial values will be restored when Auto Clear has been performed when the Clear Modes key has been pressed or when the power has been turned off Deleting the Registered Colour Balance Deletes the settings registered in colour balance programs A Press the q key When Auto Paper Select is selected proceed to step C B Sele...

Страница 81: ...e using U or T and then press the OK key D Select Program Colour Balance using U or T and then press the OK key E Select Delete using U or T and then press the OK key F Select the program number you want to delete and then press the OK key G Press Yes ...

Страница 82: ... or green This function is not available if Black White Copy is selected A Press the q key When Auto Paper Select is selected proceed to step C B Select Colour Quality using U or T and then press the OK key C Select Adjust Colour using U or T and then press the OK key D Select the colour you want to adjust using U or T and then press the OK key E Adjust the colour using W or V and then press the O...

Страница 83: ...initial values will be restored when Auto Clear has been performed when the Clear Modes key has been pressed or when the power has been turned off For explanations about and examples of what you can do with the colour adjustment function see What You Can Do with This Machine Colour Functions Colour Adjustments Reference p iii What You Can Do with This Machine Colour Functions Colour Adjustments ...

Страница 84: ...sity of an image Adjust U C R Adjusts the amount of black ink to express vividly the black areas in an image A Press the q key When Auto Paper Select is selected proceed to step C B Select Colour Quality using U or T and then press the OK key C Select Copy Quality using U or T and then press the OK key D Select the item you want to adjust using U or T and then press the OK key E Adjusts the settin...

Страница 85: ...en the Clear Modes key has been pressed or when the power has been turned off For types and examples of the image adjustment functions see What You Can Do with This Machine Colour Functions Colour Adjustments Reference p iii What You Can Do with This Machine Colour Functions Colour Adjustments Soft Sharp Adjusts the outline of an image A Adjust by pressing Soft or Sharp B Press the OK key Contrast...

Страница 86: ... as newspaper or recycled paper Adjustments should be made darker when darkening the colour of mark ers or highlighters However as the colour of highlighters is difficult to re produce the copy might not come out depending on the colour or a different colour might be copied Adjust U C R Adjusts the amount of black ink to express vividly the black areas in an image A Adjust by pressing Lighter or D...

Страница 87: ... selected will be the mode you are working in The following shows the combinations of functions 1 A function incompatibility message appears if you load a sheet that exceeds 432 mm 17 inches Copying is not possible until one of the functions is disabled 2 A function incompatibility message appears if you load OHP transparencies Copy is not possible until one of the functions is disabled 3 A functi...

Страница 88: ...ted Metric version A3L A4KL A5KL B4 JISL B5 JISKL B6 JISL 11 17L 81 2 14L 81 2 11KL 71 4 101 2KL 51 2 81 2L 8KL 16KKL C6 En velopeL C5 EnvelopeL DL EnvelopeL 41 8 91 2L 37 8 71 2L Inch version 11 17L 81 2 14L 81 2 13L 81 2 11KL 81 4 13L 8 13L 71 4 101 2KL 51 2 81 2L 41 8 91 2L 37 8 71 2L A3L A4KL A5KL B4 JISL B5 JISKL B6 JISL C6 EnvelopeL C5 EnvelopeL DL EnvelopeL 8KL 16KKL ...

Страница 89: ...s you can specify are 25 400 You can select a ratio regardless of the size of an original or paper With some ratios parts of the image might not be copied or margins will appear on copies Ratio Original Copy paper size 400 200 enlarge area by 4 A5 A3 141 enlarge area by 2 A4 A3 A5 A4 122 8 13 A3 A4 B4 JIS 93 82 8 13 A4 B4 JIS A4 71 reduce area by 1 2 A3 A4 A4 A5 50 reduce area by 1 4 A3 A5 8 13 A5...

Страница 90: ...t paper Label paper adhesive labels OHP transparencies Postcards When an odd number of originals are placed in the ADF or ARDF the back of the last page of copied paper is blank During copying the image is shifted to allow for the binding margin Combine The machine selects the reproduction ratio automatically based on the pa per size and number of original pages to be combined on each copy page Th...

Страница 91: ...or Duplex function Max Number of Sets The maximum copy quantity can be set between 1 and 99 using number keys Original Count Display You can set to display the count of originals and copying pages on the display when On is selected Colour Mode Priority You can select Full Colour or Black White as the priority set ting when the machine is turned on reset or modes are cleared Reproduction Ratio Spec...

Страница 92: ...ce 63 Clear Modes key 19 Clear Stop key 19 45 Colour adjustment iv 66 Colour Balance v 60 Colour balance program 62 Colour copying iii 59 Colour mode 59 Colour Mode Priority 75 Combination chart 71 Combine ix x 49 52 72 Combine 1 Side 49 Combine 2 Side 52 Contrast vi 68 69 Copier Features 75 Copier functions 34 Copying 19 Copying from the bypass tray 21 Copying onto various types of paper xi Copyi...

Страница 93: ...ne ix 49 Options 1 2 Orientation 75 Original Count Display 75 Original key 35 Original orientation 9 46 49 Original orientation and completed copies 46 Originals 5 Original size 5 13 15 Original type 35 Original Type Setting 75 Original weight 5 P Paper guides 21 Paper type xi Photo 35 Placing originals 5 9 Placing originals in the ADF or ARDF 11 Placing originals on the exposure glass 10 Preset R...

Страница 94: ... 55 Sizes detectable with Auto Paper Select 6 Sizes difficult to detect 8 Soft Sharp v 68 69 Sort 44 72 Specifying the original size custom size 15 Specifying the original size regular size 13 Start key 19 Status 3 Symbols 1 T Text 35 Thick paper 28 Top to Bottom 46 52 Top to Top 46 52 Translucent paper 21 Troubleshooting i Two Sided Combine x 52 U User Tools 75 W What you can do with this machine...

Страница 95: ...mark of Microsoft Corporation in the United States and or other countries Adobe Acrobat Acrobat Reader PostScript and Reader are either registered trademarks or trade marks of Adobe Systems Incorporated in the United States and or other countries UNIX is a registered trademark in the United States and other countries licensed exclusively through X Open Company Limited Other product names used here...

Страница 96: ...Operating Instructions Copy Reference GB GB D045 7651 ...

Отзывы: