background image

9

Reading the Display and Using Keys

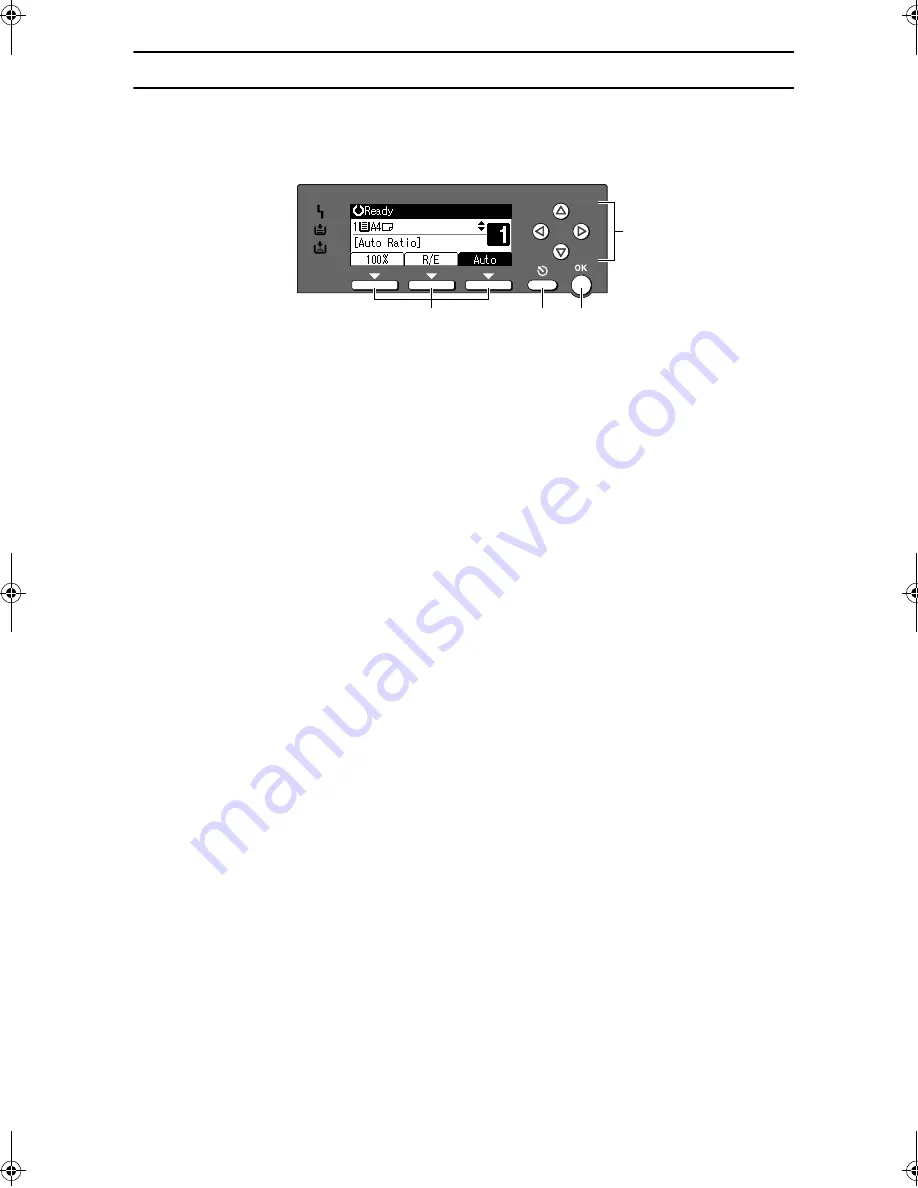
The display is not touch sensitive. Use the following keys to select the keys and
items displayed on the screen.

1.

Selection keys

Correspond to items at the bottom line on
the display.
Example: when the combine function is
set

• When the instruction “press 

[

100%

]

appears in this manual, press the left
selection key.

• When the instruction “press 

[

R/E

]

” ap-

pears in this manual, press the centre
selection key.

• When the instruction “press 

[

Auto

]

appears in this manual, press the right
selection key.

2.

{{{{

Cancel

}}}}

 key

Press to cancel an operation or return to
the previous display.

3.

{{{{

OK

}}}}

 key

Press to set a selected item or entered nu-
meric value.

4.

Scroll keys

Press to move the cursor to each direction
one by one.
When 

{{{{U

U

U

U}}}}

,

{{{{T

T

T

T}}}}

,

{{{{V

V

V

V}}}}

, or 

{{{{W

W

W

W}}}}

 key appears

in this manual, press the scroll key of the
same direction.

1

2

3

4

ABU019S

StellaC2_GBcopy_F1_pre_FM.book  Page 9  Tuesday, December 16, 2003  4:39 PM

Содержание Aficio 1515

Страница 1: ...1515 1515PS 1515F 1515MF Operating Instructions Copy Reference Placing Originals Copying Troubleshooting User Tools Copier Features Remarks ...

Страница 2: ... your local dealer Laser Safety This machine is considered a class 1 laser device safe for office EDP use The machine contains a 5 milliwatt 760 800 nanometer wavelength GaAIAs laser diode Direct or indirect reflected eye contact with the laser beam might cause serious eye damage Safety precautions and interlock mechanisms have been designed to prevent any possible laser beam exposure to the opera...

Страница 3: ...ocedures such as registering fax numbers e mail addresses and user codes Network Guide PDF file CD ROM1 Describes procedures for configuring the machine and computers in a net work environment Copy Reference this manual Describes operations functions and troubleshooting for the machine s copier function Facsimile Reference Basic Features Describes operations functions and troubleshooting for the m...

Страница 4: ... Auto Document Link installed with DeskTopBinder V2 Lite This guide is added to the Start menu when DeskTopBinder V2 Lite is installed Manuals for ScanRouter V2 Lite ScanRouter V2 Lite is a utility included on the CD ROM labeled Scanner Driver Document Management Utilities ScanRouter V2 Lite Setup Guide PDF file CD ROM2 Describes installation of settings and the operating environment for Scan Rout...

Страница 5: ...lectable as Regular Size Originals 14 Missing Image Area 14 Placing Originals 15 Original Orientation 15 Placing Originals on the Exposure Glass 15 Placing Originals in the ADF 16 Placing Regular Size Originals 16 Placing Custom Size Originals 17 2 Copying Basic Procedure 19 Copying from the Bypass Tray 20 When copying onto regular size paper 22 When copying onto custom size paper 22 When copying ...

Страница 6: ... Changing Default Settings 41 Quitting User Tools 42 Settings You Can Change with User Tools 43 Auto Tray Switching 43 Original Type Setting 43 Duplex Mode Priority 43 Orientation 44 Max Number of Sets 44 Original Count Display 44 Reproduction Ratio 44 Preset R E Priority 45 Duplex Margin 45 5 Remarks Do s and Don ts 47 Where to Put Your Machine 48 Machine Environment 48 Moving 49 Power Connection...

Страница 7: ...tries This product complies with the essential requirements and provisions of Direc tive 1999 5 EC of the European Parliament and of the Council of 9 March 1999 on radio equipment and telecommunications terminal equipment and the mu tual recognition of their conformity The CE Declaration of Conformity is available on the Internet at URL http www ricoh co jp fax ce_doc This product is only for use ...

Страница 8: ...ng the instructions under this symbol Be sure to read the instructions all of which are described in the Safety Information section The statements above are notes for your safety Important If this instruction is not followed paper might be misfed originals might be damaged or data might be lost Be sure to read this Preparation This symbol indicates information or preparations required prior to ope...

Страница 9: ...ther than those specified in this manu al Turn off the power and disconnect the power plug by pulling the plug not the cable if any of the following occurs You spill something into the machine You suspect that your machine needs service or repair The external housing of your machine has been damaged Do not incinerate spilled toner or used toner Toner dust might ignite when exposed to an open flame...

Страница 10: ...not dispose of the machine or expended supply waste at household waste collection points Disposal can take place at an authorized dealer The inside of the machine could be very hot Do not touch the parts with a label indicating the hot surface Otherwise an injury might occur Keep the machine away from humidity and dust Otherwise a fire or an elec tric shock might occur Do not place the machine on ...

Страница 11: ...e machine as indicated The inside of this machine gets very hot Do not touch the inside Doing so could result in a burn A B The anti condensation heater in the lower part of the machine interior gets very hot Do not touch it Doing so could result in a burn C The anti condensation heater in the upper part of the machine interior gets very hot Do not touch it Doing so could result in a burn ...

Страница 12: ...6 Note The anti condensation heater is optional For details contact your service rep resentative ...

Страница 13: ...tem U U U U scroll upward T T T T scroll downward V V V V scroll right W W W W scroll left Reference See p 9 Reading the Display and Using Keys 6 User Tools Counter key User Tools Press to change default and condi tions according to requirement See p 41 Accessing User Tools Copier Features Counter Press to check or print the counter val ue 7 Clear Modes key Press to clear the current settings 8 Cl...

Страница 14: ...Original Type key Press to select the original type registered with Original Type 1 Text or Original Type 2 Photo When the original type is se lected the corresponding indicator lights 17 Cancel key Press to cancel an operation or return to the previous display 18 OK key Press to set a selected item or entered nu meric value 19 Number keys Press to enter numeric values 20 Start key Press to start ...

Страница 15: ... left selection key When the instruction press R E ap pears in this manual press the centre selection key When the instruction press Auto appears in this manual press the right selection key 2 Cancel key Press to cancel an operation or return to the previous display 3 OK key Press to set a selected item or entered nu meric value 4 Scroll keys Press to move the cursor to each direction one by one W...

Страница 16: ...itch only when necessary Note This machine automatically enters Energy Saver mode or turns itself off if you do not use it for a while See General Settings Guide Turning On the Main Power A A A A Make sure the power cord is firm ly plugged into the wall outlet B B B B Turn on the main power switch The main power indicator goes on Important Do not turn off the main power switch immediately after tu...

Страница 17: ...n indicator is not lit B B B B Turn off the main power switch The main power indicator goes out When the fax unit is installed When the main power switch is turned off while using the fax func tion waiting fax and print jobs may be canceled and incoming fax docu ments not received If you have to turn off this switch for some reason keep the following points in mind Important Make sure 100 is shown...

Страница 18: ...w Power Timer and Auto Off Timer function will not operate in the following cas es When a warning message ap pears When the service call mes sage appears When paper is jammed When the cover is open When the Add toner mes sage appears When toner is being replen ished When the User Tools screen is displayed When fixed warm up is in progress When the facsimile printer or other functions are active Wh...

Страница 19: ...orn originals Curled folded or creased originals Pasted originals Originals with any kind of coating such as thermal fax paper art paper alu minum foil carbon paper or conductive paper Originals with perforated lines Originals with indexes tags or other projecting parts Sticky originals such as translucent paper Thin highly flexible originals Thick originals such as postcards Bound originals such ...

Страница 20: ...2 81 2 KL 8 13 L 1 81 4 13 L 1 81 4 14 L 1 1 Selectable when ADF is installed Exposure glass ADF Note When you copy custom size originals make sure you specify the size of the originals If not the image may not be copied properly See p 17 Placing Cus tom Size Originals Missing Image Area Even if you place originals in the ADF or on the exposure glass correctly 4 mm 0 2 margins on all four sides mi...

Страница 21: ...rmally be aligned to the rear left corner However some copy functions may produce different results de pending on the orientation of the originals For details see the expla nations of each function Placing Originals on the Exposure Glass A A A A Lift the exposure glass cover or ADF Important Do not lift the exposure glass cover or ADF forcefully If you do the ADF cover might open or be damaged B B...

Страница 22: ...le sheets feed ing in at once fan the originals before placing them in the ADF Set the original squarely Placing Regular Size Originals Note If you do not specify the original size the machine will make copies on the paper size in the tray select ed When copy paper size and original size differ you need to specify the original size as follows A A A A Place originals face down on the exposure glass...

Страница 23: ... 11 L 51 2 81 2 KL 8 13 L 81 4 13 L 81 4 14 L On the exposure glass paper sizes that can be set with this function are vertical 139 216 mm 5 5 8 5 horizontal 139 297 mm 5 5 11 6 For the ADF paper sizes that can be set with this function are verti cal 139 216 mm 5 5 8 5 hori zontal 139 1260 mm 5 5 49 6 A A A A Place originals face down on the exposure glass or face up into the ADF B B B B Select th...

Страница 24: ...nd then enter the value again E E E E Enter the vertical size of the origi nal using the number keys and then press the OK key The Accepted message appears with your set original size When the custom size originals settings are registered appears at the top of the copy dis play Note To cancel the registered original size press the Clear Modes key F F F F Press the Start key ...

Страница 25: ...s remaining press the Clear Modes key and enter again D D D D Place your originals Reference p 15 Placing Originals E E E E Make the necessary settings Reference See the explanations for each function F F F F Enter the number of copies using the number keys Note The maximum copy quantity that can be set is 99 G G G G Press the Start key Copying starts Note Copies are delivered face down How to ope...

Страница 26: ... its vertical and horizontal dimensions See p 17 Placing Custom Size Origi nals The sizes you can enter are as follows When copying onto OHP transpar encies or paper heavier than 105 g m2 about 28 lb you need to specify the paper type See p 23 When copying onto special pa per The maximum number of sheets you can load at the same time de pends on paper type The maxi mum number of sheets should not ...

Страница 27: ...sizes larger than A4L 81 2 11 L Fan paper to get air between the sheets and avoid a multi sheet feed D D D D Pull down the paper guide release lever step B B B B The bypass tray is selected on the display Note If is not selected on the dis play select using U U U U or T T T T E E E E Press the key and then select the paper size and type Reference p 22 When copying onto regu lar size paper p 22 Whe...

Страница 28: ... key The Accepted message appears When copying onto custom size paper Important You should specify the size of copy paper to avoid paper misfeeds A A A A Make sure the bypass tray is se lected Note If any other paper tray is select ed using U U U U or T T T T to select the bypass tray B B B B Press the key C C C C Select Paper Size using U U U U or T T T T and then press the OK key D D D D Select ...

Страница 29: ...pe using U U U U or T T T T and then press the OK key D D D D Select the paper type and then press the OK key The Accepted message appears When copying onto envelopes A A A A Make sure the bypass tray is se lected Note If any other paper tray is select ed using U U U U or T T T T to select the bypass tray When copying onto small sized envelopes align the flaps to the paper guide on the left B B B ...

Страница 30: ... L DL envL L L L and then press the OK key The Accepted message appears F F F F Press the key G G G G Select Paper Type using U U U U or T T T T and then press the OK key H H H H Select Thick Paper using U U U U or T T T T and then press the OK key The Accepted message appears ...

Страница 31: ...rements as follows Selecting Original Type Setting Select one of the following two types to match your originals Text Select this when your originals contain only text no pictures Photo This can reproduce delicate tones of photographs and pictures Reference p 43 Original Type Setting A A A A Press the Original key and select the original type Note Press the Original key to go through the following...

Страница 32: ...n select a preset ratio for copy ing Base Point The base point of Reduce Enlarge differs depending on how the orig inal is scanned When the original is placed on the exposure glass the upper left corner is the base point When placed in the ADF the bot tom left corner is the base point 1 Base point when placing on the exposure glass 2 Base point when placing in the ADF Reference Related default set...

Страница 33: ...U U U or T T T T A A A A Press R E B B B B Press Zoom C C C C Enter the ratio To select the ratio using U U U U and T T T T A Adjust the ratio using U U U U or T T T T Note If you have incorrectly en tered the ratio readjust using U U U U or T T T T To change the ratio in incre ments of 10 press and hold down U U U U or T T T T B Press the OK key The Accepted message ap pears To enter the ratio us...

Страница 34: ... be copied When placing originals in the ADF set the first page on top D D D D Press the Start key Note When placing originals on the exposure glass press the key after all originals are scanned Changing the number of sets You can change the number of copy sets during copying Note This function can only be used when the Sort function is selected A A A A While Copying is dis played press the Clear ...

Страница 35: ... Note You cannot use the bypass tray with this function The maximum paper weight that can be used with duplex copying is 64 90 g m2 20 24 lb You can change the original orien tation See p 29 To select the ori entation You can change the margin See p 45 Duplex Margin A A A A Press the Duplex key To select the orientation Note You can select the original ori entation when Always Specify is selected ...

Страница 36: ...ext original and then press the Start key When placing a stack of originals in the ADF A Place the originals with the first page on the top and then press the Start key One Sided Combine You can combine two pages onto one side of a sheet 1 Sided 2 Pages Combine 1 Side Copies 2 one sided originals onto one side of a sheet A A A A Press the Combine key B B B B Select Combine 2 Orig using U U U U or ...

Страница 37: ...paper size using U U U U or T T T T Note The machine calculates the ratio automatically based on the orig inal size if specified or the copy paper size D D D D Place your originals and then press the Start key Two Sided Combine You can combine 4 pages of originals into one sheet with two sides 1 Sided 4 Pages Combine 2 Side Copies 4 one sided originals onto one sheet with two pages per side A A A ...

Страница 38: ...al orientation using U U U U or T T T T and then press the OK key B Select the copy orientation us ing U U U U or T T T T and then press the OK key The Accepted message ap pears C C C C Select the paper size using U U U U or T T T T Note The machine calculates the ratio automatically based on the orig inal size if specified or the copy paper size D D D D Place your originals and then press the Sta...

Страница 39: ... able with the Duplex function has been se lected The following paper sizes are available for the Duplex func tion A4L B5 JISL Select one of these sizes Cannot sort this size A paper size not avail able with the Sort func tion hasbeen specified Use copy paper of length un der 357 mm Size error in Combine mode A paper size not avail able with the Combine function has been specified Use copy paper o...

Страница 40: ... Maintaining Your Machine Copies are too light Image density is too light Adjust the image density See p 25 Adjusting Image Density The paper size is not ap propriate Use the recommended paper Note A light copy may result when you use damp or rough grain pa per Toner bottle is almost emp ty Add toner See p 38 D Adding Toner Parts of the paper are not copied The original is not placed correctly Pla...

Страница 41: ...ng a stack of originals in the ADF the last page should be on the bottom If you place an original on the expo sure glass start with the first page to be copied Problem Causes Solutions Order of copies is not cor rect You set originals in the in correct order When setting a stack of originals in the ADF the last page should be on the bottom If you set an original on the expo sure glass start with t...

Страница 42: ...ds the number of pages that can be stored in memory Press Print to copy scanned originals and cancel the scan ning data Press Clear to cancel the scanning data and not copy Reset orig then press Resume to scan and copy the re maining originals Stop Resume The machine checks if the remaining orig inals should be cop ied after the scanned original has been printed To continue copying remove all copi...

Страница 43: ... the metal plate down and then square the paper and load it in the tray Important Check the top of the stack is not higher than the limit mark in side the tray If paper is left in the paper tray and then you add paper a mis feed might occur Note Fan the paper before loading Straighten curled or warped pa per before loading When using paper tray 2 load paper so that the paper touches the right side...

Страница 44: ...ed toner bottle Remaining toner might scatter Note You can make about 50 copies even after the D symbol begins flashing but replace toner early to prevent poor copy quality Toner Storage When storing toner the following precautions should always be followed Store toner containers in a cool dry place free from direct sunlight Store on a flat surface Used Toner Note Toner cannot be re used Do not in...

Страница 45: ...moving Toner 1 Open the front cover of the machine 2 Lift the green lever 3 Push the green lever and then gently pull out the holder 4 Press the toner bottle back to raise its top and then gently pull it out ABU033S ABU034S ...

Страница 46: ...five or six times 2 Remove the black cap Note Do not remove the black cap before shaking Do not remove the inner cap 3 Put the toner bottle on the holder and then pull its top forward 4 Push in the green lever until it clicks 5 Press down the green lever 6 Close the machine s front cover ABU035S ABU036S ...

Страница 47: ...ct even if the main power switch or operation switch is turned off or the Clear Modes key is pressed Reference For details about System Settings see User Tools System Settings General Settings Guide Changing Default Settings Note If a key operator code is set the key operator code input display appears before you can change the default settings For details about access codes see Key Operator Tools...

Страница 48: ...e display and then press the OK key The Programmed message ap pears Note To discontinue the operation and return to the initial display press the User Tools Counter key Quitting User Tools A A A A Press the User Tools Counter key The change is made and the ma chine is ready to copy ABU015S ...

Страница 49: ...1 normal text originals Text Mode 2 newspapers semi transparent originals reverse side print faintly visible Photo Mode 1 text photo images containing mostly photo areas Photo Mode 2 text photo images containing mostly text areas Photo Mode 3 actual photographic paper Special Mode 1 Highly transparent originals re verse side clearly visible or light text on a coloured background Also for originals...

Страница 50: ...atio is shown on the display with priority when Reduce or En large is selected Note Default Metric version Ratio 1 50 Ratio 2 71 Ratio 3 93 Ratio 4 141 Ratio 5 200 Inch version Ratio 1 65 Ratio 2 78 Ratio 3 93 Ratio 4 129 Ratio 5 155 You can set a ratio other than the above A Press the User Tools Counter key B Select Copier Features using U U U U or T T T T and then press the OK key C Select Repro...

Страница 51: ...ted Note Default Metric version 71 Inch version 65 Duplex Margin You can specify left margin on the back side of copies and top margin on the front side Select Top Margin or Left Margin and then set the required value Top Margin 0 50 mm 0 2 Left Margin 0 50 mm 0 2 Note Default Metric version 5 mm Inch version 0 2 inch ...

Страница 52: ...User Tools Copier Features 46 4 ...

Страница 53: ...a malfunction When the machine is not in use and in stand by mode you may hear a small noise inside This is caused by the image stabilization process and is not a malfunction Do not turn off the operation switch while copying or printing Make sure all copying or printing has finished first The machine might not produce good copy images if condensation forms inside as a result of rapid temperature ...

Страница 54: ... 30 m3 hr person Environments to avoid Locations exposed to direct sun light or other sources of strong light more than 1 500 lux Locations directly exposed to cool air from an air conditioner or heat ed air from a heater Sudden tem perature changes can cause condensation to form inside the machine Locations close to machines gener ating ammonia such as a diazo copy machine Places where the machin...

Страница 55: ...y more than 10 The wall outlet shall be installed near the machine and shall be eas ily accessible Unplug the power cord from the wall outlet before you move the machine While moving the ma chine you should take care that the power cord will not be dam aged under the machine When the paper tray unit is in stalled do not push the upper part of the main unit horizontally An injury might occur if the...

Страница 56: ...ne near the power source providing the clearance areas shown 1 Rear 1 cm 0 4 or more 2 Right 1 cm 0 4 or more 3 Front 75 cm 29 6 or more 4 Left 1 cm 0 4 or more Note For the required space when op tions are installed contact your service representative ...

Страница 57: ...Then wipe it with a dry cloth to remove the water Important Do not use chemical cleaner or or ganic solvents such as thinner or benzene If such substances get in side the machine or melt plastic parts a failure might occur Do not clean parts other than those explicitly specified in this manual Other parts should only be cleaned by your service representative Cleaning the Exposure Glass Cleaning th...

Страница 58: ...Remarks 52 5 ...

Страница 59: ...unctions can be used together When you read the chart see the following table The following shows the combinations of functions These functions can be used together These functions cannot be used together The second function selected will be the function you are working in ABU038S ...

Страница 60: ...pass tray See General Settings Guide Preset Reduce Enlarge You can select one of 5 preset ratios 2 enlargement ratios 3 reduction ra tios You can select a ratio regardless of the size of an original or copy paper With some ratios parts of the image might not be copied or margins will appear on copies Copies can be reduced or enlarged as follows Metric version Ratio Original Copy paper size 200 enl...

Страница 61: ...ner than 64 g m2 17 lb Translucent paper OHP transparencies Label paper adhesive labels Postcards When an odd number of originals is placed in the ADF the back of the last page of copied paper is blank During copying the image is shifted to allow for the binding margin The following paper sizes can be duplexed A4L B5 JISL 81 2 14 L 81 2 11 L 81 2 13 L 81 4 13 L 81 4 14 L 16KL Ratio Original Copy p...

Страница 62: ...copied You cannot use custom size paper of 357 mm in length or larger If the orientation of originals is different from that of the copy paper the machine will automatically rotate the image by 90 to make copies proper ly If the number of originals placed is less than the number specified for com bining the last page segment is left blank as shown Duplex Margin If you set a binding margin that is ...

Страница 63: ...riginals 17 Custom size paper 22 D Display 8 Do s and Don ts 47 Duplex 29 55 Duplex key 8 Duplex margin 45 56 Duplex mode priority 43 E Enlarge 26 54 Envelopes 23 Environment 48 Exposure glass 15 H Handling toner 38 I Image density 25 Indicators 7 Inserting toner 40 L Lighter and Darker 8 Loading paper 37 Low power 12 M Machine environment 48 Main power indicator 7 Main power switch 10 Maintaining...

Страница 64: ...eys 7 Selecting copy paper 26 Selecting original type setting 25 Selection keys 7 Sort 28 Sort key 8 Special paper 23 Specifications 53 Start key 8 Stop key 7 Supplementary information 54 T Text 25 Toner adding 38 handling 38 inserting 40 removing 39 storage 38 used 38 Toner storage 38 Troubleshooting 33 memory is full 36 you cannot make clear copies 34 you cannot make copies as you want 35 your m...

Страница 65: ...59 MEMO ...

Страница 66: ...60 GB GB B129 6600 MEMO ...

Страница 67: ... In accordance with IEC 60417 this machine uses the following symbols for the main power switch a a a a means POWER ON c c c c means STAND BY Trademark PostScript and Acrobat are registered trademarks of Adobe Systems Incorporated Other product names used herein are for identification purposes only and might be trademarks of their respective companies We disclaim any and all rights to those marks ...

Страница 68: ...ersey 07006 Phone 1 973 882 2000 The Netherlands RICOH EUROPE B V Groenelaan 3 1186 AA Amstelveen Phone 31 0 20 5474111 United Kingdom RICOH UK LTD Ricoh House 1 Plane Tree Crescent Feltham Middlesex TW13 7HG Phone 44 0 20 8261 4000 Germany RICOH DEUTSCHLAND GmbH Spain RICOH ESPAÑA S A Avda Litoral Mar 12 14 Blue Building Marina Village 08005 Barcelona Phone 34 0 93 295 7600 Italy RICOH ITALIA SpA...

Отзывы: