background image

Scanning 

37

3

Note

After you select a document size, you can adjust the scanning area further by clicking the left mouse 
button and dragging it. This is required when you want to crop an image when scanning. (See 

Pre-Scanning to crop a portion you want to scan


uu

page 37.)


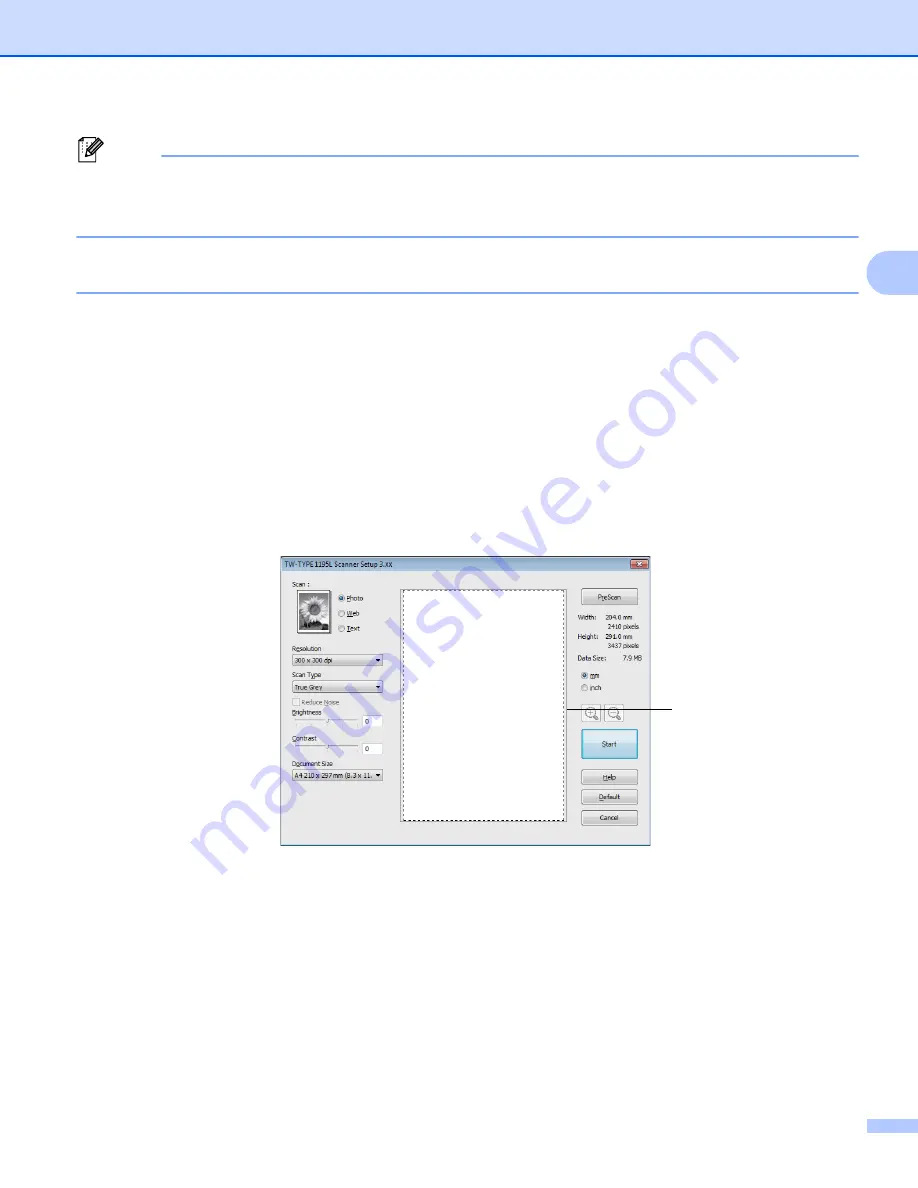
Pre-Scanning to crop a portion you want to scan

3

You can preview your image and crop unwanted portions before scanning by using the 

PreScan

 button.

When you are satisfied with the preview, click the 

Start

 button in the Scanner Setup dialog box to scan the 

image.

a

Follow the steps from 

a

 to 

b

 of 

Scanning a document into the PC


uu

page 36.

b

Choose the settings for 

Scan

 (Image Type), 

Resolution

Scan Type

Brightness

Contrast

 and 

Document Size

, as needed.

c

Click 

PreScan

.

The whole image is scanned into the PC and appears in the Scanning Area (1) of the Scanner Setup 
dialog box.


1

Содержание 1195L

Страница 1: ...manual carefully before you use this machine and keep it handy for future reference For safe and correct use be sure to read Safety Information pamphlet and Product Safety Guide Software User s Guide...

Страница 2: ...typographical and other errors relating to the publication 2013 Ricoh Company Ltd IMPORTANT NOTE This product is approved for use in the country of purchase only Do not use this product outside the co...

Страница 3: ...settings 8 Accessing the printer driver settings 9 Basic tab 10 Paper Size 10 Orientation 11 Copies 11 Media Type 12 Resolution 12 Print Settings 13 Multiple Page 13 Manual duplex two sided Booklet 1...

Страница 4: ...a portion you want to scan 37 Settings in the Scanner Setup dialog box 38 4 Remote Setup 42 Remote Setup 42 5 PC FAX Send Software 44 PC FAX sending 44 Sending a file as a PC FAX 44 Setting up user i...

Страница 5: ...Section I Machine operation keys I Using the control panel 2...

Страница 6: ...ys 1 You can access the following features from your machine s control panel Job Cancel 1 To cancel the current print job press You can clear the data that is left in the machine s memory by pressing...

Страница 7: ...Section II Windows II Printing 4 Scanning 29 Remote Setup 42 PC FAX Send Software 44...

Страница 8: ...ng system Using the printer driver 2 A printer driver is software that translates data from the format used by a PC into the format needed by a particular printer using a printer command language or p...

Страница 9: ...se the Print command If any other printer drivers are installed on your computer choose TYPE 1195L Printer as your printer driver from the Print or Print Settings menu in your software application and...

Страница 10: ...d turn over the stack When you use the manual duplex function it is possible that there may be paper jams or poor print quality If there is a paper jam see Basic User s Guide Error and maintenance mes...

Страница 11: ...cument into the computer Fax sending will not be stopped during the computer printing However when the machine is copying or receiving a fax on paper it pauses the computer printing operation and then...

Страница 12: ...e Resolution Print Settings Multiple Page Duplex Booklet Paper Source Scaling Reverse Print Use Watermark Header Footer Print Toner Save Mode Administrator Density Adjustment Improve Print Output Skip...

Страница 13: ...TYPE 1195L Printer icon and select Properties The printer properties dialog box appears For Windows 7 Right click the TYPE 1195L Printer icon and select Printer properties The printer properties dial...

Страница 14: ...Orientation Copies Media Type Resolution and Print Settings 1 b Choose Multiple Page and Duplex Booklet 2 c Choose Paper Source 3 d Confirm your current settings in the window 4 e Click OK to apply yo...

Страница 15: ...f copies that will be printed Collate With the Collate check box selected one complete copy of your document will be printed and then repeated for the number of copies you selected If the Collate chec...

Страница 16: ...ght paper or rough paper choose Thick Paper or Thicker Paper For bond paper choose Bond Paper When printing on envelopes choose Envelopes If the toner is not fixed to the envelope correctly when Envel...

Страница 17: ...image size of a page allowing multiple pages to be printed on one sheet of paper or enlarge the image size for printing one page on multiple sheets of paper Page Order When N in 1 option is selected...

Страница 18: ...rect page numbers and allows you to fold at the centre of the print output without having to change the order of the pages Booklet Manual The machine prints all the even numbered sides first Then the...

Страница 19: ...Printing 15 2 Paper Source 2 You can choose Auto Select Tray1 or Manual and specify separate trays for printing the first page and for printing from the second page onwards...

Страница 20: ...lowing selections Scaling 1 Reverse Print 2 Use Watermark 3 Header Footer Print 4 Toner Save Mode 5 Administrator 6 Other Print Options 7 Scaling 2 You can change the print image scaling Reverse Print...

Страница 21: ...ou can put a logo or text into your document as a watermark You can choose one of the preset Watermarks or you can use a bitmap file that you have created Check Use Watermark and then click the Settin...

Страница 22: ...es Click the Add button to add the watermark settings and then choose Use Text or Use Bitmap File in Watermark Style You can change the additional watermark s size and position on the page by selectin...

Страница 23: ...2 You can conserve toner use with this feature When you set Toner Save Mode to On prints appears lighter The default setting is Off Note We do not recommend Toner Save Mode for printing photo or greys...

Страница 24: ...tting We recommend that you change the printer driver setting in Media Type to the thin setting Note This operation will decrease the temperature of the machine s fusing process Improve Toner Fixing I...

Страница 25: ...the printer driver automatically detects blank pages and excludes them from printing Note This option does not work when you choose the following options Use Watermark Header Footer Print N in 1 or 1...

Страница 26: ...new print profile Restore default profiles 3 Click to restore all the default print profiles Always show Print Profiles tab first 4 Current print profile view 5 a Choose your profile from the print p...

Страница 27: ...changes dialog box appears by clicking Edit a profile a Choose an icon you want to use from the Icon list b Enter the desired title in Name c Choose the print profile you want to overwrite then click...

Страница 28: ...ing 24 2 Support 2 Click Support in the Printing Preferences dialog box Check Setting 1 You can check the current driver settings About 2 This will list the printer driver files and version informatio...

Страница 29: ...ing allows you to define which paper size is used for the tray and manual feed slot Highlight the paper source you want to define and then choose the paper size from the drop down list Click Update 4...

Страница 30: ...lay its serial number If it fails to receive the information the screen will display Auto Detect 6 The Auto Detect function obtains the machine s serial number by initiating communication between the...

Страница 31: ...ktray or by choosing Status Monitor located in Start All Programs RFG TYPE 1195L on your PC Windows 7 If you have set the Enable Status Monitor on startup during installation you will find the button...

Страница 32: ...lour depending on the machine s status A green icon indicates the normal stand by condition A yellow icon indicates a warning A red icon indicates a printing error has occurred There are two locations...

Страница 33: ...ment using the WIA driver 3 WIA compliant 3 You can choose Windows Image Acquisition WIA for scanning images from the machine You can scan images directly into any application that supports WIA or TWA...

Страница 34: ...canner Setup dialog box Paper source 1 Picture type 2 Adjust the quality of the scanned picture 3 Page size 4 Scan 5 e Choose Document Feeder from the Paper source drop down list 1 f Choose the pictur...

Страница 35: ...tion DPI and Picture type from Advanced Properties Click OK after you have changed the settings Note The scanner resolution can be set as high as 1200 dpi For resolutions greater than 1200 dpi use the...

Страница 36: ...may be very large Make sure that you have enough memory and hard disk space for the size of the file you are trying to scan If you do not have enough memory or hard disk space then your PC may freeze...

Страница 37: ...Vista and Windows 7 When the User Account Control screen appears do the following For users who have administrator rights Click Yes For users who do not have administrator rights Enter the administra...

Страница 38: ...ADF automatic document feeder to scan a whole page a Load your document b Open your software application to scan the document c Do one of the following Windows Photo Gallery Click File then Import fr...

Страница 39: ...in the Scan dialog box Scanner 1 Profile 2 Source 3 Paper size 4 Color format 5 File type 6 Resolution DPI 7 Brightness 8 Contrast 9 Scanning area 10 Scan 11 g Click Scan in the Scan dialog box The ma...

Страница 40: ...ese applications include popular programs like Adobe Photoshop CorelDRAW and many more Scanning a document into the PC 3 You can use the ADF automatic document feeder to scan a whole page a Load your...

Страница 41: ...u can preview your image and crop unwanted portions before scanning by using the PreScan button When you are satisfied with the preview click the Start button in the Scanner Setup dialog box to scan t...

Страница 42: ...he document appears in your application window g In your application window use the options available to refine the image Settings in the Scanner Setup dialog box 3 Scan Image Type 3 Choose the output...

Страница 43: ...alue is 0 representing an average You can set the Brightness level by dragging the slider to the right or left to lighten or darken the image You can also enter a value in the box to set the level If...

Страница 44: ...mm 7 2 x 10 1 in JIS B6 128 x 182 mm 5 x 7 2 in Letter 215 9 x 279 4 mm 8 1 2 x 11 in Legal 215 9 x 355 6 mm 8 1 2 x 14 in A5 148 x 210 mm 5 8 x 8 3 in A6 105 x 148 mm 4 1 x 5 8 in Executive 184 1 x...

Страница 45: ...on the screen Width shows the width of scanning area Height shows the height of scanning area Data Size shows the rough data size in Bitmap format The size will be different for other file formats suc...

Страница 46: ...tings you can upload them directly to the machine Click the Start button All Programs RFG TYPE 1195L and Remote Setup OK Lets you start uploading data to the machine and exit the Remote Setup applicat...

Страница 47: ...t is uploaded to the machine Click Apply to upload the new data to the machine and then click Print Export Lets you save the current configuration settings to a file Import Lets you read the settings...

Страница 48: ...address or fax number into the user interface You can use the Address Book Search feature to quickly find members to send to Note The PC FAX software can only send Black White fax documents in A4 size...

Страница 49: ...page f Click Start to send the fax Note If you want to cancel the fax click Cancel If you want to redial a number click Redial to scroll through the last five fax numbers choose a number and then clic...

Страница 50: ...ss Enter a number to access an outside line here This is sometimes required by local PBX telephone systems for example dialling 9 to get an outside line in your office For PC Fax send this number will...

Страница 51: ...cover page To Choose the recipient information you want to add to the cover page From Choose the sender information you want to add to the cover page Comment Enter the comment you want to add to the...

Страница 52: ...s Book Windows Vista only or Windows Contacts Windows 7 only Click the Browse button to choose the database file You can use the address book you have chosen in the Select Address Book drop down list...

Страница 53: ...appears Setting up a member in the Address Book 5 In the Address Book dialog box you can add edit and delete members and groups a In the Address Book dialog box click the icon to add a member The Addr...

Страница 54: ...b Enter the name of the new group in the Group Name field c In the Available Names box choose each member to be included in the group and then click Add Members added to the group appear in the Group...

Страница 55: ...u page 42 If you are creating a vCard you must first click on the address book member you want to create the vCard for Exporting Address Book entries 5 Note If you are creating a vCard you must first...

Страница 56: ...PC FAX Send Software 52 5 d Click OK to save the data e Enter the name of the file and then click Save...

Страница 57: ...Text From the Address Book click File Import then vCard and go to step e From the Address Book click File Import then Remote Setup Dial Data and go to step e b From the Available Items column choose t...

Страница 58: ...PC FAX Send Software 54 5 e Enter the name of the file and then click Open Note If you chose Text file in step a Files of type will be Text files txt csv...

Страница 59: ...r page 47 group 50 sending 44 setup 46 H Header Footer Print 16 19 P Password 19 Print Booklet printing 14 Manual duplex printing 14 Print Profiles 22 R Remote Setup 42 S Scan Resolution 39 TWAIN Comp...

Страница 60: ...This machine is approved for use in the country of purchase only H560 6021...

Отзывы: