Richnc RZNC-09 Series Скачать руководство пользователя страница 32

Beijing Richnc Technology Co., Ltd.

RZNC 09 Series Users Guide

Http :// www.richnc.com

Contact : Jery

E-mail : [email protected]

Software

Software

Software

Software Installation

Installation

Installation

Installation With

With

With

With PC

PC

PC

PC

1. Computer Hardware Requirements:

CPU: PIII 450 and more;
O S: Win2000 or XP and more

2. Please

choose

and

download

the correct USBCAM Driver version which it suit

your PC Windows system from

Http://www.richnc.com

,uncompress and saved(e.g.

Uncompress and saved it on D:\UsbCam ).
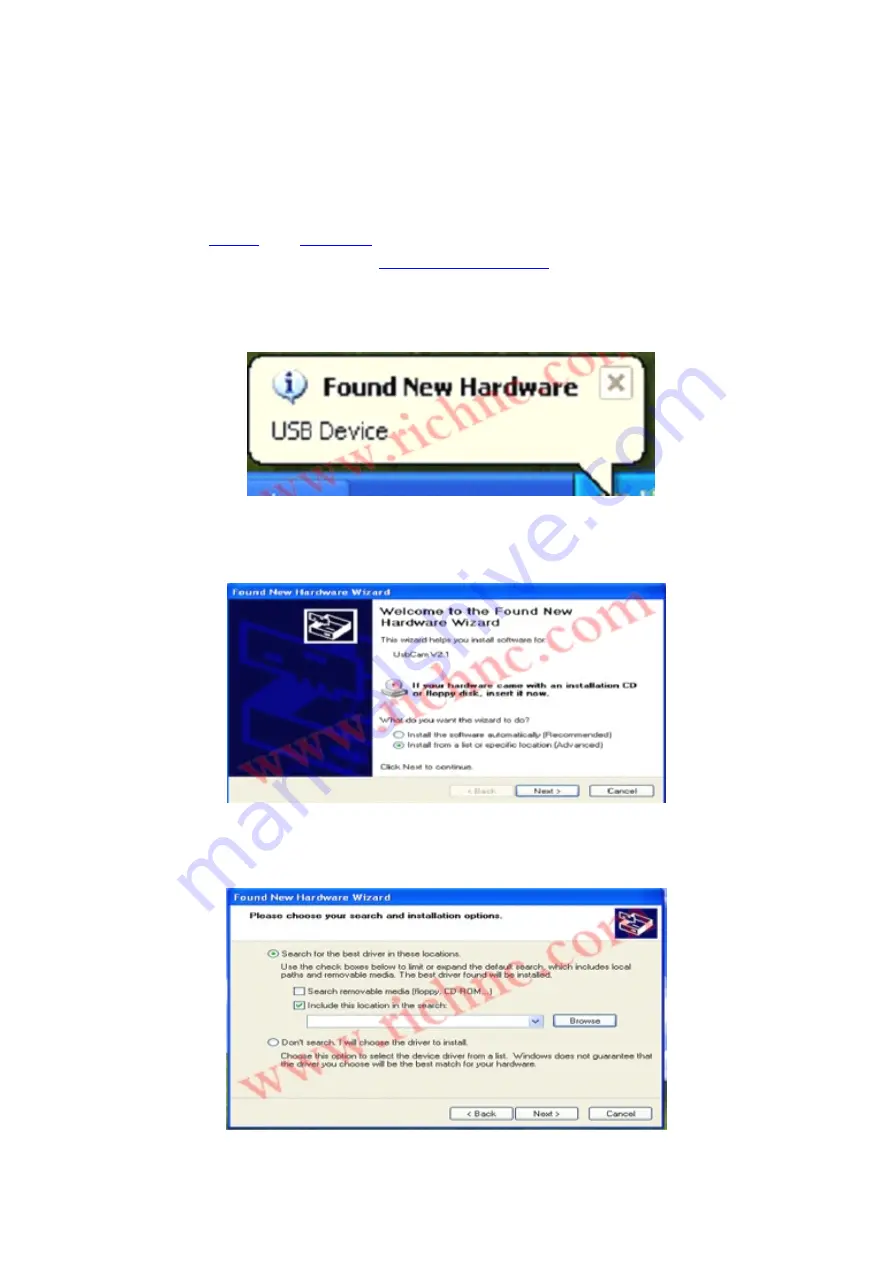
3.Plug the RZNC-05 Series(CNC Controller) in to your computer through the USB
cable,wait a while until the computer appear "

found new hardware

" (as View 3-1);

View 3-1

4. Click on the clue,It appears setup information, select the second item which

is"

install from a list or special location"

( as View 3-2);

View 3-2

5. Click on "

Next

" button,Choose "

include this location in the search

" ( as View

3-3);

Содержание RZNC-09 Series

Страница 1: ...ndle Handle RZNC 09 RZNC 09 RZNC 09 RZNC 09 Series Series Series Series Users Users Users Users Guide Guide Guide Guide Fax 86 10 57130422 Fax 86 10 57130422 Fax 86 10 57130422 Fax 86 10 57130422 Mob...

Страница 2: ...b without computer 6 Support any size file as G code Plt NC CNC MMG and so on 7 Support linear interpolation and circular interpolation 8 The RZNC offers I O pulse signal diagnostic capabilities 9 The...

Страница 3: ...utions 1 Don t use this product in strong magnetic filed or interfere environments 2 Don t remove the U flash while it is running a file 3 Protect it from water moist dust and fire 4 Protect it from m...

Страница 4: ...onnect Board 50 Pins SICI Cable Dedicated USB Cable Remark Different machine using Different CNC controller They are different controller Parts functions Multi functions Engrave Machine using RZNC 04...

Страница 5: ...Guide Http www richnc com Contact Jery E mail richnc hotmail com System Specifications The RZNC 0901 Working Video links http www richnc com video 9 html http www richnc com video 9 html http www ric...

Страница 6: ...Beijing Richnc Technology Co Ltd RZNC 09 Series Users Guide Http www richnc com Contact Jery E mail richnc hotmail com Functions Tree View...

Страница 7: ...ichnc hotmail com Know Me From Handle Know Me From Display Area I am not working now I am working now If have any matter tell me please i will solve for you My mob is 13581 806922 Do not forgot 86 Bec...

Страница 8: ...ite the property selecting in level signal setup The Z axis is direction Rise spindle speed when working Input number 3 Set to X and Y axes as working origin Input number 4 The X axis is opposite dire...

Страница 9: ...pound buttons for special applications The operating mode is press the first button and holding then press the second button release the two buttons at same time Their functions are as following 1 and...

Страница 10: ...y my my my machine machine machine machine Can not view clearly You can download the High Definition Wiring Diagram Just click here is ok So easy Yes of course This is my products style so easy so use...

Страница 11: ...ller will showing manual state screen as View 2 View 2 Remark Because we have not the correct Pulse Equivalent parameters now so we press the DELETE key first time If we had the correct Pulse Equivale...

Страница 12: ...OK key we will enter in the Pulse Equivalet Setup function as View 5 View 5 6 Please make sure the X Axis pulse is 400 if not please change to 400 For example the X Axis pulse is not 400 as View 6 1 V...

Страница 13: ...press the OK key to save this parameter and cancel the Pulse Equivalet Setup function as View 6 4 View 6 4 7 Press the CANCEL key until return the manual state screen as View 7 View 7 8 Press the MODE...

Страница 14: ...om machine origin to now with ruler For example the distance which you measured is 50mm 12 The formula used to calculate the X Equiv pulse it was only about value is not exact value 50 400 100 200 The...

Страница 15: ...press the OK key we will enter in the Machine Home Setup function as View 2 View 2 3 Select the Home Speed press the OK key we will enter in the Home Speed setup function as View 6 View 3 4 If you kn...

Страница 16: ...ed Parameter press the OK key for saved and cancel the Home Speed setup function we will return the Machine Home Setup function as View 6 View 6 7 Let us know about the Home Direction Before setup the...

Страница 17: ...the same as View 10 X Axis Because the X axis home switch at the left of machine X direction contains two direction Left and Right then the X axis Home Direction must be left of machine So the X axis...

Страница 18: ...irection is wrong press the Y or Y key to change the direction from Dir to Dir as view 9 View 9 10 Press the OK key to saved this changed and next step as view 10 View 10 Remark Different machines wil...

Страница 19: ...ne Size parameters must be make sure it is correct no matter X Axis Y Axis ror Z Axis if any one is wrong your machine will be broken your machine X Axis Effective Distance Travelled means your Spindl...

Страница 20: ...xis setup then Press the OK key saved and cancel Machine Size Setup function 5 We will return the View 1 screen After Press the OK key saved and cancel 6 Press the Cancel Key two times we will return...

Страница 21: ...the X Axis Effective Distance Travelled 1200 00mm if you want more than 1200 00mm i am sorry the controller will show your warning Over X limit and stop the X moving for protect your machine as view 8...

Страница 22: ...e key the RZNC Controller will showing manual state screen this state is High speed manual mode as View 2 View 2 Remark If we had the correct parameters we must press the OK key when the controller sh...

Страница 23: ...ed manual continuous mode View 3 2 High speed manual step mode View 3 2 High speed manual Distance mode Manual Low speed include 3 parts continuous mode Distance mode step mode Manual High speed inclu...

Страница 24: ...elete key to move the cursor as View 5 View 5 6 Enter your need parameter Manual Low speed for example it is 3000mm Min as View 6 View 6 7 Press the OK key for changed and saved the X axis manual Low...

Страница 25: ...in Press the Z the Z Axis will moving with the speed 1200mm Min when the system as Low speed manual continuous mode 9 We will setup the Low grid manual Low speed as View 9 View 9 10 Press the Delete k...

Страница 26: ...ep mode 13 Finished the Manual Low speed setup we will return the main screen as View 13 View 13 14 Press the High Low key the system will be in another manual operation mode this state is High speed...

Страница 27: ...ZNC Controller will showing manual state screen this state is Low speed manual mode as View 2 View 2 Remark If we had the correct parameters we must press the OK key when the controller show your Goto...

Страница 28: ...s working origin building the working start X Y point as View 5 View 5 6 Press the Z Z move the tool close to the surface of the material as View 6 View 6 7 Press the 8 key make the Z axis working ori...

Страница 29: ...ey to select the job file we choice the RICHNC CNC file and press the OK key The controller will show your this job parameters Processing speed Travel speed Z down Rate Speed Rate Pulse Equivalent Z u...

Страница 30: ...aving the processing speed to 5500mm Min and go to next parameter as view 13 View 13 14 As above method we can change the Travel speed to 6500 00 as view 14 View 14 15 Normal we need not to change the...

Страница 31: ...ou need to setup this parameters 17 Press the OK key the RZNC controller will checking the file as view 17 View 17 19 We will wait the Plasma pen moving to the start position the RZNC controller will...

Страница 32: ...nload the correct USBCAM Driver version which it suit your PC Windows system from Http www richnc com uncompress and saved e g Uncompress and saved it on D UsbCam 3 Plug the RZNC 05 Series CNC Control...

Страница 33: ...as View 3 4 View 3 4 Remark If your found and select the correct file the OK will able to be clicked If your found and select the wrong file the OK will unable to be clicked please make sure the UabC...

Страница 34: ...n the Finish button to finish the UsbCam install 11 Please wait a while until the computer appear your new hardware is installed and ready to use as View 3 8 View 3 8 12 The UsbCam Driver had installe...

Отзывы: