


Page 33 / 66
IV. GETTING STARTED
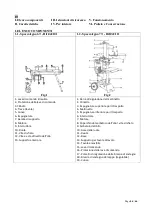
4.1- Unpacking
4.1.1- For 042101 - log splitter 6T
4.1.2- For 042111 - log splitter 7T
We recommend that at least 2 persons unpack the
log splitter package.
Remove product from its packaging.
Check that product and accessories are not
damaged
We recommend that at least 2 persons unpack the
log splitter package
Remove product from its packaging. See the
steps 1 to 5 below (*).
Check that product and accessories are not
damaged
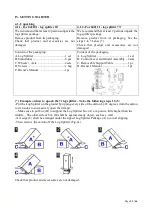
Content of the packaging
A. Log Splitter ......................................... 1 set
B. Stand tubes .......................................... 8 pcs
C. Axle .................................... 2sets
D. Screws ................................................ 1 bag
E. Owner's Manual ................................. 1pc
Content of the packaging
A. Log Splitter ......................................... 1 set
B. Control Lever and Guard Assembly ... 2sets
C. Removable Support Table .................. 1 pc
D. Owner's Manual ................................. 1pc
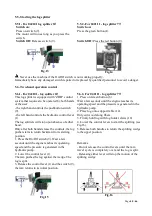
(*) Example on how to upack the 7t log splitter - Take the following steps 1 to 5:
- Put the Log Splitter on the ground by tipping every side of the carton by 45 degrees (turn the carton
to its 4 sides to successively open the 4 flaps).
. - Make sure to put box (B) to support the Log Splitter box (A) at a point a little higher than the
middle. - The other side of box (B) shall be against steady object, such as a wall.
- A wedge (C) shall be arranged under the tipped Log Splitter Package (A) to avoid slipping.
- Then remove the carton off the Log Splitter (Fig.4e).
Check that product and accessories are not damaged.


