background image

Page 7 

RHOX Steel and Aluminum Utility Boxes 
 
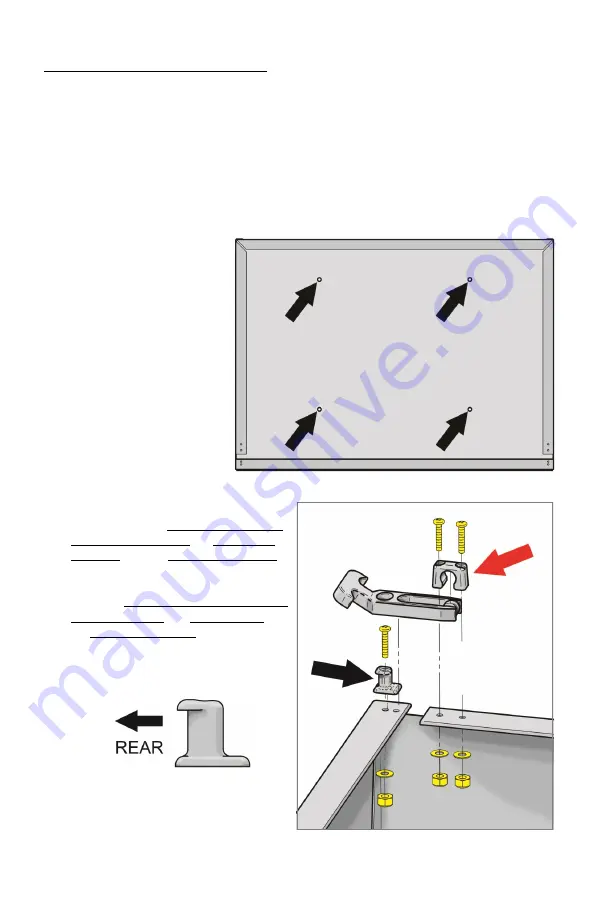
1.  Place the utility box on top of the support frames so the tailgate is at the rear of the 

cart.   
 

2.  Push the utility box towards the front of the cart and center it between the front and 

back of the cart until it is even. 
  

3.  Center the box between the driver and passenger sides of the cart. 


4.  Using a marking device, mark the (4) hole locations onto the underside of the utility 

box.  
 

5.  Remove the box from the 

cart and place it upside-
down on a clean piece of  
cardboard to avoid  
damage.  
 

6.  Use a center punch to 

make a dimple at each of 
the (4) marked locations. 
Use a small drill bit to drill 
a pilot hole. Work up to a 
7/16” drill bit for the final 
hole size. Remove any 
burrs with a small file. 


7.  Fasten the utility box to the support 

frames using (4) 10mm x 35mm Phil-
lips Head Truss Bolts, (4)10mm Flat 
Washers and (4) 10mm Nylock Nuts.  
 

8.  Fasten the latch catches to the tailgate 

using (2) 10-32 x 1” Pan Head Phillips  
Machine Screws, (2) Flat Washers and 
(2) 10-32 Nylock Nuts (black arrow). 
 
NOTE: Orient the latch catch as shown: 


Содержание BOX-112

Страница 1: ...arts of the installation Refer to vehicle s maintenance manual for torqueing specifications on reused hardware BOX 112 Club Car DS Utility Box Mounting Kit Installation Instructions Contents of BOX 11...

Страница 2: ...ill Bits Small bit for pilot holes 7 16 Center Punch or Other Marking Device Contents of BOX 112 Hardware Kit and Latch Kit Qty a 10mm x 45 Hex Head Bolts 2 b 10mm x 35 Phillips Head Truss Bolts 4 c 1...

Страница 3: ...Only Place Tow Run Switch in Tow 4 Remove top black arrows 5 Remove rear struts red arrows 6 Remove the front seat back cushion s by hand Retain hardware DS Old Style Rear Strut Driver Side DS New St...

Страница 4: ...assembly Retain hardware 9 Remove rear bumper Retain hardware and bumper Discard mounting plate blue arrows Utility Box Mounting Kit Installation 1 Loosely install the vertical support brackets to the...

Страница 5: ...dy using 2 8mm x 35 Hex Head Bolts 4 8mm Fender Washers and 2 8mm Nylock Nuts red arrows 4 Reinstall the access panel using the Original Hardware 5 Fasten the support frames to the vertical support br...

Страница 6: ...s required Will not work with Thermoplastic or Poly Boxes 9 Reinstall top using the Original Hardware if applicable RHOX Thermoplastic and Poly Utility Box Installation 1 Place the utility box on top...

Страница 7: ...Remove the box from the cart and place it upside down on a clean piece of cardboard to avoid damage 6 Use a center punch to make a dimple at each of the 4 marked locations Use a small drill bit to dr...

Страница 8: ...llips Screws 4 Flat Washers and 4 Nylock Nuts red arrow Page 7 10 Tighten all hardware This completes the installation of your RHOX Utility Box Mounting Kit and Utility Box Please enjoy safely Scan QR...

Отзывы: