Quick Manual for 4/9/16CH H.264 DVR
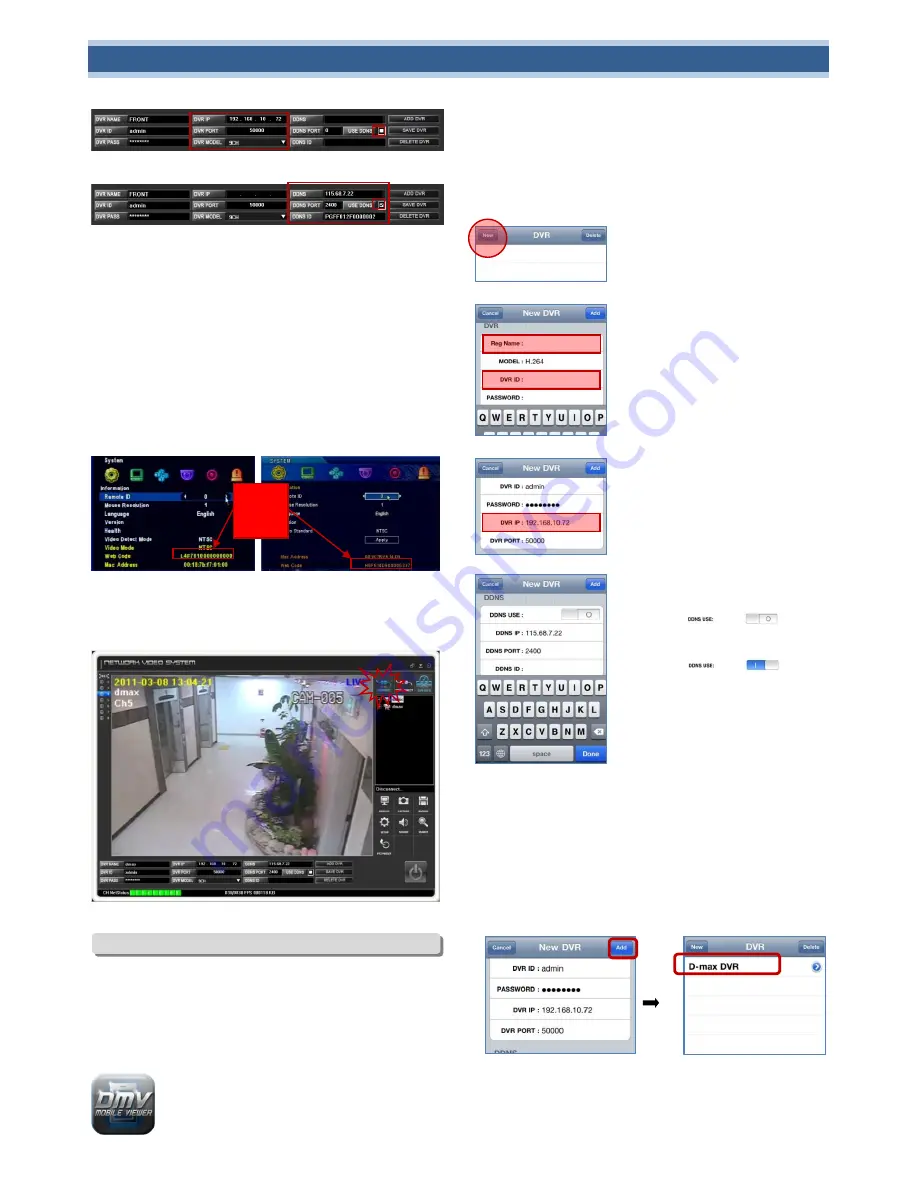
. For Static IP Users
. For DDNS(Dynamic IP) Users
. DVR NAME : Input desired DVR name
. DVR ID : Inputs the DVR‟s ID
. DVR PASS : Inputs the DVR‟s Password
. DVR PORT : Inputs the DVR‟s Use Port number
[CAUTION] You have to do connected Router’s “Use Port number” port forwarding
to proper operation.
. DVR MODEL : Inputs the DVR‟s Channel number.
. USE DDNS : If you select “USE DDNS”, the DDNS set-up would be changed
to “DDNS->115.68.7.22, DDNS PORT->2400” automatically.
[CAUTION] If the articles of
“
DDNS & DDNS PORT” were set to different numbers, it
may not work well.
. DDNS ID : Inputs the DVR Web Code.
4 Channel 9/16 Channel
. ADD DVR : The DVR would be registered.
# When you click “CONNECT” button, the DVR would be connected.
8. Connecting DMVS(Smart Phone Viewer)
1. Installing “iPhone Program”
Search the “DMVS” in the “App Store” to download and then install it in the
phone.
2. Starting the Program
The Icon is made in the phone if the program is installed
correctly.
Select this Icon to start the program.
3. Applying the Product Information
Input the Network Information to see the DVR via iPhone.
Before using iPhone, the DVR‟s Network menu should be set-up.
Please review the User Manual – Network part at first.
3-1 DVR registration:
After starting the DMVS program, click the “new”
button to register it.
3-2 Input the “Reg. Name”.
Input desired DVR name.
3-3 Input the DVR ID
To connect the DVR remotely, put the Login ID and
Password which were set in the DVR.
3-4 Input the DVR IP (for Static IP Users)
This is only for Static IP Users.
[Reference] After selecting “NO” for “DDNS USE”,
it‟s not saved if you don‟t put the “DVR IP”.
3-5 setting “DDNS USE”
· For Dynamic IP Users, select “YES”.
· For Static IP Users, select “NO”
3-6 Setting DDNS IP (for Dynamic IP Users)
“DDNS IP” is only for Dynamic IP Users so put the
defaults “115.68.7.22”.
3-7 DDNS PORT
If you select above model, “DDNS PORT” is put “2400” automatically.
[CAUTION]Do Not Change this setting.
3-8 Input the “DDNS ID” (For Dynamic IP Users)
“DDNS ID” is own numbers of the DVR. If you find it out on “SYSTEM” Menu, it‟s
indicated with “DDNS ID” or “WEB CODE”. Please put the correct numbers in the MENU.
# It is same as “7. Connecting NVS Network -> For DDNS (Dynamic IP) Users”.
# This is only for Dynamic Users, so don‟t need to input if you‟re Static IP Users.
3-9 Connecting
After finish to register, please press “Add” button on top-right side.
If you press Reg. Name of DVR, it will ask you if you want to “Connect” or “No”.
Web
Code


