15/15
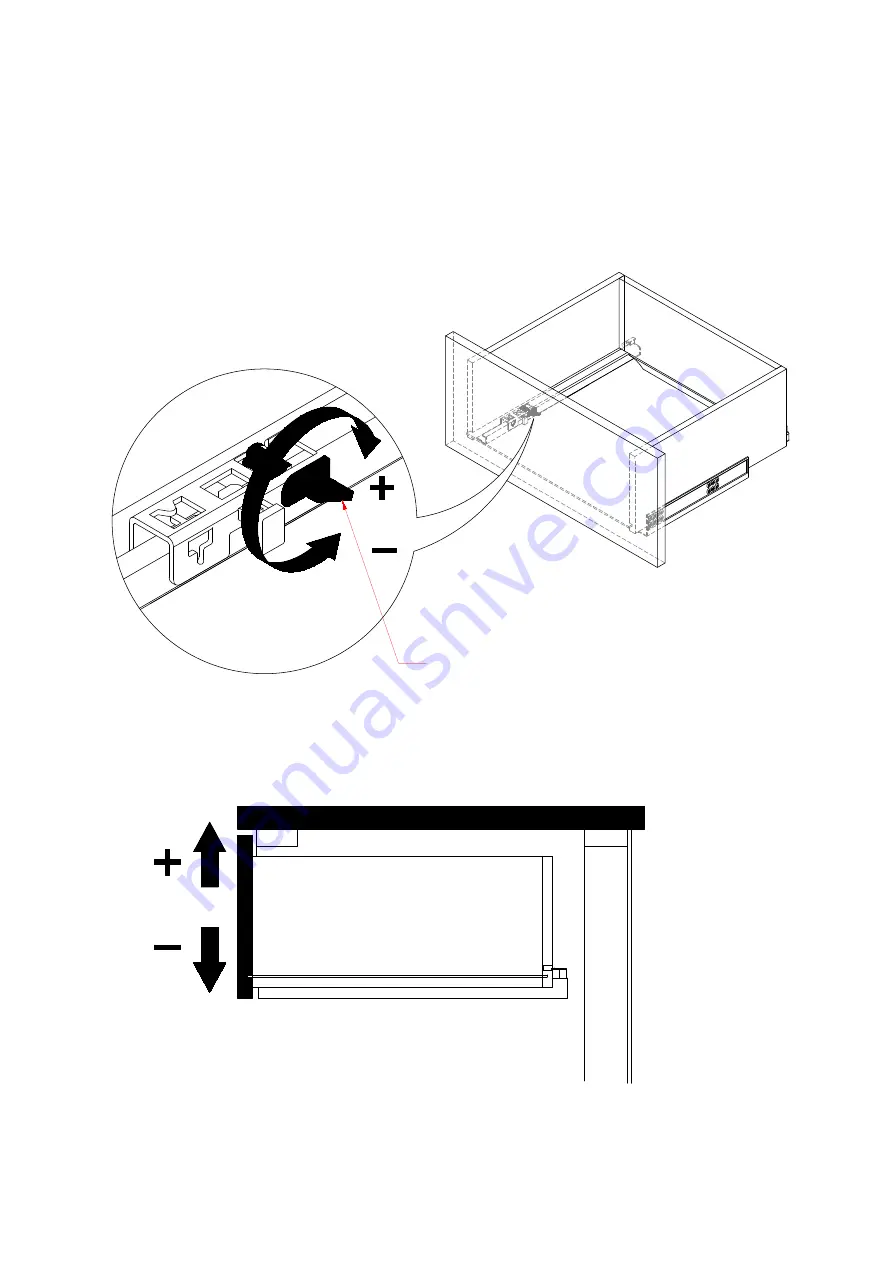
STEP 10
DRAWER HEIGHT ADJUSTMENT INSTRUCTIONS
Adjust around gap of drawer by turning
plastic button clockwise/counterclockwise
direction. See
DETAIL V
.
Plastic button
Страница 1: ...1 1 1 15...
Страница 2: ...a child is able to pull to a standing position set mattress to lowest position and remove bumper pads large toys and other objects that could serve as steps for climbing out When a child is able to cl...
Страница 3: ...ar a window or patio door where a child could reach the cord of a blind or curtain and get strangled Check this crib regularly before using it and do not use if any part is loose or missing or if ther...
Страница 4: ...n around a child s neck such as hood strings or pacifier cords DO NOT suspend strings over a toddler bed for any pacifier cords A child using the toddler or daybed should be at least 15 months of age...
Страница 5: ...ep 3 Mattress support assembly Page 8 Step 4 Headboard assembly Page 9 Step 5 Front rail assembly and hiding unused holes Page 10 Step 6 Toddler rail assembly Page 11 Step 7 Metal bed frame assembly P...
Страница 6: ...L B STEP 1 3 Align the locator pins on the end of the storage to the corresponding holes in the side rail panel left insert the side rail panel into the storage STEP 1 4 Attach the side rail panel to...
Страница 7: ...stall the bottom panel See DETAIL D STEP 2 2 Once the stabilizer rails are set gently tilt the crib as illustrated in DETAIL E STEP 1 3 Return the drawers to the storage by following the instructions...
Страница 8: ...in DETAIL H WARNING Set the mattress support to the desired height by adjusting the support arms The mattress support should be at its highest setting for newborns then adjusted to the lower position...
Страница 9: ...s STEP 4 2 Use Allen bolts CC lock washers and plain washers to attach the crib headboard to the side panels Please see DETAIL I and DETAIL J HARDWARE NEEDED FOR STEP 4 AA 1 4 x 2 3 16 Allen Bolt 4 pc...
Страница 10: ...through that correspond to the holes on the posts for both side rail panels with pre installed nuts Attach the front rail frame to the side rail panels by using Allen bolts AA with lock washers and p...
Страница 11: ...ail See DETAIL M After assembly re tighten all bolts to a snug fit DO NOT OVER TIGHTEN STEP 6 3 Visible unused holes can hurt your child s finger Please use Allen bolts EE provided Packed inside toddl...
Страница 12: ...y using Allen bolts FF with lock washers and plain washers into the sleeve nut on the other side See DETAIL O S T E P 7 4 F i l l t h e h o l e s l o c a t e d o n t h e t o p o f t h e s i d e r a i...
Страница 13: ...k the plastic peg by pulling black plastic peg on runner out See DETAIL Q STEP 8 2 Hold the drawer with both hands Carefully lift the drawer front up from the front metal pin then slide drawer forward...
Страница 14: ...umbs and push to hook the drawer at end of the runner See DETAIL S STEP 9 2 Hold the drawer with both hands Carefully lift the drawer front up from the front metal pin then slide forward to remove fro...
Страница 15: ...15 15 STEP 10 DRAWER HEIGHT ADJUSTMENT INSTRUCTIONS Adjust around gap of drawer by turning plastic button clockwise counterclockwise direction See DETAIL V Plastic button DETAIL V...