background image


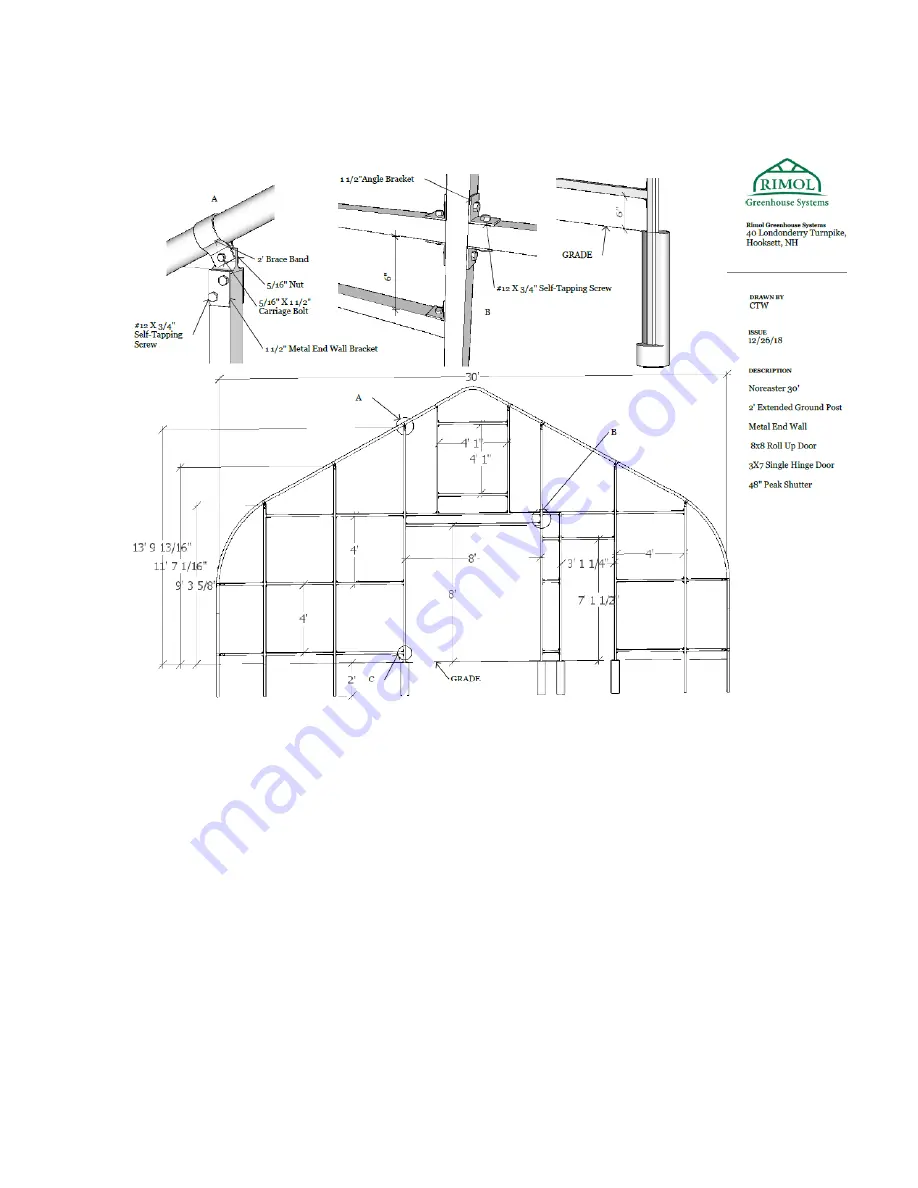
Example of a 8 x 8 roll-

up door, 48” gable shutter and steel framing on a high 

tunnel  


Example of a 8 x 8 roll-

up door, 3 x 7 hinged door, 48” gable shutter and steel 

framing on a high tunnel  


Содержание Nor' Easter 20-11

Страница 1: ...Nor Easter Greenhouse Installation Directions 603 629 9004 for Customer Support Version 20 11 ...

Страница 2: ...ciprocating saw with metal blade for polycarbonate or steel framing Extension cords RGS provides a care kit with a ground post driver a 5 16 magnetic driver for tek screws and wood mate screws a line level a 3 8 drill bit and mason line Always refer to your pick lists for parts to be used in each step of the construction process READ THROUGH EACH SECTION OF THE MANUAL FIRST BEFORE YOU ENGAGE IN TH...

Страница 3: ...Illustrated Parts List ...

Страница 4: ......

Страница 5: ...house and Installing Ground Posts Make sure your site location is clean and level as possible A level greenhouse is especially important from end to end and the site must not have more than a few inches of height difference ...

Страница 6: ...If you have rocky or very hard soil you should consider either renting a power auger or digging a continuous trench and backfilling it with clean soil ...

Страница 7: ...und posts you can either use the method below or you can set up stringlines using batter boards We provide a line level for you to make sure your string lines are level however for greenhouses 96 or longer we recommend using a laser level or a transit This is a laser level that can easily be rented ...

Страница 8: ...The depth of your ground post will be dependent upon which length that you have Refer to the diagram below to determine how far into the ground you will drive your ground post ...

Страница 9: ...If you have plated ground posts refer to the diagram below for attaching the ground posts to concrete ...

Страница 10: ...pick list and the diagram to determine how much of your ground post will be in the ground and out of the ground The bolt holes are at the top of the ground post Make sure your ground post is plumb and the holes at the top of the ground post are facing inside and outside of the greenhouse This is the ground post driver inserted into the ground post ...

Страница 11: ...the holes at the top of the ground post Pull the twine tight to get an accurate reading A laser line level or transit also works very well to get an accurate reading Next locate the right rear ground post widthwise from the left rear ground post to get the widthwise measurement Set up another string line and level the ground post To get the right front ground post correct you will need to check th...

Страница 12: ...0 wide structure 144 147 ft 34 width 144 148 Tip The way to determine the diagonal measurement is A x A B x B C x C A squared plus B squared equals C squared A is the width of the greenhouse B is the length of the greenhouse and C is the diagonal of the greenhouse For example 30 x 30 900 48 x 48 2 304 3 204 then take the square root of this which is 56 6 ft ...

Страница 13: ...6 bow spacing Using your long 100 tape measure and mark the locations of each ground post on the string lines Tip Alternatives to using the ground post driver include the following You can purchase a metal fence post driver from a hardware store or fence company These are useful when driving in taller ground posts that are 6 ft or higher and cost around 40 You can also rent or buy a gas powered po...

Страница 14: ...This is a fence post driver This is a gas powered post driver ...

Страница 15: ... ridge connector using 5 16 carriage bolts and nuts However with a ridge vent on one side of the ridge connector you will instead use 3 8 x 2 hex head bolt and nut provided in the ridge vent kit Only hand tighten Later you will be removing the nut to attach a special bracket for the vent braces Bow assembly with truss supports truss braces ...

Страница 16: ...s braces to the bow assembly Do not completely tighten any nuts and bolts You will need to have some flex when installing the bow assemblies into the ground posts Lay out your bows and ridge connector on a flat and clean surface The bows will connect to the ridge connector with an internal splice that is 8 long See photos Bow Internal Splice Ridge Connector ...

Страница 17: ......

Страница 18: ...Ridge Connector Bow ...

Страница 19: ... x 1 carriage bolts and nuts and brace bands as shown in the photo Slide 2 2 brace bands onto each side of the bow assembly Next you will assemble the two pieces of the truss support together Truss supports come in two separate pieces One piece has a swedged end and one piece has a non swedged end ...

Страница 20: ...This is what a swedge looks like This is the other end of the truss support Refer to your pick list for specific lengths of each part ...

Страница 21: ...e two pieces together slide a 1 3 8 brace band onto each tube Then insert the swedged piece into the non swedged piece and insert 2 12 x 1 tek screws into the connection as shown We provide a 5 16 driver These are tek screws ...

Страница 22: ...upport to the bow assembly as per the diagram using the brace band on the bow to connect to the truss support with the 5 16 x 1 carriage bolt and nut Hand tighten only and try to align the brace band on the green marks of the bow ...

Страница 23: ...mbly that will be installed into the ground posts is the bow assembly with the painted ends and holes drilled into the bows for the purlin connection on the end bows The 30 Nor Easter will have two holes on each side of the bow assembly and the 34 Nor Easter will have three holes on each side of the bow assembly Tip Prior to installing the bows slip one brace band on each side of the first bow ass...

Страница 24: ...emaining intermediate bow assemblies until you get the other end of the greenhouse If the holes of the ground post and bow do not line up use a pipe wrench to turn the ground post If the holes are slightly off with the inserts you can use a drift pin or a small screwdriver to move the insert to attach the bolt to the assembly ...

Страница 25: ... connector and ground post Purlin Installation You will begin by installing the ridge purlin The ridge purlin has holes drilled every 4 feet unless you have a special bow spacing for your greenhouse The first ridge purlin is 12 2 long The remaining ridge purlins are 12 3 long Attach using 5 16 x 4 carriage bolts and nuts through each connection The ridge purlin can be installed either on top of th...

Страница 26: ...nd bow with a carriage bolt and nut and the purlin should be placed on the underside of the bow The remainder of the purlin will be attached to the bows using the aluminum cross connectors The cross connectors use x 1 carriage bolts and nuts See photos of the cross connector and the use of the provided wooden jig to help with spacing to make sure the bows remain at a 4 on center measurement ...

Страница 27: ......

Страница 28: ... first bow and from the first bow to the second bow in all four corners using brace bands bolts and nuts as per the previous instructions See photo If you have a high wind kit install the extra wind braces in the upper part of the frame as per the photo Standard wind kit bracing shown The next page shows extra bracing installed with the optional high wind kit ...

Страница 29: ......

Страница 30: ...o the frame at your desired height using two 2 hole pipe straps per ground post connection Insert a 1 tek screw through each pipe strap to secure it to the frame of the greenhouse as shown On the ends of the greenhouse it is recommended to drill a 3 8 hole using the bit provided through the baseboard and ground post to bolt the baseboard onto the ground post See photo ...

Страница 31: ...make not of the dimensions 4 See examples of layouts for doors and equipment If you need further assistance on the layout please contact your salesman for more specific information 5 You will need 6 verticals per end wall Verticals should be set into concrete for stability One bag of concrete is sufficient as a footing 6 Horizontals should have a maximum spacing distance of 4 ft apart 7 See photos...

Страница 32: ... an 8 x 8 rough opening Note the framing requires a minimum of two pieces of either 2 x 4 lumber or 1 square tubing to support the weight of the door and to properly have enough surface area to attach the door to the frame HC Pre Hung or Sliding Doors part HCXXXX Double sliding doors rough opening is 3 less than door width and 1 less than door height Example 4 x 8 double sliding doors have a 93 wi...

Страница 33: ... you have a surface to attach the wire lock Coolair Fans part ACNBFXXX NBF24 33 h x 33 w NBF30 39 h x 39 w NBF36 45 h x 45 w NBF42 51 h x 51 w NBF48 57 h x 57 w Coolair Shutters part ACLRWXXX Add on to width and height of shutter Example 39 shutter is 39 x 39 Quietaire Fans part QTAGCSXXX AGCS24 29 h x 28 w AGCS30 35 5 8 h x 34 w AGCS36 42 h x 40 w AGCS42 48 h x 46 w AGCS48 54 h x 52 w Quietiare S...

Страница 34: ...VNS24 32 h x 31 w VNS30 38 h x 37 w VNS36 42 h x 41 w VNS48 56 h x 55 w J D Shutters part JDVRSGXXPS Same as Coolair shutters See above ...

Страница 35: ...Example of a 8 x 8 roll up door 48 gable shutter and steel framing on a high tunnel Example of a 8 x 8 roll up door 3 x 7 hinged door 48 gable shutter and steel framing on a high tunnel ...

Страница 36: ...Make sure the greenhouse is plumb Pull the greenhouse forward from one end to plumb the greenhouse String a line from one ground post to the other ground post to square up the ends ...

Страница 37: ...37 ...

Страница 38: ...38 ...

Страница 39: ...39 This shows how you can use an angle bracket to also connect framing lumber to the bows ...

Страница 40: ...40 ...

Страница 41: ...41 ...

Страница 42: ...42 Examples of framing and installation of a roll up door in the next series of photos ...

Страница 43: ...43 ...

Страница 44: ...44 ...

Страница 45: ...45 ...

Страница 46: ...46 ...

Страница 47: ...47 Examples of other framing ...

Страница 48: ...48 ...

Страница 49: ...y RGS are warranted if at all by the installers or manufacturers of such equipment and are not covered by this warranty RGS makes no warranties other than those stated above and specifically does not warrant that any of the RGS frames parts or products are of a merchantable equality or that they can be used for any particular purpose by the buyer RGS shall have the right to inspect any parts befor...

Страница 50: ...50 ...

Отзывы: