background image

1


SAFETY 


1.1 


INTRODUCTION 

 
Your Reimann & Georger Corporation Marine Products Canopy has been engineered to provide long term boat protection 
and safety advantages that no other type can match.  However, even a well-designed and well-built canopy kit can 
malfunction or become hazardous in the hands of an inexperienced and/or untrained user.  Therefore, read this manual and 
related equipment manuals thoroughly before installing your canopy to provide maximum safety for all personnel, and to 
get the maximum benefit from your equipment.   
 

WARNING:

DO NOT INSTALL THIS CANOPY WITHOUT STUDYING THIS ENTIRE MANUAL AND THE
MANUAL FOR THE LIFT ONTO WHICH IT IS BEING MOUNTED.  FAILURE TO DO THIS
CAN LEAD TO EQUIPMENT MISUSE WITH RESULTING DAMAGE AND/OR SERIOUS
PERSONAL INJURY.  CONTACT YOUR RGC

 MARINE DEALER IF YOU HAVE ANY

QUESTIONS.


1.2 


SAFETY DEFINITIONS 


A safety message alerts you to potential hazards that could hurt you or others or cause property damage.  The safety 
messages or signal words for product safety signs are 

DANGER

WARNING

, and 

CAUTION

.  Each safety message is 

preceded by a safety alert symbol and is defined as follows: 
 

DANGER: 

Indicates an imminently hazardous situation which, if not avoided, 

will 

cause death or serious injury.  This 

safety message is limited to the most extreme situations. 
 

WARNING: 

Indicates a potentially hazardous situation which, if not avoided, 

could 

result in death or serious injury. 


CAUTION: 

Indicates a potentially hazardous situation which, if not avoided, 

may

 result in minor or moderate injury.  It 

may also be used to alert against unsafe practices and property-damage-only accidents. 
 

1.3 


CANOPY SAFETY LABELS 


These labels warn you of potential hazards that could cause injury.  Read them carefully.  If a label comes off or becomes 
illegible, contact a Reimann & Georger Corporation dealer for a replacement. 
 

1.4 


CANOPY SAFETY RULES 


1. 


Do not install the canopy if it shows any signs of damage. 

 
2. 


Do not weld or otherwise modify any part of the canopy kit.  Such alterations may weaken the structural integrity of 
the canopy installation and void the warranty. 

 
3. 


Immediately replace any parts found to be defective. 

 
4. 


Do not use any part of the canopy kit for anything other than its designed purpose. 

 
5. 


Do not try to install the canopy under the influence of drugs, alcohol, or medication. 

 
6. 


Ensure that the lift frame is level and square before installing the canopy. 

 
7. 


Do not install the canopy in rough water conditions.


8. 


Keep people and pets clear during installation of the canopy.


Содержание 309525

Страница 1: ...UBE INSIDE TUBE JOINT Applies to P Ns 3609510 3609515 3609520 309525 3609540 3609560 3609530 3609545 3609565 3609550 3609570 3609555 3609575 3609557 3609580 3609585 REIMANN GEORGER CORPORATION MARINE...

Страница 2: ...Bundle 21 X 100 11 4 1 3 Canopy Bundle 21 X 108 12 4 1 4 Canopy Bundle 24 X 108 12 4 1 5 Canopy Bundle 24 X 116 13 4 1 6 Canopy Bundle 24 X 124 13 4 1 7 Canopy Bundle 26 X 108 14 4 1 8 Canopy Bundle...

Страница 3: ...ide Stringer Assembly 4 2 3 Mounting the Stringers 4 2 4 Mounting the Canopy Braces 5 2 5 Mounting the End Caps Plastic Caps and Canopy Ribs 6 2 6 Mounting the Center Bands 6 2 7 Velcro Strip Installa...

Страница 4: ...inently hazardous situation which if not avoided will cause death or serious injury This safety message is limited to the most extreme situations WARNING Indicates a potentially hazardous situation wh...

Страница 5: ...heel never reach through the spokes of the handwheel to perform any installation or maintenance on the canopy If the handwheel starts to spin freely do not try to stop it This can cause serious injury...

Страница 6: ...in the subassembly drawings of this section are the same as those listed in the parts lists of Chapter 4 1 Refer to Figure 2 1 Loosely attach 2 three hole plates 16 to the top hole of each canopy ext...

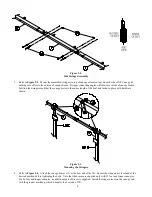
Страница 7: ...the entire length of the boat and fasten in place with hardware shown Figure 2 3 Mounting the Stringers 4 Refer to Figure 2 4 Attach the canopy braces 13 at the bow end of the lift Ensure the stringer...

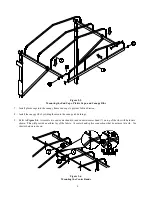
Страница 8: ...me by placing a carpenter or combination square into each corner and positioning canopy stringers and end caps to provide a 90 degree corner joint Tighten hardware to lock into position 6 Verify canop...

Страница 9: ...ll the canopy ribs by sliding them onto the canopy rib bushings 9 Refer to Figure 2 6 Assemble two end center band 6 and one mid center band 7 on top of the ribs with hardware shown This will provide...

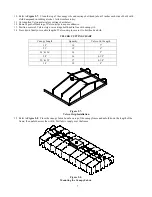
Страница 10: ...rip over carriage bolt head in line with canopy rib 14 Press down firmly over entire length of Velcro strip to secure it to bolt head and rib VELCRO CUTTING CHART Canopy Length Quantity Velcro Cut Len...

Страница 11: ...ole in canopy rib as shown Figure 2 9 Mounting the Bungee Hooks 17 Once the canopy is installed take special care in areas prone to high wind to anchor and stabilize the lift WARNING HIGH WINDS CAN TO...

Страница 12: ...9 Figure 2 10 Complete Canopy Framework...

Страница 13: ...before substances such as dirt or bird droppings are allowed to accumulate and become embedded in the fabric To clean brush off any loose dirt clean and hose down with a MILD solution of natural soap...

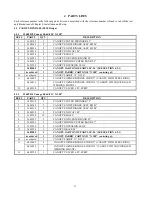
Страница 14: ...OPY FABRIC 18 X 100 11 6436905 8 CANOPY CORNER BUNGEE CORD 9 CANOPY WITH STEEL RING 6436910 8 CANOPY CORNER BUNGEE CORD 12 CANOPY WITH QUICKLASH WEBBING MOUNT 12 6403599 1 CANOPY VELCRO 6 FT STRIP 4 1...

Страница 15: ...Y CORNER BUNGEE CORD 12 CANOPY WITH QUICKLASH WEBBING MOUNT 12 6403599 1 CANOPY VELCRO 6 FT STRIP 4 1 4 3609525 Canopy Bundle 24 X 108 REF PART QTY DESCRIPTION 1 3609120 2 CANOPY CENTER STRINGER 114 6...

Страница 16: ...ANOPY CORNER BUNGEE CORD 12 CANOPY WITH QUICKLASH WEBBING MOUNT 12 6403599 1 CANOPY VELCRO 6 FT STRIP 4 1 6 3609560 Canopy Bundle 24 X 124 REF PART QTY DESCRIPTION 1 3609120 2 CANOPY CENTER STRINGER 1...

Страница 17: ...ANOPY CORNER BUNGEE CORD 12 CANOPY WITH QUICKLASH WEBBING MOUNT 12 6403599 1 CANOPY VELCRO 6 FT STRIP 4 1 8 3609545 Canopy Bundle 26 X 116 REF PART QTY DESCRIPTION 1 3609115 2 CANOPY CENTER STRINGER 1...

Страница 18: ...6910 8 CANOPY CORNER BUNGEE CORD 12 CANOPY WITH QUICKLASH WEBBING MOUNT 12 6403599 1 CANOPY VELCRO 6 FT STRIP 4 1 10 3609550 Canopy Bundle 28 X 116 REF PART QTY DESCRIPTION 1 3609120 2 CANOPY CENTER S...

Страница 19: ...8 CANOPY CORNER BUNGEE CORD 12 CANOPY WITH QUICKLASH WEBBING MOUNT 12 6403599 1 CANOPY VELCRO 6 FT STRIP 4 1 12 3609555 Canopy Bundle 30 X 116 REF PART QTY DESCRIPTION 1 3609125 2 CANOPY CENTER STRING...

Страница 20: ...ANOPY CORNER BUNGEE CORD 12 CANOPY WITH QUICKLASH WEBBING MOUNT 12 6403599 1 CANOPY VELCRO 6 FT STRIP 4 1 14 3609557 Canopy Bundle 32 X 116 REF PART QTY DESCRIPTION 1 3609127 2 CANOPY CENTER STRINGER...

Страница 21: ...ORD 12 CANOPY WITH QUICKLASH WEBBING MOUNT 12 6403599 1 CANOPY VELCRO 6 FT STRIP 4 1 16 3609585 Canopy Bundle 34 X 124 REF PART QTY DESCRIPTION 1A 3609163 2 CANOPY CENTER STRINGER 93 RH 1B 3609166 2 C...

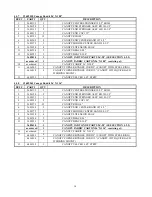
Страница 22: ...EW 19 5806255 16 3 8 16 X 3 HEX HEAD CAP SCREW 20 5803436 8 3 8 16 X 2 1 2 ROUND HEAD CAP SCREW SLOTTED 21 5806257 8 3 8 16 X 3 1 2 HEX HEAD CAP SCREW 22 5806141 36 3 8 16 LOCKNUT 23 5806287 4 1 2 13...

Страница 23: ...D CAP SCREW 19 5806255 16 3 8 16 X 3 HEX HEAD CAP SCREW 20 5803436 8 3 8 16 X 2 1 2 ROUND HEAD SCREW SLOTTED 21 5806257 8 3 8 16 X 3 1 2 HEX HEAD CAP SCREW 22 5806141 36 3 8 16 LOCKNUT 23 5806287 4 1...

Страница 24: ...sunlight mildew rot and normal atmospheric chemicals for a period of three 3 years from date of original purchase This limited warranty applies to the canopy fabric only It does not cover labor insta...

Страница 25: ...E 3 YEARS FROM THE DATE OF PURCHASE Some States do not allow limitations on how long an implied warranty lasts so the above limitations may not apply to you K QUESTIONS REGARDING LIMITED WARRANTY Any...

Страница 26: ...tion change on other products made after the Buyer s product was built M RIGHT TO MODIFY PRODUCT The Manufacturer has the right to modify this product at any time without incurring any obligation to m...

Страница 27: ...t is found to be defective in material and workmanship C MANUFACTURER S OBLIGATIONS The Manufacturer s sole obligation under either of these limited warranties is the replacement or repair at the Manu...

Страница 28: ...torms tornadoes sandstorms lightning floods and earthquakes 4 Damage under conditions caused by fire or accident by abuse or negligence by improper installation by misuse by incorrect operation by nor...

Отзывы: