background image

mini

User Manual

31

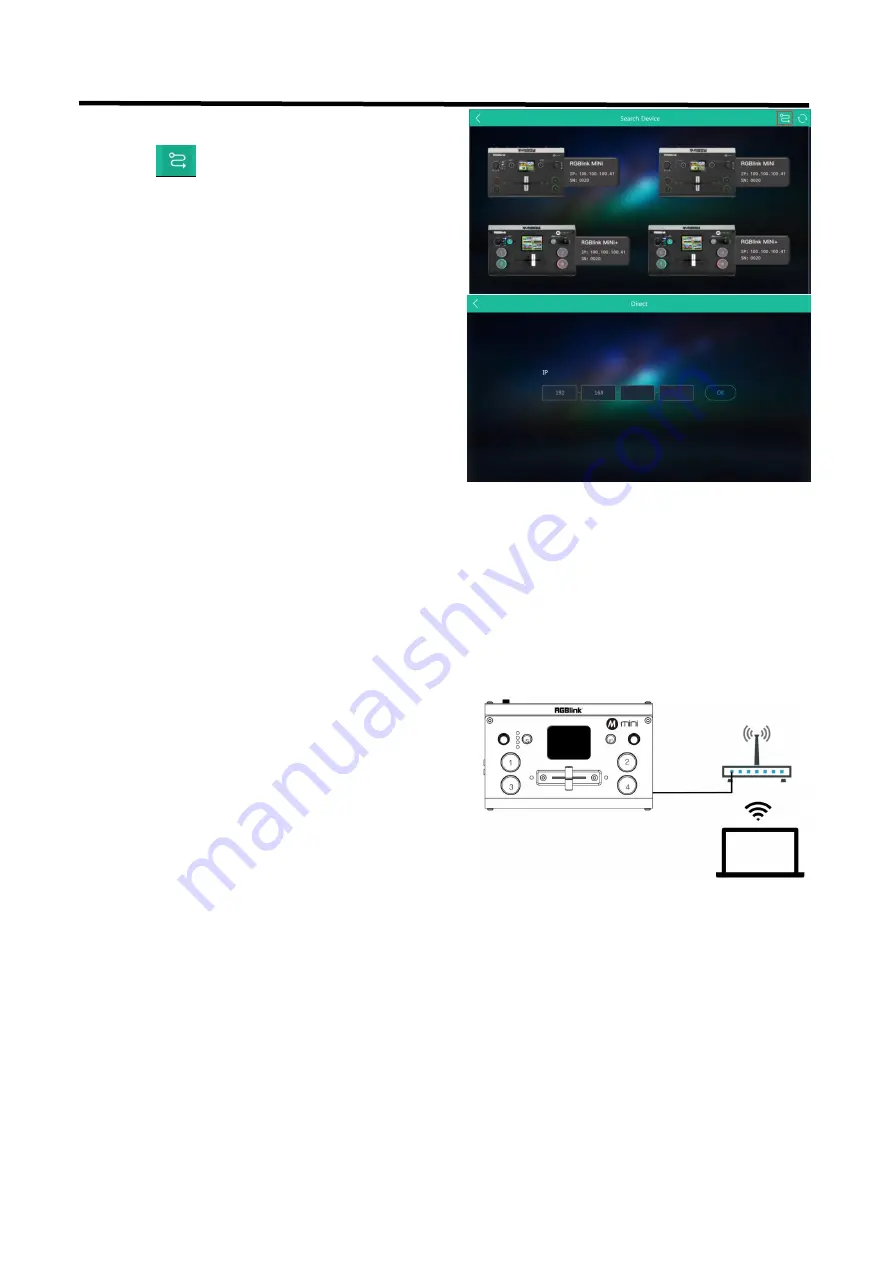
5.1.3 Connect Wirelessly with Your Router

The mini provides wireless control, so you can control it from a greater distance when the mini is not in your
immediate vicinity. A wireless router is required to use this feature. The computer receives the wi-fi signal from
the wireless router you connect the mini to.

Steps of wireless connection:

.

1. Open XPOSE mini and click on the icon in the upper

right corner

.

2. Enter the IP address of the currently connected mini.

1. Connect the mini to the router's LAN port.

2. Press the "M" button

Содержание Mini

Страница 1: ...1 User Manual Article NO RGB RD UM mini E000 Version NO V1 0 ...

Страница 2: ...hone and External Monitoring Devices 13 2 6 Connect USB as a Network Signal Source 13 2 7 Connect Computer and mini 14 Chapter 3 Use Your Product 15 3 1 Menu 15 3 2 S Button 19 3 3 Switch Source 22 Chapter 4 Streaming 24 4 1 OBS Streaming 24 4 2 vMix Streaming 27 Chapter 5 XPOSE mini Operation 29 5 1 Connect mini and computer 29 5 2 Using XPOSE mini 32 5 3 Upgrade 36 Chapter 6 Ordering Codes 39 6 ...

Страница 3: ... the case of special systems and software on the date of commissioning at latest 30 days after the transfer of risks In the event of justified notice of compliant RGBlink can repair the fault or provide a replacement at its own discretion within an appropriate period If this measure proves to be impossible or unsuccessful the purchaser can demand a reduction in the purchase price or cancellation o...

Страница 4: ...before connecting to the product input or output terminals A protective ground connection by way of the grounding conductor in the power cord is essential for safe operation Use the Proper Power Cord Use only the power cord and connector specified for your product Use only a power cord that is in good condition Refer cord and connector changes to qualified service personnel Use the Proper Fuse To ...

Страница 5: ...ontact your sales representative Once you have removed all the components from their packaging and checked that all the listed components are present visually inspect the system to ensure there was no damage during shipping If there is damage notify the shipping carrier immediately for all claims adjustments Site Preparation The environment in which you install your product should be clean properl...

Страница 6: ...3 0 Cable Power Adapter Note Power Adapter supplied as standard according to destination market For computers phones pads without HDMI port but with Type C interface you can convert Type C to HDMI Be sure that the Type C interface shall meet the USB 3 1 standard ...

Страница 7: ...ng with seamless switching there are other outstanding features such as audio embedding de embedding and automatically identifying color depth of RGB4 4 4 YUV4 4 4 YUV4 2 2 YUV4 2 0 mini devices are easy to operate either on board or remotely from mobile devices or laptops with XPOSE mini 1 2 1 Key Features USB3 0 live streaming Port 4CH HDMI inputs 2 TFT display on board to Live preview four inpu...

Страница 8: ...u and back button 4 PUSH Y Y turn knob to select menu item push to confirm PUSH Push knob to quickly switch HDMI Out between 6 Picture PVW and PGM when TFT is under the state of previewing 4 inputs 5 TFT display To display 4 inputs and menu 6 1 2 3 4 4 inputs 1 red is on air PGM 2 static green signal is standing by 3 flashing green ready to be switched 4 No light input source is not supported 7 T ...

Страница 9: ... or PGM 3 DC 12V 1 DC Jack for power input connect to 12V 4A power adapter 4 LAN Communication port to link dedicated software for control 5 USB USB3 0 output capture signal via third party streaming software and push to live broadcasting websites 6 AUDIO IN OUT AUDIO In analog audio input port connect to microphone with power AUDIO OUT analog audio output port connect to loudspeaker ...

Страница 10: ...mini User Manual 10 1 3 Dimension Following is the dimension of mini for your reference 180mm 113mm 49mm ...

Страница 11: ...y 2 2 Turn on Your mini The device will enter to the boot interface automatically after being powered on 2 3 Connect HDMI Input You can use any camera computer or other HDMI device as the input source of the mini It supports up to 1080P standard and 4 sources of different formats and resolutions at the same time If you are using interlaced signal mini supports one de interlacement to all interlace...

Страница 12: ...i also provides a powerful function to modify the output resolution you can use Y knob and M button in combination to adjust the output Connect LCD display to mini by HDMI cable to display 6 picture PVW Note The HDMI cable is not included in the mini package and needs to be purchased separately Some camcorders use a mini HDMI port you need to buy a mini HDMI HDMI cable separately when you use thes...

Страница 13: ...dio output so you can use external speakers or headphones to monitor the mini s main output audio signal in real time Connect microphone to Audio In and Loudspeaker to Audio Out 2 6 Connect USB as a Network Signal Source You can use the mini s USB port to use the mini as a webcam source and you can recognize the webcam signal from the mini on live streaming platforms like Zoom YouTube Facebook Twi...

Страница 14: ...tware control connect computer and mini with CAT6 cable Record and Stream connect mini s USB A and mini s USB 3 0 port with USB3 0 cable Note the color of USB3 0 port is blue Note The IP address of the mini must be in the same WLAN segment as the computer ...

Страница 15: ...f the input signal source If there is no input source it displays NO INPUT After mini is powered on push button M to enter the main menu Main Menu include Input HDMI USB 3 0 Audio Logo Overlay Ip Setting Language Reset Push M button MENU to enter main menu and select first menu item INPUT push Y knob to enter INPUT menu ...

Страница 16: ...Push Y knob to enter HDMI menu 2 rotate Y knob to select PVW output and PGM output for HDMI Output PVW or PGM Format 1920 1080 60 2 rotate Y knob to select PVW output and PGM output for HDMI Output Choose PGM or PVW Format 1920 1080 60 2 Rotate Y knob to select Audio Source AFV or LINE IN Audio Bar ON OFF 1 Push MENU rotate and push Y knob to enter the fourth menu item AUDIO ...

Страница 17: ...Select each segment with the Y knob then press to enter and set the value of each segment by pressing the knob again Set IP Address Automatically Use this setting if your network router has a D HCP server Select DHCP and set to ON manual setting is di sabled and the IP Address for mini is set from the network Note After setting IP address manually please restart the device 2 Rotate and push Y knob...

Страница 18: ...and rotate and push Y knob to enter the ninth menu item INFO INFO shows Device SN IP address MAC address MAC address MCU version Video version 1 Push MENU and rotate and push Y knob to enter the eighth menu item RESET 2 Rotate and push Y knob to select YES or NO ...

Страница 19: ... switch menu MODE and the LED indicator beside will light up 3 Push S button three times to enter menu PIP and the LED indicator beside will light up 4 Push S button four times to preview 4 inputs and the LED indicator beside will light up Each time the menu is opened the corresponding indicator light will be on and then rotate the PUSH knob Y to select and confirm 3 2 1 MIX Press S button to ente...

Страница 20: ...0s The steps are as follows Note In actual use the hard cut is only available in Quick Cut mode if you use T Bar mode it will automatically change to FADE 1 Push S button to enter transition effect menu MIX Transition effect as picture above 3 Press knob Y to confirm 2 Turn knob Y to select transition effect 1 Press the S button twice to enter the mode interface Mode include Fast and T Bar ...

Страница 21: ...ess the Y knob and wait for the option to turn yellow 3 Turn the Y knob to change the parameters 3 Press the Y knob to confirm 1 Select the signal you want for background When the letter is A it means background signal 2 Push S button three times to enter PIP setting page 3 Rotate Y button to select layout you want and confirm by Pressing 4 Push X button first and then push signal button for sub p...

Страница 22: ...ng the currently selected signal is being edited red constant the signal is currently on the main output unlit the source is not accessed or the resolution of the accessed source is not supported by the mini After transition effect MIX and transition mode MODE is selected In FAST Time Mode 5 Finally push the T Bar and the content you ve set will be taken to PGM T bar has to be totally left or righ...

Страница 23: ... Any MIX transition effect will be applied as the T BAR is moved Once the T BAR has been fully transitioned the indicator lights on sources buttons that are PGM and PVW will be swapped Note Source selection is locked when T BAR is in transition not entirely docked at a left or right position 1 Press a source button 1 2 3 or 4 that is green 2 Slide T Bar from left end to right end or reversely ...

Страница 24: ...to the latest version 1 Click icon 2 choose video capture device 3 Click video capture device to open up setting page 4 Choose RGBlink USB 3 0 Capture 5 Choose Video Format YUY2 Note If there is no video format YUY 2 after setting above check the USB 3 0 port connection Make sure it is linked to USB 3 0port on PC by USB 3 0 cable USB 3 0 cable or port is standard in blue while USB 2 0 is in black ...

Страница 25: ...io setting on OBS 1 Set Default for the audio source 2 Audio setting on OBS Choose Audio click Setting and choose audio device Mic Auxiliary Audio Device Synchronize Video with External Audio When the video itself doesn t have embedded audio and need insert external audio Here are the steps 1 Set the audio source Setting Audio Mic Auxiliary Audio Devices ...

Страница 26: ...ce and choose Filter 3 Click under Audio Video Filters and choose Video Delay Async 4 You can custom the filter name in the pop up window Click OK to confirm the filter name 5 Input delay value in ms the value need to adjusted until the video and audio is synchronous ...

Страница 27: ...lower right corner and click Stream Choose Stream Type as Streaming Service or Custom Streaming Server If choose Streaming Service there is a list of streaming service name available in the drop down list of Service If the streaming service is in the list choose it from the list If choose Custom Service just fill in URL and Stream Key 4 Paste the RMTP URL to Server or URL and Stream Key to Stream ...

Страница 28: ...ton 5 Complete the URL and Key information Click Start 1 vMix will begin streaming Note vMix does not support automatic recognition of the output resolution of mini Every time the output resolution of mini is modified the picture on vMix will pause The user needs to re select RGBlink USB3 0 Capture and manually input the current output resolution of mini ...

Страница 29: ...r Therefore you need to keep the mini on the same IP network segment as your PC or mobile device If the mini is connected directly to a computer you need to change the mini s IP manually to avoid IP conflicts on the same network segment Steps to modify mini s IP address 2 Change the PC s IP Address To ensure that the mini and the PC can communicate smoothly the IP address of the computer needs to ...

Страница 30: ...and Sharing Center 2 Click on Internet 3 Access to Properties may require administrator privileges 4 Under This connection uses the following items find Internet Protocol version 4 TCP IPv4 5 Select Use the following IP address and change the IP address to the same network segment as mini eg mini s IP address is 192 168 0 99 then the computer s IP address can be set to 192 168 0 1 255 Please make ...

Страница 31: ... immediate vicinity A wireless router is required to use this feature The computer receives the wi fi signal from the wireless router you connect the mini to Steps of wireless connection 1 Open XPOSE mini and click on the icon in the upper right corner 2 Enter the IP address of the currently connected mini 1 Connect the mini to the router s LAN port 2 Press the M button ...

Страница 32: ... the icon XPOSE and login the software Click Search to search mini device Install dedicated software named XPOSE to control mini Right click the setup exe file Choose Run as administrator to open the exe and install the software Note The Android and IOS versions can only connect wirelessly Regardless of whether you are using wireless or wired you need to make sure that the IP addresses are on the ...

Страница 33: ...desired device by SN and IP and enter the management interface The software interface is a simulation of operation panel on real mini device For example clicking Button M can open up menu as on the device If it is the first time for you to use XPOSE mini we suggest you watch our User Guide video Click the drop down arrow and click to play the User Guide video ...

Страница 34: ...pture H 265 When it is ON users can watch 4 inputs streaming back on XPOSE software Import the related OBS application if users need to do live streaming click Relate to confirm OBS slide ON to start streaming Note H 265 and OBS cannot work at the same time User choose either H 265 or OBS not both 5 2 2 Live Streaming 5 2 3 Test Pattern If you have used XPOSE mini before you can direct click MENU ...

Страница 35: ... LAN XPOSE mini provides a password protection function as an administrator you can set a password for the device controlling XPOSE mini and when you control the interface again you need to enter the password to control it 2 Select the mode of the test pattern 3 Adjust color Note If you have forgotten your password please restore the factory settings on the mini ...

Страница 36: ...8 0 99 in which case your computers IP address should be in the range 192 168 0 xxx xxx cannot be the same as mini or other device on the network to enable connection between the mini and your computer Check IP of PC If the T Bar is not in the correct position no other operation is possible t Bar correction is available in XPOSE mini The steps are as follow 1 Turn on the T Bar Calibration switch 2...

Страница 37: ... selected by default but please choose the Use the Following IP Address Step 8 Now put your desired IP Address according to your wish its correct format Change Subnet mask and default gateway if you want to Install XTOOL App Step 1 Extract the Firmware ZIP package into a folder Step 2 Navigate to the Upgrade Tool XTOOL folder Step 3 Right mouse click the XTOOL Soft Setup and Run as Administrator W...

Страница 38: ...on Connection Step 2 check the Net Comm option box Step 3 enter the IP Address of the mini as example above default mini IP is 192 168 0 99 remember computer and mini MUST be on the same subnet Step 4 click Confirm Step 1 After Connection XTOOL automatically matches the upgrade program and click the upgrade button to upgrade automatically Step 2 Monitor the progress DO NOT DISCONNECT OR POWER DOWN...

Страница 39: ...mini User Manual 39 Chapter 6 Ordering Codes 6 1 Product Code 230 0001 01 0 mini ...

Страница 40: ...mini User Manual 40 Chapter 7 Support 7 1 Contact US ...

Страница 41: ... 1024 60 1360 768 60 1366 768 60 1440 900 60 1600 1200 60 1680 1050 60 1920 1080 60 1920 1200 60 Output Resolutions HDMI SMPTE VESA USB H 265 720p 60 1080p 60 1024 768 60 1280 720 60 1280 768 60 1280 1024 60 1360 768 60 1920 1080 60 1024 768 60 1280 720 60 1280 1024 60 1360 768 60 1920 1080 60 Supported Standards HDMI 1 3 USB 3 0 H 265 ITU T H 265 ISO IEC 23008 2 Power Input Voltage DC 12V 1 5A Co...

Страница 42: ... SDI Serial Digital Interface Standard definition video is carried on this 270 Mbps data transfer rate Video pixels are characterized with a 10 bit depth and 4 2 2 color quantization Ancillary data is included on this interface and typically includes audio or other metadata Up to sixteen audio channels can be transmitted Audio is organised into blocks of 4 stereo pairs Connector is BNC HD SDI High...

Страница 43: ...isplayPort 1 1 allow a maximum bandwidth of 10 8 Gbit s 8 64 Gbit s data rate over a standard 4 lane main link enough to support 1920x1080 60Hz DP 1 2 Introduced on 7 January 2010 effective bandwidth to 17 28 Gbit s support increased resolutions higher refresh rates and greater color depth maximum resolution 3840 2160 60Hz DP 1 4 Publish on 1 Mar 2016 overall transmission bandwidth 32 4 Gbit s Dis...

Страница 44: ...a bayonet mount along with a long spring loaded ferrule to support the fiber USB Universal Serial Bus is a standard that was developed in the mid 1990s that defines cables connectors and communication protocols This technology is designed to allow a connection communication and power supply for peripheral devices and computers USB 1 1 Full Bandwidth USB specification was the first release to be wi...

Страница 45: ...separate streams SMPTE2110 is intended principally for broadcast production and distribution facilities where quality and flexibility are more important SDVoE Software Defined Video over Ethernet SDVoE is a method for transmission distribution and management AV signals using a TCP IP Ethernet infrastructure for transport with low latency SDVoE is commonly used in integration applications Dante AV ...

Страница 46: ...he protocol was developed for communication between electronical musical instruments and latterly computers MIDI instructions are triggers or commands sent over twisted pair cables typically using 5pin DIN connectors OSC The principle of Open Sound Control OSC protocol is for networking sound synthesizers computers and multimedia devices for musical performance or show control As with XML and JSON...

Страница 47: ...her to wait until the vertical interval to switch This avoids a glitch temporary scrambling which often is seen when switching between sources Scaling A conversion of a video or computer graphic signal from a starting resolution to a new resolution Scaling from one resolution to another is typically done to optimize the signal for input to an image processor transmission path or to improve its qua...

Страница 48: ...rincipal V1 0 2021 05 06 0000 Release Sylvia All information herein is Xiamen RGBlink Science Technology Co Ltd excepting noted is a registered trademark of Xiamen RGBlink Science Technology Co Ltd While all efforts are made for accuracy at time of printing we reserve the right to alter otherwise make change without notice ...

Отзывы: