


Press Button 0.1, 32 cues of RF32C will activated one by one in interval 0.1 second;
Press Button 0.2, 32 cues of RF32C will activated one by one in interval 0.2 second;
The same will other numeral buttons.
Press Button ALL, 32 cues of Bank will activated simultaneously.
C. Before Use
1) Power connecting
Inner batteries: Screw out Battery Cover #20 in the chassis, and put 10x AA
battery into Battery Enclosure #21 and screw up the cover.
External batteries: Plug alligator clip wire into External Battery Jack #18, and
use red alligator clip to connect the anode of the SLA batteries, and black alligator
clip to connect the cathode.
When external batteries are connected, inner batteries will be cut off automatically.
You don’t need to have the both powers connected in the same time, any one only
will work.
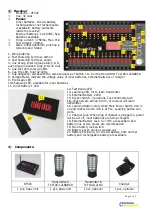
2) Check if all parts of receiver work normally
Step 1: Shift Main Switch #19 to check power supply, corresponding battery LED
#11 or #14 should be turned on;
Step 2: Shift Rocker Switch #15 at Test, Test Ready LED #12 should be on, in the same time all Cue Test
LEDs #5 and Cue Fire LEDs #6 should be turned on.
Step 3: Shift Rocker Switch #15 at Fire, Fire Ready LED #9 should be on, and all Cue Test LEDs #5 and
Cue Fire LEDs #6 should be off.
Step 4: Shift Main Switch #19 to Off.
Important:
If any Cue Fire LED #6 is only kept on and all Cue Test LEDs #5 are off during the procedure
of the steps above, the channel is shorted out, don’t connect any e-match or igniter to the channel!!! The
cue will fire e-match or igniter without any operation, it may have damage to body and the board may burn
out.
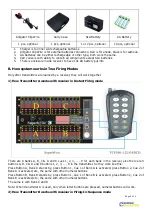
3) Learn transmitters
Clear code in receiver first: Turn on Main Switch #19, shift Rocker Switch #15 at Fire, Press Learning
Button #16 and don’t release for more than 6 seconds, Learning LED #13 will be turned on and then 3
seconds later blink three times, the code is cleared successfully
Learn Transmitter A: Press Learning Button #16 and don’t release until Learning LED #13 is turned on,
then press any button of Transmitter A within 3 seconds, Learning LED #13 will blink one time and then off,
learning succeeds.
Learn Transmitter B: After Transmitter A is learned, press Learning Button #16 and don’t release until
Learning LED #13 is turned on, then press any button of Transmitter B within 3 seconds, Learning LED #13
will blink one time and then off, learning succeeds.
Check if learning succeeded: After learning, in Transmitter A, press any one of Button A, B, C & D and
then press any one of Button 1 to 8, the correlative Cue Fire LED should be turned on and off after 0.5s; In
Transmitter B, press any button, the 32 Cue Fire LEDs should be turned on and off in the correlative interval
one by one. Otherwise the learning didn’t succeed and you can do the same procedure above again.
Note: receiver can store the codes of one transmitter A and one transmitter B only, if you have another
transmitter A or B learned by the receiver, the former transmitter A or B will be replaced.
Warning: Only when no e-match or igniter is connected, you can Learn transmitter or Clear
transmitter!
D. How to Use
1) Have transmitters and receiver work together.
Page 5 of 6