18
IV. How to Setup the IP Address for your Digital KVM via IP
Please click on
Network config to get the following image.
.
Страница 1: ...for your Digital KVM via IP V How to Edit the User Accounts VI How to Setup your Digital KVM via IP System Identification 21 VII How to Strengthen your Digital KVM via IP System Security 22 VIII How...
Страница 2: ...g Optional Serial Supervisor Module IPMI supported with the R Port 59 Appendix H Using Optional Modem Feature 67 NOTE Since firmware for our Digital KVM via IP Products is constantly evolving to offer...
Страница 3: ...Optional cables for PS 2 computers CBMxxxH CBMxxxUH 1 to 3 cable for PS 2 computer 1 to 2 cable for USB computer...
Страница 4: ...ent point for multiple computers B Package Contents Your package should contain the following 1 x Digital KVM via IP unit 1 x Power Adapter 1 x AC Cord for Power Adapter 1 x User s Manual 1 x Rack Mou...
Страница 5: ...Host Computer s and Client Computer The First Way Using the IP OSD step by step menu Recommended Hardware Necessary for this way I A Digital KVM via IP unit with a power adapter II A keyboard and moni...
Страница 6: ...online Step 3 Power up the monitor and Digital KVM via IP the IP OSD menu comes up automatically simply follow the step by step instructions to finish the initial setup If you would like to bring up...
Страница 7: ...unit with a power adapter II A computer with a keyboard mouse and monitor III A CAT 5 cable with RJ 45 connector IV A DB9 RS 232 null modem cable Step 1 Connect the DB9 RS 232 null modem serial cable...
Страница 8: ...minal as following Step 3 If you never setup your HyperTerminal before it will ask you to input your phone area code please feel free to do so and then click OK you will get the following screen Pleas...
Страница 9: ...6 Step 4 Choose the proper serial port you connect for example COM1 Step 5 Change Bits per second to 115200...
Страница 10: ...ollowing screen Step 7 Follow the instruction on the screen For example simply type I for setting your IP type F for resetting everything back to factory defaults and so on Here is a reminder for you...
Страница 11: ...1 From the Control Panel click on Mouse 2 From Mouse Properties click on Motion tab 3 Make sure the Pointer speed bar is centered and Acceleration is set to None Windows XP and Windows Server 2003 1...
Страница 12: ...9 C How to Connect your Digital KVM via IP Example of 16 port Digital KVM via IP Connection Example of UCIP 16 Connection...
Страница 13: ...dure for each PS 2 enabled managed computer You will be able to add additional managed computers later with the Digital KVM via IP powered on b If you are using USB connections to your managed compute...
Страница 14: ...word you will get the following screen Please simply double click on the small square window in the middle of the screen You ll get the VNC screen You may need to upgrade or download your Java support...
Страница 15: ...he LAN port by your DHCP server as identified in the previous section or b the fixed IP address you setup see Quick Start Guide for more information Again the default IP address of the LAN port of Dig...
Страница 16: ...browser or the Java VNC client always choose the option to continue Step 2 The Home Screen The Home screen serves two functions First it is a place to check the status of the unit view essential syste...
Страница 17: ...ve a login account for local access and a different one for remote access The local account would select 16 bit color max bandwidth and so on And the remote account would select 8 bit color low bandwi...
Страница 18: ...15...
Страница 19: ...16 II How to Get the Snapshots As the following image shown the user can get the screen snapshot of full size half size quarter size one 8th size and one 16th size...
Страница 20: ...e Host Computer s Please simply click the VNC Connect to get the screen of host computer as the following image shown From here you get the fully control on the host computer like you physically sit i...
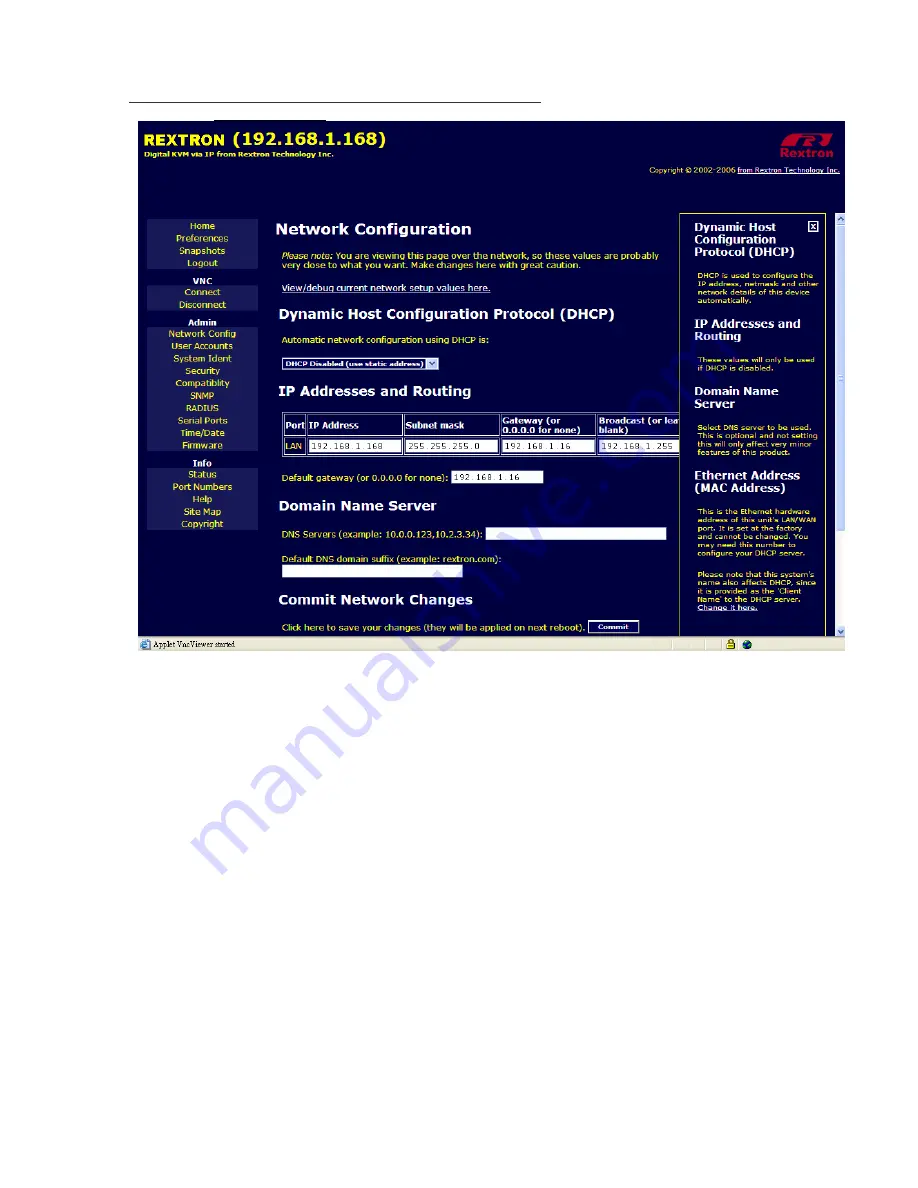
Страница 21: ...18 IV How to Setup the IP Address for your Digital KVM via IP Please click on Network config to get the following image...
Страница 22: ...e IP Addresses and Routing table below IP Addresses and Routing This table allows you to assign IP information for the LAN port If you are using DHCP the values for the LAN port will be filled in auto...
Страница 23: ...t have the authority to change settings but can access the Web interface and log in the VNC console Selecting Delete permanently removes the user from the system If you enter values for a user that do...
Страница 24: ...following image Right here you can define the following details machine name location contact name network address description These details are useful for the DHCP servers SNMP agents and VNC clients...
Страница 25: ...r Password The administrator can change the default password for admin recommended Read and consider the comments and instructions on this menu before making any changes as changing these features cou...
Страница 26: ...nd prompts generated by the firmware We call this second method fancy login If it is enabled fancy login will be required from Java VNC clients as well which is unfortunate because the one time passwo...
Страница 27: ...cess right to control the host computer s 2 Enable Network user given priority under this mode the local user has NO right to control the host computer s And on the screen there is an IP OSD menu pops...
Страница 28: ...the wrong value is used here special language keys will not work and some basic symbols such as may not even work correctly The key layout of the remote keyboard must match the key layout of the local...
Страница 29: ...nothing empty The default value is public Read write Community This community is allowed to read and change any value You should make this value unique and keep it confidential for security reasons a...
Страница 30: ...be specified numerically Leave blank if not needed X How to Setup RADIUS authentication Please click on RADIUS to get the following image The RADIUS server requires the IP address the UDP port number...
Страница 31: ...nnecting via VNC a login screen is generated that asks for a RADIUS username and password XI How to Setup and Control the External Serial Consoles Please click on Serial Ports to get the following ima...
Страница 32: ...following image Allow you to set your Digital KVM via IP to Local Time or Universal Coordinated Time GMT Date and time is stored without consideration for time zone If you are controlling multiple si...
Страница 33: ...r Firmware Please click on Firmware to get the following image The firmware of Digital KVM via IP is online upgradeable upgrading to the latest version please login as admin That is only the administr...
Страница 34: ...o multiple units manually Manual Upload Enter the name of the firmware file that you received from Rextron Technology Inc into the field provided or use the Browse button Press Start Upload and wait u...
Страница 35: ...together into one PEM file There should be no encryption on the private key and it must be first in the file Therefore we expect a text file in this format BEGIN RSA PRIVATE KEY based64 encoded key E...
Страница 36: ...rrent Users it shows the users list that currently log in Current Connection it shows the current IP and what encryption you are using to log in Digital KVM via IP Network Config these tables allow yo...
Страница 37: ...up Port Number Please click on Port numbers to get the following image This menu shows all network servers running on this machine For the security reasons some services may be disabled or moved to no...
Страница 38: ...35 XVII How to Speed Up your Digital KVM via IP There are 2 ways to speed up the VNC screen connection 1 Please click on Preferences to get the following image...
Страница 39: ...ar refers to Chapter 5 section C How to Use the Bribar down there please click on Menu refers to Chapter 5 section D How to Use the Main Menu Should you find B W on the screen click the proper bandwid...
Страница 40: ...es as though you were at a local console A Cascade Configuration You can connect a second level of KVMs to one or more of your Digital KVM via IP s PC 1 8 ports The KVM switches connected to the Digit...
Страница 41: ...UM 108D 116D models offer F5 see Function key F5 1 MNIP 04 08 16 WMM 001 108D 116D and WUM 001 models do not offer F5 function By hitting the left Ctrl key twice within two seconds you may see the Hot...
Страница 42: ...en if the unit is powered down Function key F2 To switch the eye mark of a computer on or off First use the and arrow keys to highlight it then press F2 to switch its eye mark on or off If Scan Type i...
Страница 43: ...ess of computer power status The non volatile memory stores the Scan Type setting Scan Rate Sets the duration of a computer displayed in Auto Scan mode The options are 3 seconds 8 seconds 15 seconds a...
Страница 44: ...e Hotkey Menu every time the left Ctrl key is pressed twice Left Ctrl refers to the Ctrl key located at the left side of the keyboard 1 8 A H refer to the number keys 1 to 8 at the upper row of the ke...
Страница 45: ...our BIOS and any operating system left Ctrl left Ctrl F4 1 The unit switches between rates of 10 15 20 and 30 characters sec Audio Stick A multimedia module can be LINKed to the back of the Master swi...
Страница 46: ...is a standard SSH server running on port 22 the standard SSH port Once connected via SSH the VNC traffic is tunneled through the SSH connection and encrypts the VNC session Each method will be discuss...
Страница 47: ...om RealVNC www realvnc com This source base is the original version of VNC maintained by the original developers of the standard For a commercial supported version of VNC you should consider TridiaVNC...
Страница 48: ...above one will be shown This tells you which system you are controlling what encryption algorithm was used and what key strength is currently in effect Click anywhere inside the window to clear it or...
Страница 49: ...ends the key sequence to host closes windows KVM Calls up the KVM menu refers to Chapter 4 for more informaton 1 8 A H Select specific port simply by one click on the number Menu Shows the main menu r...
Страница 50: ...corner Here is a guide outlining various fields from the Main Menu Most of the functions operate immediately Other functions require a response to a confirmation prompt first before performing the re...
Страница 51: ...ned with the Digital KVM via IP this key makes accessing their built in menu easier especially from the Java client This button will only be shown when an external KVM has been enabled via the web int...
Страница 52: ...the system will calibrate color for the best possible picture in approximately one minute If the system cannot find the test pattern on the screen it will say so Check that the pattern isn t scaled or...
Страница 53: ...ormal for the first time you connect to any machine running SSL You should answer yes so that your SSL client saves the public key of this host and doesn t re issue this warning Forgotten the master p...
Страница 54: ...ontrol Panel set the VGA output of your computers to match the highest resolution of the LCD monitor with Large Font selected Master Slave does not work or there is a double KVM OSD Make sure that the...
Страница 55: ...one Connect computer to the Digital KVM via IP and power this computer on Power on the Digital KVM via IP while pressing the ESC key on the keyboard connected to it This will switch the DTE Serial Por...
Страница 56: ...local console USB Keyboard for UCIP 01 04 08 16 local console Only USB Mouse for UCIP 01 04 08 16 local console Only LAN RJ 45 Serial Supervisor RJ 14 DB9 RS 232 Male DTE DC in UCIP UNIP MNIP 01 1 x...
Страница 57: ...ack to the defaults press and hold around 8 seconds IP SETUP button Press once to bring up the IP OSD helping the user the step by step initial setup very easily without studying the user s manual Reg...
Страница 58: ...erver Standardized real time KVM network protocol Compatible with existing VNC client software VNCS SSL tunneled VNC VNC protocol tunneled via SSLTLS encryption For secure real time control of the ser...
Страница 59: ...equential or otherwise loss of profits loss of business or any pecuniary loss arising out of related to the use of the product exceed the actual price paid for the product Some states do not allow the...
Страница 60: ...C Rules for a class A digital device and also with European standards EN55022 Operation is subject to the following conditions 1 this device may not cause harmful interference and 2 this device must a...
Страница 61: ...the Digital KVM via IP any more vulnerable to outside attacks Can I prevent the warning from occurring Yes You have two options that may prevent the warning from occurring First if the Web browser you...
Страница 62: ...n the Serial Supervisor please feel free to choose any one of them Once you have added the first computer to Digital KVM via IP by using the Serial Supervisor you can connect the second computer by us...
Страница 63: ...his link will open a separate Web page that will display the last 200 characters committed to that device s console log Note that existing data is overwritten automatically when the 200 character limi...
Страница 64: ...rface At the command prompt type connect x where x is the number of the Serial Supervisor device you wish to manage Alternatively you can enter the command connect l to see a list of active devices Op...
Страница 65: ...orts via an add in card if you need a serial port for other purposes i e modem Enabling IPMI support usually requires enabling options in the host computer s BIOS setup software and the instructions w...
Страница 66: ...of cable you will use to make the connection The DTE Serial port on the front panel requires the use of a null modem serial cable Connect a female end of a serial cable to the serial port that is con...
Страница 67: ...of security for the BMC ensure the password you enter on the menu offers sufficient authority to control chassis power and monitor fan status Once you have made the necessary changes on this screen c...
Страница 68: ...ndow Examples Accessing IPMI Controls There are two ways to access power controls for the managed computer The first is through the Home screen on the Web interface The second is through the Bribar du...
Страница 69: ...t computer VNC If you are inside an active VNC session and are logged in as admin you can use the Bribar to access IPMI features ou have two choices from the Bribar Reset Equivalent to pressing the RE...
Страница 70: ...e this feature through a PBX system it may require some experimentation and additional support from your telecom services provider and is not supported by Rextron Activating the Modem Option A system...
Страница 71: ...000 bps do not indicate a problem with the modem or the but simply reflect the line conditions at the time the connection is made The SERIAL port on the rear panel must be used for the modem connectio...
Страница 72: ...network connections Step 3 Click Create a new connection under Network Tasks Step 4 The New Connection Wizard window will open Click Next Step 5 Select Connect to the Internet and click Next Step 6 S...
Страница 73: ...connection will be grayscale to conserve bandwidth If other users are connected while a PPP session is active their screens will be in grayscale as well When PPP in inactive color is automatically re...
Страница 74: ...t okay The modem has responded appropriately to the init string Saw PPP startup from client A PPP authentication has occurred and a session has started Phone line rings An incoming call has been detec...
Страница 75: ......