


7
Config Menu
Cellpro Multi4
Firmware VX.XX
Start
Apply power to charger
Press & Hold
Mode
button
Press & Hold to set Amps
Press & Hold to
set Auto Start
CHOOSE SPLY AMPS
LIMIT @ X.XXA
USE AUTO START
>Yes
EXIT
Hold for More
USE AUTO START
>Yes
USE AUTO START
>No
CHOOSE SPLY AMPS
LIMIT @ X.XXA
Release
Release
Press to change Amps
Press
Press
Release
to Preset Menu (see page 4)
Other User Preset operations
n
To remove a User Preset:
See “Clearing a User Preset.” Thereafter, that slot will show
EMP-
TY PRESET
until you load a Library Preset into it.
n
To load a Library Preset into any slot:
See “Loading a Library Preset.” If the slot was empty,
this will create a new User Preset; if the slot already had a User Preset, this will overwrite it.
n
To back up / restore presets using the Charge Control Software:
See “Working with files.”
Strategies for organizing User Presets
Suppose all your packs can be handled with a small group of User Presets, and you don’t need
any of the other User Presets (at least not now). What’s the most efficient way to organize your
core presets?
n
If you aren’t using the Charge Control Software: Follow the instructions in “Loading a Li
-
brary Preset” to put your core presets in adjacent slots. Use the instructions in “Clearing a
User Preset” to remove the User Presets you don’t need. Now, when you move through the
Preset Menu on the charger, use the “reverse press” technique when you see
EMPTY PRESET
in the display—that will let you quickly move forward and back through your core presets.
n
If you are using the Charge Control Software: In the
Presets
tab, drag the presets you want
to the top of the list. For the presets you don’t need, set their visibility to
Hide
. Finally, click
Update Charger
. Now, only your core User Presets will appear in the Presets Menu. (De
-
tails are in “Using the Charge Control Software.”)
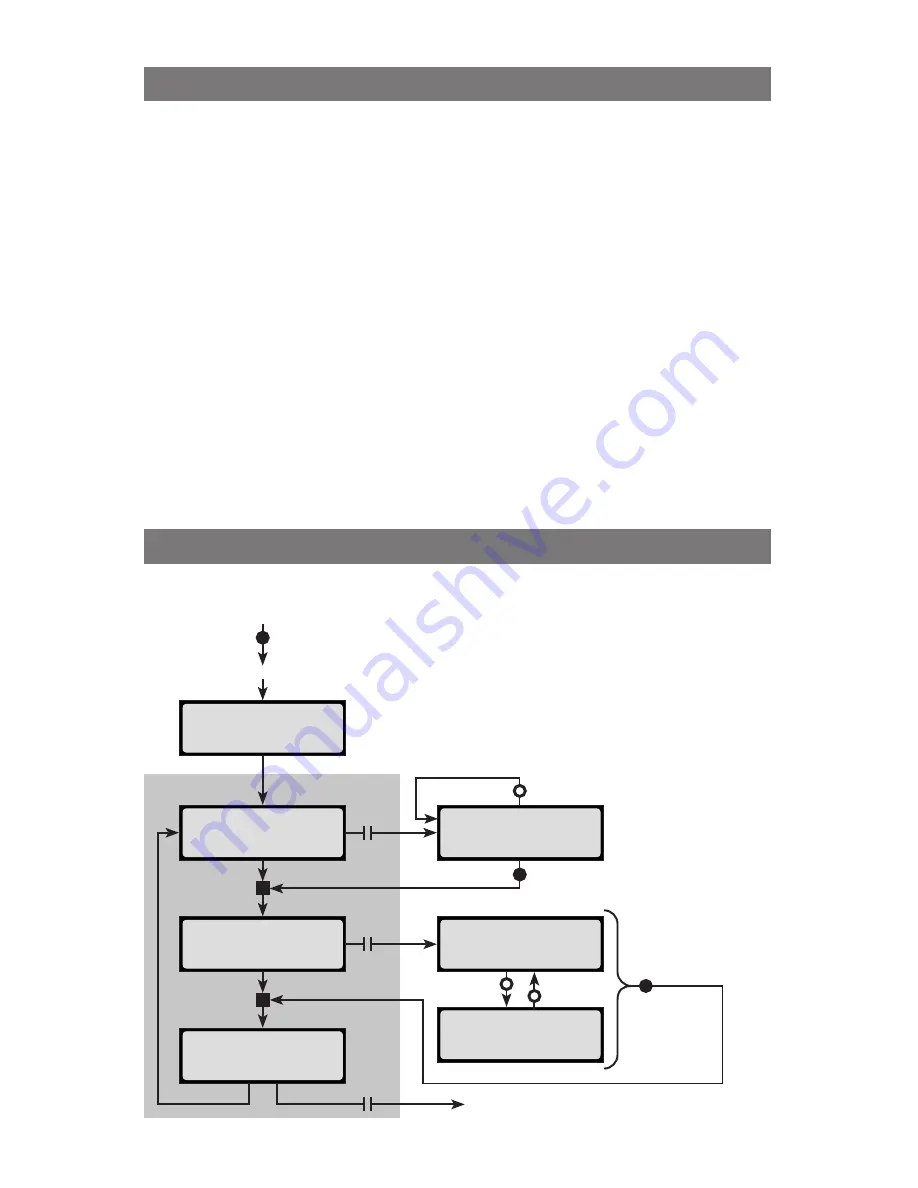
Configuring input current limiting and Auto Start
Press and hold the
Mode
button while applying power to the charger to access the
Config Menu
.
n
CHOOSE SPLY AMPS
limits how much current the char-
ger draws from the power supply.
n
USE AUTO START
:
Yes
enables you to start charg-
ing using the selected preset simply by connecting the
pack.
No
requires you to start charging using the
START
CHARGE
screen in the Operations Menu.
(These can also be set via the Charge Control Software.)


