background image

3

2

3

1

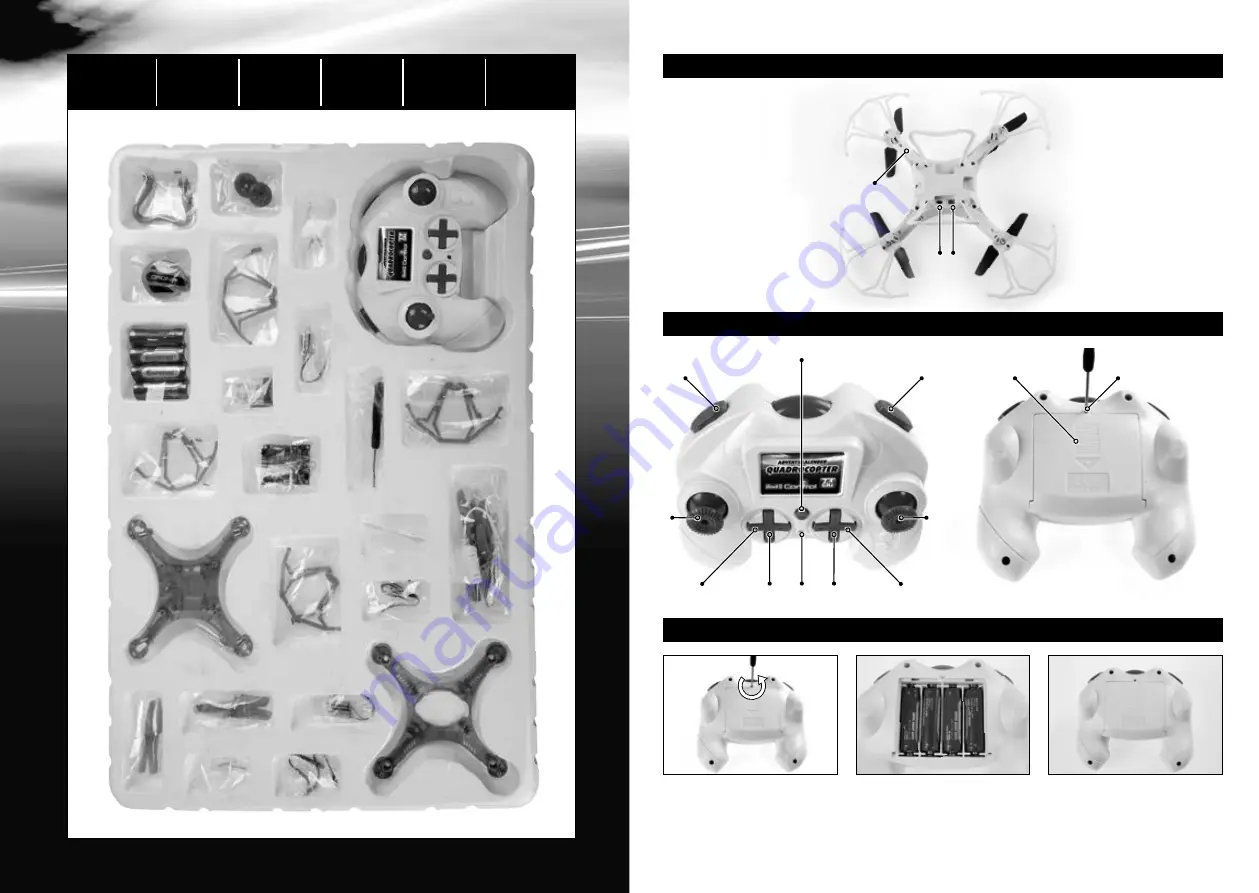
1A

2G

2H

2C

2E

2D

2F

1C

1B

2L

2J

2K

2I

2A

2B

3A

3B

3C

2

Contenuto

Contenido

Inhoud

Contenu

Table of 

contents

Inhalt

Содержание Advents Calendar

Страница 1: ...VEL HEADLESS MODE ERSATZTEILE REPLACING SPARE PARTS EPIÈCES DÉTACHÉES RESERVEONDERDELEN PIEZAS DE REPUESTO PEZZI DI RICAMBIO V 02 05 45008 45013 45019 45012 45018 45022 45009 45014 45020 Body Rumpf landing skid rotor protection Landekufen Schutzbügel rotor set Rotorset charger USB Ladegerät battery Akku motor set Motorset LED lights LED Lampen gear set Getriebeset PCB Steuerungs Platine ...

Страница 2: ...3 2 3 1 1A 2G 2H 2C 2E 2D 2F 1C 1B 2L 2J 2K 2I 2A 2B 3A 3B 3C 2 Contenuto Contenido Inhoud Contenu Table of contents Inhalt ...

Страница 3: ...7E 7F 7G 7H 4 4A 4B 8 7C 7D A B A B 5 5A 5B 5C 5D 2A 6 6C 2B 2A 6A 6B 2D 7 2A 7A 7B 2A 2B 2B 2B 2B 2A 2A 5 4 ...

Страница 4: ...en nicht geladen werden Aufladbare Batterien dürfen nur unter Aufsichtvon Erwachsenen geladen werden Ungleiche Batterietypen oder neue und gebrauchte Batterien dürfen nicht zusammen verwendet werden Es dürfen nur die empfohlenen Batterien oder die eines gleichwertigen Typs verwendet werden Batterien müssen mit der richtigen Polarität und eingelegt werden Leere Batterien müssen aus der Fern steueru...

Страница 5: ...MODELLS Achtung Vor dem Laden und nach jedem Flug müssen Akku und die Motoren ca 15 30 Minuten abkühlen andernfalls können sie beschädigt werden Der Ladevorgang ist ständig zu überwachen Für den Aufladevorgang ist immer auf eine feuerfeste Unterlage und eine brandsichere Umgebung zu achten Das USB Ladegerät in einen USB Steckplatz mit mindestens 500 mAh Leistung einstecken Zum Laden muss der Akku ...

Страница 6: ...twärts 2B steuert Ein Beispiel Würde man das Modell um 180 drehen und auf sich zu fliegen müsste man Vor Zurück und Seitwärts umdenken also entge gengesetzt steuern Aktiviert man den Headless Mode ist das nicht mehr nötig da der interne Prozessor die Steuerrichtungen immer automatisch umrechnet Ein weiterer Druck auf die Taste 2H deaktiviert den Mode Das Modell immer auf eine ebene Fläche stellen ...

Страница 7: ...ehende A und linksdrehende B Rotorblätter gibt 8 WECHSELN DER ROTORBLÄTTER FEHLERBEHEBUNG Problem Die Propeller bewegen sich nicht Ursache 1 Keine bestehende Verbindung 2 Der Akku ist zu schwach bzw leer Abhilfe 1 Alles ausschalten und in der richtigen Reihenfolge einschalten 2 Den Akku aufladen Problem Das Modell stoppt ohne ersichtlichen Grund während des Flugs und sinkt ab Ursache Der Akku ist ...

Страница 8: ...batteries must be avoided Only recommended batteries or those of an equivalent type may be used Batteries must be inserted according to the correct polarity and Depleted batteries must be removed from the remote control The connection terminals may not be short circuited Remove the batteries from the remote control if they are not to be used for an extended period of time Charging unit safety inst...

Страница 9: ...re the battery cells There is a risk of explosion The LiPo battery must be kept out of reach of children When disposing of batteries they must be discharged or their capacity must be fully depleted Cover exposed terminals with adhesive tape in order to prevent short circuiting Maintenance and care Please only use a clean damp cloth to wipe off the model Protect the model and batteries from direct ...

Страница 10: ... the model around to the left by moving the control for thrust and rotation 2A to the left 7H Turn model around to the right by moving the control for thrust and rotation 2A to the right Button 2H Pressing this button activates Headless mode Headless mode supports be ginners in the initial stages Regardless of where the quadrocopter turns the direction of flight always corresponds exactly to the d...

Страница 11: ... The model stops and descends during flight for no apparent reason Cause The battery is too weak Remedy Charge the battery Problem The model cannot be controlled with the remote control Cause 1 The ON OFF switch is in the OFF position 2 The batteries were not inserted correctly 3 The batteries do not have enough power Remedy 1 Set the ON OFF switch to the ON position 2 Check whether the batteries ...

Страница 12: ...s anciens et nouveaux appareils dans votre assurance responsabilité civile Demandez une confirmation écrite et conservez la en lieu sûr Autrement la société DMFV propose une adhésion d essai gratuite sur Internet www dmfv aero comprenant l assurance Consignes de sécurité pour la télécommande Pour la télécommande nous recommandons l usage de piles alcalines au manganèse Pour préserver l environneme...

Страница 13: ...geur n est pas un jouet Le chargeur de la batterie Li Po est conçu uniquement pour le chargement de la batterie du modèle Son utilisa tion est limitée au chargement de la batterie du modèle ne pas l utiliser pour le chargement d autres batteries Le modèle est équipé d une batterie Li Po Lithium Polymère recharge able Veuillez respecter les consignes de sécurité suivantes Ne jamais jeter les batter...

Страница 14: ...eusement les consignes suivantes Diriger légèrement la commande des gaz vers le haut et faire monter l hélicoptère à une hauteur de 0 5 à 1 mètre 6A Si le modèle se déplace de lui même rapidement ou lentement vers la gauche ou vers la droite pousser graduellement le compensateur de vol en translation latérale 2E dans la direction opposée 7G Pour faire tourner le modèle vers la gauche diriger légèr...

Страница 15: ...pparente pendant le vol et perd de l altitude Cause La batterie est trop faible Solution Charger la batterie Problème Le modèle ne répond pas aux ordres de la télécommande Cause 1 L interrupteur ON OFF est en position OFF 2 Les piles ne sont pas correctement insérées 3 Les piles sont déchargées Solution 1 Mettre l interrupteur ON OFF en position ON 2 Vérifiez que les piles sont correctement inséré...

Страница 16: ...n mogen niet worden opgeladen Oplaadbare batterijen mogen alleen onder toezicht van volwassenen worden opgeladen Gebruik geen batterijen van verschil lende typen of nieuwe en gebruikte batterijen door elkaar Gebruik uitsluitend de aanbevolen batterijen of batterijen van een gelijkwaardig type Plaats batterijen altijd met de polen en in de juiste richting Verwijder lege batterijen uit de zender De ...

Страница 17: ...geving Laat de accu niet onbeheerd achter tijdens het laden Demonteer de contacten van de accu in geen geval en probeer ze niet aan te passen Beschadig de cellen van de accu niet en maak ze niet open Er bestaat ontploffingsgevaar Houd de LiPo accu buiten bereik van kinderen Accu s moeten ontladen zijn of de accucapaciteit moet uitgeput zijn voordat u ze weggooit Dek vrijliggende polen af met plakb...

Страница 18: ... links om het model linksom te laten draaien 7H Beweeg de liftkracht draaiingsregelaar 2A naar rechts om het model rechtsom te laten draaien Knop 2H Door indrukken wordt de Headless Mode geactiveerd Met de Headless Mode worden beginnende vliegers ondersteund doordat de quadrocopter altijd in de richting vliegt waarin wordt gestuurd met de regelaar voor vooruit achteruit en zijwaarts vliegen 2B ong...

Страница 19: ...e A en links draaiende B rotorbladen zijn PROBLEEMOPLOSSING Probleem De propellers bewegen niet Oorzaak 1 Er is geen verbinding 2 De accu is te zwak of leeg Oplossing 1 Alles uitschakelen en in de juiste volgorde inschakelen 2 De accu opladen Probleem Het model stopt zonder zichtbare oorzaak tijdens de vlucht en verliest hoogte Oorzaak De accu is te zwak Oplossing De accu opladen Probleem Het mode...

Страница 20: ...istinto tipo ni tampoco mezclar baterías nuevas y usadas Solo está permitido utilizar las baterías recomendadas o unas equivalentes Las baterías deben colocarse respe tando la polaridad y Las baterías descargadas deben sacarse de la emisora Bajo ninguna circunstancia se deben cortocircuitar los contactos Saque las baterías de la emisora cuando no vaya a utilizarse durante un periodo de tiempo prol...

Страница 21: ...ca de gas y giro 2A debe apuntar hacia abajo Para encender la emisora coloque el interruptor ON OFF 2F en la posición ON y mueva la palanca de gas y giro brevemente una vez hacia arriba y de nuevo hacia abajo Tras unos 3 segundos el modelo se activa y está listo para volar Apague primero el helicóptero y a continuación la emisora al terminar de volar Desenchufe la batería del modelo y extraiga la ...

Страница 22: ...a palanca de gas y giro 2A hacia la derecha para rotar el modelo hacia la derecha Botón 2H Una pulsación activa el modo Headless El modo Headless ayuda a los principiantes a iniciarse al vuelo ya que independientemente de la dirección en la que esté girando el quadro cóptero la dirección de vuelo se corresponde siempre exactamente a la dirección en la que se controla la palanca de vuelo hacia dela...

Страница 23: ... SOLUCIÓN DE PROBLEMAS Problema Las hélices no se mueven Causa 1 no hay ninguna conexión establecida 2 la carga de la batería es insuficiente o la batería está descargada Solución 1 apague todo y vuelva a conectar siguiendo la secuencia correcta 2 cargue la batería Problema El modelo se detiene sin motivo aparente durante el vuelo y pierde altura Causa la carga de la batería es insuficiente Soluci...

Страница 24: ...nsigliate o un tipo simile Inserire le batterie rispettando la giusta polarità e Le batterie scariche devono essere rimosse dal radiocomando I morsetti di raccordo non devono essere cortocircuitati Rimuovere le batterie dal radiocomando quando non vengono utilizzate per molto tempo Avvertenze di sicurezza sul caricabatterie Non ricaricare batterie monouso Questo caricabatterie non è adatto a perso...

Страница 25: ...i è il rischio di esplosione Tenere la batteria LiPo lontana dalla portata dei bambini Scaricare le batterie per lo smaltimento e o attendere che si siano esaurite Coprire i poli liberi con nastro adesivo per evitare cortocircuiti Cura e manutenzione Pulire il modellino solo con un panno umido pulito Proteggere il modellino il radiocoman do e le batterie dall esposizione diretta alla luce solare e...

Страница 26: ...o per volo in avanti indietro e laterale 2B 7G Per virare il modello a sinistra spostare verso sinistra il regolatore accelerazione e virata 2A 7H Per virare il modello a destra spostare verso destra il regolatore per accelerazione e virata 2A Tasto 2H Una pressione attiva la modalità Headless La modalità Headless supporta i principianti in quanto la direzione in cui gira il quadricottero corrispo...

Страница 27: ...rio A e pale che girano in senso antiorario B ELIMINAZIONE DEI GUASTI Problema Le eliche non si muovono Causa 1 Nessuna connessione esistente 2 Batteria scarica e o esaurita Soluzione 1 Disattivare tutto e attivare nell ordine corretto 2 Ricaricare la batteria Problema Il modellino si ferma senza motivo durante il volo e cade Causa La batteria è scarica Soluzione Ricaricare la batteria Problema No...

Страница 28: ...ieses Produkt in Übereinstimmung mit den grund legenden Anforderungen und den übrigen einschlägigen Bestim mungen der Richtlinie 1999 5 EC befindet Die Konformitätserklärung ist unter www revell control de zu finden Legge sui rifiuti elettronici Una volta concluso l utilizzo rimuovere le batterie e smaltire separatamente i vecchi apparecchi elettrici presso i punti di raccolta comunali per i rifiu...

Отзывы: