background image

2

Installation and Operation
Blood Bank Refrigerators

3

Unpacking and Inspection

At delivery, examine the exterior for physical damage while the 
carrier’s representative is present. If exterior damage is present, 
carefully unpack and inspect the unit and all accessories for 
damage.

If there is no exterior damage, unpack and inspect the equipment 
within five days of delivery. If you find any damage, keep the 
packing materials and immediately report the damage to the 
carrier. Do not return goods to Revco without written 
authorization.
 When submitting a claim for shipping damage, 
request that the carrier inspect the shipping container and 
equipment.

4

Installation

4.1

Location

Install the unit in a level area free from vibration with a minimum 
of 6 inches of space on the sides and rear and 12 inches at the top.

Do not position the equipment in direct sunlight or near heating 
diffusers, radiators, or other sources of heat. The ambient 
temperature range at the location must be 59 to 90

°

(15 to 32

°

C).

4.2

Wiring

CAUTION!

Connect the equipment to a separate, 

dedicated, power source with the correct voltage. 
Power fluctuations or incorrect voltage can result in 
severe damage to the equipment.

DANGER!

For personal safety and trouble-free 

operation, this unit must be properly grounded before 
it is used. Failure to ground the equipment may cause 
personal injury or damage to the equipment. Always 
conform to the National Electrical Code and local 
codes. Do not connect unit to already overloaded 
power lines.

Always connect the equipment to a dedicated (separate) circuit. 
Electrical codes require fuse or circuit breaker protection for 
branch circuit conductors. Use time delay fuses for #12 AWG 
circuits.

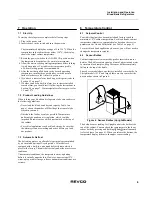
For all blood bank models, the wiring diagram is attached to the 
back of the cabinet.

4.3

Leveling

The unit must be level. Rotate the leveling screws, located under 
the front corners of the unit, until the unit is level. If the floor is 
seriously out of level, you may need to shim the corners with thin 
sheets of metal.

Note:

Use thin sheets of metal to level units equipped with 
optional casters.

4.4

Glass Doors

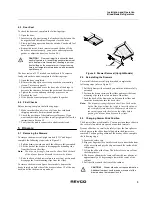
All Space Saver and Upright models have standard dual-pane 
glass doors, insulated to prevent condensation.

Glass door tension on Upright models can be adjusted. Check the 
door operation. If the self-closing doors do not work properly, 
make sure the unit is level. If the unit is level and the doors do 
not self-close, adjust the door tension.

CAUTION!

Do not overtighten the tension as 

damage to the equipment can result.

WARNING!

 Disconnect equipment from main 

power before attempting any maintenance to 
equipment or its controls.

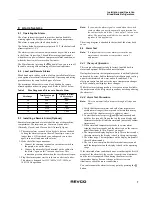
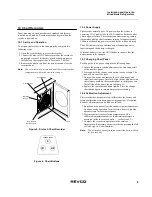
You can use a regular screwdriver to adjust spring tension and 
center each door on its frame. The adjustment screws (“torque” 
for tension and “sag” for door placement) are located on the 
bottom hinge bracket (shown below in Figure 1).

Figure 1.  Bottom Hinge Bracket for Glass Doors

Hinged glass doors can be propped open with metal braces at the 
bottom hinges. Open the door 90 degrees or until you feel some 
resistance. Push the door open past the resistance and the metal 
braces engage. To close the door, push it toward the unit (past the 
resistance).

Torque

Sag

Содержание REB-1204

Страница 1: ...ining this product please be sure to read this manual and product warning labels carefully Failure to follow these instructions may cause this product to malfunction which could result in injury or damage Below are important safety precautions that apply to this product Use this product only in the way described in the product literature and in this manual Before using it verify that this product ...

Страница 2: ...ed power lines Always connect the equipment to a dedicated separate circuit Electrical codes require fuse or circuit breaker protection for branch circuit conductors Use time delay fuses for 12 AWG circuits For all blood bank models the wiring diagram is attached to the back of the cabinet 4 3 Leveling The unit must be level Rotate the leveling screws located under the front corners of the unit un...

Страница 3: ...g tabs from the slots on the slides Note The drawers fit snugly between the slides Push the back of the drawer from underneath to remove the drawer 3 Raise the back of the drawer almost to a vertical position and disengage the front mounting clips from the slides To remove the drawers on Space Saver models depress the hooks located on both sides of the drawers about 1 3 of the way back and slide t...

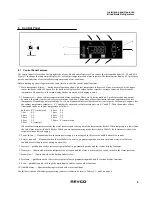
Страница 4: ...nts are 8ºC and 0ºC Then the number of bars illuminated indicates cabinet temperature as follows bulb only 0ºC cold alarm 6 bars 4 8 1 bar 0 8 7 bars 5 6 2 bars 1 6 8 bars 6 4 3 bars 2 4 9 bars 7 2 4 bars 3 2 10 bars 8 warm alarm 5 bars 4 setpoint When cabinet temperature exceeds the warm alarm setpoint the top bar of the thermometer flashes When temperature is lower than the cold alarm setpoint t...

Страница 5: ...larm test Test by simulating warm alarm conditions Press and simultaneously hold for five seconds Display and thermometer show simulated cabinet temperature alarms flash and sound as appropriate Display blinks twice when test is completed Lower sensor Display lower cabinet temperature Press and simultaneously and hold Display shows lower cabinet temperature while buttons are held returns to upper ...

Страница 6: ...r critical applications such as blood storage be sure that the alarm systems are working and active before you load any product 7 3 Automatic Defrost The defrosting process on all models is primarily accomplished by air circulated during off cycle periods All models are equipped with a built in on demand defrost feature which is preset at the factory The units defrost only under the most severe co...

Страница 7: ...e purple and red white wires must be tied together in this application The wiring diagram is attached to the inside of the alarm back cover 9 4 Alarm Test Note It is important to test your alarm system after any maintenance operation or temperature control adjustment 9 4 1 Theory of Operation This test procedure applies to both factory installed built in alarms and optional field installed remote ...

Страница 8: ... needs to be changed 10 3 Changing Chart Paper To change the chart paper complete the following steps 1 Locate the pressure sensitive buttons at the front upper left of the recorder panel 2 Press and hold the change chart button for one second The pen will move off the scale 3 Unscrew the center nut remove the old chart paper and install new chart paper Carefully align the day and time with the re...

Страница 9: ...Condensers should be cleaned at least every six months In heavy traffic areas condensers load with dirt more quickly Failure to keep the condenser clean can result in equipment warm up or erratic temperatures CAUTION Never clean near condensers with your fingers Some surfaces are sharp Periodically check the condenser to make sure that it is clean In all models the condenser is located in the top ...

Страница 10: ...mperature continues to fluctuate call an authorized Revco service representative Unit warms up Door is open Make sure the door is completely closed Door seal Check the door seal following instructions in Section 4 5 on page 3 Warm product recently loaded in unit Allow ample time to recover from loading warm product Power supply Check for proper voltage to the unit If there is no voltage to the uni...

Страница 11: ...Can dial up to four telephone numbers to advise of alarm condition across any telephone system which accepts pulse dialing One system can monitor up to four individual cabinets In addition the system can monitor up to three groups of cabinets Contact Revco for detailed specifications Customer installed 6224 Description Catalog No Temperature recorder 6 in circular chart seven day drive free standi...

Страница 12: ...months from the date of shipment by Revco If any part is found to contain a manufacturing defect in material or workmanship Revco assumes no responsibility for any labor expenses for service removal or reinstallation required to replace part or for incidental repairs and such costs are the responsibility of the Owner unless a service labor agreement exists between the Owner and his Dealer The warr...

Страница 13: ...plate attached to the equipment If available please provide the date purchased the source of purchase Revco or specific agent rep organization and purchase order number If You Need Assistance REVCO SALES DIVISION Phone 828 658 2711 800 252 7100 FAX 828 645 3368 LABORATORY PARTS and SERVICE Phone 800 438 4851 FAX 828 658 2576 TECHNICAL SUPPORT Phone 800 438 4851 275 Aiken Road Asheville NC 28804 U ...

Отзывы: