REVCAMUK MON16 Скачать руководство пользователя страница 6

 6 

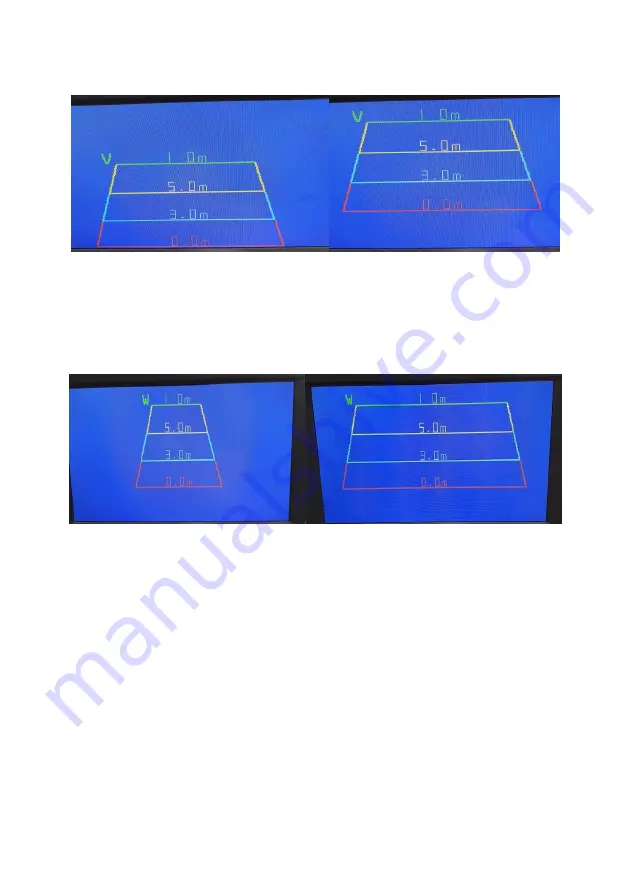
The first adjustment will allow you to move the batch of guidelines along the vertical axis, 
the image below shows the max adjustment up and down of the guidelines.   

Tip: We find holding the up or down button will move it quicker than pressing individually 
lots of times. 

When you are happy with the adjustment press Men(u) to take you to adjust the width of 
the guideline box ie the Horizontal adjustment.  See the picture below for min max 
horizontal adjustment.  

To adjust the values on the lines, go back to the main park setup menu and enter the line 
number menu. To modify values use the up and down keys to change the number to the 
required value and the Menu button to go to the next number to adjust. 

Interval Config Sub Menu 

This monitor can be setup to switch between two cameras automatically on a pre-assigned 
number of seconds per camera.  This menu system will allow you to do so.  Enter the menu 
and you will have CAM1 and CAM2 listed.  You can change either channel from 1 to 30 
seconds.  So if you wanted CAM1 on for 30 seconds then just a quick view of CAM2 for 3 
seconds you would set CAM1 to 30 and CAM2 to 3. 

To see the interval change in action, exit the menu system. 

Now press the Menu button for a few seconds until you see the word “Interval” pop up in 
green on the top of the screen, this should now change channels to the timings set in the 
interval config sub menu. 

Содержание MON16

Страница 1: ...ave written this guide to help navigate some of the options inside the menu system Please be aware that some of the menu systems are subject to change if you notice anything that differs then please l...

Страница 2: ...cameras attached to 6W with two cameras Digital Screen Resolution 800 x3 RGB x480 Contrast 500 1 Brightness 400cd m2 Viewing Angle U 50 degrees D 60 degrees R L 70 degrees Operating Temperature 10C t...

Страница 3: ...s after not noticing the arrows that need to be lined up before pushing together Button Layout Both monitors have touch sensitive buttons as opposed to physical push in buttons We find these really re...

Страница 4: ...lection up at any time Picture Sub Menu Scoll to required option and press menu button to enter modify required option Brightness Adjust the brightness of the picture Contrast Adjust the contrast of t...

Страница 5: ...cameras are mirror imaged as standard so mirroring this mirror image will turn it back in to a normal view image Video Sub Menu As standard we recommend that you use Auto which will auto detect the v...

Страница 6: ...up and down keys to change the number to the required value and the Menu button to go to the next number to adjust Interval Config Sub Menu This monitor can be setup to switch between two cameras auto...

Страница 7: ...Soft Recommended for night time driving Vivid Bright with high contrast Light Brightest picture for very bright conditions CAM button This button will change channel between the two available inputs I...

Страница 8: ...8 Optional Brackets for both monitors Both monitors have rear channels to allow for alternative brackets...

Отзывы: