background image

Chapter 8

Component Removal/Installation

REF 1029568 Rev B

BiPAP Focus Ventilator Service Manual © Respironics, Inc.

8-13

8.7 Blower

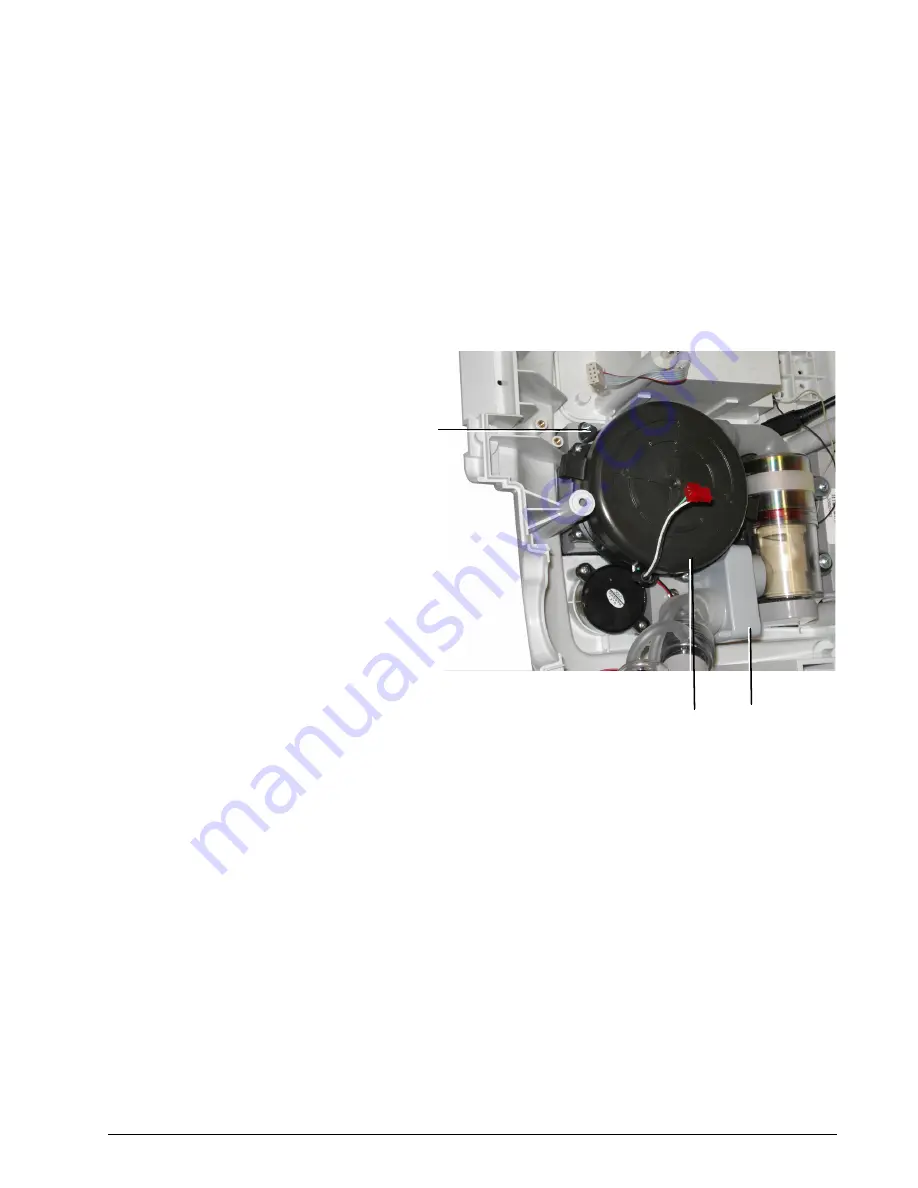
Follow these steps to remove the Blower (Figure 8-14, Figure 8-15). Reverse 
to install.

1. Remove top cover (section 8.2).

2. Remove the user interface PCB (section 8.4).

3. Remove the controller PCB (section 8.5).

Figure 8-14: Blower 

4. Remove the 2 screws that anchor the blower to the muffler.

Diffuser

Screws (x2)
(5 lbf-in., 57 N cm)

Blower

Содержание BiPAP

Страница 1: ...BiPAP Focus Ventilator S E R V I C E M A N U A L ...

Страница 2: ...mation retrieval system except as specifically permitted under United States copyright law without the prior written consent of Respironics In the U S and Canada Respironics California Inc 2271 Cosmos Court Carlsbad CA 92011 USA 1 800 345 6443 Authorized European Representative Respironics Deutschland GmbH Gewerbestrasse 17 D 82211 Herrsching Germany 49 8 15 29 30 60 For Technical support contact ...

Страница 3: ... 3 3 3 1 5 Air Flow Sensor 3 3 3 1 6 Diffuser 3 3 3 2 Electronic System 3 4 3 2 1 User Interface PCB 3 5 3 2 2 Controller PCB 3 6 3 2 3 VGA Interface PCB 3 7 3 2 4 VGA Display 3 7 3 2 5 External AC DC Power Supply 3 7 3 2 6 Internal Battery 3 7 3 3 Back Panel 3 8 4 Periodic Maintenance 4 1 4 1 Preliminary Cleaning and Inspection 4 1 4 2 Cleaning the Reusable Air Inlet Filter 4 2 4 3 Replacing Air ...

Страница 4: ... USB Drivers to the Service PC 6 5 6 3 Installing Operating Software on the Ventilator 6 12 6 4 Reprogramming the BiPAP Focus Serial Number 6 22 7 Testing Calibration and Performance Verification 7 1 7 1 Test Equipment and Accessories 7 2 7 2 Recommended Testing 7 3 7 3 Ventilator Run in 7 4 7 4 Battery Test 7 5 7 5 Real time Clock Calibration 7 6 7 5 1 Downloading Real Time Clock Calibration Soft...

Страница 5: ...ry Alarm 8 16 8 10 Bottom Cover and Muffler 8 17 8 11 Interconnect Diagrams 8 18 9 BiPAP Focus Replacement Parts List 9 1 9 1 Complete Parts List 9 1 9 2 Exterior 9 4 9 3 Front Panel User Interface 9 6 9 4 Ventilator Interior 9 7 9 5 Communications Cables 9 9 9 6 Electronic Parts 9 10 10 Specifications 10 1 10 1 Ventilator Specifications 10 1 10 2 Patient Circuit Details 10 6 10 3 Maximum Pressure...

Страница 6: ...VI BiPAP Focus Ventilator Service Manual Respironics Inc REF 1029568 Rev B Table of Contents ...

Страница 7: ...rements consensus guidelines US regulatory statutes and international regulatory standards for life support mechanical ventilation devices Read this manual thoroughly before performing service or maintenance on the ventilator This manual contains advanced troubleshooting calibration and maintenance instructions All service is to be performed by qualified service personnel Review the BiPAP Focus Op...

Страница 8: ... 1040310 or equivalent Respironics utility software required for calibrating and testing BiPAP Focus ventilator Log on to http my respironics com to download utility software to a PC Ventilator Accessories Connector 22 mm quantity 2 Respironics P N 1002505 or equivalent Coupling silicone qty 2 P N 500 1000 43 Flow control valve Respironics P N 1006120 Inspiratory bacteria filter 22 mm M F qty 1 Re...

Страница 9: ... supplier Screwdriver flat pen size Local supplier Screwdriver Phillips 1 Local supplier Screwdriver Phillips 2 Local supplier Screwdriver Phillips pen size Local supplier Torque driver 1 to 25 in lbs Local supplier Tubing silicone 3 16 in ID x 6 5 ft Local supplier Table 1 2 Measurement Accuracy Requirements Unit of Measure Range Accuracy Pressure 25 to 150 cmH20 0 100 psi 1 of reading or 0 20 cm...

Страница 10: ...Chapter 1 1 4 BiPAP Focus Ventilator Service Manual Respironics Inc REF 1029568 Rev B Introduction and Intended Use This page is intentionally blank ...

Страница 11: ...present in the AC DC power supply power cord and VGA interface PCB To avoid electrical shock disconnect power before cleaning or repairing the ventilator DO NOT immerse this device in liquid or allow liquid to enter the cabinet or the filter intake To avoid personal injury always disconnect external AC and DC power sources from the ventilator before servicing or cleaning To avoid personal injury o...

Страница 12: ...cteria filter between the main outlet and test device Explosion hazard Do not operate the ventilator in the presence of flammable anesthetic agents To avoid the risk of fire use only Respironics approved batteries All battery connectors are keyed to ensure proper connection Do not attempt to connect a battery incorrectly When running on battery the high flows that occur during a patient disconnect...

Страница 13: ...the ventilator with AC power connected and the ON OFF switch in the ON I position When the ventilator is stored disconnected from AC power with the power ON OFF switch ON I and in standby the battery may become depleted within two weeks When the ventilator is stored with the ON OFF switch in the OFF O position the battery typically becomes depleted in three months If a 343 error code is displayed ...

Страница 14: ... for product use additional warnings cautions and notes Service calibration procedures require a printer to be assigned to the service PC this can be an internal print location for example using Adobe PDF or a printer connected to the PC If a print error occurs at the end of the calibration the calibration table is cleared and the calibration must be repeated ...

Страница 15: ...elivers timed breaths if the patient does not initiate a breath Ventilator alarms occur when high or low pressure apnea patient disconnect low power or loss of AC power conditions occur The system displays a real time estimated delivered pressure bar graph The BiPAP Focus includes alarm silence and alarm pre silence features A fully charged backup battery provides a minimum of 45 minutes of backup...

Страница 16: ...nhanced particulate filtration 3 1 2 Muffler The muffler reduces the noise of air flow into the blower This is done by channeling the air through a baffled system lined with sound absorbing material The channel also provides a path for air recirculation BiPAP Focus ventilator Air inlet filter s Muffler Air inlet port Blower motor Flow valve Diffuser Bacteria filter mandatory Oxygen enrichment adap...

Страница 17: ...n by an electromagnetic coil Valve commands from the controller PCB control current 125 to 675 mA to the coil Flow valve movement is proportional to the current through the coil The flow valve operates as a closed loop system using feedback from the flow sensor and pressure transducers 3 1 5 Air Flow Sensor The air flow sensor measures flow from the flow valve The ventilator uses this measurement ...

Страница 18: ...e controlling inspiratory and expiratory pressures according to the selected ventilator settings Figure 3 2 shows an interconnect block diagram of the BiPAP Focus ventilator Figure 3 2 BiPAP Focus Block Diagram Communication between the microcontrollers allows each to check the function of the other ensures proper transition between AC and DC power sources and allows internal battery maintenance E...

Страница 19: ...ation Power supply input monitoring and distribution 18 VDC input voltage primary working voltage 12 VDC relay control and 3 3 and 5 5 supply sources 5 VDC USB drivers LCD display CCFL inverter 3 3 VDC kernel circuits digital circuits Figure 3 3 BiPAP Focus User Interface PCB J1 interprocessor communications cable Connects to J1 and J10 of the controller PCB S1 ON OFF switch J10 interconnect power...

Страница 20: ...Flow sensor measurement and calibration Real time clock with battery backup Microprocessor watchdog Figure 3 4 BiPAP Focus Controller PCB Interprocessor communications cable J1 Connects to user interface PCB J1 Backup alarm cable Blower connection J5 Switch control cable MT2 P1 connects to air flow sensor nipple closest to patient outlet MT2 P2 connects to air flow sensor nipple away from patient ...

Страница 21: ...p Microprocessor watchdog 3 2 4 VGA Display STN blue mode transmissive viewing One quarter VGA 320 x 240 Dot pitch 0 36 x 0 36 mm 3 2 5 External AC DC Power Supply 90 240 VAC 40 60 Hz input 120 W 18 VDC output 3 wire line cord connection provides functional earth ground 3 2 6 Internal Battery 9 6 V 3 7 Ah nickel metal hydride NiMH In line thermal fuse Built in thermistor for temperature monitoring...

Страница 22: ...serial communications port USB port AC DC power supply input and power cord strain relief clip ON OFF switch Figure 3 5 Back Panel NOTE The ON OFF switch controls all power management function Internal battery charging and ventilator operation are disabled in the OFF O position Nurse call serial port USB port AC DC power supply input Power cord strain relief clip ON OFF switch shown in the OFF O p...

Страница 23: ...he ventilator with a soft damp cloth moistened with any of the following solutions mild detergent or soapy water 10 bleach solution 90 water isopropyl alcohol 91 or quaternary ammonium germicide spray or disposable cloth Clean the ventilator interior using an ESD safe vacuum Remove and inspect the air inlet filters Clean or replace as necessary Table 4 1 BiPAP Focus Periodic Maintenance Part Inter...

Страница 24: ... Inlet Filter WARNING Failure to replace a dirty filter may cause the device to operate at higher than normal temperatures and damage the device CAUTION Use only Respironics approved filters CAUTION The gray reusable air inlet filter must be completely dry before use Never place a wet filter into the device 4 3 Replacing Air Inlet Filter s The ventilator is designed to accommodate 1 reusable gray ...

Страница 25: ...elivery continues until the battery is depleted Test the battery once per month A fully charged battery is designed to support ventilation for 45 minutes at default settings and should be replaced if it cannot 4 4 1 Battery Operating Time The length of time the ventilator can operate on internal battery power depends primarily on ventilator CPAP IPAP settings Table 4 2 WARNING When running on batt...

Страница 26: ...rging LED turns off The charging cycle operates in Normal and Standby mode Battery charge time is typically less than 5 hours but can be longer depending on ambient temperature It is important to maintain a fully charged internal battery in case of a power outage Recharge the battery if the ventilator has been in storage An unused fully charged battery depletes within 3 months if the power switch ...

Страница 27: ...Remove the old battery remove from the compartment and unplug the cable 4 Install the new battery plug in the cable and install the battery into the compartment 5 Replace the battery compartment door and screws 6 Reconnect the DC power supply 7 Allow sufficient time to fully charge the new battery Battery is fully charged when the Battery Charging LED turns off Figure 4 2 Replacing the Battery CAU...

Страница 28: ...y with a minimum voltage of 2 80 VDC as measured across the red and black battery connector wires If measured battery voltage measured is 2 80 VDC use the BiPAP Focus battery charging cable P N 1040421 to provide the initial charge required to allow the ventilator to recharge a depleted battery 1 Turn the ventilator OFF O and disconnect the power cord from the rear of the unit Figure 4 3 Figure 4 ...

Страница 29: ...ice Manual Respironics Inc 4 7 2 Remove the battery compartment screws Figure 4 4 Figure 4 4 Removing the Battery Compartment Screws 3 Remove the internal battery and disconnect its cable Figure 4 5 Figure 4 5 Removing the Internal Battery Battery compartmen t screws Disconnect ...

Страница 30: ...to wall power and turn the ON OFF switch ON I 8 Confirm that the green Battery Charging LED lights Figure 4 7 If not repeat the process from step 5 one additional time If the Battery Charging LED still does not light after a second attempt replace the battery Figure 4 7 Front Panel Battery Charging LEDs 9 Allow the battery to fully charge Charging is complete when the Battery Charging LED turns of...

Страница 31: ... Focus Ventilator Service Manual Respironics Inc 4 9 4 5 Storing the Ventilator Store the ventilator in a location that meets environmental specifications To avoid premature battery depletion ensure that the ventilator power switch is in the OFF O position ...

Страница 32: ...Chapter 4 4 10 BiPAP Focus Ventilator Service Manual Respironics Inc REF 1029568 Rev B Periodic Maintenance This page is intentionally blank ...

Страница 33: ... View real time sensor readings and status of specific controls Activate and confirm audible visual and remote alarms Activate specific controls to test circuits 5 1 Entering Diagnostic Mode To enter Diagnostic mode 1 Press the STANDBY key then simultaneously press the Alarm Reset and Alarm Silence keys on the ventilator front panel at power up for 15 seconds or until Diagnostic mode appears on th...

Страница 34: ...68 Rev B Diagnostic Mode and Troubleshooting Figure 5 1 Diagnostic Mode Warning Prompt Figure 5 2 Diagnostic Mode Main Menu 3 Press the arrow keys to highlight the menu selection then press Enter 4 To exit Diagnostic mode at any time turn the ventilator off using the STANDBY key ...

Страница 35: ... Manufacture The 12 digit serial number on the base of the unit indicates the date of manufacture From left to right the fifth and sixth digits indicate the year the seventh and eighth the month the ninth and tenth the day Example 1 This serial number indicates a manufacture date of 13 March 2009 Example 2 This serial number indicates a manufacture date of 29 July 2006 Ventilator serial number ide...

Страница 36: ...nter or press Cancel to exit without making a change 3 Press the Menu key to return to the main menu Figure 5 4 Diagnostic Mode System Settings Screen NOTE Operating times increment based on power on hours Do not adjust Total time unless replacing the user interface PCB If so reset Total time to the original number of hours Once the Since Service time is reset it starts counting from 0 hours and c...

Страница 37: ...hlight the button to change then press Enter 2 Adjust the value and press Enter or press Cancel to exit without making a change Use Display Units to select cmH2O hPa or mbar as the unit of pressure Use Alarm Volume to adjust the volume from 1 to 5 The alarm volume cannot be turned completely off Use Contrast to adjust the contrast from 20 to 100 Use Brightness to adjust the contrast from 10 to 100...

Страница 38: ...e significant event log Figure 5 6 displays a log of the 200 most recent system events including settings changes alarms and codes that can be used for troubleshooting section 5 10 describes significant event codes in detail Figure 5 6 Diagnostic Mode Significant Event Log Use the arrow keys to scroll up and down Press Menu to return to the main menu ...

Страница 39: ...escribes sensor readings Parameter Measured value A D counts Status Table 5 1 Sensor Readings Screen Parameter Description 3 3V 3 3 V supply measurement Range 883 to 976 counts Voltage V counts 0 003662 5V 5V measurement Range 884 to 977 counts Voltage V counts 0 005371 12V 12V supply measurement Range 889 to 983 counts Voltage V counts 0 012817 18Vin 18V mains input measurement Range 882 to 1008 ...

Страница 40: ...d Temp Measurement of temperature on the user interface PCB Range 233 to 540 counts Temperature o C counts 0 00244 0 6 100 Ambient Temp Measurement of ambient temperature within the unit Range 0 to 60 o C 18VINCMP Status of high incoming mains voltage 15 64V typical threshold 1 Above threshold 0 Below threshold 18VBSTCMP Status of high 18V_Boost voltage 15 64V typical threshold 1 Fault 0 No Fault ...

Страница 41: ...grams Accessories Communications HyperTerminal 4 Enter a name for the connection Figure 5 8 shows BiPAP Focus choose an icon then click OK PORLATCH Status of processor reset due to a drop in the 3 3V rail This signal must be primed by software with the EXT_WDOG_LATCH_CLR signal This can be done using the PORLATCLK diagnostics label in the System Test screen 1 Loss of 3 3V supply caused last reset ...

Страница 42: ...nection to the BiPAP Focus Ventilator 5 Select the appropriate serial port from the Connect using drop down list Figure 5 9 shows COM1 then click OK Figure 5 9 Selecting the Serial Port 6 Enter these settings for the serial port Figure 5 10 then click OK Figure 5 10 Serial Port Settings 19200 Bits per second 8 Data bits Parity None 1 Stop bit Flow control None ...

Страница 43: ...e configuring the properties Click File Properties from the menu bar 8 Click on the Settings tab Figure 5 11 9 Select ANSIW from the Emulation drop down list box Figure 5 11 HyperTerminal Settings Tab 10 Click the Terminal Setup button 11 Select underline and blink for cursor settings then click OK Figure 5 12 Terminal Settings 12 Click the ASCII Setup button Figure 5 11 ...

Страница 44: ...ev B Diagnostic Mode and Troubleshooting 13 Match the ASCII Setup screen Figure 5 13 then click OK Figure 5 13 ASCII Setup Screen 14 Save this configuration Select File Save As and save to the desktop if you want to create an icon for BiPAP Focus Communications on the Windows desktop ...

Страница 45: ...e File window click Save 6 In the HyperTerminal Capture Text window click Start 7 Type DRPT all caps in the dialog box and press the Enter key This retrieves information from the significant event log 8 If the ventilator is connected and communication occurs a response similar to the following appears Respironics Inc BiPAP Focus Ventilator Serial Number 8772060206 04 Date Time 6 19 09 20 49 Event ...

Страница 46: ... TXT file by default use any word processing program to view the file Figure 5 14 shows how to interpret each line of the DRPT report Figure 5 14 Interpreting the DRPT Report NOTE The last two fields if applicable can also show mode setting changes and their from to values 10 To save the DRPT highlight the appropriate fields or Edit Select All copy Edit Copy and then paste into any text editor wor...

Страница 47: ... V BattMeasEn is On the Sensor Readings screen displays battery voltage when Off the Sensor Readings screen displays the internal battery thermistor temperature Figure 5 15 Diagnostic Mode System Test Screen Table 5 2 System Test Screen Miscellaneous Settings Setting Description Blower On Blower on Off Blower off V BattMeasEn On Sensor Readings screen displays battery voltage Off Sensor Readings s...

Страница 48: ...there is power to the ventilator Each significant event log entry includes the following 1 Event ID A code and brief text description of the event 2 Date Each event is date stamped in a month day year format for example 10 20 02 3 Time Each event is time stamped in hour minute format for example 09 15 4 Previous current value For settings changes the previous and current values are displayed PORLA...

Страница 49: ...E CORRUPT Controller processor detected a program memory checksum error 1 If the problem persists replace the controller PCB 2 Retrieve the DRPT and contact technical support 3 EXTERNAL RAM FAILURE Controller processor detected an external RAM memory error 1 If the problem persists replace the controller PCB 2 Retrieve the DRPT and contact technical support 4 FIQ STACK OVERFLOW Controller processo...

Страница 50: ... Controller processor detected an unexpected exception 1 If the problem persists replace the controller PCB 2 Retrieve the DRPT and contact technical support 16 UNEXPECTED SOFTWARE INTERRUPT Controller processor detected an unexpected exception 1 If the problem persists replace the controller PCB 2 Retrieve the DRPT and contact technical support 17 MICROPROCESSOR PREFETCH EXCEPTION Controller proc...

Страница 51: ...y capture screen output to a file 1 Attempt to recalibrate the system 2 If calibration fails replace the controller PCB 3 Retrieve the DRPT and contact technical support 27 EXCESSIVE DRIFT ON PRIMARY PRESSURE SENSOR Controller processor detected that the drift check on the primary pressure has failed Pressure sensor drift and calibration information can be monitored using using the D Drift Screen ...

Страница 52: ...troller PCB 2 Retrieve the DRPT and contact technical support 36 PARAMETER OUT OF RANGE IN PARAMETER STORAGE Controller processor detected that a write operation to EEPROM failed the range check for that data item 1 If the problem persists replace the controller PCB 2 Retrieve the DRPT and contact technical support 37 CORRUPT REAL TIME CLOCK VALUE Controller processor detected that the real time c...

Страница 53: ...r processor detected that the limits test on the 12V reference voltage signal failed 1 Replace the controller PCB 2 Retrieve the DRPT and contact technical support 45 5V REFERENCE OUT OF RANGE Controller processor detected that the limits test on the 5V reference voltage signal failed 1 Replace the controller PCB 2 Retrieve the DRPT and contact technical support 46 BULK VOLTAGE OUT OF RANGE Contro...

Страница 54: ...ted and recalibrated 3 Retrieve the DRPT and contact technical support 54 MOTOR CURRENT HIGH WHILE BLOWER OFF Controller processor detected a current draw of more than 100mA for longer than 5 seconds when the motor is powered off 1 If the problem persists replace the pneumatics subassembly blower and valve 2 If the problem persists replace the controller PCB The original pneumatics subassembly blo...

Страница 55: ...arm may be annuciated press Alarm Reset 1 Retrieve the DRPT and contact technical support 62 BLOWER SPEED EXCEEDED Controller processor detected an out of tolerance blower speed above 23337 RPM for more than 3 seconds 1 If the problem persists replace the pneumatics subassembly blower and valve 2 If the problem persists replace the controller PCB The original pneumatics subassembly blower and valv...

Страница 56: ...t technical support 76 TCB BUZZER SUPERCAP FAILURE Controller processor detected that the backup alarm buzzer capacitor test failed a limits check for greater than five minutes 1 Enter Diagnostics mode and use the System Test screen to check if the backup alarm can be turned on and off 2 If the problem persists replace the controller PCB 3 Retrieve the DRPT and contact technical support 77 HIGH PR...

Страница 57: ... stored in EEPROM 1 Replace the controller PCB 2 Retrieve the DRPT and contact technical support 87 ST EPAP SETTING FAIL Controller processor detected that the ST mode EPAP setting change is not consistent with the value stored in EEPROM 1 Replace the controller PCB 2 Retrieve the DRPT and contact technical support 88 ST RISE SETTING FAIL Controller processor detected that the ST mode rise time se...

Страница 58: ...PT and contact technical support 97 APNEA RATE ALARM SETTING FAIL Controller processor detected that the APNEA rate alarm setting change is not consistent with the value stored in EEPROM 1 Replace the controller PCB 2 Retrieve the DRPT and contact technical support 98 ERR TUI SYSTEM ERROR IND A system error has occurred on the UI processor and the controller processor has been informed of the fact...

Страница 59: ...ITY FAILURE User interface processor detected that the monitor application software is not compatible with the user interface boot software 1 Re download application software to ventilator 2 Replace user interface PCB The 3XX user interface processor POST codes 300 POST SUCCESSFUL No action required The screen should display the message STARTING UP PLEASE WAIT 301 POST BLOWER SWITCH CONTROL FAILED...

Страница 60: ...iled during POST 1 If running on battery ensure that the battery is fully charged 2 Check if the problem occurs during AC and battery operation 3 Enter Diagnostics mode and use the Sensor Readings screen to check the voltage and ADC readings 4 Replace the user interface PCB 333 POST 3_3VMON FAIL User interface processor detected that the 3 3V test failed during POST 1 If running on battery ensure ...

Страница 61: ...ENCLOSURE TEMPERATURE TOO HIGH User interface processor detected that the enclosure high temperature test failed during POST 60 o C 1 Ensure that the system is at room temperature or within operating specifications 2 Enter Diagnostics mode and use the Sensor Readings screen to check the voltage and ADC readings 3 Replace the user interface PCB 340 POST LOW TEMP VIO The screen should also display E...

Страница 62: ...est failed during POST 1 Ensure that the ventilator is at room temperature or within operating specifications 2 Verify that the battery is present 3 Check the battery wiring for shorts or opens 4 Enter Diagnostics mode and use the Sensor Readings screen to check voltage and ADC readings 5 Replace the battery 6 Replace the user interface PCB 4XX Continuous built in test CBIT codes 401 CBIT MON RAM ...

Страница 63: ...processor detected that the 5 0V test failed during CBIT 1 If running on battery ensure that the battery is fully charged 2 Check if the problem occurs during AC and battery operation 3 Enter Diagnostics mode and use the Sensor Readings screen to check the voltage and ADC readings 4 Replace the user interface PCB 434 12V VOLTAGE RAIL FAILED User interface processor detected that the 12V test faile...

Страница 64: ...s at room temperature or within operating specifications 2 Enter Diagnostics mode and use the Sensor Readings screen to check temperature and ADC readings 3 Replace the user interface PCB 440 BLOWER SWITCH CONTROL FAILURE User interface processor detected that the blower test failed during CBIT 1 Enter Diagnostics mode and use the System Test screen to check if the blower can be turned on 2 Check ...

Страница 65: ...interface processor detected that the settings cross check test failed during CBIT 1 Replace the user interface PCB 2 Replace the controller PCB 5XX Setting change codes Previous and new settings are recorded 500 SETTING BASE 501 Unused 502 Unused 503 MODE SETTING CHANGE No action required 504 RATE SETTING CHANGE No action required 505 IPAP SETTING CHANGE No action required 506 EPAP SETTING CHANGE...

Страница 66: ...ion in Operator s Manual 649 LOW TEMPERATURE 1 See alarms information in Operator s Manual 7XX Unused codes 8XX User interface processor software anomaly codes 801 Soft Anomaly Software anomaly error code that identifies a file and line number of the assertion 1 Retrieve the DRPT and contact technical support 802 TUI RTOS Error User interface RTOS error 1 Retrieve the DRPT and contact technical su...

Страница 67: ...echnical support 904 SOFT RESET An unexpected external watchdog soft reset occurred Code 310 POST Abnormal Restart should be logged with the same timestamp 1 Retrieve the DRPT and contact technical support 905 PWR ON RESET No action required the device has been powered on and this event is expected 906 SET CAL MODE FAILURE Failure detected when attempting to enter Calibration mode Check that the s...

Страница 68: ...Chapter 5 5 36 BiPAP Focus Ventilator Service Manual Respironics Inc REF 1029568 Rev B Diagnostic Mode and Troubleshooting This page is intentionally blank ...

Страница 69: ... Connect the service PC to the ventilator and enter ventilator Download mode section 6 1 2 Install USB driver software onto the service PC section 6 2 3 Install operating software onto the ventilator section 6 3 4 Reprogram the ventilator serial number section 6 4 CAUTION To avoid possible interruption due to power loss ensure that the ventilator is running on AC power not battery during this proc...

Страница 70: ...rivers included with the adapter before installing the adapter NOTE Do not connect or use the BiPAP Focus USB cable while connected to a docking station Do not connect the BiPAP Focus USB cable through a USB hub Using docking stations or USB hubs causes communication errors 1 Connect the serial cable from BiPAP Focus communications cable kit P N 1039800 Connect the double ended serial cable Figure...

Страница 71: ...rt and the Type A end to the service PC Figure 6 2 Figure 6 2 USB Cable Figure 6 3 shows the ventilator back panel Figure 6 3 Back Panel 3 Ensure that the DC power supply and AC power are connected then turn the ON OFF switch to the ON l position USB Type B end to ventilator USB Type A end to service PC USB port DC power supply input ON OFF switch shown in OFF position Nurse call serial communicat...

Страница 72: ...press and hold the UP and DOWN arrow keys Figure 6 4 until the message WAITING FOR DOWNLOAD SERVER appears Figure 6 4 Entering Download Mode 5 Install USB driver software as described in section 6 2 1 Press the STANDBY key 2 Immediately press and hold the UP and DOWN arrow keys until the unit passes POST Alarm sounds and WAITING FOR DOWNLOAD SERVER appears ...

Страница 73: ...ice PC The USB drivers are on software CD P N 1063919 1 Insert the software CD P N 1063919 into the service PC CD ROM drive 2 Using Windows Explorer to navigate to the CD ROM drive then double click to display the CD files Figure 6 5 Figure 6 5 Files on the CD P N 1063919 3 At Can Windows connect to Windows Update to search for software click Yes this time only then Next 4 Select Install the Softw...

Страница 74: ...1029568 Rev B Ventilator Communications Figure 6 6 Install the Software Automatically Recommended 5 At the prompt indicating that the software you will be installing has not passed Windows logo testing click Continue Anyway Figure 6 7 Figure 6 7 Windows Logo Testing Window ...

Страница 75: ...B BiPAP Focus Ventilator Service Manual Respironics Inc 6 7 6 At the Files Needed window Figure 6 8 click Browse and select the CD ROM drive Figure 6 8 Files Needed Window 7 Double click the Drivers folder Figure 6 9 Figure 6 9 Locate File Window Drivers ...

Страница 76: ...mmunications 8 Double click the WinXP folder Figure 6 10 Figure 6 10 Locate File Window WinXP 9 Click on the BiPAPFocus inf file then click Open Figure 6 11 Figure 6 11 Locate File Window BiPAPFocus inf 10 Use the file path suggested then click OK Figure 6 12 Figure 6 12 Files Needed Window File Path ...

Страница 77: ... If prompted to insert the Respironics CD already in the drive click OK Figure 6 13 Figure 6 13 Insert Disk Window 12 At the Files Needed window click Browse and select the CD ROM drive Figure 6 14 Figure 6 14 Files Needed Window 13 Double click the Drivers folder Figure 6 15 Figure 6 15 Locate File Window Drivers ...

Страница 78: ...munications 14 Double click the WinXP folder Figure 6 16 Figure 6 16 Locate File Window WinXP 15 Click on the BiPAPFocus sys file then click Open Figure 6 17 Figure 6 17 Locate File Window BiPAPFocus sys 16 Use the file path suggested then click OK Figure 6 18 Figure 6 18 Files Needed Window File Path ...

Страница 79: ...are Wizard begins installing the software Figure 6 19 Figure 6 19 Found New Hardware Wizard Progress Window 18 Once the software installation is complete click Finish to complete the installation Figure 6 20 Figure 6 20 Found New Hardware Wizard Complete 19 Leave the ventilator in Download mode to begin ventilator software Installation ...

Страница 80: ...r Communications 6 3 Installing Operating Software on the Ventilator Follow these steps to install operating software onto the ventilator 1 With the software CD P N 1063919 into the CD ROM drive use Windows Explorer to view the CD files Figure 6 21 Figure 6 21 Files on the BiPAP Focus Software CD ...

Страница 81: ...Manual Respironics Inc 6 13 2 Double click Install_Focus_Software exe to launch the BiPAP Focus Wizard Figure 6 22 then click Next Figure 6 22 BiPAP Focus Wizard 3 Select Install new BiPAP Focus Software Figure 6 23 then click Next Figure 6 23 Install New BiPAP Focus Controller Software ...

Страница 82: ...s to the ventilator Figure 6 24 The cables have already been connected as described in section 6 1 Click Next Figure 6 24 Communications Cable Connection Screen 5 When Phase 1 BiPAP Focus Wizard appears click Next Figure 6 25 The software erases the controller PCB software Figure 6 26 and then installs new software Figure 6 27 Figure 6 25 Do Not Interrupt Upgrade Message ...

Страница 83: ...apter 6 Ventilator Communications REF 1029568 Rev B BiPAP Focus Ventilator Service Manual Respironics Inc 6 15 Figure 6 26 Erasing Controller PCB Software Figure 6 27 Reprogramming Controller PCB Software ...

Страница 84: ...mplete click the Phase 2 button Figure 6 28 Figure 6 28 Phase 1 Complete Start Phase 2 7 The Phase 2 BiPAP Focus Wizard opens to begin installing software on the user interface PCB The ventilator should still be in Download mode and the cables connected Click Next and follow the screen prompts Figure 6 29 Figure 6 29 Welcome to Phase 2 BiPAP Focus Wizard ...

Страница 85: ...t the ventilator to the service PC If the cables are still connected select No Thanks I ll skip the instructions and click Next Figure 6 30 Figure 6 30 Option to View Cable Connection Instructions 9 The Wizard verifies that it can communicate with the ventilator When the Next button is enabled click Next Figure 6 31 Figure 6 31 Detecting Ventilator Connection ...

Страница 86: ...lator Communications 10 The Wizard software then gathers the ventilator configuration information Click Next Figure 6 32 Figure 6 32 Searching for BiPAP Focus Ventilator window 11 When the ventilator configuration is displayed click Next Figure 6 33 Figure 6 33 Ventilator Configuration Window ...

Страница 87: ...that asks what operation to perform select I want to install new software into the ventilator and click Next Figure 6 34 Figure 6 34 Selecting to Install new software 13 At available software window select in this example Version 2 00 File D Loads P2 00 004 TUI scl then click Next Figure 6 35 Figure 6 35 Available Software Window ...

Страница 88: ...ngs window Figure 6 36 click Next Figure 6 36 Verify Software Download Settings 15 The Installing User Interface Software window shows installation progress as the software erases the old user interface software installs new software and then updates ventilator software configuration information Figure 6 37 Figure 6 37 Installing User Interface Software ...

Страница 89: ...gure 6 38 Figure 6 38 Software Installation Complete 17 When BiPAP Focus Wizard Phase 2 Completion window appears click Finish Figure 6 39 Figure 6 39 BiPAP Focus Wizard Phase 2 Completion window 18 The ventilator restarts in Normal mode using the default settings Depending on the ventilator configuration you may need to perform a calibration as described in Chapter 7 ...

Страница 90: ...e the PCB 1 Write down the serial number from the bottom of the unit include hyphens if the serial number includes them Do this before reprogramming the serial number 2 All necessary software should already be installed If not follow the instructions in this chapter from the beginning 3 Enter Download mode and ensure that BiPAP Focus communication cables are still connected to the service PC 4 Dou...

Страница 91: ...us wizard asks what operation to perform Figure 6 41 select I want to perform advanced configuration operations then click Next Figure 6 41 Selecting Advanced Configuration Operations 6 Select I want to modify the BiPAP Focus ventilator s configuration then click Next Figure 6 42 Figure 6 42 Selecting Modify Ventilator Configuration ...

Страница 92: ...lick Ventilator Serial Number enter the serial number exactly as it appears on the bottom of the ventilator then click the Update Configuration button Figure 6 43 Figure 6 43 Entering the Serial Number 8 When the configuration is successfully updated click Next Figure 6 44 Figure 6 44 Configuration Update Successful ...

Страница 93: ...Inc 6 25 9 At the BiPAP Focus Wizard Phase 2 Completion window appears click Finish Figure 6 45 Figure 6 45 Phase 2 Wizard Complete 10 The ventilator restarts in Normal mode using the default settings Depending on the ventilator configuration you may need to perform a calibration as described in Chapter 7 ...

Страница 94: ...Chapter 6 6 26 BiPAP Focus Ventilator Service Manual Respironics Inc REF 1029568 Rev B Ventilator Communications This page is intentionally blank ...

Страница 95: ...ting section 7 7 Alarm LED testing section 7 8 Pressure accuracy testing section 7 9 A performance verification consists of the electrical safety alarm LED and pressure accuracy tests Record test results on the performance verification data form section 7 10 WARNING To prevent disease transmission use personal protective equipment when handling contaminated bacteria filters or other patient access...

Страница 96: ...g calibration PC or laptop with Windows XP or compatible operating system 9 pin serial communication port COM1 or USB to serial adapter assignable to COM1 USB port CD ROM drive Internet connection Local supplier Respironics utility software required for calibrating and testing BiPAP Focus ventilator Log on to http my respironics com to download utility software to a PC Inspiratory bacteria filter ...

Страница 97: ...rocessor communications X X X Cable interconnect power X X X Cable internal battery X X X Cable switch control X X X Cable UI VGA ribbon X X X Connector silicone X Diffuser X Flow valve X X X X X Keypad membrane panel X X X LCD 1 4 VGA X X X X Muffler and baffle assembly X X X X Outlet port X PCB controller X X X X X2 X X PCB user interface X X X X X2 X X PCB VGA interface X X X X Power cord X X X...

Страница 98: ...t least 120 minutes to avoid possible calibration failures Required equipment Test orifice BiPAP 0 25 in P N 332353 Follow these steps 1 Connect the test orifice to the ventilator outlet port 2 Run the ventilator for at least 2 hours 120 minutes before performing the calibration at default settings S T mode RR 4 min IPAP 12 cmH2O I Time 1 sec EPAP 4 cmH2O Ramp Time 0 min Rise Time 2 Ramp Start 4 c...

Страница 99: ...y alarms sound near the end of the battery test Gas delivery continues until the battery is depleted Test the battery once a month A fully charged battery is designed to support ventilator operation for 45 minutes at default settings Replace the battery if it cannot do so The 3 7 amp hour Ah nickel metal hydride NiMH battery provides 45 minutes of operation at default settings System automatically...

Страница 100: ... when an event occurs Because the calibration fails if the times do not match perform the real time clock calibration before you proceed to the calibration procedure 7 5 1 Downloading Real Time Clock Calibration Software Follow these steps to download the most current software to the service PC then perform the real time clock calibration 1 From the service PC go to http my respironics com and cli...

Страница 101: ...Service Manual Respironics Inc 7 7 2 Click on Utility Tools Figure 7 2 Figure 7 2 Select Utility Tools 3 At Service Center Tools Suite click Download Figure 7 3 Figure 7 3 Service Center Suite 4 When the download is complete extract the file Service Center Tools exe and launch the installation wizard ...

Страница 102: ...gh a USB hub Use of docking stations or USB hubs cause communication errors 1 Record the serial number and model number exactly as they appear on the bottom of the ventilator for use during calibration This information is required during system calibration section 7 6 2 Ensure that the ventilator is connected to AC power then power up in Diagnostic mode 3 Connect the serial communications cable be...

Страница 103: ...8 Rev B BiPAP Focus Ventilator Service Manual Respironics Inc 7 9 5 Select SET RT CLOCK Figure 7 5 Figure 7 5 Selecting Set RT Clock 6 At the Real Time Calibration Tool window click the RT Clock to begin calibration Figure 7 6 Figure 7 6 Real Time Clock Calibration Tool ...

Страница 104: ...on 7 When the Success window appears click OK Figure 7 7 Figure 7 7 Calibration Success Window 7 5 3 If Real Time Clock Calibration Fails If calibration fails confirm that ventilator time and date are set to within 5 minutes of the service PC Re run the calibration If the calibration fails again replace the controller PCB and retest ...

Страница 105: ...vent occurs Because the system calibration fails if the times do not match perform the real time clock calibration section 7 5 before you start this calibration procedure 7 6 1 Downloading System Calibration Software Follow these steps to download the most current calibration software to the service PC then perform the calibration procedure 1 From the service PC go to http my respironics com and c...

Страница 106: ...rformance Verification 2 Click on Utility Tools Figure 7 9 Figure 7 9 Select Utility Tools 3 At BiPAP Focus Calibration Software click Download Figure 7 10 Figure 7 10 BiPAP Calibration Software 4 When the download is complete extract the file BiPAP Focus Calibration_Software exe and launch the installation wizard ...

Страница 107: ...nning Windows XP version software A working default printer connected to the computer before beginning the calibration procedure BiPAP Focus communications cable kit P N 1039800 Flow control valve P N 1006120 Oxygen enrichment adapter P N 312710 Pressure tubing Smooth bore patient tubing NOTE Service calibration procedures require a printer to be assigned to the service PC this can be an internal ...

Страница 108: ...ormation screen Figure 7 11 verify the serial number If the serial number does not match reprogram the serial number as described in section 6 4 Figure 7 11 Product Information Screen 6 Ensure the ventilator is in Diagnostic mode Remove the bacteria filter from the ventilator if connected Pressure calibration 7 Connect the oxygen enrichment adapter to the patient outlet of the ventilator and use t...

Страница 109: ...ubing from the oxygen port of the oxygen enrichment adapter to the pneumatic calibration analyzer Figure 7 12 Figure 7 12 Pressure Calibration Setup 9 On the service PC open the Service Calibration Software and start the calibration by clicking on the white Run arrow in the upper left corner of the window Figure 7 13 Figure 7 13 Starting Calibration Run arrow ...

Страница 110: ...appears then click OK 11 At the prompt enter the ventilator model number and click OK 12 Enter operator name and click OK 13 Verify that the label is BiPAP Focus and click PASS 14 The program runs an alarm test follow the onscreen instructions 15 At the prompt Figure 7 14 attach the manometer and occlude the test orifice then click OK to start sensor calibration Figure 7 14 Pressure Sensor Calibra...

Страница 111: ...ng click DECREASE BLOWER SPEED or INCREASE BLOWER SPEED onscreen Figure 7 15 to achieve a pressure of 4 00 cmH2O then click DONE Figure 7 15 Increase Decrease Pressure 17 Enter in the pressure reading from the analyzer and press ENTER on the keyboard Figure 7 16 Entering Pressure Reading 18 The program prompts you to calibrate at various pressure levels using the onscreen buttons to increase or de...

Страница 112: ...tion beginning with positive flow Figure 7 17 Flow Calibration 20 Press ENTER on the keyboard Unblock the oxygen enrichment adapter then connect patient tubing or a coupling between the oxygen enrichment adapter and the flowmeter inlet Connect another length of patient tubing from the flowmeter outlet of the to the control valve completely open the flow valve Figure 7 18 Figure 7 18 Positive Flow ...

Страница 113: ... click INCREASE BLOWER SPEED or DECREASE BLOWER SPEED to achieve a flow of 150 to 160 LPM then click DONE Figure 7 19 Figure 7 19 Increase Decrease Flow 23 Note the flowmeter reading and adjust the flow control valve to achieve a flow of 146 LPM then click OK 24 The screen then prompts you to adjust the flow valve to achieve various flow settings Ensure that each flow setting is achieved before cl...

Страница 114: ...alibration Figure 7 20 Negative Flow Calibration 26 Connect a length of patient tubing between the flow control valve outlet and the negative flow source outlet Figure 7 21 Turn on the negative flow source and click OK Figure 7 21 System Calibration With Negative Flow Source NOTE For the negative flow source a REMstar device may be used with the pressure set at 20 cmH2O Air flow into ventilator fr...

Страница 115: ...negative flow However pressure against the normal flow direction is considered a negative flow Figure 7 22 Negative Flow Value Display 28 Enter the flow reading Figure 7 23 Be sure to enter the negative or minus symbol first The software rejects a positive value at this point Figure 7 23 Entering The Negative Flow Value 29 At the prompts adjust the flow control valve to achieve various negative fl...

Страница 116: ...atient tubing and occlude the O2 port at the ventilator outlet port 34 Pressure accuracy the program instructs the ventilator to produce specific pressures Note the analyzer pressure readings and enter them as prompted This step is performed twice to test the blower and the flow valve 35 At the green PASS prompt on service PC click OK to view the test data sheet Figure 7 24 Click OK on the print r...

Страница 117: ...Chapter 7 Testing Calibration and Performance Verification REF 1029568 Rev B BiPAP Focus Ventilator Service Manual Respironics Inc 7 23 Figure 7 25 Print Error No Printer Connected ...

Страница 118: ...onnected to 220 240 VAC 3 The electrical safety test is complete NOTE Ground impedance testing 25 A for US and Europe 40 A for Canada is not applicable to the BiPAP Focus ventilator system The earth connection from the rear panel of the ventilator is a functional earth for EMC purposes only The Protective Earth system is within the power supply unit as it has no conductive exposed parts The access...

Страница 119: ...imary Audible On and press Enter to test the alarm 6 Select Backup Audible On and press Enter to test the alarm Figure 7 27 Diagnostic Mode System Test Screen 7 Set the DMM to measure resistance Connect the DMM to pins 1 and 6 and verify that resistance is infinite open circuit when Remote Alarm Off is selected on the System Test screen When Remote Alarm On is selected verify that the DMM measures...

Страница 120: ...tilator is not already in normal ventilation mode cycle power to the ventilator to enter normal ventilation mode 4 Select CPAP mode and set the pressure to 4 cmH2O Verify the pressure reading and record the results 5 Set the pressure to 20 cmH2O Verify pressure reading and record the results 6 Select S T mode IPAP 10 cmH2O EPAP 5 cmH2O Rate 10 BPM and I Time 2 0 7 Verify that the BiPAP Focus switc...

Страница 121: ...ata Form Ventilator serial no Service notification Respironics use only Model no Total operating time Hospital name and address Technician name Date Preliminary cleaning and inspection Circle one Damage to ventilator exterior Yes No If yes brief description Cleaned ventilator exterior Yes No Cleaned ventilator interior Yes No Inspected inlet filters Yes No Electrical safety test Passed value Faile...

Страница 122: ...ce at pins 1 and 9 open circuit Yes No Remote Alarm Off resistance at pins 1 and 9 closed circuit Yes No ALARM ALARM SILENCE and ON BATTERY LEDs turn on Yes No Pressure accuracy test Passed value Failed value Value after repair When CPAP 4 cmH2O measured pressure 3 6 4 4 cmH2O cmH2O cmH2O cmH2O When CPAP 20 cmH2O measured pressure 18 22 cmH2O cmH2O cmH2O cmH2O When IPAP 10 cmH2O measured pressure ...

Страница 123: ...an antistatic electrostatic discharge ESD protected environment NOTE Always retrieve and save the DRPT if possible before replacing parts Removing the user interface PCB deletes the serial number significant event log entries and ventilator preference settings Review the significant event log before removing the user interface PCB NOTE To avoid damaging the controller PCB pressure transducers care...

Страница 124: ...ny components from the ventilator disconnect AC and battery power sources Figure 8 1 1 Turn the ventilator OFF O and disconnect the AC power cord 2 Remove the 2 battery cover screws 3 Remove the battery cover and battery pack 4 Disconnect the battery Figure 8 1 Disconnecting Battery Power Battery cable connector Battery compartment Screws x2 5 lbf in 57 N cm ...

Страница 125: ...f the ventilator remove the screws that hold the side covers 2 screws on each side cover to the ventilator and remove the side covers 2 Remove the 4 screws that hold the display assembly to the ventilator 2 screws at either side of the display and 2 screws under the display assembly Figure 8 2 Bottom Cover Screws x2 5 lbf in 57 N cm Screws x2 5 lbf in 57 N cm Screws x2 5 lbf in 57 N cm Screws x2 8...

Страница 126: ...9 pin serial port on the back panel 4 Remove the ON OFF switch bezel gently apply downward pressure to the top of the bezel allowing it to spring outward Then gently apply upward pressure to the bottom of the bezel allowing it to spring outward Figure 8 4 Bipap Focus Back Panel 5 Tilt the bottom of the display assembly outward to separate it from the bottom and top covers Jack screws 2 ON OFF swit...

Страница 127: ...Respironics Inc 8 5 6 Remove the four screws holding the top and bottom covers together 8 lbf in 90 N cm Lift front edge of top cover and remove ensuring that the back panel cut outs clear the serial port and switch Figure 8 5 Top and Bottom Covers Screws x4 8 lbf in 90 N cm Top cover Bottom cover ...

Страница 128: ...e the display assembly Figure 8 6 Figure 8 7 Figure 8 8 Figure 8 9 Figure 8 9 Reverse to install 1 Remove top cover section 8 2 2 Disconnect the VGA UI ribbon cable from the user interface PCB 3 Disconnect the ground cable from the user interface PCB Figure 8 6 Display Assembly and User Interface PCB UI VGA ribbon cable UI VGA ground cable Display assembly User interface PCB ...

Страница 129: ...back of the display assembly 6 Remove the side cover 7 Carefully open the display assembly taking care not to damage the ribbon cable and ground cable between the VGA LCD and VGA interface PCB 8 Pull the ground cable through the rear display cover and completely open the display assembly 9 Remove the 4 screws that secure the VGA LCD and VGA interface PCB 10 Disconnect the cables from the VGA inter...

Страница 130: ...Connections 11 Replace the display assembly or its replaceable components as necessary NOTE Tuck ribbon cables under VGA interface PCB before securing screws Do not twist or pinch cables between covers Screws x4 5 lbf in 57 N cm VGA interface PCB VGA LCD VGA interface PCB Display front cover UI VGA ribbon cable connector Cables from VGA LCD Ground cable Ribbon cable from keypad membrane panel ...

Страница 131: ...er section 8 2 Figure 8 10 User Interface PCB 2 Disconnect these cables Switch control cable Primary alarm connector Battery cable from battery housing Interconnect power cable controller PCB and retaining screw Interprocessor communications cable 3 Remove the 4 screws from the spacer nuts Switch control cable Primary alarm connector Interconnect power cable Interprocessor communications cable Pri...

Страница 132: ... Figure 8 11 Figure 8 12 Reverse to install 1 Remove top cover section 8 2 2 Remove the user interface PCB section 8 4 3 Disconnect the interconnect power cable 4 Remove the 3 spacer nuts and nylon washers Figure 8 11 Controller PCB 5 Lift the PCB to expose the remaining cables and tubing Interconnect power cable Spacer nuts x3 Nylon washers x3 Controller PCB Low profile service clip ...

Страница 133: ...damaging the controller PCB pressure transducers carefully remove tubing to avoid pulling on the sensors NOTE When reconnecting the tubing to the controller PCB sensors ensure that the tubing fits tightly If the tubing has become loose clip a short length 2 mm from the end of the tubing to ensure a snug fit Switchcontrol cable Blower cable J5 Backup alarm cable MT2 P2 connects to air flow sensor n...

Страница 134: ...d valve strap from the valve assembly 5 Disconnect the rubber elbow from the blower outlet CAUTION Do not pull the rubber elbow away from the flow valve If the rubber elbow is separated from the flow valve you must replace the entire assembly 6 Disconnect the diffuser from the flow valve 7 Remove or replace the flow valve Diffuser Outlet port Air flow sensor Primary alarm Tubing connects to contro...

Страница 135: ...lower Follow these steps to remove the Blower Figure 8 14 Figure 8 15 Reverse to install 1 Remove top cover section 8 2 2 Remove the user interface PCB section 8 4 3 Remove the controller PCB section 8 5 Figure 8 14 Blower 4 Remove the 2 screws that anchor the blower to the muffler Diffuser Screws x2 5 lbf in 57 N cm Blower ...

Страница 136: ... Pull the blower from the silicone gasket NOTE When replacing the blower and silicone blower gasket align the gasket tabs with the cut outs in the blower muffler housing then install the blower tabs into the gasket cut outs Align the blower screw holes with the screw holes in the muffler Blower tab Silicone gasket Cut out in gasket and muffler housing ...

Страница 137: ... install 1 Remove top cover section 8 2 2 Remove the user interface PCB section 8 4 3 Remove the user controller PCB section 8 5 4 Move the outlet port and air flow sensor without disconnecting them to access the backup alarm Figure 8 13 5 Remove the 2 screws that attach the backup alarm 6 Remove the backup alarm and foam gasket Figure 8 16 Backup Alarm Diffuser Screws x2 3 lbf in 34 N cm Backup a...

Страница 138: ... Alarm Follow these steps to remove the primary alarm Figure 8 17 Reverse to install 1 Remove top cover section 8 2 Figure 8 17 Primary Alarm 2 Disconnect the primary alarm connector from the user interface PCB 3 Remove the 2 primary alarm screws Primary alarm connector Screws x2 2 lbf in 23 N cm Primary alarm User interface PCB ...

Страница 139: ...5 4 Remove the flow valve section 8 6 and the outlet port air flow sensor silicone connector and diffuser 5 Remove blower section 8 7 6 Remove the four screws from the muffler that anchor it to the bottom cover 7 Remove the foam if necessary and clean any adhesive residue with isopropyl alcohol Install new foam if needed and apply product labeling if replacing the bottom cover Figure 8 18 Bottom C...

Страница 140: ...e Manual Respironics Inc REF 1029568 Rev B Component Removal Installation 8 11 Interconnect Diagrams This section shows power Figure 8 19 and communication Figure 8 20 interconnections Figure 8 19 Power Interconnection External AC DC power supply ...

Страница 141: ...9 The BiPAP Focus ventilator has the following communications requirements Interprocessor communication IPC between the controller PCB and the user interface PCB Serial port for calibration and controller PCB software upgrade USB port for user interface PCB software upgrade Figure 8 20 Communications Interconnection ...

Страница 142: ...Chapter 8 8 20 BiPAP Focus Ventilator Service Manual Respironics Inc REF 1029568 Rev B Component Removal Installation This page is intentionally blank ...

Страница 143: ... a complete list of all BiPAP Focus repair parts Table 9 1 Complete BiPAP Focus Service Parts List Description Quantity Part number Alarm backup 1 1039803 Alarm primary 1 1041089 Battery 1 1028006 Bezel ON OFF switch 1 1031160 Blower assembly includes damper strap blower cap blower gasket screws 1 1023818 Cable kit BiPAP Focus communications 1 1039800 Cable battery 1 1025776 Cable UI VGA GND 1 104...

Страница 144: ...e inlay 1 1031226 Foot black rubber package of 4 4 1031227 Gasket backup alarm foam 1 1031224 Gasket blower silicone 1 1056851 Gasket display foam 1 1031225 Gasket plate seal 1 1031228 Keypad membrane panel international 1 1025773 Keypad membrane panel USA 1 1025774 Label main 1 1031229 Label power ON OFF 1 1031230 LCD 1 4 VGA 1 1012282 Muffler assembly 1 1017913 Packaging box foam 1 1031231 PCB c...

Страница 145: ... 1031233 Screw M3 x 20 PH stainless steel package of 10 4 1030119 Screw M3 x 8 Pozi PH package of 10 16 1030148 Screw M4 x 10 Pozi PH package of 10 9 1030145 Seal flow valve foam 1 1011998 Spacer M3 x 8 x 5A F hex 4 1031235 Strain relief clip power cord 1 1031223 Strap flow valve 1 1031236 Strip strain relief hole cover 1 1031238 Washer 4 type B narrow flat package of 10 1 1030151 Washer 3 18 x 15...

Страница 146: ...ver Side covers 2 Rear access door Battery cover Washer x4 P N 1031240 Spacer x4 P N 1031235 Place standoffs after installing controller PCB M3 x 8 screws x4 P N 1030148 Black rubber foot x4 P N 1031227 Rear access door P N 1025766 Battery cover P N 1025761 NOTE When replacing the bottom cover order the main cover assembly P N 1052538 and a main label P N 1031229 Contact product support 1 800 345 ...

Страница 147: ...al P N 1025773 Display rear cover Display front cover BiPAP Focus display cover assembly P N 1052539 Includes these components Cover display front Cover display rear Cover display side Display side cover ON OFF switch bezel P N 1031160 Main label P N 1031229 Reusable particulate filter gray P N 1005964 Disposable particulate filter white P N 1005945 Power cord strain relief clip P N 1031223 ...

Страница 148: ...Chapter 9 9 6 BiPAP Focus Ventilator Service Manual Respironics Inc REF 1029568 Rev B BiPAP Focus Replacement Parts List 9 3 Front Panel User Interface VGA LCD P N 1012282 VGA interface PCB P N 1012280 ...

Страница 149: ...ironics Inc 9 7 9 4 Ventilator Interior Air flow sensor P N 1008490 Flow valve P N 1017912 Diffuser P N 1018156 Flow valve strap P N 1031236 Blower gasket silicone P N 1056851 Connector silicone P N 1056850 Outlet port kit P N 1062043 Blower assembly P N 1023818 Flow valve seal foam P N 1011998 Grommet x3 ...

Страница 150: ...Chapter 9 9 8 BiPAP Focus Ventilator Service Manual Respironics Inc REF 1029568 Rev B BiPAP Focus Replacement Parts List Backup alarm P N 1039803 Primary alarm P N 1041089 Muffler assembly P N 1017913 ...

Страница 151: ...9 BiPAP Focus Replacement Parts List REF 1029568 Rev B BiPAP Focus Ventilator Service Manual Respironics Inc 9 9 9 5 Communications Cables BiPAP Focus communications cable kit P N 1039800 USB cable Serial cable ...

Страница 152: ...ment Parts List 9 6 Electronic Parts Controller PCB P N 1035076 AC DC power supply assembly P N 1025775 Battery P N 1028006 User interface PCB P N 1025750 Power cord Denmark P N 1029991 Europe P N 1029985 India RSA P N 1034954 Italy P N 1034953 Switzerland P N 1034955 UK Ireland P N 1029982 USA P N 1029989 ...

Страница 153: ...l Respironics Inc 9 11 Interprocessor communications cable P N 1040722 Interconnect power cable P N 1025764 Battery cable P N 1025776 Switch control cable P N 1031159 UI VGA ribbon cable P N 1031239 UI VGA GND cable P N 1040723 Low profile service clip plastic adhesive backed ribbon cable P N 1030057 ...

Страница 154: ...Chapter 9 9 12 BiPAP Focus Ventilator Service Manual Respironics Inc REF 1029568 Rev B BiPAP Focus Replacement Parts List This page is intentionally blank ...

Страница 155: ...AP Mode CPAP Range 4 20 cmH2O 4 20 hPa Resolution 1 cmH2O 1 hPa Dynamic accuracy 5 cmH2O 5 hPa Ramp Time Range 0 45 min Resolution 5 min Accuracy 10 of setting Ramp Start Range 4 cmH2O to CPAP setting 4 hPa to CPAP setting Resolution 1 cmH2O 1 hPa Settings S T Mode IPAP Range 4 30 cmH2O 4 30 hPa Resolution 1 cmH2O 1 hPa Dynamic accuracy 5 cmH2O 5 hPa IPAP cannot be set below EPAP EPAP Range 4 25 c...

Страница 156: ...1 10 of setting sec I Time and Rate settings cannot allow I Time to exceed expiratory time Ramp Time Range 0 45 min Resolution 5 min Accuracy 10 of setting Ramp Start Range 4 cmH2O to EPAP 4 hPa to EPAP Resolution 1 cmH2O 1 hPa Measured Data Patient circuit pressure bar graph continuous display Range 0 35 cmH2O 0 35 hPa Resolution 1 cmH2O 1hPa Accuracy 10 of scale In the event of total loss of pow...

Страница 157: ...tion 0 1 L min Accuracy 1 L or 10 actual whichever is greater when leak is 60 L min using the Vision circuit Leak Range 0 150 L min Resolution 1 L min Accuracy 15 L min 10 Apnea Range 0 99 hour Resolution 1 hour Accuracy 1 hour after 1 hour Trigger Range Patient or Timed ventilator NOTE Est Vt and Est MV estimates are at ambient temperature and pressure dry ATPD Pressure signals are filtered using...

Страница 158: ...gnal Nurse Call Station 1 6 9 Nurse call station common Normally open NO during normal non alarm operation Normally closed NC during normal non alarm operation Serial Communications 2 3 4 5 7 8 Respironics advanced serial protocol RASP RS 232 Transmit Tx RASP RS 232 Receive Rx Not used RS 232 signal ground RS 232 Tx reserved for Respironics Technical Support RS 232 Rx reserved for Respironics Tech...

Страница 159: ...recharge or if operating in elevated ambient temperature above 28 C Charge is complete when the green CHARGING LED extinguishes Nurse call station relay The nurse call station port is intended to connect only to a SELV Safety Extra Low Voltage and ungrounded system with basic insulation to ground in accordance with IEC 60601 1 To prevent damage to the nurse call circuit the signal input should not...

Страница 160: ...uit Details The BiPAP Focus System automatically compensates for pressure drops associated with a Vision single patient use circuit and the mandatory bacteria filter The pressure drop increases as restrictive elements for example humidifiers are added to the circuit Always use a manometer to verify patient mask pressure ...

Страница 161: ...connect alarm operates properly with the circuit 10 4 Environmental Triggers and cycles Volume based trigger Flow reversal cycle Shape signal Timed trigger IPAP maximum of 3 0 seconds Peak flow cycle Supplemental oxygen Flow and pressure into oxygen valve Maximum flow 15 L min at ambient pressure Environmental Temperature Operating 5 to 35 C at 10 to 95 relative humidity Storage 20 to 60 C at 95 r...

Страница 162: ...s indicate the year the seventh and eighth the month the ninth and tenth the day Example 1 This serial number indicates a manufacture date of 13 March 2009 Example 2 This serial number indicates a manufacture date of 29 July 2006 S N 8772 09031301 P N 1028772 Date YY MM DD Unit number This serial number has no hyphen S N 8772 060729 01 P N 1028772 Date YY MM DD Unit number Include the hyphen if pr...

Страница 163: ...cling directives If you are subject to the WEEE RoHS directives refer to www respironics com for the passport for recycling this product NOTE The backlight display includes a cold cathode fluorescent light CCFL which contains mercury Follow all applicable regulations for disposal Electromagnetic Emissions WARNING Using cables other than those supplied by Respironics may result in increased emissio...

Страница 164: ...ns flicker emissions IEC 61000 3 3 not applicable Immunity Test IEC 60601 Test Level Compliance Level Electromagnetic Environment Guidance Electrostatic discharge ESD IEC 61000 4 2 6 kV contact 8 kV air 6 kV contact 8 kV air Floors should be wood concrete or ceramic tile If floors are covered with synthetic material the relative humidity should be at least 30 Electrical fast transient burst IEC 61...

Страница 165: ...r 25 cycles 5 UT 95 dip in UT for 5 sec Mains power quality should be that of a typical commercial and or hospital environment If the BiPAP Focus System user requires continued operation during power mains interruptions it is recommended that the BiPAP Focus System be powered from an uninterruptable power supply or a battery Power Frequency 50 60 Hz magnetic field IEC 61000 4 8 3 A m 3 A m Power f...

Страница 166: ... determined by an electromagnetic site surveya should be less than the compliance level in each frequency rangeb Interference may occur in the vicinity of equipment marked with the following symbol a Field strengths from fixed transmitters such as base stations for radio cellular cordless telephones and land mobile radios amateur radio AM and FM radio broadcast and TV broadcast cannot be predicted...

Страница 167: ...E THE SOLE REMEDY FOR BREACH OF WARRANTY IN NO EVENT SHALL RESPIRONICS BE LIABLE FOR LOST PROFITS LOSS OF GOOD WILL OR INCIDENTAL OR CONSEQUENTIAL DAMAGES EVEN IF RESPIRONICS HAS BEEN ADVISED OF THE POSSIBILITY OF THE SAME Exclusions This warranty does not apply to any unit or individual parts which have been repaired or altered in any way that in Respironics judgement affect its ability or reliab...

Страница 168: ...spironics Inc REF 1029568 Rev B Specifications Unauthorized service and or failure to perform periodic maintenance may void this warranty This warranty does not cover damage that may occur in shipment This warranty does not cover internal battery replacement ...

Страница 169: ...harging when fully depleted 4 6 replacement 4 5 Battery cable part number 9 11 Block diagram BiPAP Focus 3 4 Blower description 3 3 part number 9 7 removal installation 8 13 Bottom cover part number 9 4 removal installation 8 17 Brightness selecting 5 5 C Cable serial communications 6 2 Calibration negative flow 7 18 pressure 7 14 real time clock 7 6 system 7 11 Calibration positive flow 7 18 Caut...

Страница 170: ...heory of operation 3 4 F Filter disposable periodic maintenance 4 1 Filter reusable periodic maintenance 4 1 Flow and pressure accuracy 7 22 Flow valve description 3 3 part number 9 7 removal installation 8 12 Form performance verification 7 27 I Installing operating software 6 12 Intended use 1 1 Interconnect diagrams 8 18 Interconnect power cable part number 9 11 Interprocessor communications ca...

Страница 171: ...duct information screen 5 3 R Real time clock calibration 7 6 downloading software 7 6 performing calibration 7 8 Replacement interval air inlet filters 4 2 Replacement parts list 9 1 Reprogramming ventilator serial number 6 22 Reverse video selecting 5 5 S Screen lock timer selecting 5 5 Sensor readings screen 5 7 Serial cable installing 6 2 part number 9 9 Serial number 5 3 10 8 reprogramming 6 ...

Страница 172: ...le part number 9 11 UI VGA ribbon cable part number 9 11 Unit of pressure selecting 5 5 USB cable installing 6 3 part number 9 9 USB drivers installing to service PC 6 5 USB port 3 8 User interface PCB description 3 5 part number 9 10 removal installation 8 9 V Ventilation modes 3 1 Ventilator storage 4 9 VGA display description 3 7 VGA interface PCB description 3 7 part number 9 6 removal install...

Отзывы: