


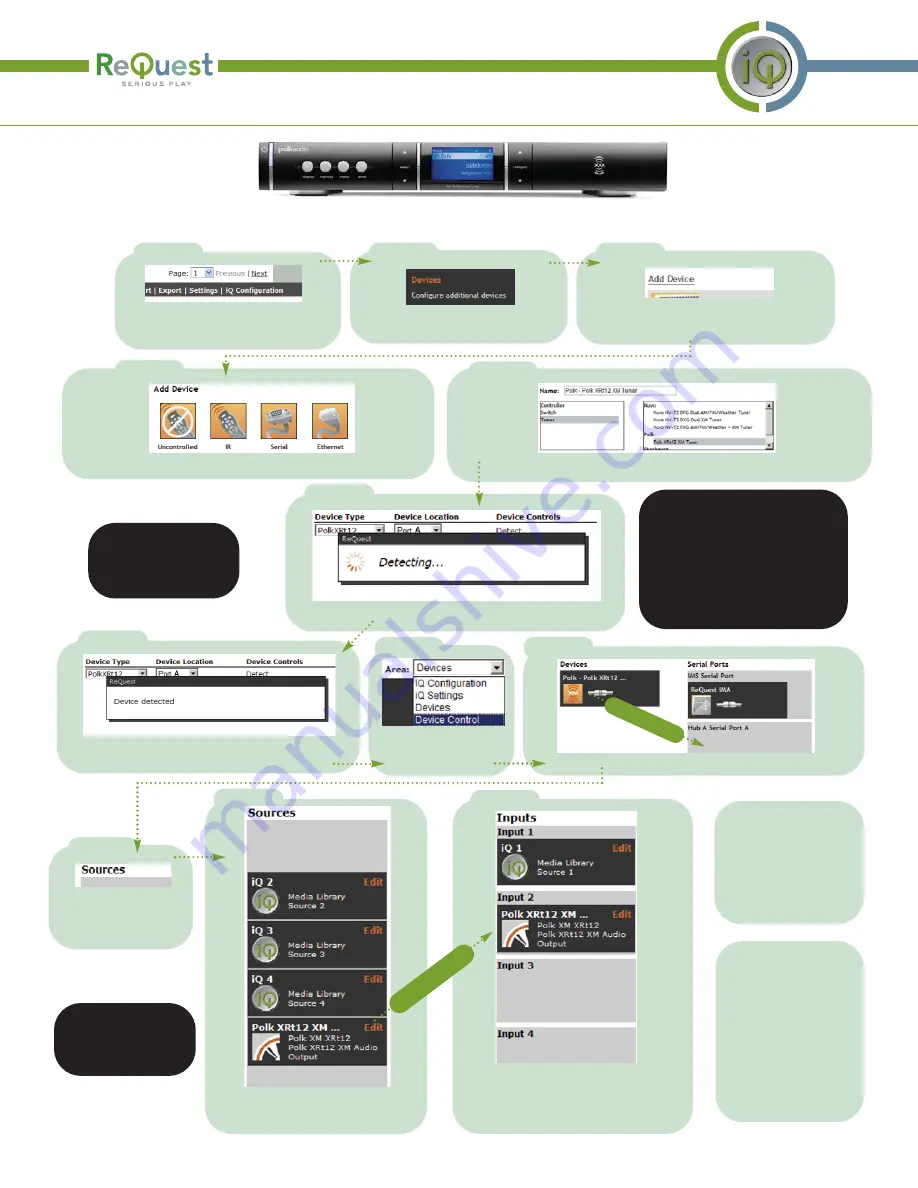
iQ Configuration for Polk XRt12
Click on the
"iQ Configuration"
link at
the bottom of the screen.
Select
"Serial"
from the control types popup.
Click on the link for
" Devices"
Click on the
"Add Device"
link located
above the Devices list
Click on
“Detect”
This means the Polk XRt12 is successfully detected.
Drag your tuner to the correct serial port on the right.
Step 8
Select “Tuner” then “Polk XRt12 Tuner” from the “Add Serial Device” box
On a networked computer, open a web browser and go to the IP address displayed on the front
of the iQ.IMS then follow these instructions:
In the event that you cannot
detect the Polk XRt12, check the
cable connections, ensure the XRt12's
power is on, and verify that you have
selected the correct the port A or B in
the Device Location field. Note: You
may safely attempt to detect the
XRt12 on either Port 1 or Port 2 if you
are unsure which port has been
connected.
The Polk tuner is
being shown here as an
example. Setup for other
supported tuners would
be similar.
If the device you
are connecting has
multiple tuners, you will
have to do this for each.
Step 1
Step 2
Step 3
Step 4
Step 5
Step 6
Step 7
You will see the Polk XRt12 device in
the list of available sources (left).
Step 10
Place the Polk XRt12 source from the left
to the input slot on the right where you
have connected the tuner to the IMA
(refer to Connection Guide).
Step 11
You may rename
the source from the
default
"Polk XRt12
XM Tuner"
to a name
you wish to appear on
the iQ interfaces by
clicking the
“Edit”
link
Optional: You may
rearrange the order in
which the iQ's configured
sources appear on the iQ
interfaces (TS35 and TS15).
Click on the link "3: Source
Order" on the top of the
screen and drag the
available sources to the
various slots. For more
information consult the
ReQuest iQ.IMS Installer
Guide.
clic
k and drag
Click on the “Sources”
link to return to the
Sources configuration
Step 9
clic
k and drag
Select ““D
De
ev
viic
ce
e C
Co
on
nttrro
oll””
from the A
Arre
ea
a menu at
the top.
Step 8
Setup Guide for the iQ.SCK2 and iQ.SCK4 Page 2


