background image

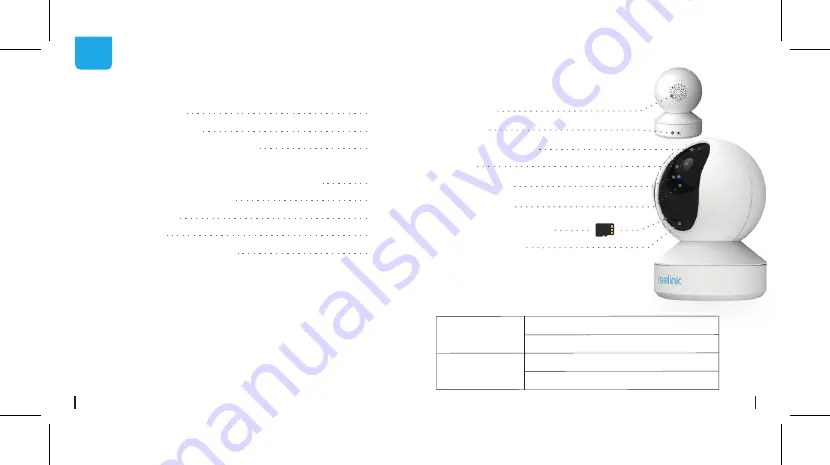
• Meaning of the Status LED

Speaker

Micro SD Card Slot

Daylight Sensor

WiFi connection failed

WiFi is not configured
Camera is starting up
WiFi connection succeeded

On

Blinking

General Introduction

EN

Contents

What’s in the Box

What’s in the Box

General Introduction
Set up Camera on Reolink App  

(For Smartphones)

Add the Camera to Reolink Client (For PC)
How to Mount the Camera
Troubleshooting
Specifications
Notification of Compliance

1

2
3

7
9

11

13
14

Camera ×1

Mounting Plate  ×1

Power Adapter  ×1

Quick Start Guide ×1

Surveillance Sign ×1

Mounting Hole 

Template ×1

Pack of Screws ×1

DC 5V

Built-in Mic

Status LED

Lens

Reset Button

(Rotate the camera's lens to find the 

reset button and the SD card slot.)

2

English

1 English

Содержание E1 Series

Страница 1: ...July 2019 QSG2_A Reolink E1 Series Operational Instruction EN DE FR IT ES ...

Страница 2: ...troduction Set up Camera on Reolink App For Smartphones Add the Camera to Reolink Client For PC How to Mount the Camera Troubleshooting Specifications Notification of Compliance 1 2 3 7 9 11 13 14 Camera 1 Mounting Plate 1 Power Adapter 1 Quick Start Guide 1 Surveillance Sign 1 Mounting Hole Template 1 Pack of Screws 1 DC 5V Built in Mic Status LED Lens Reset Button Rotate the camera s lens to find t...

Страница 3: ...llow the prompt tones to configure the camera 1 Please click the button in the top right corner to add the camera 2 Scan the QR code on the bottom of the camera Available on the Get it on 3 Click Connect to Wi Fi to configure the WiFi settings NOTICE Your family can click Access Camera for live view after the initial setup 4 English 3 English ...

Страница 4: ...of about 30 cm 12 inches and let the camera scan the QR code 30cm 12 inch 5 Follow the steps to finish the Wi Fi settings 6 After you created a password for your camera please follow the steps to sync the time and then start live view or go to Device Settings Menu Add New Device Device Settings Access the Live View 30cm 12 inch 6 English 5 English ...

Страница 5: ...anual and install it Please configure the camera using the Reolink App first Launch the Reolink Client software and follow the steps below toadd the camera 1 Connect your computer to the WiFi network of your router 2 Launch Reolink Client The camera will automatically display in the device list in LAN NOTICE If you ve created the password for your camera on Reolink App please click the button to ent...

Страница 6: ...by tightening the screws into the plastic anchors Step 4 Align the camera with the bracket then turn the camera unit clockwise to lock it in position NOTICE 1 Turn the camera anticlockwise to remove it from the wall 2 In case your camera is mounted upside down the picture will need to be rotated as well Please go to Device Settings Display interface then click Rotation to adjust the image 10 Engli...

Страница 7: ...o factory settings and check the IR light settings again If the problem goes on contact Reolink Support If you fail to upgrade the firmware for the camera try the following Confirm the current firmware version of the camera Make sure the firmware you download in the download center is the correct one Make sure the network of your computer is smooth If it still won t work please contact Reolink support...

Страница 8: ...nterference and 2 this device must accept any interference received including interference that may cause undesired operation For more information visit https reolink com fcc compliance notice Operating Frequency 2 4 GHz E1 Dual Band E1 Pro E1 Zoom Operating Temperature 10 to 55 C 14 to 131 F Size Φ76 x 106mm Weight 200g 11 2 oz Frame Rate 15fps in default Audio Two Way Audio IR Cut Filter Yes Dis...

Страница 9: ...t of reach of children By using the Product Software that is embedded on the Reolink product you agree to the terms of this End User License Agreement EULA between you and Reolink Learn more https reolink com eula This product comes with a 2 year limited warranty that is valid only if purchased from Reolink Official Store or a Reolink authorized reseller Learn more https reolink com warranty and r...

Страница 10: ...amera auf der Reolink App ein Fügen Sie die Kamera zum dem Reolink Client ein Installation Fehlerbehebung Technische Daten Konformitätserklärung 17 18 19 23 25 27 29 30 Kamera 1 Montageplatte 1 Netzteil 1 Kurzanleitung 1 Überwachungszeichen 1 Montage Lochschablone 1 Schrauben im Paket 1 DC 5V Internes Mikrofon Status LED Linse Reset Knopf Drehen Sie das Kameraobjektiv für den Zugriff auf Reset Loc...

Страница 11: ...folgen Sie bitte die Ansage um die Kamera zu konfigurieren 1 Klicken Sie bitte auf den Knopf oben rechts um die Kamera hinzuzufügen 2 Scannen Sie den QR Code auf der Unterseite der Kamera Available on the Get it on 3 Klicken Sie auf WLANVerbindung um fortzufahren Hinweis Ihre Familie kann nach der Erstkonfiguration über Auf Kamera zugreifen zur Live Ansicht gelangen 20 Deutsc 19 Deutsc ...

Страница 12: ...utzfilm auf der Kamera linse entfernt haben 30cm 12 inch 5 Befolgen Sie die Schritte um die WLAN Einstellungen zu schaffen 6 Nachdem Sie ein Passwort für Ihre Kamera erstellt haben folgen Sie bitte den Schritten um die Uhrzeit zu synchronisieren Starten Sie dann die Live Ansicht oder gehen Sie zu Geräteeinstellungen für weitere Konfiguration Menü Neues Gerät hinzufügen Geräteeinstellungen Live View ...

Страница 13: ...ps reolink com de software and manual Vor der Verbindung mit der Reolink Client Software muss die Kamera zuerst auf der Reolink App eingerichtet werden 1 Verbinden Sie Ihren Computer mit dem gleichen Router mit dem auch die Kamera verbunden ist 2 Starten Sie den Reolink Client Die Kamera wird nun automatisch in der Geräteliste im LAN angezeigt Hinweis Wenn Sie das Passwort für Ihre Kamera in der R...

Страница 14: ...stoffdübeln anzlehen Schritt 4 Rlchten Sie die Komera mlt der Halterung ous Drehen Sie die Kameroelnhelt dann Im Uhrzelgerslnn um sie In lhrer Position zu fixleren Hinweis 1 Drehen Sie die Komera gegen den Uhrzeigersinn um sie von der wand zu entfernen 2 Wenn lhre Kamero auf dem Kopf stehend montiert ist müssen Sie dos Bild ebenfalIs drehen Bitte öffnen Sie Gerāteeinstellungen Anzelgeoberfläche kllc...

Страница 15: ... Modus auf Auto um die IR Lampen zu aktivieren Aktualisieren Sie Ihre Kamera Firmware auf die neueste Version Setzen Sie sie auf die Werkseinstellungen zurück und aktiveren Sie die IR Lichteinstellungen Wenn dies das Problem nicht behebt wenden Sie sich bitte an das Reolink Support Team Wenn Sie die Firmware nicht aktualisieren können versuchen Sie die Lösungen Bestätigen Sie die aktuelle Firmware...

Страница 16: ...es Gerät muss alle empfangenen Interferenzen akzeptieren einschließlich Interferenzen die zu einem unerwünschten Betrieb führen können Weitere Informationen finden Sie unter https reolink com fcc compliance notice Betriebsfrequenz 2 4 GHz E1 Dualband WLAN E1 Pro E1 Zoom Betriebstemperatur 10 to 55 C Größe Φ76 x 106mm Gewicht 200g 11 2 oz Bildfrequenz 15 fps Standard Audio Zwei Wege Audio IR Sperrfil...

Страница 17: ...d Datenschutzrichtlinien auf https reolink com de Durch die Verwendung der in das Reolink Produkt integrierten Produktsoftware stimmen Sie den Bestimmungen dieses Endbenutzer Lizenzvertrags EULA zwischen Ihnen und Reolink zu Weitere Informationen https reolink com eula 2 Jahre eingeschränkte Garantie ist für dieses Produkt verfügbar Mehr Infos https reolink com de warranty and return Korrekte Ents...

Страница 18: ...figurer la caméra sur l application Reolink pour Smartphone Ajouter la caméra sur Reolink client pour PC Guides d installation Dépannage Caractéristiques techniques Avis de conformité 33 34 35 39 42 44 45 46 Caméra 1 Support de montage 1 Adaptateur secteur 1 Guide de démarrage 1 Signe de surveillance 1 Plaque de trous de montage 1 Lot de vis 1 DC 5V Micro intégré Voyant LED Lentille Bouton de réini...

Страница 19: ...vite pour configurer la caméra 1 cliquez sur le bouton dans le coin supérieur droit pour ajouter l option caméra 2 Scannez le code QR au verso de la caméra Available on the Get it on 3 Cliquez sur Se connecter au Wi Fi pour configurer les paramètres WiFi NOTICE Votre famille peut cliquer sur Accès Caméra pour l affichage en direct après l affichage de la configuration initiale 36 French 35 French ...

Страница 20: ...lm de protection de l objectif de la caméra 30cm 12 inch 5 Suivez les étapes pour terminer la configuration WiFi 6 Après avoir créé un mot de passe pour votre la caméra veuillez suivre les étapes suivantes pour synchroniser l heure et puis lancez l affichage en direct ou allez dans Réglages de l appareil Menu Ajouter un nouvel appareil Réglages de l appareil Accéder à la vue en direct 30cm 12 pouce...

Страница 21: ...ficiel https reolink com software and manual et installez le Veuillez configurer la caméra sur l application Reolink 1 Connectez votre ordinateur au même routeur que celui auquel la caméra est connecté 2 Lancez Reolink Client la caméra s affiche automatiquement dans la liste des périphériques du réseau local NOTICE Si vous avez créé le mot de passe de votre la caméra sur l application Reolink cliqu...

Страница 22: ...es ancrages en plastique Etape 4 Alignez la camera sur le support puis tournez unite camera dans le sens horaire pour la verrouiller en position NOTICE 1 Tournez Ia camera dons le sens lnverse des aiguilles d une montre pour la retirer du mur 2 Si votre camera est monteeo l envers I mage devra egalement etre tournee Allez dans Parametres de rappareil Afficher l lnterface puis cliquez sur Rotation ...

Страница 23: ...Affichage en direct et vérifiez le mode Jour Nuit réglez le mode sur Auto pour activer les lumières infrarouges Mettez à jour le firmware de votre caméra avec la dernière version Restaurez les réglages d usine et vérifiez à nouveau les réglages de l éclairage infrarouge Si le problème n est toujours pas résolu veuillez contacter l équiped assistance Reolink Si vous ne parvenez pas à mettre à niveau l...

Страница 24: ...eived including interference that may cause undesired operation For more information visit https reolink com fcc compliance notice Fréquence Wi Fi 2 4 GH E1 Bi Bande E1 Pro E1 Zoom Température de fonctionnement 10 to 55 C Dimensions Φ76 x 106mm fréquence d images 15fps dé fault Audio Audio Bidirectionnel Filtre infrarouge Oui Résolution vidéo 5MP E1 Zoom 4MP E1 Pro 3MP E1 Distance de vision noctur...

Страница 25: ...onfidentialité de https reolink com Veuillez laisser ce produit dans un endroit que les enfants ne peuvent pas atteindre En utilisant le logiciel produit intégré au produit Reolink vous acceptez les termes du présent contrat de licence utilisateur final CLUF entre vous et Reolink Pour en savoir plus https reolink com eula Ce produit est livré avec une garantie limitée de 2 ans En savoir plus https r...

Страница 26: ...Impostare la Telecamera sulla App Reolink per Smartphone Aggiungere la Telecamera al Client Reolink per PC Guide all Installazione Risoluzioni dei Problemi Specifiche Avviso di Idoneità 49 50 51 55 57 59 61 62 Telecamara 1 Supporto di Montaggio 1 Adaptador de Corriente 1 Guida Rapida 1 Cartello di Sorveglianza 1 Modello per Foro di Installazione 1 Viti 1 DC 5V Microfono incorporato LED di Stato Len...

Страница 27: ...a telecamera 1 Fare clic sul pulsante nell angolo in alto a destra per aggiungere la telecamera 2 Scannerizzare il codice QR sul retro della telecamera Available on the Get it on 3 Fare clic su connetti al Wi Fi per configurare le impostazioni Wi Fi AVVISO La vostra famiglia può fare clic su Accedi a Telecamera per la visualizzazione dal vivo dopo il setup iniziale 52 Italian 51 Italian ...

Страница 28: ...i aver rimosso la pellicola protettiva della lente della telecamera 30cm 12 inch 5 Seguire i passaggi per completare le impostazioni Wi Fi 6 Dopo aver creato una password per la vostra telecamera seguire i passaggi per sincronizzare l ora poi avviare la visualiz zazione dal vivo o andare su Impostazioni Dispositivo Menu Aggiungi nuovo dispositivo Impostazioni Dispositivo Accedi a Visuale dal Vivo ...

Страница 29: ...anual e installarlo Impostare la telecamera sulla App Reolink prima di aggiungere la telecamera al Reolink Client 1 Connettere il computer allo stesso router al quale è connessa la telecamera 2 Lanciare Reolink Client La telecamera verrà visualizzata automaticamente nella lista dispositivi in LAN AVVISO Se hai creato la password per la telecamera a sulla Reolink App clicca su per inserire la passw...

Страница 30: ...negll oncoroggl In plostlco Posso 4 Alllneore lo vldeocomera con lo stoffa qulndl ruotare lo vldeocomero In senso arorlo per bloccorla In poslzlone AVVISO 1 Girare lo fotocomero In senso ontlororlo per rlmuoverlo dol muro 2 Nel coso ln cul lo vldeocomero slo montotα copovolta soro necessorlo ruotare onche l lmmoglne Vol o lmpostozlonl dlsposltlvo lnterfocclo display qulndl faI cllc su Rotozlone pe...

Страница 31: ...ecente Ripristinate sulle impostazioni di fabbrica e controllate nuovamente le impostazioni delle luci IR Se il problema non si risolve contattare il team di supporto Reolink Se non riuscite ad aggiornare il film della telecamera provate le soluzioni seguenti confermate nella versione firma attuale della telecamera Assicuratevi che il firmware scaricato dal centro download sia quello corretto Assicur...

Страница 32: ...eve accettare qualsiasi interferenza ricevuta incluse interferenze che possono causare operazioni indesiderate Per maggiori informazioni visitare https reolink com fcc compliancenotice Frequenza Wi Fi 2 4 GHz E1 Dual Band E1 Pro E1 Zoom Temperatura in operatività 10 to 55 C Dimensione Φ76 x 106mm Peso 200g 11 2 oz frequenza dei fotogrammi 15fps didefault Audio Audio a 2 vie Filtro taglio IR Sì Ris...

Страница 33: ...su https reolink com Tenere fuori dalla portata dei bambini Utilizzando il software prodotto incorporato al prodotto Reolink voi accettate i termini di questo accordo di licenza per l utente finale EULA fra voi e Reolink Scopri di più https reolink com eula Questo prodotto viene fornito con una garanzia limitata di 2 anni Ulteriori informazioni https reolink com warranty and return Corretta rottama...

Страница 34: ...a cámara en la aplicación Reolink Agregue la cámara en el cliente Reolink Cómo instalar Solución de problemas Especificaciones Notificación de Cumplimiento 65 66 67 71 73 75 77 78 Cámara 1 Plantilla de montaje 1 Adaptador de corriente 1 Guía de inicio rápido 1 Señal de vigilancia 1 Plantilla de orificio de montaje 1 Tornillos 1 DC 5V Micrófono incorporado LED de estado Lente Reset Button Ruotare l ob...

Страница 35: ...ar la cámara 1 Por favor haga clic al botón en la esquina derecha superior para añadir la cámara 2 Escanee el código QR en la parte posterior de la cámara Available on the Get it on 3 Haga clic en conectar al WiFi para continuar Nota Su familia puede hacer clic en Acceder a la Cámara para ver la Vista en Vivo después de la configuración inicial 68 Spanish 67 Spanish ...

Страница 36: ... que haya retirado la cubierta de protección del lente de la cámara 30cm 12 inch 5 Sigue los pasos para finalizar la configuración de Wifi 6 Después de crear una contraseña para su cámara siga los pasos para sincronizar la hora y luego inicie la vista en vivo o vaya a Configuración del dispositivo Menú Añadir Nuevo Dispositivo Configuración de Dispositivo Acceder a la Vista en Vivo 30cm 12 piest 70 Spa...

Страница 37: ...uestro sitio web oficial https reolink com software and manual Nota Por favor configurarse primero en Reolink App 1 Conecte su computadora al mismo enrutador al cual la cámara esta conectada 2 Inicie Reolink Client La Cámara se mostrará automáticamente en la lista de dispositivos en LAN Nota Si ha creado la contraseña para su cámara en la aplicación Reolink por favor haga clic en el botón para ingre...

Страница 38: ...los anclojes de pl6stico Paso 4 Allnee la càmarc con el soporte luego glre Ia unldad de la càmara hacla la derecha para que que de segurc en su poslclón Nota 1 GIre la comaraen sentl do contrario a las manlllas del rel oj para retlrarla de la pared 2 En caso de que Ia camara este montada al reves I a Imagen tamblen debera gl rarse Vaya aConflguracion del dlsposltlvo lnterfaz de po ntolla luego hogo...

Страница 39: ...de su cámara a la ultima versión Restaure la configuración de fábrica y verifique la configuración de la luz IR nuevamente Si el problema aún no se soluciona comuníquese con el equipo de soporte de Reolink Si no puede actualizar el firmware para cámara pruebe las siguientes soluciones Confirme la versión actual del firmware de la cámara Asegúrese de que el firmware que descargue en el centro de descargas...

Страница 40: ... este dispositivo debe aceptar cualquier interferencia recibida incluidas las interferencias que puedan causar un funcionamiento no deseado Para obtener más información visite https reolink com fcccompliance notice Frecuencia WiFi 2 4 GHz E1 Doble Banda E1 Pro E1 Zoom Temperatura de funcionamiento 10 to 55 C Tamaño Φ76 x 106mm Peso 200g 11 2 oz Frecuencia de fotogramas 15fps por defecto A u dio Au...

Страница 41: ... servicio y la Política de privacidad en https reolink com Mantenga fuera del alcance de los niños Al utilizar el Software del producto que está incorporado en el producto Reolink usted acepta los términos de este Acuerdo de licencia de usuario final EULA entre usted y Reolink Obtenga más información https reolink com eula Este producto viene con una garantía limitada de 2 años Aprenda más https re...

Страница 42: ...re de support en ligne à l adresse https support reolink com Supporto Tecnico Se avete bisogno di aiuto le chiediamo gentilmente di contattare Reolink prima di restituire il prodotto La maggior parte delle domande può essere risolta tramite Soporte técnico Si necesita ayuda comuníquese con Reolink antes de devolver su producto La mayoría de las preguntas se pueden responder a través de nuestro cen...

Отзывы: