background image

32 


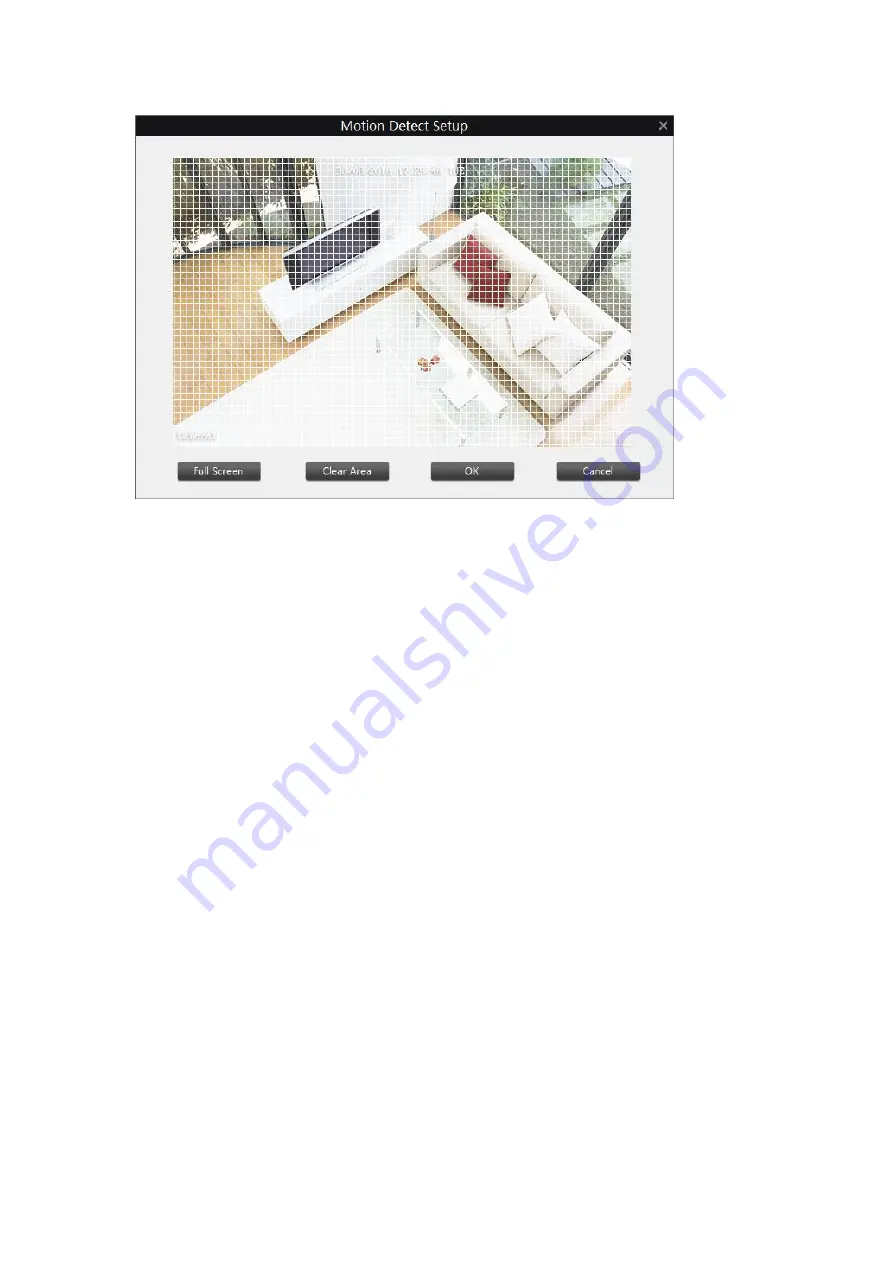
Full Screen

: Click to select the whole screen as the motion detection area. 


Clear Area

: Click to clear all the motion detection area you configured. 


OK

: Click to save the motion detection area configured. 


Cancel

: Cancel the settings you just made. 

Tips

1. 

Click mouse to select and click again to de-select. 

2. 

Click and drag the left-click button on the mouse to select or de-select certain area you 
want. 

Click 

OK

 on the Alarm page to save and enable settings. 


4.5 Device Settings > System   

Under this menu, you may check the system information of the device, configure the time 
settings, upgrade the firmware of the camera and reboot it. 


4.5.1 System > General 

Under 

General

, users can set up the Video Standard and time settings etc. 

Содержание C1

Страница 1: ......

Страница 2: ...symbol within an equilateral triangle is intended to alert the user to the presence of uninsulated dangerous voltage within the products enclosure that may be of sufficient magnitude to constitute a risk of electric shock The exclamation point within an equilateral triangle is intended to alert the user to the presence of important operating and maintenance servicing instructions in the literature...

Страница 3: ...d the software and manual from https reolink com software and manual If you have any questions you may refer to https reolink com faqs If you may need any technical support please contact us at support reolink com You may download the Firmware from https reolink com firmware ...

Страница 4: ...s and regulations relating to the use of cameras Before using any camera for any purpose it is the buyer s responsibility to be aware of all applicable laws and regulations that prohibit or limit the use of cameras and to comply with the applicable laws and regulations FCC Regulation for USA Prohibition against eavesdropping Except for the operations of law enforcement officers conducted under law...

Страница 5: ...de 13 3 3 Playback 13 3 3 1 Local Playback 13 3 3 2 Remote Playback 14 Chapter 4 Camera Configuration 16 4 1 Device Settings Display 17 4 2 Device Settings Recording 19 4 2 1 Recording Encode 19 4 2 2 Recording Option 20 4 2 3 Recording Schedule 20 4 3 Device settings Network 21 4 3 1 Network General 21 4 3 2 Network Advanced 22 4 3 3 Network Status 27 4 3 4 Network Wi Fi Settings 28 4 4 Device Se...

Страница 6: ... User 37 4 7 1 User Online User 37 4 7 2 User Add User 37 4 7 3 User Manage User 38 Chapter 5 Basic Settings 39 5 1 Basic Settings OSD 39 5 2 Basic Settings Encode 39 5 3 Basic Settings Image 40 Chapter 6 Advance Setup 41 ...

Страница 7: ...uilt in Micro SD socket Built in Microphone and speaker Reset Button Software Features Protocols Standards TCP IP UDP IP DHCP FTP SMTP DDNS NTP UPnP HTTP P2P Image Compression H 264 MJPEG Maximal Frame Rate 30fps Code rate 1024Kbps 6144Kbps Audio Two way Audio Maximum User Access 2 Users for Clear Stream Browser Supported IE Edge Chrome Firefox Safari OS Supported PC Windows Mac OS Smart Phone iOS...

Страница 8: ...2 1 2Physical Appearance ...

Страница 9: ... an Ethernet cable otherwise Reolink client software will not be able to find the camera 2 Make sure the camera and your computer are connected to the same router 2 2 Requirement for computer Item Requirement CPU 2 0GHz or faster RAM 2 GB or more Network adapter 10 100Mbps Resolution 1024x768 Operating System Microsoft Windows 7 and later ...

Страница 10: ... into your computer locate the file called Reolink and run this file Step 2 You may be asked by UAC User Account Control to allow Reolink to make changes to your system Select Allow or Continue Step 3 Follow the installation wizard to install the software ...

Страница 11: ...5 ...

Страница 12: ...our computer you can use it to manage your camera Double click on the icon to launch the client software on your computer 3 1 Live View Live view is the default mode Under live view users can view the video feed from the camera and go to configure the camera 3 1 1 General Introduction of the icons ...

Страница 13: ... detailed configuration please refer to chapter 4 4 PTZ Set the Pan Tilt Zoom Parameters For detailed configuration please refer to 3 1 3 Pan tilt and Preset 5 Click to stretch the windows to full screen Right click on the screen or hit ESC on the keyboard to exit full screen 6 Click to choose 1 4 and multi channel view up to 32 Channels 7 Click to adjust its volume 8 Enable disable audio means au...

Страница 14: ...ital Zoom For more details please refer to 3 1 2 Zoom in out the Image and Auto Focus 17 Click to snap a picture for the selected channel The still picture will be automatically saved to your computer 18 Start stop manual recording for the selected channel the video will be automatically saved to your computer 19 Start or stop live feed for the selected channel 3 1 2 Zoom in out the Image and Auto...

Страница 15: ...utton to delete the preset position if you do not want it Enable status will go back to Unset Call Click this button the camera will turn to the preset position you have choose How to set preset 1 Click the directional arrows on the pan tilt wheel to turn the camera lens 2 when it points to the position you prefer choose Preset 1 highlighted in yellow color then click the button to record the pres...

Страница 16: ... Cruise Point 1 and go to Cruise Point Setup 3 Choose the Preset you have set input Cruise Time how long it will stay when the camera moves to a preset point unit second and Cruising Speed 4 Configure other Cruise Point according to your need 5 Click OK to save and then click to run the preset point Click to stop cruise ...

Страница 17: ...ded Capture Path Where Reolink will save still images captured using the snapshot function Click Browse to choose another path on your computer if needed Language Select the language you want to Reolink to display Modify Password Change the password to login the Reolink client software There is no password by default Auto Login whether permission to login the Reolink will be asked or not when laun...

Страница 18: ...h stores the recorded file The minimum size is 10GB Record schedule click Set to enter the record schedule settings Click the grid box to change the schedule type Normal Motion and None If you want to select a large area click the schedule type to select it then press the left click button on the mouse and move it to select a period of time Normal it means the camera will constantly record during ...

Страница 19: ...o select the save path for the transcoded file 2 Click Add to add the file which you want to transcode to AVI format 3 Choose the file then click Transcode it will show Start or Finish under Status Remove remove the selected file from the box Clear remove all the files in the box no matter it is selected or not 3 3 Playback Under this menu you can playback the recorded video both on your computer ...

Страница 20: ...o remove the selected file from the list Click the button to delete the selected file from the list and your computer Click the button to choose the play mode among single play single cycle order play and loop play Click to choose the playing speed 3 3 2 Remote Playback Click the Playback button and go to Remote Playback On this page you can play the recorded video saved on the SD card ...

Страница 21: ...under Device List 2 Click on the date when the video was recorded 3 Click the button to show time in detailed hours and minutes click the left arrow or the right arrow to choose the time 4 The recorded video will show in blue color click on the segment where you want to play and hit the button to play How to download video from SD card 1 Click the button 2 Choose the video you want and click on th...

Страница 22: ...ike indicates the start time and end time of the selected video 3 Click the button to download the selected video clip Chapter 4 Camera Configuration Under the camera listed in Camera List you can refresh the camera start or stop live view and configure device settings edit or delete device This chapter will mainly introduce how to configure Device Settings ...

Страница 23: ...another attempt to login This icon is available only when camera status is login failed Edit Click to edit the login information of the camera Delete Delete the camera from Camera List Device Settings Click the button to enter Device Settings page 4 1 Device Settings Display Click OSD under Display users can modify the display info of the camera on this page ...

Страница 24: ... show the date and time on the screen Position Settings Choose where to display the time including upper left lower left upper right lower right top center or bottom center Privacy Mask Turns on off the masking function How to set up Mask 1 Check the box Privacy Mask to enable it then click Setup 2 Move the cursor to where you want to cover with a mask press the left click button on the mouse and ...

Страница 25: ...will record and display This is the higher quality stream Fluent Sub Stream the video stream that the Camera will send to remote devices via a network or the Internet It is the lower quality stream as a reduction in video size makes it easier to send over a network Record Audio Check to enable recording with audio otherwise there will be no audio for the recorded file Resolution Choose the resolut...

Страница 26: ...gs to SD card Overwrite Enable or Disable the camera to record over the oldest files on your SD card when it is full Pre record Enable or Disable the camera to record for 5 8 seconds before an event occurs Post record How long after an event occurs that the camera will continue to record 4 2 3 Recording Schedule This page allows you to set the recording schedule of the SD card Click the grid box t...

Страница 27: ... only store Motion Detection alarm it doesn t support continuous recording 4 3 Device Settings Network Under Network there are 4 sub menus including General Advanced Status and Wi Fi Settings you may check and configure the network parameters of the camera 4 3 1 Network General On this page you can configure the network parameters of the camera and check the MAC address ...

Страница 28: ... on your router for the camera in order to avoid IP conflict IP Address enter a fixed IP address for the camera in dotted decimal notation Subnet Mask Enter a subnet mask in dotted decimal notation Gateway Enter a default gateway in dotted decimal notation Preferred DNS Enter a DNS address in dotted decimal notation Alternate DNS Enter a DNS address in dotted decimal notation MAC Addr Displays the...

Страница 29: ...ogin to the web interface of the camera by a web browser The default value is 80 and you can change it RTSP Port Used to send the streaming file to Realplayer the default value is 554 and you can change it HTTPS Port Default value is 443 and you can change it Onvif Port used to add the camera to third party Onvif client software The default value is 8000 and you can change it UID Displays the UID ...

Страница 30: ...me you set up with your DDNS server Password Enter the password you set up with DDNS server Confirm Password Re type the password to confirm Click OK to save and enable settings NOTE If test is unsuccessful a message will appear onscreen informing you that Update was Unsuccessful This could mean that there s a problem with your network setup or there s a problem with the DDNS Account Name and Pass...

Страница 31: ...just accordingly or simply not use NTP and DST simultaneously Email Setup Click the Setup button next to E mail to enter the setup page Enable SSL or TLS Whether the email server you re using requires a secure link This is on by default and should be left on if you re using any of the preset email servers SMTP Server Type in the SMTP server for the sender Address The default server is for Gmail SM...

Страница 32: ...file can be uploaded to a FTP server Click the Setup button next to FTP to enter the FTP settings FTP server Type in the IP address or URL for your FTP server and input the correct port Port service port of the FTP server the default value is 21 you can modify it when necessary Anonymous Check this box when you FTP server does not have a username and password User Name Type in the user name of you...

Страница 33: ... server during this time None the camera will not record and upload to the FTP server during this time FTP Test Click to test whether the FTP is setup successfully If test failed please check your configuration and try again 4 3 3 Network Status This pages shows the network parameters of your camera including IP address subnet mask gateway preferred DSN and alternate DNS ...

Страница 34: ... password of the SSID you choose Click Show Password to display the password you entered double check whether it is correct 4 Click on Wi Fi Test to test if the WIFI Setting is succeeded If Wi Fi Test Succeed click OK to save the settings If Wi Fi Test Failed please check a if the password is correct b If the Antenna on Wi Fi Camera connected properly c if the Wi Fi Router working properly NOTE 1 ...

Страница 35: ...n this page NOTE Don t use PTZ system and motion detection simultaneously 4 4 1 Motion Sensitivity It means how sensitive the camera will be to the change of the environment Drag the slider to change the sensitivity value The lower the number is the more sensitive the motion detection will be and the more frequent motion will be triggered Click the Setup button to enter the Sensitivity setup page ...

Страница 36: ... more or less sensitive to motion depending on the circumstances The difference might be very dramatic Weather The weather conditions are going to affect your motion detection Dramatic weather phenomenon such as heavy rain strong winds lightning and so on may trigger the motion detection with surprising frequency On the other hand things like fog mist and other obscuring kinds of weather might mas...

Страница 37: ...rs SD Card Recording When selected the camera will start to record to SD card when the event type you have selected occurs Push Notification When selected the Reolink App will send a notification to you phone when the event type you have selected occurs 4 4 4 Motion Motion Detect Click the Setup button to enter the motion detect setup page You can set the motion detection area on this page Areas m...

Страница 38: ...ouse to select and click again to de select 2 Click and drag the left click button on the mouse to select or de select certain area you want Click OK on the Alarm page to save and enable settings 4 5 Device Settings System Under this menu you may check the system information of the device configure the time settings upgrade the firmware of the camera and reboot it 4 5 1 System General Under Genera...

Страница 39: ...chronize the camera time with local PC time DST Settings Turn on and set up DST if DST is applied in your area As to how to configure it please refer to how to configure DST Settings Enable Password Enable or disable the password to log in the camera Device Name Shows the name of your camera You can modify the name here Click OK to save and enable settings How to configure DST Settings 1 Click on ...

Страница 40: ...formation of the camera including device name model number and firmware version etc 4 5 3 System Maintenance On this page you can set the camera to reboot itself automatically at a certain time reset the camera to default settings and upgrade the firmware etc ...

Страница 41: ...re Upgrade Instructs the Camera to update its firmware How to upgrade firmware 1 Download the firmware from Reolink official website https reolink com firmware 2 Go to Device Settings System Maintenance click on From Local 3 Click on Browse to locate the upgrading file end with pak click on Upgrade to upgrade the firmware Note It is suggested to check Update Configure File when upgrading the firmw...

Страница 42: ... CPU loading for the connected Camera bit rate and Ethernet Port Throughout 4 5 5 System Reboot Click the Reboot button on this page to restart the camera 4 6 Device Settings Device Users can check the SD card info or format the SD card on this page ...

Страница 43: ...is menu you can check and modify the user information 4 7 1 User Online User It shows the current users who are accessing the camera 4 7 2 User Add User The admin account has the authority to add other users The maximum number of users is ...

Страница 44: ...dded user Administrator Whether or not this account has administrator authority Password Type a password for the added user Confirm Password Re type the password to confirm Click OK to save and enable settings 4 7 3 User Manage User Change the password for the User or delete user on this page ...

Страница 45: ... it to confirm then go to OK it will show Operation Succeed on the bottom which means the password changed successfully Note If the old password is the default one please leave the Old Password field blank Chapter 5 Basic Settings Click Basic Settings to display the sub menus including OSD Encode and Image 5 1 Basic Settings OSD Please refer to 4 1 Device Settings Display 5 2 Basic Settings Encode...

Страница 46: ...ween the blackest black and the whitest white in the image Saturation Alters how much color is displayed in the image The higher the saturation the brighter and more vivid colors will appear to be Hue Changes the color mix of the image this can have very dramatic results Sharpen Sharpen image to increase the Signal Noise Ratio Mirroring Choose to change the orientation of the image to be horizonta...

Страница 47: ...white balance to correct image colors Select Manual to adjust red gain and blue gain Day Night Set the camera s color mode during different times of the day and night Color the camera will show a colorful image which is usually in the day time Black and white the camera will show the image only with black and white color which is usually during the night when the IR LEDs are on Auto the camera wil...

Страница 48: ...42 LED light Turn on off the IR LEDs Default Restore to default settings Click OK to save and enable settings ...

Отзывы: