


Care and cleaning
• This product does not require maintenance. Repair or maintenance work must be carried out by a
specialist.
• Disconnect the product from the power supply before cleaning.
• Never use aggressive detergents, rubbing alcohol or other chemical solutions, as these may damage the
enclosure or cause the product to malfunction.
• Use a dry, lint-free cloth to clean the product. Dust can be easily removed using a clean, soft brush and
a vacuum cleaner.
Disposal
Electronic devices are recyclable waste and must not be placed in household waste. At the end
of its service life, dispose of the product in accordance with applicable regulatory guidelines.
You thus fulfil your statutory obligations and contribute to environmental protection.
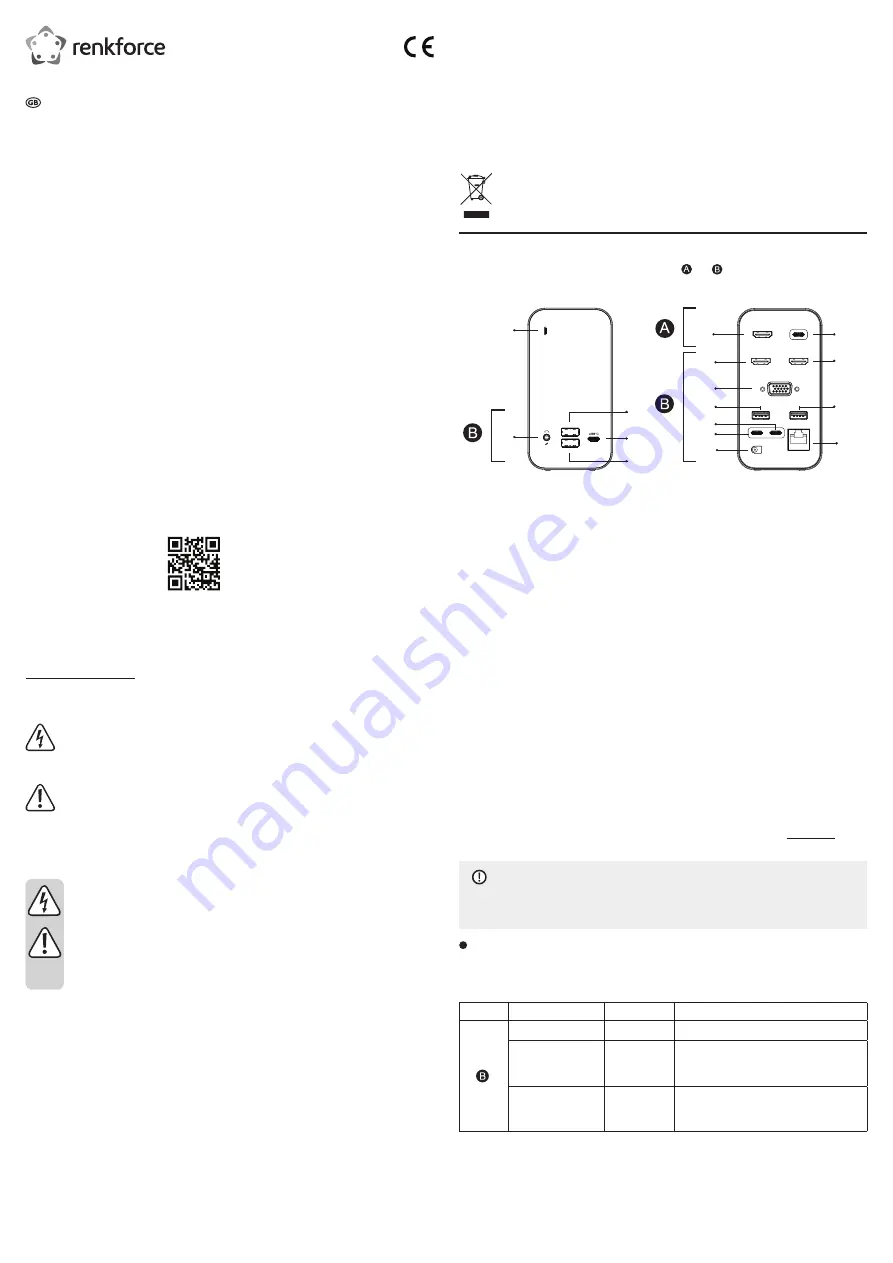
Components
The product is divided into 2 independent operating units and . Communication between units is not
possible.
1
2
3
4
5
6
8
10
11
13
14
15
7
9
12
16
1 LED indicator
2 3.5 mm jack socket
3 USB-A port
4 USB-C™ port
USB-C
5 USB-A port
6 HDMI port
7 USB-C™ port
HOST
8 HDMI port
9 HDMI port
10 VGA port
11 USB-A port
12 USB-A port
13 USB-C™ (PD3.0) port
Power
14 USB-C™ port
Host
15 Low-voltage socket
16 Network port
Connection and use
This topic explains how make connections and use them. The product is powered by the power adapter.
The topic covers some common usage scenarios. Use them as guidance when setting up your connections.
Individually covered scenarios:
• Using a USB peripheral device (mouse, keyboard, storage, printer)
• Charging or powering devices
• Connecting screens
• Using an analogue microphone or headphones
• Adding a network connection
a) Supplying power
Use the power adapter to power the product.
1. Connect the power adapter cable to the low-voltage socket on the product.
- The LED indicator light lights up.
b) Connecting and using devices
Each usage scenario lists the required/suitable product components listed in the topic Components.
Use cables suitable for the connections you make.
NOTICE
Prevent device damage.
Always disconnect the power adapter from the product before you connect and disconnect devices.
Using a USB peripheral device (mouse, keyboard, storage, printer)
Connect a USB peripheral device (e.g. Keyboard) and make it available to a connected host device (e.g.
computer).
Ports:
Unit
Port
Component
Limitations
USB-C™ (IN)
Host
14
USB-A
11,12
- USB 3.0 (USB 3.1 GEN1) port
- max. 5 GBit/s
- 5 V/DC / max. 0.9 A / max. 4.5 W
USB-A
3,5
- USB 3.0 / USB 3.1 GEN1 port
- max. 5 GBit/s
- 5 V/DC / max. 1.5 A / max. 7.5 W
Connect as follows:
1. (If connected) disconnect the power adapter.
2. Connect the host device (e.g. computer) to the USB-C™ port
Host
.
Operating instructions
USB-C™ 15-in-1
Laptop docking station
Item no. 2249726
Intended use
Connect up to two host devices (e.g. computer) to
the product via USB-C™ to extend their interfaces
or add additional functionality.
Charge or power devices on designated ports.
Use the power adapter to supply power to the
product.
This product is intended for indoor use only.
Do not use it outdoors. Contact with moisture
(e.g. in a bathroom) must be avoided under all
circumstances.
For safety and approval purposes, do not rebuild
and/or modify this product. Using the product for
purposes other than those described above may
damage the product. In addition, improper use can
cause hazards such as a short circuit, fire or electric
shock.
Read the operating instructions carefully and
store them in a safe place. Only make this product
available to third parties together with its operating
instructions.
This product complies with statutory, national and
European regulations. All company and product
names contained herein are trademarks of their
respective owners. All rights reserved.
HDMI is a registered trademark of HDMI Licensing
L.L.C.
Package contents
• Docking station
• Power adapter
• 2x USB cable (USB-C™ to USB-C™)
• Operating instructions
Up-to-date operating instructions
Download the latest operating instructions at
www.conrad.com/downloads or scan the QR code
shown. Follow the instructions on the website.
Explanation of symbols
The symbol with the lightning in a
triangle indicates that there is a risk
to your health, e.g. due to an electric
shock.
The symbol with an exclamation
mark in a triangle is used to highlight
important information in these
operating instructions. Always read this
information carefully.
Safety information
Read the operating instructions and
safety information carefully. If you
do not follow the safety information
and information on proper handling
in these operating instructions,
we will assume no liability for
any resulting personal injury or
damage to property. Such cases will
invalidate the warranty/guarantee.
a) General information
• The device is not a toy. Keep it out of the reach
of children and pets.
• Do not leave packaging material lying around
carelessly. It may become a dangerous
plaything for children.
• Protect the product from extreme temperatures,
direct sunlight, strong jolts, high humidity,
moisture, flammable gases, vapours and
solvents.
• Do not place the product under any mechanical
stress.
• If it is no longer possible to operate the product
safely, stop using it and prevent unauthorised
use. Safe operation can no longer be
guaranteed if the product:
- is visibly damaged,
- is no longer working properly,
- has been stored for extended periods in poor
ambient conditions or
- has been subjected to any serious transport-
related stresses.
• Handle the product carefully. Jolts, impacts or
a fall even from a low height may damage the
product.
• Consult a technician if you are not sure how
to use or connect the product, or if you have
concerns about safety.
•
Maintenance, modifications and repairs must
be carried out by a technician or a specialist
repair centre.
• If you have questions which remain unanswered
by these operating instructions, contact our
technical support service or other technical
personnel.
b) Connected devices
• Always observe the safety information and
operating instructions of any other devices
which are connected to the product.
c) Electrical safety
• The mains outlet must be located near to the
device and be easily accessible.
• Only power the product using the power
adapter provided.
• Only connect the power adapter to a normal
mains socket connected to the public supply.
Before plugging in the power adapter, check
whether the voltage stated on the power
adapter complies with the voltage of your
electricity supplier.
• Never connect or disconnect power adapters if
your hands are wet.
• Never unplug the power adapter from the mains
socket by pulling on the cable; always use the
grips on the plug.
• For safety reasons, disconnect the power
adapter from the mains socket during storms.
• Do not touch the power adapter if there are
any signs of damage, as this may cause a fatal
electric shock! Switch off the mains voltage
to the socket containing the power adapter
(switch off the corresponding circuit breaker
or remove the safety fuse, and then switch
off the corresponding RCD protective switch).
You can then unplug the power adapter from
the mains socket. Dispose of the faulty power
adapter in an environmentally friendly manner
and discontinue its use. Replace it with a power
adapter of the same design.
d) Persons and product
• Never pour liquids over electrical devices or
place objects filled with liquid next to the device.
If liquid or a foreign object enters the interior of
the device nevertheless, first power down the
respective mains socket (e.g. switch off the
circuit breaker) and then pull the mains plug
from the mains socket. Discontinue use and
take the product to a specialist repair centre.
• Never use the product immediately after it has
been brought from a cold room into a warm one.
This may cause condensation to form, which
can destroy the product. Allow the product to
reach room temperature before connecting it
and putting it into use. This may take several
hours.
• When setting up the product, ensure that the
cables are not pinched, kinked or damaged by
sharp edges.
• Always lay the cables so that nobody can trip
over or become entangled in them. This poses
a risk of injury.


