background image


24 

3.4.5 Connection 

Type 

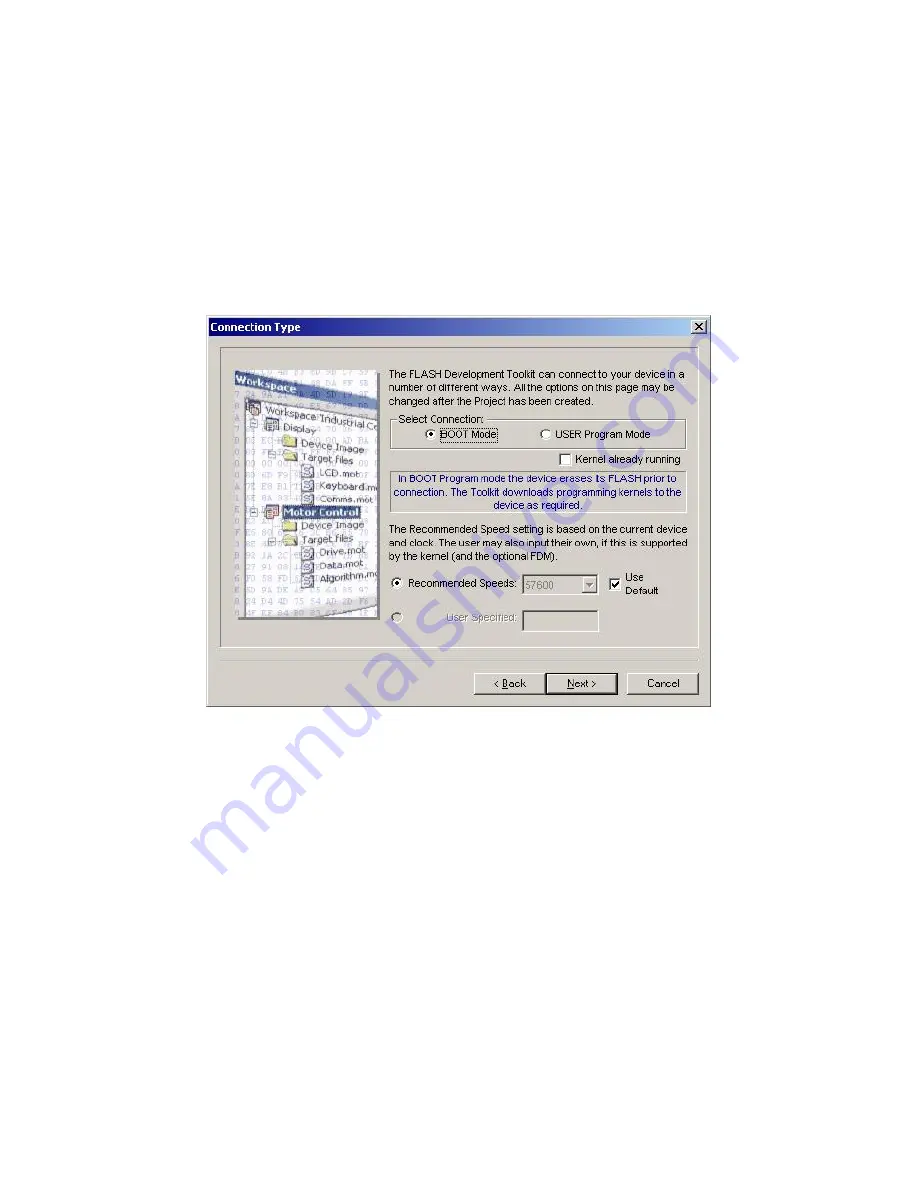
Select whether the connection is for Boot Mode or User Mode in the ‘Connection Type’ dialog. 
Additionally, for a connection to a kernel that is still running on the device from a previous session, select 
the ‘Kernel already running’ check box. Next, select the communication speed (bps) if the default value is 
not correct or not present. Speeds where the target error rate is greater than 4%, or the FDM\E8Direct error 
rate is greater than 0% are automatically removed from the recommended list. When using the 
FDM\E8Direct the ‘User Specified’ connection speed option is enabled; when selected, this allows the user 
to specify a non-standard baud rate. The error rate will be displayed – this takes into account the target 
peripheral clock rate, the target Bit Rate Register calculation formula, and the FDM\E8Direct 
characteristics. 

Click the ‘Next’ button to continue.  


Figure 3-6 

Connection Type


Note that ‘Use Default’ is designed for use with the Renesas Evaluation Board or Evaluation Development 
Kits. Uncheck this to allow manual selection of the bit rate. 


Содержание FLASH Development Toolkit 3.07

Страница 1: ...s Manual Rev 9 00 Revision Date Oct 31 2006 Renesas FLASH Microcomputer Programming System HS6400FDIW3S Renesas FLASH Development Toolkit 3 07 for Windows 98SE Me Windows NT 4 0 Windows 2000 and Windo...

Страница 2: ...such as safety systems or equipment or systems for transportation and traffic healthcare combustion control aerospace and aeronautics nuclear power or undersea communication transmission If you are co...

Страница 3: ...o not have Local Machine Administrator rights for my PC 15 3 2 7 How do I recompile a kernel 16 3 2 8 How do I use the supplied demonstration User Mode Kernels 16 3 2 9 Can I modify the User Mode kern...

Страница 4: ...ion only 32 3 5 6 Generic Boot Confirmation 34 3 5 7 Generic Boot Select Device 34 3 5 8 Generic Boot Select Clock Mode 35 3 5 9 Generic Boot Setup Complete 36 3 5 10 Generic Boot Device Settings 36 3...

Страница 5: ...or Script Edit Configuration 48 4 4 Wait For Script Run Configuration 48 4 5 Wait For Script Script Commands 48 4 5 1 Workspace 49 4 5 2 Connect 49 4 5 3 Download 50 4 5 4 Erase 50 4 5 5 BlankCheck 51...

Страница 6: ...u 65 7 1 1 Close 65 7 1 2 New Workspace 65 7 1 3 Open Workspace 65 7 1 4 Save Workspace 65 7 1 5 Close Workspace 65 7 1 6 Open an S Record 66 7 1 7 Save 66 7 1 8 Save As 66 7 1 9 Exit 66 7 2 Edit Menu...

Страница 7: ...1 7 7 Device Menu 71 7 7 1 Connect to Device 71 7 7 2 Disconnect 71 7 7 3 Erase FLASH blocks 71 7 7 4 Blank check 72 7 7 5 Upload Image 72 7 7 6 Download Active File 72 7 7 7 FLASH Checksum 72 7 7 8 G...

Страница 8: ...ecksum 80 8 2 12 Compare File Device Checksum 80 8 2 13 Compare File Device Complete Device 81 8 2 14 Compare File Device File Data Only 81 8 3 Workspace Properties 81 8 4 Project Properties 82 8 5 Co...

Страница 9: ...9 1 5 Request Checksum 100 9 1 6 Erase Device Before Program 100 9 1 7 Security Protection 100 9 1 8 Field Programming Run Published File 100 9 1 9 About 100 9 2 Dialog Controls 101 9 2 1 Back to Proj...

Страница 10: ...ld Programming Run Published File 108 11 1 9 About 108 11 2 Dialog Controls 109 11 2 1 Back to Project 109 11 2 2 Exit 109 11 2 3 Download Project image radio button 109 11 2 4 Program Flash Erase 109...

Страница 11: ...of bodily injury such as aerospace aeronautics nuclear power combustion control transportation traffic safety equipment or medical equipment for life support Design your application so that the produ...

Страница 12: ...le through these respective areas Chapter 9 Simple Interface Mode describes use of FDT with a cut down Graphical User Interface Chapter 10 Basic Simple Interface Mode describes use of FDT with a cut d...

Страница 13: ...lash areas Kernel Code which takes control of the device and allows reprogramming functions This code is often downloaded to the device Micro Kernel The part of the kernel which gets executed first an...

Страница 14: ...r this string Used to indicate text that must be entered excluding the quotes Key Key Used to indicate required key presses For example Ctrl N means press the Ctrl key and then whilst holding the Ctrl...

Страница 15: ...s Standard window operation based on the 32 bit Windows GUI Various online help functions Selectable messaging levels Simple programming environment optionally controls an adapter board Serial communi...

Страница 16: ...2...

Страница 17: ...need only be set once as they can be stored between sessions by saving the Project A single project within the workspace is active at any point in time The active project is the context to which all D...

Страница 18: ...s on the Menu bar as indicated by the menu titles Using the mouse the user can select a command operation invoke a dialog box or a window to interact with the system Clicking the left mouse button on...

Страница 19: ...ON Figure 2 3 Checked Menu Items If a menu item has the symbol 8 next to it then a cascading or hierarchical menu is available Clicking on the menu item will reveal the cascading menu Figure 2 4 Casca...

Страница 20: ...button and in the status bar The toolbar buttons can be customised to provide a button for the majority of the features available in FDT and can be arranged in an order that the user finds convenient...

Страница 21: ...n of the target device is blank Upload launches the Upload Image dialog box to allow data to be obtained from the target device Download Active File downloads the file which is active in the hex edito...

Страница 22: ...8 bytes The number of bytes that can be accommodated on each line is dependent upon the size of the window Toggle ASCII turns ASCII data ON or OFF Find launches the Find dialog box Find and Replace l...

Страница 23: ...r the searches Find locates data in active file Find Next locates next occurrence of search criteria Find Previous locates previous occurrence of search criteria 2 1 3 Status Bar The Status Bar is loc...

Страница 24: ...F10 and then selecting the required menu option An example pop up menu is Figure 2 11 Pop up Menu The contents and operation of specific pop up menus are explained in detail in the description of eac...

Страница 25: ...Commands Close File Ctrl F4 Open S Record Ctrl R Save All Ctrl Shift H Save Ctrl S Exit Alt F4 Edit Commands Undo Ctrl Z Redo Ctrl Y Cut Ctrl X Copy Ctrl C Paste Ctrl V Select All Ctrl A Find Ctrl F...

Страница 26: ...Blocks Ctrl Alt E Blank Check Ctrl Alt B Upload Image Ctrl Alt U Download Active File Ctrl Alt P Flash Checksum Ctrl Alt S Go From Address Ctrl Alt G Block Locking Ctrl Alt L Cancel Operation Ctrl Bre...

Страница 27: ...lect the file to program for each enabled area 5 Select the Program Flash Button 6 Disconnect when programming is completed 3 2 Background Information 3 2 1 What are the User Area User Boot Area and D...

Страница 28: ...ingle file for the User Mode test program e g Protocol C kernels 3 2 3 What is the difference between User Mode and User Program Mode Some devices use an additional mode pin to protect the flash from...

Страница 29: ...ernel recompiled The main difference to the Protocol B User Mode Kernels is that the Write and Erase modules are held internally on the device Protocol D For R8C and former Mitsubishi family devices e...

Страница 30: ...ould be used rather than command com The above batch file should be modified to reflect the path of your compiler Ensure that the specified temporary directory exists and is writeable 3 2 8 How do I u...

Страница 31: ...culate the Bit Rate Register value 3 3 Starting FDT 3 3 1 Starting FDT without Security or Simple Interface Mode enabled To start FDT open the Start menu of Windows and select Programs Renesas Flash D...

Страница 32: ...turn straight back to that mode 3 3 7 Starting FDT with Access Rights password security enabled If the Access Rights password security has been enabled FDT will display the login dialog before allowin...

Страница 33: ...figuration file is double clicked in Windows Explorer 3 3 9 5 Opening w4f Script Configuration files from the command line with Access Rights password security enabled FDT path FDT exe arl Username Pa...

Страница 34: ...r created See Chapter 10 Basic Simple Interface Mode for details on programming without setting up a workspace and project 3 4 1 New Project Workspace Figure 3 2 New Workspace Enter the workspace name...

Страница 35: ...that has information about the kernel such as the device version number and the compilers it was created with Select the required kernel from the displayed list or if you have an alternative kernel el...

Страница 36: ...in addition to the serial ports there is also an option to use the FDM USB interface board For some kernels there are also other port options such as USB Direct eg for the 2215UF E8 E8Direct and FoUS...

Страница 37: ...decimal places The target device the kernel and the Clock Mode determine the valid range 3 Clock Mode If enabled select the required value from the drop down list 4 Multiplier for CKM If enabled selec...

Страница 38: ...r rate is greater than 0 are automatically removed from the recommended list When using the FDM E8Direct the User Specified connection speed option is enabled when selected this allows the user to spe...

Страница 39: ...the required mode for User Mode projects set the User Mode Outputs User Mode Setting and the User Program Mode Setting for the required mode Click the Next button to continue Mode Outputs sets which...

Страница 40: ...26 Figure 3 8 FDM Pin Settings Figure 3 9 E8Direct Pin Settings...

Страница 41: ...ion Click the Finish button Mode Outputs sets which pins are driven by the FDM Mode Setting sets whether output pins are driven High checked or Low Unchecked Notes Setting the mode pins using the FDM...

Страница 42: ...28 Figure 3 11 E8DirectRESET Pin Settings...

Страница 43: ...be connected and set into Boot Mode at the time you create the project If a Generic Boot device is selected then a series of screens appear displaying the results of the inquiry functions you will be...

Страница 44: ...col C devices which appear in the device list are supported by using Generic Boot This means that when one of these devices is selected in the Project Wizard FDT will behave as if Generic BOOT Device...

Страница 45: ...then click the Next button Figure 3 15 Communications Port 3 5 4 Generic Boot FDM Pin Settings FDM connection only If the FDM is selected the following screen will be shown Set the mode pin settings...

Страница 46: ...to set up the connection Figure 3 17 Select USB Device 3 5 5 Generic Boot E8Direct Pin Settings E8Direct connection only If E8Direct is selected the following two screens will be shown The first allo...

Страница 47: ...ly voltage If the E8 has not yet been restarted as an E8Direct device then the following messages will appear in the FDT output window Preparing for re enumeration of E8 to E8Direct Sending re enumera...

Страница 48: ...oot Confirmation After this FDT displays a dialog that displays the boot progress At various points during the Generic Boot process the user is required to select or confirm details of the device see...

Страница 49: ...number of Clock Modes a list is provided of all possible Clock Modes The user should select the correct Clock Mode from the list then click OK Please check with the hardware manual target board manua...

Страница 50: ...nnect option The Programmer tab of the Flash Properties dialog allows the user to configure whether FDT should reinterrogate the Generic device on each connection The default is set to No so after a c...

Страница 51: ...on of whether the E8 should supply power to the target and at which voltage level The selected power level will be supplied to the target device when connecting and switched off when disconnecting The...

Страница 52: ...that multiple files can be added at once from the Add File s dialog 2 Build the device image for the User Area create a file which is the result of merging all of the included target files by selecti...

Страница 53: ...item Project Download Image 5 Programming is complete when Image successfully written to device is displayed in the output window 3 7 5 Programming some files to the User Area and other files to the...

Страница 54: ...When Erase complete is displayed in the output window erasure is completed Figure 3 28 Erase Blocks Note To erase all blocks clicking the Select All button will tick every available check box To erase...

Страница 55: ...tart reading When Upload operation complete is displayed in the output window and the uploaded data is displayed in the hex editor reading is complete If the user specifies an Absolute image the uploa...

Страница 56: ...he Disconnect toolbar button 3 12 Saving a Workspace When the File Save Workspace menu option is selected the FDT workspace can be saved 3 13 Closing a Workspace Select File Close Workspace to close t...

Страница 57: ...sages in the output window can optionally be echoed to a log file for later analysis and traceability Additionally a status file can be created which holds information about the state of the current a...

Страница 58: ...ht of the Wildcard edit field invokes a standard Windows directory selection dialog If a directory is chosen from this dialog then a trailing fsf fsf is the default script extension will also be appen...

Страница 59: ...FDT will prompt to ask if you want to execute the saved script immediately 4 2 3 Status File Page This is an optional page leave the Enable status output to file checkbox unchecked if no status file...

Страница 60: ...re the fact that the error occurred and continue processing further scripts Run Script forces FDT to process an error handling script upon encountering an error The script file to execute on script fa...

Страница 61: ...nnect Display a message to the user Alert output Alert output THE CURRENT SCRIPT PROCESSING HAS FAILED Alert output Alert output Wait For Script Processing will now be aborted Alert output To retry us...

Страница 62: ...ated with it on the same line By default these script files will have a fsf extension The syntax for a script line is the command followed by a space followed by required arguments separated by the op...

Страница 63: ...t Device connection dialog normally seen with these settings USB FDM SN S ERIAL NUM If using an FDM the PID should be set to FDM and the BID should be set to SN followed by the FDM s serial number USB...

Страница 64: ...Required One of Download the user and user boot image only valid when specifying image norebuild Optional Don t rebuild the image s before downloading even if they are out of date only valid when spec...

Страница 65: ...e Arguments filename Required File to write the upload out to will be created or overwritten if necessary If not needed specify none start address Required Start address in Hex to start the upload fro...

Страница 66: ...et as part of the disconnect Example Disconnect Disconnect reset 4 5 9 RebuildImage Description rebuild the specified image from the project target files Arguments user Rebuild the user image userboot...

Страница 67: ...se make sure the board is connected 4 5 12 Pause Description this command will pause script file execution for the specified number of milliseconds Arguments time Required Number of milliseconds to pa...

Страница 68: ...his script file filename directory Required The file directory the source file is to be copied moved renamed to Example Move script server networkfiles done txt Copy script C backups 4 5 15 Abort Desc...

Страница 69: ...the device with this Product ID Bus ID connect USB 0x000D 0 do an initial blank check blankcheck download the file C 2215uAuto mot and verify that programming was OK script processing will stop if th...

Страница 70: ...Status The current state of FDT This will be either waiting if FDT is looking for a script processing if FDT has found a script and is using it error processing if something has gone wrong with the sc...

Страница 71: ...rface Mode user the right only to program the device image from Simple Interface Mode A supervisor would need to configure the project before a SIM User could use FDT 5 2 Enabling Access Rights FDT is...

Страница 72: ...Projects enables the Back to Project button in Simple Interface Mode SimpleInterface Exit Allows exiting of FDT enables the Exit button in Simple Interface Mode SimpleInterface Download File Allows u...

Страница 73: ...59 5 3 4 Delete User This button allows deletion of user accounts 5 3 5 Reset Pwd This button allows setting of the password for the selected user 5 3 6 Close This button closes the User Admin Dialog...

Страница 74: ...60...

Страница 75: ...or click once to pop up the icon menu and select Restore or select required window from the Menu bar Window drop down menu 6 1 2 Tiling windows After some time there may be many windows open on the sc...

Страница 76: ...kspace By default the Workspace is displayed To disable display of the Workspace select the View Workspace menu option If the disable option is selected the Workspace will be disabled and removed from...

Страница 77: ...to select which toolbars are displayed The default is to display only the Editor Search and FDT toolbars The New button launches the Toolbar Name dialog box which allows the user to name and generate...

Страница 78: ...64...

Страница 79: ...New Workspace Launches the New Workspace dialog box allowing the user to specify the name and location of a new workspace and creates a new workspace directory 7 1 3 Open Workspace Launches the Open...

Страница 80: ...on 7 2 3 Cut This will remove the contents of the highlighted block from the window and place it on the clipboard in the standard Windows manner This option is only available if a block is highlighted...

Страница 81: ...I features such as the Workspace and Output Windows 7 3 1 Workspace Displays the Workspacewindow 7 3 2 Output Displays the Output window 7 4 Project Menu The Project menu provides high level control a...

Страница 82: ...68 Figure 7 2 File Extensions Dialog 7 4 5 1 File Extensions Add Selecting Add allows FDT to handle files of new extension types Figure 7 3 Add File Extensions Dialog...

Страница 83: ...component files especially if data from different files will reside in the same erase block area because downloading each component file separately could cause the device to erase the block before th...

Страница 84: ...ssions and the default directory for new workspaces 7 5 4 Format Views This allows the user to change the appearance of different windows 7 5 5 Simple Interface Simplifies the appearance of FDT For mo...

Страница 85: ...the bottom of the screen 7 6 5 Close All This option closes any files open in the editor window 7 6 6 file name This option becomes active when a file name is selected and checked 7 7 Device Menu The...

Страница 86: ...he user to select an address to execute code from There is an option to select an indirect address mode so that the address referenced is itself an address of where the code needs to run from 7 7 9 Bl...

Страница 87: ...73 7 8 3 About Launches the About Flash Development Toolkit dialog box through which additional information regarding FDT can be accessed FDT version Copyright information...

Страница 88: ...74...

Страница 89: ...may also be launched from a number of the main menu items 8 1 Workspace window The Workspace window contains details of the items in the workspace including the workspace name projects contained in th...

Страница 90: ...window is docked or if it can float around the main window 8 1 1 3 Hide Invoking Hide conceals the Workspace window It is restored by View Workspace 8 1 1 4 Properties This option displays informatio...

Страница 91: ...he workspace the pop up menu for Projects has the following items 8 1 2 1 Add Files Launches the Open dialog box allowing the user to add S Record files to the project 8 1 2 2 Remove Files Launches a...

Страница 92: ...ect made since the last save will be lost when the project is unloaded FDT will not prompt to save changes before unloading 8 1 2 10 Add Files From Kernel Dir This allows the user to select files from...

Страница 93: ...enu for Device File has the following items 8 2 1 Open filename This feature opens the selected file 8 2 2 Add Files Allows additional files to be added to the project 8 2 3 Remove Files Removes files...

Страница 94: ...e is tagged as a User Boot Area file 8 2 11 File Checksum The file checksum returns the checksum for the file using the algorithm in the kernel EPROM style and also a raw checksum The raw checksum is...

Страница 95: ...vice File Data Only This mode would compare the data in the file to the corresponding data on the device This is identical in behaviour to the after write readback verify process Areas not covered by...

Страница 96: ...ed from the Project pop up menu item Properties The Properties dialog box shows details of The name of the project The location and the filename of the project file The last modification date and time...

Страница 97: ...ath frequency protocol clock multipliers and clock mode Double clicking on these entries when disconnected will invoke the Project Wizard at the appropriate screen Figure 8 8 Kernel Properties Kernel...

Страница 98: ...change the Port and Baud Rate when disconnected Figure 8 9 Communications Properties Port This drop down list provides the user with a list of supported COM ports available for connection to the devi...

Страница 99: ...ify whether or not the kernel is in the target device Figure 8 10 Device Properties Device Displays the name of the active device Double clicking invokes the Project Wizard to allow editing of this it...

Страница 100: ...ng on the target device before connection by FDT Double clicking invokes the Project Wizard to allow editing of this item Available RAM and Free RAM These are for display only and are not editable Buf...

Страница 101: ...verification Use this option to specify whether you would like to perform read back verification always after confirmation or never Double click to edit the setting Reset on Disconnect When disconnec...

Страница 102: ...s the setting on the QzROM toolbar see 2 1 2 Select Automatic to always protect the device at disconnection Select Prompt to query the user what to do and select None to never protect the device at di...

Страница 103: ...file tab If the file is open in the editor window double clicking on a range highlights the selected data Figure 8 13 S Record Properties Block Usage 8 6 2 Cursor Value This tab shows various represen...

Страница 104: ...7 Output Window The Output window is one of the main windows contained in the FDT GUI Figure 8 16 Output Window The window has available pop up menu that contains the following items 8 7 1 Copy Copies...

Страница 105: ...play file contents or target uploads within FDT There are several ways of opening a file within the editor double click on a project file from the Workspace view double click on an FDT file type from...

Страница 106: ...le Also note that FDT will default to saving text based file formats e g S Record or DDI as uppercase even if the original file was lowercase This is to improve compatibility with other Renesas tools...

Страница 107: ...When the ASCII Fill check box is selected the data to be written can be specified with ASCII characters 8 8 11 Find This will launch the Find dialog box allowing the user to enter either hexadecimal o...

Страница 108: ...entirely different to the similarly named kernel command Go From Address 8 9 Customise Toolbars Invoked by Tools Customise in the Customise dialog box Figure 8 18 Customise Toolbars Dialog 8 9 1 Show...

Страница 109: ...r selected in the list 8 9 5 OK Clicking on OK in the Toolbar Name dialog box adds the new name to the Toolbars list on the Toolbars window and invokes a blank toolbar on the GUI Clicking on OK in the...

Страница 110: ...pace Once you have made the choice choose the relevant section of the dialog 2 Click the Add button If you would like to add an existing system tool to the menu then select the Select from existing sy...

Страница 111: ...shown below will be displayed Select the Menu tab 2 Select the menu option that you would like to modify and then click the Modify button 3 Make the desired changes on the Modify Tool dialog and then...

Страница 112: ...98...

Страница 113: ...look and feel of FDT once a project is configured See Chapter 5 Access Rights for details about using this in conjunction with user names and passwords This chapter describes the full Simple Interfac...

Страница 114: ...etting Readback Verification on the Programmer tab of the Project Properties window but the user can override the default by selecting this menu item 9 1 5 Request Checksum This option controls whethe...

Страница 115: ...terface Download Project Image access see Chapter 5 for details 9 2 4 Project Image Download File Area If the Download Project Image radio button is selected then FDT will display the image filename t...

Страница 116: ...102...

Страница 117: ...for details about using this in conjunction with user names and passwords This chapter describes the Basic Simple Interface Mode see Chapter 9 for details of the full Simple Interface Mode Basic Simpl...

Страница 118: ...read and compare operation after programming The setting is remembered between sessions 10 1 5 Request Checksum This option controls whether FDT automatically performs a checksum request operation af...

Страница 119: ...er to download the file to the User Area or the User Boot Area For devices with a Data Area the user can choose whether to download the file to the User Area or the Data Area 10 2 4 Program Flash Eras...

Страница 120: ...106...

Страница 121: ...ts To publish create a fpf packages file Select the Project Field Programming Publish menu item when in the full FDT Workspace view Because a project image is a prerequisite for publishing a project i...

Страница 122: ...peration after programming The setting is remembered between sessions 11 1 5 Request Checksum This option controls whether FDT automatically performs a checksum request operation after programming The...

Страница 123: ...Exit access see Chapter 5 for details 11 2 3 Download Project image radio button This will be disabled if the user currently logged in to FDT does not have the SimpleInterface Download Project Image...

Страница 124: ...110...

Страница 125: ...ally FDT will only update the Level 1 area but in some cases a Level 0 update is also required This is usually seen when connecting with E8Direct see Chapter 13 E8Direct for the first time and will re...

Страница 126: ...uires version 2 00 XX XXX Adaptor version type OK current type E8EMULATOR Processing Data file c FDT ADPFiles E8 Rel Img mot Mismatched Adaptor Software Level 1 version number found current E8 version...

Страница 127: ...designed to be backwardly compatible WARNING E8Direct is intended for use with Renesas Starter Kits Use of E8Direct with other boards is not supported and is untested damage may occur to the E8 and or...

Страница 128: ...meration command Request sent successfully closing E8 Comms At this point the E8 will re identify itself to Windows as an E8Direct device NOTE it will remain as an E8Direct device until next unplugged...

Страница 129: ...l have to be board specific rather than device specific FDM Pin Name Pin No 14 pin connector 20 pin connector Japan only E8 Direct Pin Name 1 SCK RES Output D 2 GND GND GND 3 FWx FWx Output C 4 MD0 GN...

Страница 130: ...a H8S 2148AF with an 18 432MHz crystal but the E8 uses an H8S 2215UF with a 16MHz crystal The numbering system above applies to the 14 pin FDM and E8 This numbering system does not apply to the 20 pi...

Страница 131: ...devices don t If Device Protection is set to Automatic or Interactive FDT will use this to check the device write state before programming FDT is aware of QzROM based on the device that is configured...

Страница 132: ...as it disconnects The level of protection will be determined when Automatic is initially selected typically Full If the device offers multiple levels of protection then a dialog will appear to allow t...

Страница 133: ...re 14 6 None Note clicking on the icons will not immediately protect the device This is still merely the current disconnect setting 14 2 2 Project It is also possible to change this option from the pr...

Страница 134: ...er be in a mode where only the Simple Interface dialog is accessible this setting can instead be changed via a menu option Figure 14 9 Security Protect Simple Interface The check mark shows the curren...

Страница 135: ...uring normal operations The options are available from a toolbar button and a menu entry Figure 15 1 ToolbarButton Figure 15 2 Menu Entry Each erase block that supports the feature can be locked and u...

Страница 136: ...ically disable the locking of device on connection This will allow all blocks on the device to be written or erased whether they are currently locked or not 2 Query User FDT will ask the user what to...

Страница 137: ...ntrols how FDT behaves as it connects to a device with locking ability See more on this in the Connection section 2 On Disconnect The right hand side of the dialog controls how FDT behaves as it disco...

Страница 138: ...ming that the user does not select the Do Nothing radio option There are two possible values Locked the erase block will be protected at disconnect Unlocked the erase block will be unprotected at disc...

Страница 139: ...s to be erased Figure 15 6 Erase Confirmation Message If the user selects Yes FDT will lock and unlock as appropriate If the user selects No then no erase will occur no locks will be set however the d...

Страница 140: ...will cause FDT to ignore any locking settings and skip straight to the disconnection process as in 3 below Clicking Cancel at this point will cancel both the dialog and the disconnect operation as a w...

Страница 141: ...stributed prior to FDT 3 1 will result in this feature being disabled For projects using FDT versions prior to FDT 3 0 a new workspace and project should be created using the wizard This will ensure t...

Страница 142: ...128...

Страница 143: ...Me Windows NT 4 0 Windows 2000 and Windows XP Publication Date Rev 8 00 October 31 2006 Published by Sales Strategic Planning Div Renesas Technology Corp Edited by Customer Support Department Global...

Страница 144: ...Renesas Technology Hong Kong Ltd 7th Floor North Tower World Finance Centre Harbour City 1 Canton Road Tsimshatsui Kowloon Hong Kong Tel 852 2265 6688 Fax 852 2730 6071 Renesas Technology Taiwan Co L...

Страница 145: ......

Страница 146: ...2 6 2 Ote machi Chiyoda ku Tokyo 100 0004 Japan Renesas FLASH Development Toolkit 3 07 for Windows 98SE Me Windows NT 4 0 Windows 2000 and Windows XP User s Manual...

Отзывы: