- 3 -
2. CALIBRATING RCS ESC’s.
All RCS
ESC’s
are pre-calibrated when sent out. Please test the system is working OK before re-calibrating it.
If the RX has been correctly connected to the ESC, the system will perform as described in the ESC instructions.
The 2
nd
step in system preparation is to calibrate the direction & throttle knobs. Even though this step is only needed
once when first setting up an uncalibrated ESC, from time to time it is advisable to run through the procedure to ensure
the best possible system performance is achieved.
A pushbutton is mounted on the ESC pcb for both Calibration & system Programming. See 2.3 below.
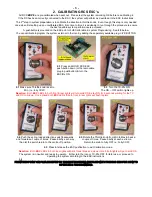
You can calibrate & program the system external to the loco by adding the separately available plug in # P-BUTTON.
2.3 Press and HOLD RCS ESC
push-button down (or the removable
plug in pushbutton) & turn the
ESC/Rx ON.
2.1 Make sure Throttle knob is set to
Min. (i.e. fully CCW).
2.3 Turn the TX-20+ ON.
The ON – OFF switch lights up.
Reaction; Both ESC LED’s & both front & rear lights will turn solid ON & stay ON for 6 seconds waiting for the TX
and RX to link up. Once linked both ESC LED’s & both front & rear lights will flash rapidly.
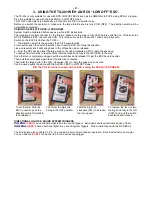
2.4 Push the spring loaded direction switch backwards
and forwards a couple of times. Pause briefly each way
then let the switch return to the centre off position.
2.5 Rotate the Throttle knob from Min to Max & back a
couple of times. Pause briefly at each extreme.
Return the knob to fully OFF i.e. Fully CCW.
2.5 Press & release the ESC pushbutton to exit Calibration mode.
Reaction; Both ESC LED’s & both loco lights will blink three times at a slower rate & both lights will go to solid ON.
The system is in neutral and ready to operate. Either turn the loco or TX-20+ OFF for later use, or proceed to
operating the system according to the ESC instructions.
FROM THIS POINT ON PLEASE REFER TO THE INSTRUCTIONS SUPPLIED WITH THE RCS ESC FOR HOW TO
OPERATE & PROGRAMMING.


