background image

18

3.

  To cut the 

hair at the 

top of the 

head, hold 

the hair 

between your 

fingers and 

cut a small 

amount at a time. Cut from the 

front to the back.

4.

  Remove the trimming guide and 

replace with either the left or right 

ear guide. The shorter guide teeth 

are designed to be toward the ear. 

Move the clipper from the front of 

the head to the back. This creates 

a tapered effect around the ears 

and back of the neck.

5.

  The final trim 

can be made 

with the hair 

clipper or 

the included 

scissors. 

Make sure to 

check over 

the entire 

head for any 

uneven areas. 

For styled hair or giving quick 

trims, you may prefer using your 

hair clipper without the trimming 

guide.

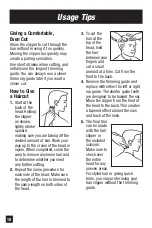
Giving a Comfortable,  

Even Cut

Allow the clipper to cut through the 

hair without moving it too quickly. 

Moving the clipper too quickly may 

create a pulling sensation.
Use short strokes when cutting, and 

initially use the longest trimming 

guide. You can always use a closer 

trimming guide later if you want a 

closer cut.

How to Give 

a Haircut

1.

  Start at the 

back of the 

head. Holding 

the clipper 

as shown, 

lightly stroke 

upward 

making sure you are taking off the 

desired amount of hair. Work your 

way up to the crown of the head in 

layers. When completed, comb the 

area to remove any loose hair and 

to determine whether you need 

any further cutting.

2.

  Repeat the same procedure for 

each side of the head. Make sure 

the length of the hair is trimmed to 

the same length on both sides of 

the head.

Usage Tips  

Содержание HC06A

Страница 1: ...Guía de Uso y Cuidado HC4050 HC4051 HC4055T Modelo HC06A ...

Страница 2: ...a se debe INSTRUCCIONES DE SEGURIDAD IMPORTANTES descuidar cuando esté enchufado Este artefacto no está diseñado para ser usado por personas con incapacidad sensorial o mental incluido niños o que no tengan experiencia a menos que se les supervise o capacite sobre el uso del producto por una persona responsable de su seguridad Niños deben ser supervisados para asegurar que no jueguen con el artefa...

Страница 3: ...ro conectar el cable al toma corriente Para desconectar ponga todos los controles en posición de OFF luego remueva el enchufe del toma corriente Nunca tire del cable para desenchufar del toma corriente No enchufe o desenchufe este electrodoméstico con las manos mojadas No use ningún tipo de extensión o convertidor de voltaje No enrosque el cable alrededor del aparato Siempre almacene este aparato ...

Страница 4: ...e Corte de 15mm X X 8 1 Peine de Corte de 16mm X 9 1 Peine de Corte de 18mm X X X 10 1 Peine de Corte de 22mm X 11 1 Peine de Corte de 25mm X X X 12 2 Guía de Corte para oreja der izq X X X 13 1 Levantador para Cabello Fino 14 1 Protector de cuchillas X X X 15 1 Cepillo de limpieza X X X 16 1 Cepillo para limpiar el cuello X X X 17 1 Peine de barbero X X X 18 Clips para el Cabello x4 x2 x4 19 1 Ca...

Страница 5: ...5 Producto 2 3 4 1 5 6 12 12 13 14 15 16 17 19 18 22 20 8 7 9 10 11 21 1 HC4051 HC4050 HC4055T HC4055T 23 ...

Страница 6: ...mm 18mm y 25mm dependiendo el modelo HC4050 HC4051 HC4055T Véase la tabla anterior para determinar el tamaño de los peines que contiene su modelo 2 Sujete la guía de recorte con los dientes hacia arriba Deslice la guía de recorte en las cuchillas hasta que se bloquee en su sitio 1 5mm Rojo 3mm Naranja 6mm Amarillo 9mm Verde Limón 12mm Verde 16mm Turquesa 18mm Azul 22mm Azul Oscuro 25mm Morado Pein...

Страница 7: ...to favor leer las instrucciones de seguridad en el manual de instrucciones Mantenimiento de la cuchilla La duración de las cuchillas depend erá de la frecuencia de uso el cuidado la aplicación de aceite y el tipo y condición del cabello Agregar aceite a las cuchillas antes de cada uso Deben reemplazarse las cuchil las cuando se haya deteriorado la eficiencia del corte PRECAUCIÓN No sumerja el apar...

Страница 8: ...tos y determinar si necesita cortar más 2 Repita el mismo procedimiento para cada lado de la cabeza Asegúrese de cortar el cabello de forma que tenga la misma longitud en ambos lados de la cabeza 3 Para cortar el cabello en la parte de arriba de la cabeza sujete el cabello entre los dedos y corte una pequeña cantidad poco a poco Corte desde la parte delantera hacia atrás 4 Quite la guía de recorte...

Страница 9: ...de recorte 6 La palanca de control cónica ajustable le permite cambiar gradualmente la velocidad del corte con o sin la guía de recorte Cuando la palanca está totalmente hacia delante las cuchillas le proporcionarán el corte más rápido El mover la palanca gradualmente hacia atrás aumenta la longitud de corte Estilos muy cortos 1 Utilizando la guía de recorte de 12mm sujete el peine plano contra la...

Страница 10: ...egistrada y TM marca comercial por Spectrum Brands Inc 2018 Spectrum Brands Inc 06 18 Job 22690 00 T22 7000335 A Diseñado en USA HECHO EN CHINA Características eléctricas Modelo HC06A HC4050 HC4051 HC4055T 110V 120V 60Hz 5W 220V 220 240V 50Hz ...

Страница 11: ...11 Use and Care Guide HC4050 HC4051 HC4055T Type HC06A ...

Страница 12: ...y to persons An appliance should never be left unattended when it s plugged in This appliance is not intended for use by persons including children with reduced physical sensory or mental capabilities or lack of experience and knowledge unless they have been given supervision or instruction concerning use of the appliance by a person responsible for their safety Children should be supervised to en...

Страница 13: ...t wrap the cord around the appliance Contents Spanish 1 English 11 Insert the plug into the outlet To disconnect turn all controls to OFF then remove plug from outlet Do not place this appliance on any surface while operating Do not use this appliance with a damaged or broken cutting unit as injury may occur Always make certain blades are aligned properly This clipper is designed for use with 110 ...

Страница 14: ... X X X 7 1 15mm Guide Comb X X 8 1 16mm Guide Comb X 9 1 18mm Guide Comb X X X 10 1 22mm Guide Comb X 11 1 25mm Guide Comb X X X 12 2 Left Right Guide Comb X X X 13 1 Thin Hair Lifter 14 1 Blade Guard X X X 15 1 Cleaning Brush X X X 16 1 Neck Brush X X X 17 1 Comb X X X 18 Sectioning Clips x4 x2 x4 19 1 Barber Cape X X 20 1 Scissors X X X 21 1 Lubricating Oil X X X 22 1 Plastic Cord Keeper X X 23 ...

Страница 15: ...15 Product 2 3 4 1 5 6 12 12 13 14 15 16 17 19 18 22 20 8 7 9 10 11 21 1 HC4051 HC4050 HC4055T HC4055T 23 ...

Страница 16: ...mm 15mm 18mm and 25mm See preceding chart to determine which combs your model contains 2 While the clipper is off hold the trimming guide with the teeth up Slide the trimming guide onto the blades until it locks into place How to Use 1 5mm Red 3mm Orange 6mm Yellow 9mm Lime Green 12mm Green 16mm Turquoise 18mm Royal Blue 22mm Dark Blue 25mm Purple Color combs for model HC4051 only ...

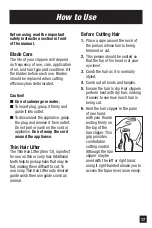
Страница 17: ...ly hair Additional teeth help to pickup hairs that may lie flat making them difficult to cut To use snap Thin Hair Lifter onto desired guide comb then use guide comb as normal Before Cutting Hair 1 Place a cape around the neck of the person whose hair is being trimmed or cut 2 This person should be seated so that the top of his head is at your eye level 3 Comb the hair as it is normally styled 4 C...

Страница 18: ... without the trimming guide Giving a Comfortable Even Cut Allow the clipper to cut through the hair without moving it too quickly Moving the clipper too quickly may create a pulling sensation Use short strokes when cutting and initially use the longest trimming guide You can always use a closer trimming guide later if you want a closer cut How to Give a Haircut 1 Start at the back of the head Hold...

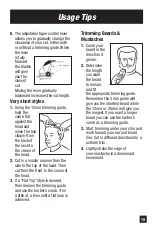
Страница 19: ... front to the crown of the head 3 If a Flat Top style is desired then remove the trimming guide and use the barber s comb Trim a little at a time until a flat look is achieved Trimming Beards Mustaches 1 Comb your beard in the direction it grows 2 Determine the length you want the beard to remain and fit the appropriate trimming guide Remember the 3mm guide will give you the shortest beard while t...

Страница 20: ...ademark of Spectrum Brands Inc 2018 Spectrum Brands Inc 06 18 Job 22690 00 T22 7000335 A Spectrum Brands Inc Middleton WI 53562 MADE IN CHINA DESIGNED IN USA Electrical Characteristics Type HC06A HC4050 HC4051 HC4055T 110V 120V 60Hz 5W 220V Chile 220 240V 50Hz ...

Отзывы: