background image

8

107990

ELECTRIC CHAIN SAW

®

For more information, visit www.desatech.com

Cord Length

AWG Cord Size

25 feet

16 AWG

50 feet

16 AWG

100 feet

16 AWG

150 feet

14 AWG

CUTTING WITH THE CHAIN
SAW

1.

Connect saw to extension cord. Con-
nect extension cord to power supply.

2.

Make sure section of log to be cut is
not laying on ground. This will keep
chain from touching ground as it cuts
through log. Touching ground with
moving chain will dull chain.

3.

Use both hands to grip saw. Always use
left hand to grip front handle and right
hand to grip rear handle. Use firm grip.
Thumbs and fingers must wrap around
saw handles (see Figure 9).

4.

Make sure your footing is firm. Keep
feet apart. Divide your weight evenly
on both feet.

5.

When ready to make a cut, press in
switch lockout with right thumb and
squeeze trigger (see Figure 9). This will
turn saw on. Releasing trigger will turn
saw off. Make sure saw is running at
full speed before starting a cut.

6.

When starting a cut, place moving
chain against wood. Hold saw firmly
in place to avoid possible bouncing or
skating (sideways movement) of saw.

7.

Guide saw using light pressure. Do not
force saw. The motor will overload and
can burn out. It will do the job better
and safer at the rate for which it was
intended.

8.

Remove saw from a cut with saw run-
ning at full speed. Stop saw by releas-
ing trigger. Make sure chain has
stopped before setting saw down.

9.

Practice until you can maintain a steady,
even cutting rate.

Switch
Lockout

Trigger

Figure 9 - Switch Lockout and Trigger
Location

OPERATING CHAIN
SAW

EXTENSION CORDS

Use proper extension cords with this saw.
Use only extension cords marked for out-
door use. The cord must be marked with
suffix W or W-A following the cord type
designation. 

Example:

 SJTW-A or SJTW.

Use proper sized cord with this saw. Cord
must be heavy enough to carry current
needed. An undersized cord will cause volt-
age drop at saw. Saw will lose power and
overheat. Follow cord size requirements
listed below.

Extension
Cord

Chain Saw
Power Cord

Figure 7 - Tying Extension Cord and
Power Cord in Knot

OILING CHAIN

Always check oil level before using saw. To
oil chain, press squeeze bulb on oil cap. Do
not attempt to operate the oiler while cutting
with the saw. Oil will feed onto guide bar
and chain. Press squeeze bulb on oil cap at
least once before each cut. Check oil level
often by looking at oil sight level hole. Oil
sight level hole is on left side of saw, be-
tween front handle and front hand guard.

 WARNING: Read and under-

stand this owner’s manual be-
fore operating this saw. Make
certain you read and understand
all 

Safety Warnings, pages 2 and

3. Improper use of this chain saw
can cause severe injury or death
from fire, electrical shock, or body
contact with moving chain, or
falling wood.

Figure 8 - Pressing Squeeze Bulb on Oil
Cap to Oil Chain

Keep cord away from cutting area. Make
sure cord does not catch on branches or logs
during cutting. Inspect cords often. Replace
damaged cords.

The extension cord may come undone from
the power cord during use. To avoid this,
make a knot with the two cords as shown in
Figure 7 below.

Cord Length

AWG Cord Size

25 feet

16 AWG

50 feet

16 AWG

100 feet

14 AWG

150 feet

12 AWG

Models LNT-2: 076728K, 099178H,
100089-06, & 100089-08; Pole Saw Assy
104317 &106821; Pole Saw 104316-04 (8")
& 106890 (10")

Models EL-7: 075762J, 098013J, 099039J,
100089-04, 100089-05, & 100089-07

Содержание 075762J

Страница 1: ...proper use of saw can cause severe injury Keep this manual for future reference MODELS LNT 2 076728K 099178H 100089 06 100089 08 EL 7 075762J 098031J 099039J 100089 04 100089 05 100089 07 Pole Saw 104316 04 8 106890 01 10 Pole Saw Assembly 104317 8 106821 10 ELECTRIC CHAIN SA W OWNER S MANUAL ...

Страница 2: ...ecessary Do not change the plug in any way WHILE OPERATING SAW 1 Stay alert Use common sense while operating chain saw 2 Keep work area clean Cluttered areas invite injuries 3 Be aware of extension cord while op erating chain saw Be careful not to trip over cord Keep cord away from chain and operator at all times 4 Keep children animals and bystand ers away from chain saw and extension cord Only c...

Страница 3: ...handles dry clean and free of oil and grease Keep all screws and nuts tight Inspect power cord often If dam aged have repaired by authorized service center Never carry chain saw by power cord Never yank power cord to unplug it Keep power cord from heat oil and sharp edges Inspect extension cords often and replace if damaged 4 When servicing use only identical re placement parts 5 When not in use a...

Страница 4: ...uide bar Also known as saw body Pushback Kickback Pinch Rapid pushback of chain saw Pushback may oc curifchainalongtopofguidebarispinched caught or contacts a foreign object Rear Handle Handle located at rear of saw body Reduced Kickback Guide Bar Guide bar that reduces chance of kickback Replacement Chain Chain that complies with ANS B175 1 when used with a specific saw It may not meet ANS requir...

Страница 5: ...d Oil Cap With Squeeze Bulb Trigger Switch Lockout Motor Housing Figure 2 Electric Chain Saw Oil Level Sight Hole located on saw body hidden by front handle Front Handle PRODUCT IDENTIFICATION UNPACKING 1 Remove all items from carton 2 Check all items for any shipping dam age If you find any damage or if any parts are missing promptly inform dealer where you bought chain saw Spike ...

Страница 6: ... saw body Place rear of guide bar between adjusting plate and sprocket support IMPORTANT Make sure to insert ad justing block into oval adjusting hole on guide bar 6 Line up holes on sprocket support with center slot on guide bar and holes in saw body 7 Insert guide bar bolts through front hand guard saw body center slot of guide bar and sprocket support Attach guide bar nuts to guide bar bolts IM...

Страница 7: ...edges on chain are sharp Use protective gloves when handling chain WARNING Maintain proper chain tension always A loose chain will increase the risk of kickback Aloosechainmayjump outofguidebargroove Thismay injure operator and damage chain A loose chain will cause chain guide bar and sprocket to wear rapidly Figure 5 Turning Adjusting Screw Guide Bar Correct Tension Guide Bar Gap Incorrect Tensio...

Страница 8: ...xtension cords with this saw Use only extension cords marked for out door use The cord must be marked with suffix W or W A following the cord type designation Example SJTW A or SJTW Use proper sized cord with this saw Cord must be heavy enough to carry current needed An undersized cord will cause volt age drop at saw Saw will lose power and overheat Follow cord size requirements listed below Exten...

Страница 9: ...ing a tree be aware of your surround ings Do not endanger any per son strike utility lines or cause property damage If tree strikes utility lines contact utility com pany at once Figure 10 Retreat Path From Tree Direction of Fall Retreat Path Retreat Path 45 Tree FELLING A TREE Cutting Down a Tree Felling Procedure A Felling Notch A properly placed felling notch will deter mine direction tree will...

Страница 10: ...elow to buck a log LIMBING A TREE Figure 12 Limbing A Tree WARNING Whencuttinglimb thatisundertension useextreme caution Bealertforwoodspring ing back When wood tension is released limb could spring back and strike operator causing se vere injury or death WARNING Avoid kickback Kickback can result in severe in juryordeath SeeKickback page 3 to avoid risk of kickback Limbingisremovingbranchesfromaf...

Страница 11: ... from tree trunk on underside of limb Use top of guide bar to make this cut Cut 1 3 through diameter of limb see Figure 16 2 Move two to four inches farther out on limb Make second cut from above limb Continue cut until you cut limb off 3 Make third cut as close to tree trunk as possible on underside of limb stub Use top of guide bar to make this cut Cut 1 3 through diameter of stub 4 Make fourth ...

Страница 12: ...t guide bar problems Incorrect sharpening of chain cutter and depth gauge settings often cause this When bar wears unevenly it widens guidebargroove seeFigure17 Thiscauses chainclatterandrivetpopping Sawwillnot cutstraight Replaceguidebarifthisoccurs Inspect guide bar before sharpening chain A worn or damaged guide bar is unsafe A worn or damaged guide bar will damage chain It will also make cutti...

Страница 13: ... to Sharpen Chain Purchasetheseitemsfromyourlocaldealer hardwarestore orchainsawsuppliesoutlet 5 32 round file Depth gauge tool File guide Vise Medium sized flat file Continued 30 Guide Mark File Guide Filing Direction 5 32 Round File Sharpening Cutters Use file guide for 30 filing 1 Adjust chain for proper tension seeSaw Chain Tension Adjustment page 7 2 Clamp guide bar in vise to hold saw steady...

Страница 14: ...e sprocket see Replacement Parts and Accessories page 19 TECHNICAL SERVICE You may have further questions about as sembling operating ormaintainingthissaw If so contact DESA International s Techni cal Service Department at 1 800 323 5190 You can also visit DESA International s technical service web site at www desatech com SERVICE PUBLICATIONS You can buy a service manual from address listedonback...

Страница 15: ... Open line fuse or circuit breaker 4 Bad motor brushes 5 Open wiring circuit on saw Gear train failure 1 Clogged oil slot in guide bar 2 Oil is too thick 1 Chain is loose 2 Guide bar and chain not assembled right Saw damaged Do not use saw Oil cap is not secure REMEDY See Assembly page 6 See Sharpening Saw Chain page 13 Extension cord wire size too small See Extension Cords page 8 1 Press in switc...

Страница 16: ...16 107990 ELECTRIC CHAIN SAW For more information visit www desatech com ILLUSTRATED PARTS BREAKDOWN LNT 2 3 4 5 6 7 13 8 25 9 10 11 12 14 15 16 17 18 19 22 21 21 20 22 22 23 24 1 2 26 ...

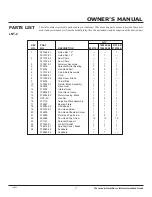
Страница 17: ...076744 Hex Head Bolt 2 2 2 6 107512 01 Cap Bulb Assembly 1 1 1 7 099829 01 Cord 1 1 1 8 077399 02 Side Cover Black __ 1 __ 9 076105 Thrust Disk 1 1 1 10 107482 01 Field Brush Assembly 1 1 1 11 059606 Drive Gear 1 1 1 12 075752 Internal Gear 1 1 1 13 106809 01 Front Hand Guard 1 1 1 14 079089 02 Motor Housing Black 1 1 1 15 NPC 4C Hex Nut 2 2 2 16 077115 Adjusting Plate Assembly 1 1 1 17 075887 Bea...

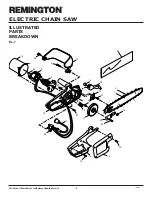
Страница 18: ...18 107990 ELECTRIC CHAIN SAW For more information visit www desatech com ILLUSTRATED PARTS BREAKDOWN EL 7 6 7 10 15 18 16 23 24 14 1 2 9 4 3 25 27 21 21 17 11 20 26 12 8 19 19 5 13 22 ...

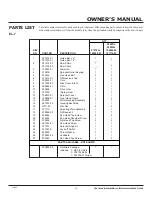
Страница 19: ... Oil Reservoir Cap 1 1 7 099829 01 Cord 1 1 8 077399 02 Side Cover Black 1 1 9 098042 01 Field 1 1 10 059606 Drive Gear 1 1 11 075752 Internal Gear 1 1 12 106810 01 Sprocket Cover 1 1 13 106809 01 Front Hand Guard 1 1 14 076053 Motor Housing Assembly 1 1 15 097034 02 Housing Assembly 1 1 16 NPC 4C Hex Nut 2 2 17 077115 Adjusting Plate Assembly 1 1 18 079086 02 Oil Reservoir 1 1 19 059046 Pan Head ...

Страница 20: ...a City CA 95993 530 671 1871 COLORADO CO McGuckin Power Equipment Center 2845 Valmont Road Boulder CO 80302 303 443 9317 Ace Mower and Small Engines 4718 Chromium Drive Colorado Spring CO 80918 719 593 0862 Bartell Tool Service 1448 W Cedar Avenue Denver CO 80223 303 777 5463 Metrogas Equipment Company 790 West 64th Ave Denver CO 80221 303 428 3036 Winfrey s Jones LLP 317 8th Street Greeley CO 806...

Страница 21: ...All 210 N Stokes Street Havre De Grace MD 21078 410 939 1720 Tracy s Appliance Company 520 Soleman s Island Road P Frederick MD 20678 301 855 1818 B M Sharpening Repair 8614 Church Lane Randalstown MD 21133 410 655 6945 MASSACHUSETTS MA Ormond s Inc 115R Dean Ave Franklin MA 02038 508 528 2013 Beacon Lumber Beacon Rental 513 Church Street New Bedford MA 02745 508 995 1766 Grafton Power Equipment N...

Страница 22: ... 44889 216 839 2508 OKLAHOMA OK Kay Electric Company 1101 W Broadway P O Box 635 Altus OK 73522 580 482 1757 B M I Inc 13102 East 1st Street Broken Arrow OK 74012 918 252 0011 H L Moss 1714 E 15th Street Tulsa OK 74104 918 744 1305 Kay Electric Motors Inc 810 48th Street Woodward OK 73801 405 256 3254 OREGON OR Turner s Lawnmower and Saw 728 SE Robin Way Gresham OR 97080 503 665 5441 Pendleton Gra...

Страница 23: ...230 804 285 4838 Outdoor Power Equipment 800 White Marsh Road Suffolk VA 23434 804 925 4933 Mills Repair Service 4750 B Baxter Road Unit B Virginia Beach VA 23462 757 490 7001 WASHINGTON WA Action Small Appliance Service 1500 145th Place SE Bellevue WA 98007 206 643 9806 TUCO Industrial Products 5223 180th SW Suite 4A 1 Lynnwood WA 98037 425 743 9533 Action Small Appliance 2125 Second Avenue Seatt...

Страница 24: ... are not reimbursable under this warranty and are the responsibility of the owner To the full extent allowed by the law of the jurisdiction that governs the sale of the product this express warranty excludes any and all other expressed warranties and limits the duration of any and all implied warranties including warranties of merchantability and fitness for a particular purpose to one year form t...

Отзывы: