background image


19 


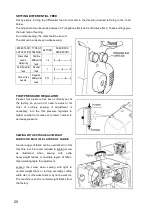
DIFFERENTIAL FEED 

The 

differential 

feed 

has 

two 

independent feed dogs, one front (A) and 
one rear (B). 
 
Each  feed  dog  has  an  individual  feed 
mechanism which enables the feeding of 
material at a different ratio. 


POSITIVE DIFFERENTIAL FEED 

WHEN  SET  FOR  POSTITVE  DIFFERENTIAL 
FEED

,  the  front  feed  dog  (A)  makes  a 

longer stroke than the rear feed dog (B). 
This  has  the  effect  of  accumulating 
material  under  the  presser  foot  to  offset 
the wavering on the fabric. 


NEGATITVE DIFFERENTIAL FEED 

WHEN  SET  FOR  NEGATIVE  DIFFERENTIAL 
FEED,

  the  front  feed  dog  (A)  makes  a 

shorter stroke than the rear feed dog (B). 
This has the effect of stretching material 
under  the  presser  foot  to  offset  the 
puckering on the fabric. 
 

Содержание DREAMSTITCHER 600SO

Страница 1: ...PORTABLE SERGER INSTRUCTION MANUAL DREAMSTITCHER 600SO ...

Страница 2: ......

Страница 3: ... Differential feed 19 Foot pressure regulator 20 Sewing with extra heavyweight fabric or multiple layers of fabric 20 Basic techniques Turning outside corners without cutting threads 21 Turning curved edges Removing stitches from sewn fabric 21 Corded overlock 22 Decorative effects 23 Differential feed applications 24 3 CARING FOR YOUR MACHINE Replacing moving cutter Disengaging moving cutter 25 R...

Страница 4: ...ad tension control 12 Lower Looper thread tension control 13 Upper looper thread tension control 14 Needle thread guides 15 Thread cutter lever Model 320 only 16 Two thread convertor instruction Model 320 only 17 Threading chart 18 Lint tray 19 Foot control 20 Release lever 21 Foot release lever 22 Spool disc 23 Differential feed control dial 24 Stitch length dial 25 Hand wheel 26 Plug connector s...

Страница 5: ...er B Model 320 only 3 Needle set option 4 Brush option 5 Screwdriver small 6 Tape measure option 7 Machine cover 8 Screwdriver large 9 Oiler 10 Moving cutter 11 Spanner 12 Thread net 13 Tweezers 14 Spool disc 15 Spool holder 16 Cord guide 17 Accessory bag Only Model 320 has storage of accessories at the back of front cover ...

Страница 6: ...less the power light switch is turned on This same switch controls both machine power and sewing light When leaving the machine unattended or servicing the machine remove the power line plug from supply outlet 4 OPENING FRONT COVER To open front cover pull it to the right and down towards you 5 OPENING WORKING TABLE To open working table pull the release lever towards you with your right hand and ...

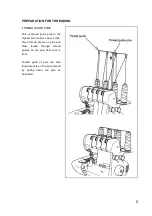
Страница 7: ...ead guide pole to the highest point until you hear it click Place thread spools on pins and draw thread through thread guides on the pole from rear to front Thread guide of pole can hold thread spools on the spool stand by pulling down the pole as illustrated ...

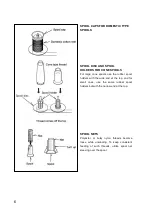
Страница 8: ...s use the rubber spool holders with the wide end at the top and for small ones use the same rubber spool holders but with the narrow end at the top SPOOL NETS Polyester or bulky nylon threads become loose while unwinding To keep consistent feeding of such threads utilize spool net sleeving over the spool ...

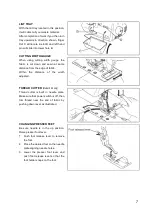
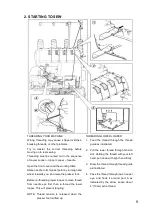
Страница 9: ...tance from the edge of fabric Within the distance of the width adjusted THREAD CUTTER Model 320 only Thread cutter is built in needle plate Make sure that power switch is off then trim thread near the end of fabric by pushing down lever as illustrated CHANGING PRESSER FEET Be sure needle is in the up position Raise presser foot lever 1 Push foot release lever to remove the foot 2 Place the desired...

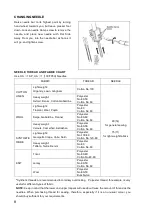
Страница 10: ...cot Polyester No 80 60 CottonNo 80 60 Jersey Polyester No 60 50 Cotton No 60 KNIT Wool Polyester No 60 50 Bulk Nylon 90 14 for general sewing 75 11 for light weight fabrics Raise needle bar to its highest point by turning hand wheel towards you but leave presser foot down Loosen needle clamp screw to remove the needle and place new needle with Flat Side Away From you into the needle bar as far as ...

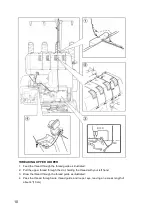
Страница 11: ...e the presser foot Before re threading lower looper remove thread from needle eye first then re thread the lower looper This will prevent tangling NOTE Thread tension is released when the presser foot is lifted up THREADING LOWER LOOPER 1 Feed the thread through the thread guide as illustrated 2 Pull the lower thread through tension slot Holding the thread with your left hand pull down with right ...

Страница 12: ...ad guide as illustrated 2 Pull the upper thread through the slot holding the thread with your left hand 3 Draw the thread through the thread guide as illustrated 4 Pass the thread through wire thread guide and looper eye leaving an excess length of about 4 10 cm ...

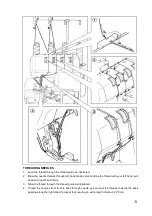
Страница 13: ...tension slot Holding the thread with your left hand pull down with right hand firmly 3 Draw the thread through the thread guide as illustrated 4 Thread the needles from front to back through needle eye and pull the threads towards the back passing along the right side of presser foot leaving an extra length of about 4 10cm ...

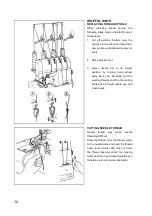
Страница 14: ...edle bar to its lowest position by turning hand wheel away from you Carefully pull the existing threads until the connecting knots pass through needle eye and looper eyes CUTTING NEEDLE THREAD Frayed thread may make needle threading difficult Draw the thread near the thread cutter on the needle plate and push the thread cutter lever model 320 only or draw the thread passing under the moving cutter...

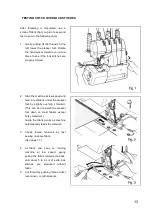
Страница 15: ...speed and feed in test fabric under the presser foot by slightly pushing it forward This can be done with the presser foot down on most fabrics except bulky materials Guide the fabric gently as machine automatically feeds the material 3 Check thread tensions by test sewing on spare fabric See page 17 4 At fabric end carry on running machine at low speed gently pulling the fabric towards the back u...

Страница 16: ...14 ...

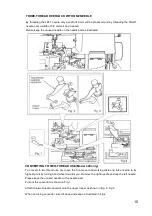
Страница 17: ...WO THREAD USE Model 320 only To convert to two thread use first open the front cover and working table and raise needle to its highest point by turning hand wheel towards you Remove the right needle and use the left needle Please keep the unused needle on the needle pad Pull out the convertor as shown in Fig 1 Attach the two thread convertor onto the upper looper as shown in Fig 2 Fig 3 When not u...

Страница 18: ...m the needle plate by screw driver and keep it in the front cover as illustrated Model 320 only or in the accessory bag 4 Set the machine according to page 14 NOTE 1 Please use following recommended thread for making ideal seams 2 After finishing reset the stitch finger in its place Please ensure inserting it deep as illustrated in Fig 1 RECOMMENDED THREAD Narrow overlock edge Rolled edge With Thr...

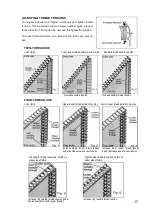
Страница 19: ...lled to top side Decrease needle tension Increase needle thread tension FOUR THREAD USE Just right Upper looper thread pulled to top side Lower looper thread pulled to top side Increase Upper looper thread tension and or decrease lower looper tension Increase lower looper thread tension and or decrease upper looper tension Increase left needle thread tension and or decrease either or both looper t...

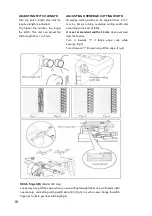
Страница 20: ...urning overedge cutting width dial according to the kind of fabric It is set at standard width of 6 mm when delivered from the factory Turn it towards 5 if fabric edge curls while sewing Fig 1 Turn it toward 7 if loops hang off the edge Fig 2 Stitch finger B Model 320 only Loops may hang off the edge when you sew with lightweight fabric using 3 threads right needle only and setting cutting width d...

Страница 21: ...FOR POSTITVE DIFFERENTIAL FEED the front feed dog A makes a longer stroke than the rear feed dog B This has the effect of accumulating material under the presser foot to offset the wavering on the fabric NEGATITVE DIFFERENTIAL FEED WHEN SET FOR NEGATIVE DIFFERENTIAL FEED the front feed dog A makes a shorter stroke than the rear feed dog B This has the effect of stretching material under the presse...

Страница 22: ... FOOT PRESSURE REGULATOR Presser foot pressure has been correctly set at the factory so you do not need to adjust it for most of ordinary sewing If adjustment is necessary turn the foot pressure regulator to higher number to increase or to lower number to decrease pressure SEWING WITH EXTRA HEAVYWEIGHT FABRIC OR MULTIPLE LAYERS OF FABRIC A wide ranger of fabric can be overlocked on this machine bu...

Страница 23: ...r about 3 cm before turning the fabric Fig 2 TURNING CURVED EDGES For inside curves guide fabric gently with trimming line of the fabric under the right front of the presser foot or a little to the left applying pressure at point A in the direction of the arrow with your left hand and at the same time applying a little opposite pressure at point B with your right hand Fig 3 For outside curves plac...

Страница 24: ... guide 3 See Fig 1 3 Insert the cord through either the front or rear hole according to the operation see diagrams Figures 2 and 3 in the presser soot and pass it under and to the rear of the foot 4 Place the material to be sewn as normal Start at slow speed observing if cord is feeding correctly and increase speed as needed FOR JOINING SHOULDERS OR SLEEVES pass the cord through the front hole ens...

Страница 25: ...nhole twist or embroidery thread on the lower looper Butted seams using only two threads or using three threads flat seam Place two pieces of fabric wrong sides together and overlock along the edge Unfold and press By using different coloured fabrics and thread a pleasing patchwork effect can be achieved Pin tucking using three threads Fold fabric along a line to be pin tucked and overlock sew alo...

Страница 26: ...To obtain waver free seams set the differential feed control dial at more than 1 3 Gathering Differential feed makes gathering easier on lightweight fabric Use it on waistlines sleeve heads sleeve bottoms and ruffles etc Set the differential feed control dial between 1 5 and 2 to obtain the best gathering effect for your use IMPORTANT The exact adjustment depends on the thickness and elasticity of...

Страница 27: ...d wheel towards you by hand In this position set replacement cutter in position and secure it with screw ENSURING THAT THE EDGE OF THE MOVING CUTTER IS APPROXIMATELY 0 5 MM BELOW THE SURFACE OF THE FIXED CUTTER DISENGAGING MOVING CUTTER If you want to sew without cutting open the working table and disengage the moving cutter by pushing the cutter release knob to the left and turning it towards you...

Страница 28: ...Y BY REMOVING PLUG FROM SOCKET OUTLET 1 Open the front cover and working table Using the brush provided remove dust and lint that have accumulated 2 Apply a few drops of oil to the points indicated by arrows ALWAYS USE A GOOD QUALITY SEWING MACHINE OIL 3 Remove each top cover with screw driver and remove dust and lint of inside with the brush ...

Страница 29: ...of Needle Loose Presser Foot Do not pull Fabric guide it gently Choose correct size Needle for Thread and Fabric Reset Needle Reset Presser Foot Puckering Incorrect Thread Tension s Bent or blunt Needle Differential feed is set Incorrectly Reset Thread Tension s Insert new Needle Set it at less than 1 Wavering Differential feed is set Incorrectly Set it at 1 or at more than 1 For knitted fabrics S...

Страница 30: ...ng Bent needle Thread Tension s too tight Incorrect setting of Needle Thread Spool tangled Thread Guide Pole not extended Re thread machine Insert new Needle Reset thread tension s Reset needle Reset spool properly Fully extend Guide Pole ...

Страница 31: ...roduct including without limitation any lia bility for third party claims for damage and is limited to the amount paid by the original purchaser Reliable Product with respect to which this limited warranty protection applies This limited warranty does not apply with respect to products that have been altered or which are missing serial numbers or for products not purchased directly from Reliable o...

Страница 32: ...1 800 268 1649 www reliablecorporation com ...

Отзывы: