background image

Page | 7   


4)


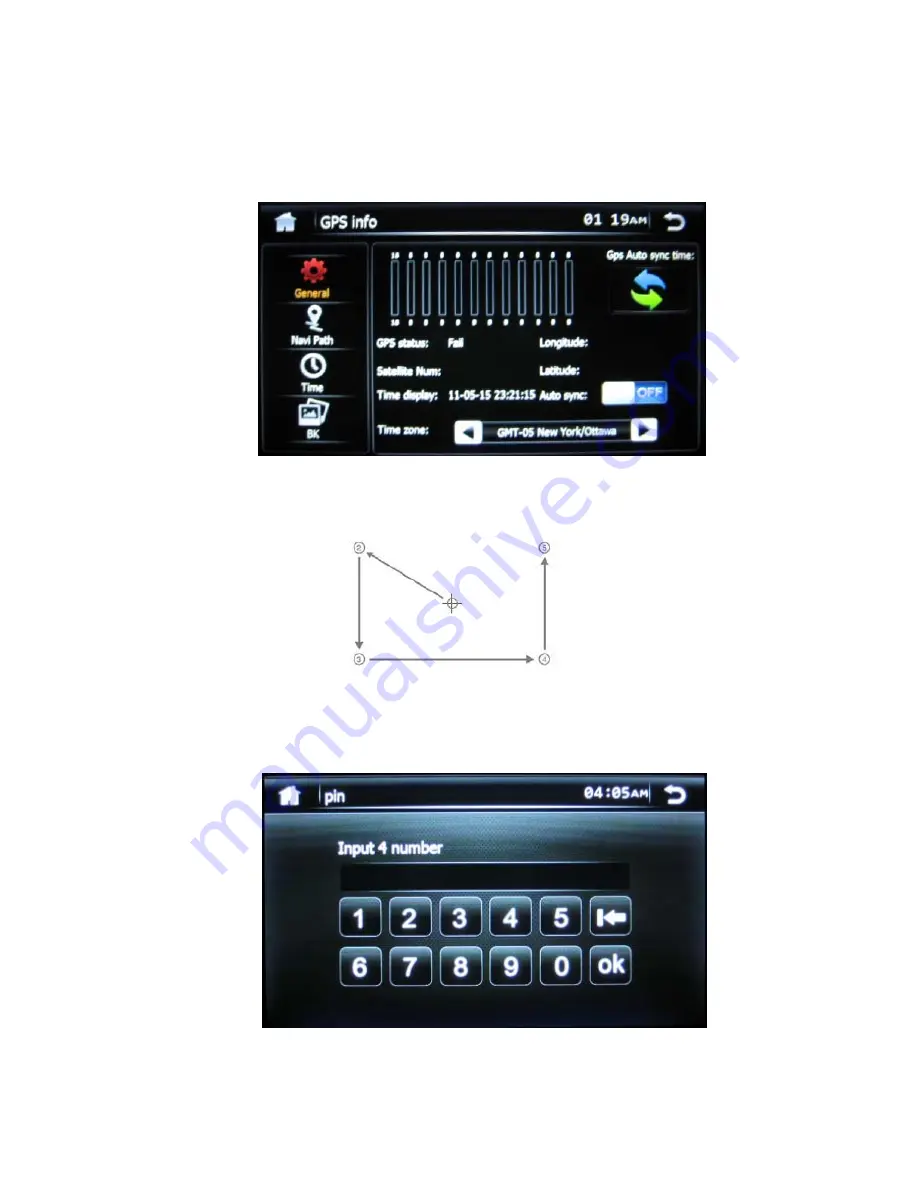
GPS INFO 

Screen displays the current GPS location status, if GPS is installed. 
If auto SYNC is set to on, the GPS will automatically update the clock setting on 
the RADIO, and NOT allow the user to manually set the clock.    To manually set 
the clock, verify that AUTO SYNC is set to OFF first. 


5)


CALIBRATE SCREEN 

     Touch only the crosshairs as it changes locations to calibrate the touch screen. 


6)


FACTORY SET 

    Screen allows access to Factory setup options.  The user must press pin numbers 

3368 then OK to enter. Settings made here are saved during a master reset. 


Содержание EVR-6500D

Страница 1: ...6 2 Touch Screen AM FM Multimedia Receiver with CD DVD USB iPod Auxiliary A V Inputs Bluetooth Audio Streaming Installation Operation Manual EVR 6500D ...

Страница 2: ...RES 6 2 Touch Screen Operation Electronic AM FM Stereo Tuner Preset Up to 30 Radio Stations 18 FM 12 AM EURO and USA frequency bands Rear A V RCA Inputs Supports USB microSD memory cards MP3 WMA playback w ID3 Tag Support MPEG 1 MPEG 2 MPEG 4 DIVIX playback iPod iPhone Playback Control CD DVD Playback Back up Camera input Bluetooth audio Streaming w support for Hands Free calling RCA Composite vid...

Страница 3: ...ooth Operation 12 Recent Calls 13 Bluetooth Setup 13 Phone book 14 Bluetooth Audio Streaming 15 AM FM Operation 16 USB microSD CD media 17 iPod iPhone Operation 18 DVD Operation 19 DVD Setup 22 Back up Camera Operation 27 File Requirements 27 Remote Control 28 Troubleshooting 30 Radio Dimensions 30 Radio Installation 31 Radio Removal 33 Electrical Connections 34 Specifications 35 ...

Страница 4: ...r a call Press the END button End Bluetooth connected calls 4 Bluetooth Microphone Internal microphone for Bluetooth calls CURRENTLY NOT AVALIABLE 5 Reset Button Press to reset system settings to factory default 6 Front Panel mini B USB input Connect to USB memory for playback of music video files 7 Front Panel microSD Inputs RIGHT SIDE SLOT IS RESERVED FOR FUTURE USE ONLY Connect to microSD memor...

Страница 5: ...eft corner of the screen or press the SRC button Touch either the Radio BT Phone Setup DVD AUX iPod USB SD Rear View or BT Music to change to the corresponding source The upper right hand icons shown below will change color to RED when the corresponding source is connected to the Radio If the source chosen is not connected NO DEVICE is displayed ...

Страница 6: ...the up down arrows on the right side of the page to access the desired options The general Setup options include 1 OSD TIME ON OFF Switches the clock display ON OFF when is enabled video on the front panel 2 CAMERA MIRROR ON OFF Reverses the input image from the Back up camera input 3 GPS MIX ON OFF Reserved for future use only ...

Страница 7: ...nd NOT allow the user to manually set the clock To manually set the clock verify that AUTO SYNC is set to OFF first 5 CALIBRATE SCREEN Touch only the crosshairs as it changes locations to calibrate the touch screen 6 FACTORY SET Screen allows access to Factory setup options The user must press pin numbers 3368 then OK to enter Settings made here are saved during a master reset ...

Страница 8: ...screen to a custom 800 480 bmp file using a microSD card Select the SD icon then choose the image b VOLUME BALANCE Adjusts the gain settings of the source Recommended settings are below Exceeding these settings may result in clipping or overdriving the signal levels Use the arrows to adjust the desired setting if necessary ...

Страница 9: ...cklight brightness level of the Back up camera image f NAVIGATION Reserved for future use Turns the Navigation icon ON OFF in the HOME screen 7 VERSION Displays the current firmware on the Multimedia player 8 BACKLIGHT SET Allows the user to customize the backlight brightness settings of the screen Depending on the time on the clock 9 BT ENABLE ON OFF Turns the Bluetooth Discovery mode on the play...

Страница 10: ...ed background image on the screen to change If the user has a custom image it must first be loaded onto a microSD card with a resolution of 800 480 and saved as a BMP file Then press the SD icon on the bottom of the page to access the custom image files on the card and select from available images NOTE The microSD card must be present at all times for continuous use ...

Страница 11: ... prompt to bond should appear on your Mobile device Press to accept and continue the process The device will then ask for the passkey enter it on the mobile device NOTE Some mobile devices require the passkey to connect If your moblie device requires the passkey you will need to enter it now The default code for the Radio unit is 0000 5 After entering the passkey press OK The Mobile device should ...

Страница 12: ...button Press to transfer audio controls between the radio and phone NOTE If no audio is present after the call is answered press this button to transfer the call back to the phone 7 Link button Press to connect to a previously paired device 8 Disconnect button Press to disconnect from a previously paired device 9 Phonebook button Press to access the contacts of the paired device 10 Call End Ignore...

Страница 13: ...st 5 SCROLL UP DOWN to access addition pages on the list BT SET 1 Auto Answer Turns the Auto Answer feature of a paired Bluetooth phone ON or OFF When set to ON the radio will automatically answer all incoming calls 2 Input 4 number This is the customizable PASSKEY necessary to pair a Bluetooth device NOTE If the number is changed it does NOT affect previously paired devices ...

Страница 14: ...ected device 2 SAVE the contacts list into the radio s memory 3 DELETE the current list of Contacts After accessing the list of contacts simply scroll Up Down and press the screen on the desired contact The number will display in the Status window but the number will not be dialed until the Place Call Button is pressed ...

Страница 15: ... in the manual to connect Touch the BT Audio icon from the HOME screen or the shortcut icon on the BT Phone screen Press the PLAY icon on the screen and verify audio is present While listening to audio the following functions are available 1 PREVIOUS button Touch to play the previous track 2 STOP button Press to stop playback 3 PLAY PAUSE button Touch to pause playback Touch again to resume playba...

Страница 16: ...eted the radio will scan for 5 seconds through each of the preset stations of either the AM or FM band and stop Press this button momentarily to scan only the presets 7 SCAN button Press this button to automatically preview all radio stations for 5 seconds 8 AM button Press this button to change to AM frequency This provides access to AM1 and AM2 presets 9 FM button Press this button to change to ...

Страница 17: ...lly on the front LCD as shown below The playback screen allows access to the follow 1 Spectrum Analyzer View press to playback with this view 2 Info button press to playback with this view 3 LIST media files press to view all available files After pressing this button the icons on the left side of the menu gives the user playback control of the available file formats on the media Select the title ...

Страница 18: ...gh your apple device verify that the Black 30 pin extension is connected to the pigtail on the rear of the radio Next connect the 30 pin cable to the Apple device Once connected the radio will automatically switch the source to iPod When connected you can control your device via touch screen and access Playlists Artists Albums etc To return to the iPod source from any other source menu touch SRC o...

Страница 19: ...to search from DVD Operation Insert a Disc into the top disc slot and disc play begins automatically You cannot insert a disc if there is already a disc in the unit or if the Radio is off To access DVD Mode from another SOURCE switch to the HOME screen by either pressing SRC on the front panel or the HOME icon Then press the DVD icon on the screen A blank control screen will be shown for playback ...

Страница 20: ...20 7 PAGE Shows the current page press to access the next pages 8 DISPLAY SETTINGS Press to access the video settings of the front panel during playback 9 PRESET EQ NOT USED PAGE 2 of 3 1 TRACK DISPLAY Displays statistical disc information during playback Continue pressing to access Current Title Total Titles Current Chapter Total Chapters for Current Title Title Elapsed Time Current Audio Languag...

Страница 21: ... or 1 4 7 PAGE Shows current page press to access the next page PAGE 3 of 3 1 MUSIC FILES Press to access music files on the media 2 IMAGE FILES Press to access images files on the media 3 VIDEO FILES Press to access video files on the media 4 EJECT Eject button 5 NAVIGATION CONTROLS Press to access GUI controls to easily navigate through DVD media 6 NUMERIC Press to directly access chapters using...

Страница 22: ... enable ON or disable OFF the screen saver When the DVD is in the STOP or PAUSE mode or there is no disc in the slot the screen saver will be played after 3 minutes of no activity TV TYPE This is to set appropriate aspect 4 3 or 16 9 according to the connected monitor 1 4 3PS for 4 3 TV Playback in the PAN SCAN style If wide screen monitor is connected the left and right edges are cut off 2 4 3LB ...

Страница 23: ... settings LANGUAGE SETUP MENU OSD LANGUAGE This item sets the default language for the On Screen Display OSD messages Press ENTER and then to move cursor over the available selections and press ENTER again to select desired language setting AUDIO LANG This item sets the default language soundtrack for DVD discs ...

Страница 24: ...ts the default SUBTITLE language for DVD discs MENU LANG This item is for setting the default MENU language for DVD discs DIVX VOD Not used VIDEO SETUP MENU Valid for Digital output settings only NOT USED FOR THIS MODEL VIDEO SETUP MENU ...

Страница 25: ...ST This item adjusts the CONTRAST of the video output of the unit HUE This item adjusts the HUE of the video output of the unit SATURATION This item is for adjusting the SATURATION of video output of the unit SHARPNESS This item is for the SHARPNESS adjustment of the video output of the unit ...

Страница 26: ...xes the signals from center rear right front right positions 2 STEREO Mixes the signals from center rear left front left and rear right positions Mixes the signals from center rear right front right and rear left positions 3 VSS Virtual Surround Sound FRONT 1 LARGE Sends all frequencies out the audio output 2 SMALL Filters the audio output at 60Hz DIGITAL SETUP MENU All settings are reserved for f...

Страница 27: ...pend on the rear view camera exclusively AUDIO FILE REQUIREMENTS MP3 WMA using ISO9660 formatting The MP3 files with a sampling rate of 32 44 1 or 48 kHz And a bitrates between 32 to 320 kbps 44 1khz 128kbps or higher is recommended The WMA file with a sampling rate of 32 44 1 or 48 kHz And a bitrates between 62 to 192 kbps 44 1khz 128kbps is recommended MPEG 4 FILE REQUIREMENTS MP4 Profile MPEG 4...

Страница 28: ...ied and associated logos are trademarks of Rovi Corporation or its subsidiaries and are used under license DivX Certified to play DivX video including premium content Covered by one or more of the following U S patents 7 295 673 7 460 668 7 515 710 7 519 274 iPod and iPhone are trademarks of Apple Inc registered in the U S and other countries REMOTE CONTROL ...

Страница 29: ...or buttons 10 EJECT BUTTON Press to EJECT the disc 11 CURSOR BUTTONS In menu mode these buttons moves the cursor 12 TITLE PBC BUTTON During DVD mode press to return to the disc title menu 13 PLAY PAUSE BUTTON Press to PAUSE in playback mode press again to PLAY in pause mode 14 STOP BUTTON In playback mode press once to pause play press twice to STOP 15 ST RPT BUTTON In radio mode press to switch f...

Страница 30: ...riven Bitrate of audio file is too large Adjust the volume level of the auxiliary source Check the VOLUME BALANCE section of SETUP Change the sample frequency or Bitrate of the file iPod screen displays iPod Linking for a long period of time iPod is not a supported device Wait for iPod to load or reconnect 30 pin plug If still Linking then device is not supported use the AUX input or a Bluetooth c...

Страница 31: ... that do NOT require the use of the DIN collar The radio has threaded holes in the chassis side panels for ISO mount applications If necessary four M5x10mm screws are included with the hardware pack to assist you COLLAR INSTALLATION RECOMMENDED CUTOUT DIMENSIONS ...

Страница 32: ... below to lock into place Pass the harnesses and antenna cable through the DIN collar and connect to the back of the radio Verify clearance then gently insert the radio into the DIN Collar until both spring clips are locked into place A Trim plate is provided to improve the appearance if necessary ...

Страница 33: ...additional support install a rear support bracket as shown below RADIO REMOVAL To remove the radio when installed using the DIN collar remove the Face Plate is installed Then insert the removal keys in both sides to release the lock clips ...

Страница 34: ...ning For safety reasons you cannot view a video source on the built in monitor as long as the vehicle is in motion This is a violation of federal law In order to display video the Brown handbrake Trigger wire of the included harness must be hardwired into the vehicle s parking brake ground circuit and the vehicle s parking brake must be engaged ...

Страница 35: ...ity 75dB Stereo Separation 40dB 1kHz Image Rejection Ration 75dB IF rejection ratio 100dB Signal to Noise ratio 70dB stereo AM RADIO Frequency range USA 530kHz 1710kHz 10 kHz step EURO 522kHz 1620kHz 9 kHz step Usable Sensitivity 28 dB uV 25uV S N 20dB CD DVD PLAYER Signal Noise Ratio 1kHz 120dB Frequency Response 1dB 10 20 000Hz 1dB Total Harmonic Distortion 1kHz less than 0 20 1Khz Number of Cha...

Страница 36: ...namic Range 80dB 1kHz Harmonic Distortion 0 01 AUXILIARY INPUT SPECIFICATIONS Frequency Response 1db 20HZ 20Khz 3dB Input Voltage Maximum Voltage 1200mV Input impedance 10KΩ VIDEO PLAYBACK Format NTSC PAL AUTO Video Input Output level 1 0V p p 75Ω 0 2V GPS Frequency Range L1 1575 42MHz MONITOR Screen Size 6 2 Measured Diagonally 16 9 Widescreen Resolution 800 480 Due to continuous product improvem...

Отзывы: