background image


User’s Guide 

12


ECVR-1500D AM/FM/WB/CD/DVD/USB/BT Motor Coach Radio User’s Guide         

Radio Engineering Industries, Inc. | 6534 L Street | Omaha, NE 68117


© 2018 Radio Engineering Industries, Inc.        

800.228.9275 | p: 402.339.2200 | f: 402.339.1704 | radioeng.com


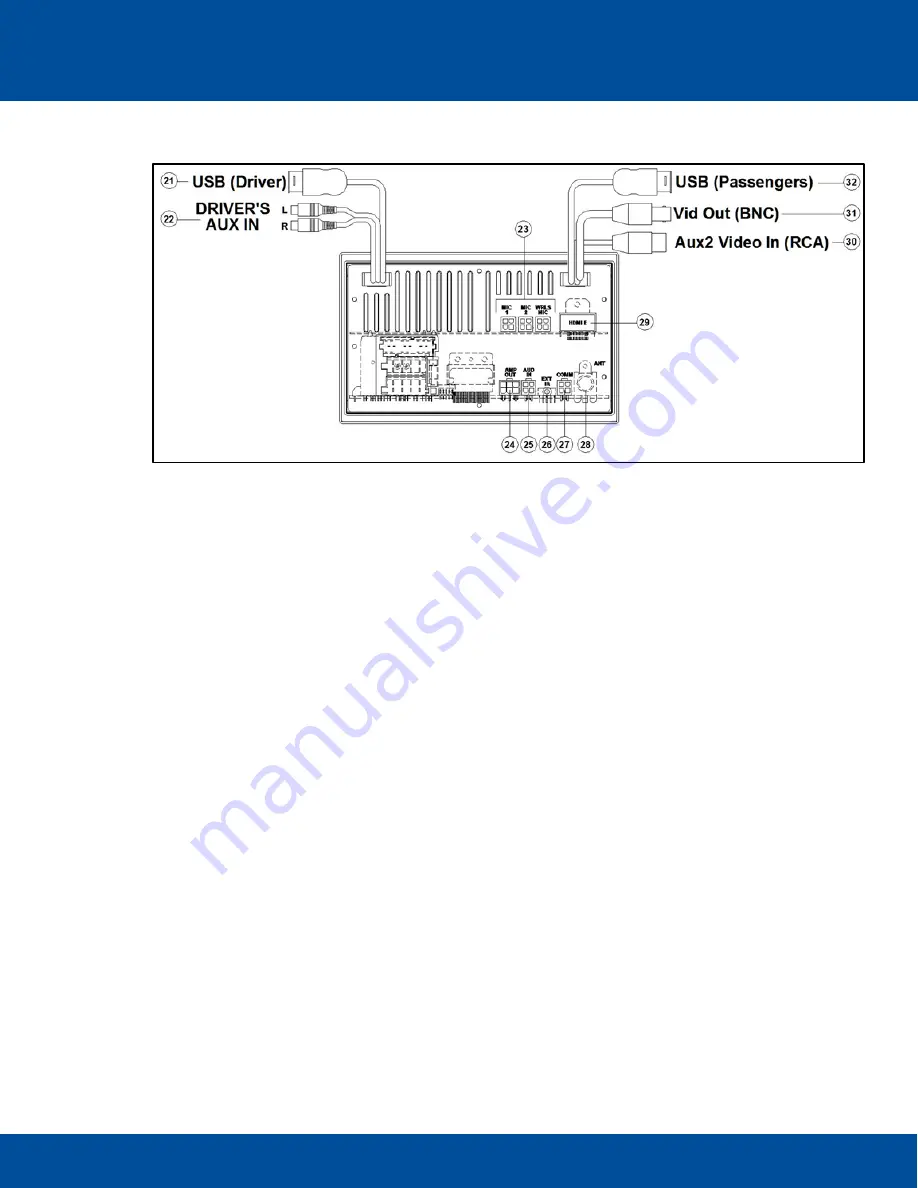
2.2


Rear Inputs 


Radio Cable Connections 

21

. Rear Driver’s USB 2.0 (Type A) Input 

22

. Rear Driver’s AUX1 Input Jacks 

23

. Microphone inputs 

24

. Audio Amplifier line output 

25

. HDMI Switcher/external DVD line input 

26

. External IR Input 

27

.RS485 communication port 

28

. Rear antenna input (Motorola style, 6” pigtail) 

29

. HDMI Video output (automotive HDMI Type E Receptacle) 

30

. Aux 2 composite video input 

31

. Composite Video Output (BNC, 6” pigtail) 

32

. Rear USB input (2.0 Type A Jack, 6” pigtail) 

3


Cable Connection Points 

3.1


Rear Driver’s USB Jack 

Access to compressed audio files and device charging for the DRIVER’S USB. 

3.2


Driver’s AUX Input Jack 

Access to the driver’s stereo RCA analog inputs. 

3.3


P.A. Inputs 1-3 

Public Address Microphone inputs for Passenger announcements. 

3.4


External Amplifier Audio Output 

Line output for connection to REI amplifier. 

3.5


External Audio Input 

Input for audio from either the external REI HDMI switcher or separate external REI DVD player. 

Содержание ECVR-1500D

Страница 1: ...ECVR 1500D AM FM WB CD DVD USB BT Motor Coach Radio User s Guide 2018 Radio Engineering Industries Inc...

Страница 2: ...res 6 2 Controls and Indicators 11 2 1 Reset Switch 11 2 2 Rear Inputs 12 3 Cable Connection Points 12 3 1 Rear Driver s USB Jack 12 3 2 Driver s AUX Input Jack 12 3 3 P A Inputs 1 3 12 3 4 External A...

Страница 3: ...3 3 15 Video Disable 13 3 16 Aux Trigger 13 3 17 MUTE 13 4 Drivers Operation Functions 14 4 1 Service Menu 14 4 2 Setup Menu 17 4 3 Clock 21 4 4 Power and Mute Function 21 5 Driver s Section 22 5 1 Dr...

Страница 4: ...Using a Bluetooth Device as an Audio Source 27 6 Passenger s Section 28 6 1 Passenger s VOL SEL Selection 28 6 2 SETTING THE TIME 29 Passenger s RAD button 29 6 3 Preset Memory Recall Operation 30 6 4...

Страница 5: ...04 radioeng com 6 17 MENU 38 6 18 SEARCH BACK 38 6 19 Ejecting the disc 38 6 20 Changing the Splash screen output file 38 6 21 VERIFYING THE APP FIRMWARE OF THE UNIT 39 6 22 Bluetooth Connection 41 6...

Страница 6: ...NC Composite video Output for non HD systems Drivers Analog Auxiliary audio input Passengers A V input Independent AM FM Digital tuners for Driver and Passenger Zones Presets for up to 30 Radio Statio...

Страница 7: ...228 9275 p 402 339 2200 f 402 339 1704 radioeng com RADIO DIMENSIONS RADIO INSTALLATION ISO INSTALLATION For installations that do NOT require the use of the DIN collar The radio has threaded holes in...

Страница 8: ...02 339 1704 radioeng com Place the DIN collar into the dash opening Bend the tabs outward as shown on the drawing below to lock into place Pass the harnesses and antenna cable through the DIN collar a...

Страница 9: ...o Engineering Industries Inc 800 228 9275 p 402 339 2200 f 402 339 1704 radioeng com For installations requiring additional support install a rear support bracket as shown below RADIO REMOVAL To remov...

Страница 10: ...FM WB CD DVD USB BT Motor Coach Radio User s Guide Radio Engineering Industries Inc 6534 L Street Omaha NE 68117 2018 Radio Engineering Industries Inc 800 228 9275 p 402 339 2200 f 402 339 1704 radioe...

Страница 11: ...s Select Knob 6 Disc EJECT 7 Passenger s Radio 8 Passenger s SCR 9 Passenger s VID 10 Passenger s Select Knob 11 Preset Memory Recall Media Control Buttons 12 Tune Seek Down 13 Tune Seek Up 14 Media...

Страница 12: ...ear antenna input Motorola style 6 pigtail 29 HDMI Video output automotive HDMI Type E Receptacle 30 Aux 2 composite video input 31 Composite Video Output BNC 6 pigtail 32 Rear USB input 2 0 Type A Ja...

Страница 13: ...ernal composite video source 3 11 Composite Video Output BNC Outputs composite video from digital media sources or Aux 2 Input source 3 12 Rear Passenger s USB Jack Access to compressed audio video fi...

Страница 14: ...on or off CD HDMI can be turned on or off select Reset to Default and the Driver s and Passenger s Blue Tooth can be turned on or off USA or EURO Rotate the VOL SEL knob to select either USA or EURO...

Страница 15: ...SEL knob to turn PASSENGERS AUX 2 ON or OFF Press and rotate the VOL SEL knob to continue on reviewing the options on the Service menu A few moments of inactivity will close the menu and return the u...

Страница 16: ...adio screen Push VOL SEL knob to reset the Bluetooth module to its default setting Press and rotate the VOL SEL knob to continue on reviewing the options on the Service menu A few moments of inactivit...

Страница 17: ...LCD will display SETUP Rotate the VOL SEL knob to choose the option then press to make a selection MCU FIRMWARE VERSION The first option displayed on the Setup menu Indicates the firmware version pres...

Страница 18: ...will close the menu and return the user to the previous radio setting Brightness Set Buttons and Brightness Set LCD Press and hold the Driver s VOL SEL knob until SETUP appears on the radio screen On...

Страница 19: ...rs ON OFF Press and hold the Driver s VOL SEL knob until SETUP appears on the radio screen Once SETUP appears release the VOL SEL knob and rotate the VOL SEL knob until SUBWOOFERS ON appears on the ra...

Страница 20: ...wing the options on the Setup menu A few moments of inactivity will close the menu and return the user to the previous radio setting Subwoofer LPF The Subwoofers must be turned ON for Subwoofer LPF to...

Страница 21: ...ivity will close the menu and return the user to the previous radio setting 4 3 Clock The digital clock can display time in either 12 or 24 hour format The radio must be in Driver s mode to set the ti...

Страница 22: ...knob to select one of the following functions BASS TREB Rotate the knob to adjust the desired setting from 7 0 7 For Balance rotate the knob to adjust the setting from left to right 5 3 RAD button Pre...

Страница 23: ...hold the preset button until the channel identifier appears on the radio screen For example if station FM 105 95 is selected as preset channel 6 hold preset button 6 until CH6 appears on the top of th...

Страница 24: ...le NOAA National Weather Radio Broadcasts from over 380 Locations throughout the U S on seven VHF FM frequencies are available Tune to receive continuous weather information 24 hours a day on one of t...

Страница 25: ...the driver s USB input Note Mode will skip SOURCES if media is not present or if the source is turned off D USB P USB DISC BT PHONE If enabled BT AUDIO if paired Playing Internal DVD CD Must be contro...

Страница 26: ...UX button to pass the desired audio input source from the Driver s AUX input Driver s AUX function 5 8 Public Address system P A When any of the microphone inputs are keyed the control head switches o...

Страница 27: ...mobile device can be paired with the radio at a time Once a paired mobile device is disconnected changing the pass key will NOT disable the device from reconnecting Turn Driver s Bluetooth OFF in the...

Страница 28: ...Bluetooth Audio When the Bluetooth icon is displayed it indicates the radio is successfully connected Press the Play Pause button to listen to audio While audio plays the following functions are avail...

Страница 29: ...ss and hold the DISP button until the hour display begins to flash Rotate Volume Select Knob to adjust the hour Press the DISP button again and the minute display will flash Rotate VOL SEL Knob to adj...

Страница 30: ...io mode press this button momentarily to manually tune downward Press and hold a button and the radio will automatically seek to the previous radio station once released 6 5 TUNE SEEK UP Under Radio m...

Страница 31: ...sing both the Composite BNC video input and the Aux 2 Stereo RCAs When in AUX 2 mode video is upconverted through the HDMI E to 1080P There is also an optional active low AUX 2 trigger that automatica...

Страница 32: ...M FM WB CD DVD USB BT Motor Coach Radio User s Guide Radio Engineering Industries Inc 6534 L Street Omaha NE 68117 2018 Radio Engineering Industries Inc 800 228 9275 p 402 339 2200 f 402 339 1704 radi...

Страница 33: ...through an Apple device verify that Apple certified USB extension is connected to the USB pigtail on the rear of the radio Next connect the cable to the Apple device Once connected the radio will auto...

Страница 34: ...o books on the iPod o Select the audio book from the list to begin playback pressing the VOL SEL knob of the active section Songs o Select to view a list of all songs on the iPod o Use the Folder butt...

Страница 35: ...the song from the list begin playback by pressing the VOL SEL knob of the active section The options are also displayed on the HDMI output to the monitors After making your selection the LCD will disp...

Страница 36: ...r a secondary DVD2 The video will be displayed on the monitors inside the motor coach Internal Disc playback CD OPERATION Insert a Compact Disc into the disc slot label side up The radio will automati...

Страница 37: ...ng digital media use this button to PAUSE STILL and PLAYBACK digital files Press PAUSE PLAY to pause or play the track 6 13 DVD OPERATION Insert a DVD into the disc slot label side up The radio will a...

Страница 38: ...on the DVD disc 6 18 SEARCH BACK Press to navigate on the device and select a specific song or play context applicable to USB flash drives CD MP3 discs and iPods Press again to go BACK one level when...

Страница 39: ...ng Industries Inc 800 228 9275 p 402 339 2200 f 402 339 1704 radioeng com Splash Screen 6 21 VERIFYING THE APP FIRMWARE OF THE UNIT After the disc is ejected verify the ECVR 1500D is still in Passenge...

Страница 40: ...The available sources are as follows 1 Video 1 2 Video 2 3 3 5 mm 4 HDMI 1 5 HDMI 2 6 HDMI 3 External HDMI Switcher sources Playing External DVD using DVD 2 Press the passenger s video button to acce...

Страница 41: ...ntering the pass key press OK The mobile device should display connected The Bluetooth icon of the radio should appear on the screen Once selected the pairing of the device and the radio should have o...

Страница 42: ...io players or Bluetooth adapters compatible with these profiles can be connected to this Radio Verify the device is connected via Bluetooth then touch the MODE button on the front to access BT AUDIO P...

Страница 43: ...18 Radio Engineering Industries Inc 800 228 9275 p 402 339 2200 f 402 339 1704 radioeng com 7 Remote Control The ECVR 1500D includes a remote control providing access to all DVD player functions The m...

Страница 44: ...confirmation Stop Stop Playback FLD Increment Folders for compressed audio video playback FLD Decrement Folders for compressed audio video playback Track Frame Forward Next Track Play or Frame Forward...

Страница 45: ...t Back Return Press to RETURN to a previous menu Slow Slow Play Decrement Playback Speed 1 2 1 4 1 8 1 16 NORMAL Zoom Zoom Video Image X2 X3 X4 NORMAL Zoom Control Title Press to Toggle between Availa...

Страница 46: ...emote Control Setup Display Press Setup on Remote During DVD Playback Use the SCROLL Arrows Up Down left right Press OK to select Options This is to select the appropriate aspect 4 3 or 16 9 according...

Страница 47: ...tions Menu This player can play discs whose contents are recorded in either PAL or NTSC formats Select either format when you re connected to a corresponding NTSC or PAL monitor Select either ON or OF...

Страница 48: ...se Check for both ACC BATTERY voltage with Multi meter check all fuses Cannot tune radio stations The antenna cable is not connected The signal is too weak The radio is in the wrong frequency AREA Con...

Страница 49: ...f the unit next press the STOP button the display will show the following item shown as NOT CON are nor receiving valid communication MP 1000 Media Player If the external HDMI switcher source is locke...

Страница 50: ...00MHz 0 05 MHz step Usable Sensitivity 10 2 dBf 0 9 uV 75 50db Quieting Sensitivity 15 2 dBf 1 6 uV 75 Frequency Response 30Hz 15kHz 3dB Alternate Channel Selectivity 75dB Stereo Separation 40dB 1kHz...

Страница 51: ...VRCP 1 0 PBAP Microphone Built In and optional External input 3 5mm USB INTERFACES USB Standard USB Type A 1 1 2 0 Full Speed Maximum Supply Current 1 5A File System Fat16 32 Supported file types Pass...

Страница 52: ...r Coach Radio User s Guide Radio Engineering Industries Inc 6534 L Street Omaha NE 68117 2018 Radio Engineering Industries Inc 800 228 9275 p 402 339 2200 f 402 339 1704 radioeng com Radio Engineering...

Отзывы: