background image

E

N

G

L

IS

H

  4

4


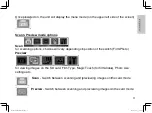
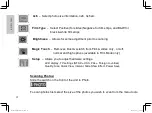
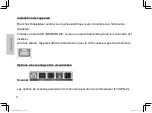
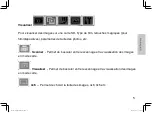
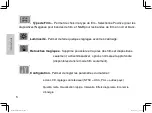
4x6  –  Select photo size information, 4x6, 3x5 etc. 

 Film Type  –  Select Positive (for slides) Negative for film strips, and B&W for

                        black & white film strips 

   Brightness  –  Allows for some adjustment prior to scanning 

  Magic Touch  –  Removes Dust & scratch from Film & slides only,  on/off,   

                             normal and high options (available in Film Mode only) 

 Setup  –  Allows you to adjust hardware settings: 

                   LCD display, TV settings (NTSC = USA, PAL = Foreign countries) 

                   Quality, Size, Quick View, Interval, Slide Show Effect, Power Save 

Scanning Photos:

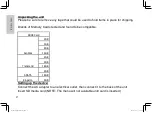
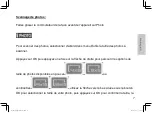
Slide the switch on the front of the unit to Photo 

To scan photos first select the size of the photos you wish to scan from the menu tools.  

3720093-多國manual.indd   4

2010/11/4   下午 7:14

Содержание Imagebox LCD 9

Страница 1: ...s 1 for film strip 1 for mounted slides Additional holders available for purchase PARTS OF THE SCANNER 1 Front of unit 2 Rear of unit DC Power USB 2 0 Port A V TV Port 3 Power Status LED 4 Photo Film Switch 5 Film Slide Holder Insertion slot 6 Film Scanner Internal screen cover 3720093 多國manual indd 1 2010 11 4 下午 7 14 ...

Страница 2: ... tested and found to be compatible SDHC Card SanDisk 2GB 4GB 8GB 16GB Transcend 2GB 4GB 16GB ADATA 4GB 16GB Kingston 4GB Setting up the device Connect the AC adapter to an electrical outlet then connect it to the back of the unit Insert SD media card NOTE The menu will not available until card is inserted 3720093 多國manual indd 2 2010 11 4 下午 7 14 ...

Страница 3: ...Switch be Preview Switch ll display the menu mo ns will vary depending on card Film Type Magi etween scanning and p between scanning and de on the upper left si n position of the switch c Touch for film slides previewing images on t d previewing images o 3 ide of the screen Film Photo s Photo size the card mode on the card mode 3720093 多國manual indd 3 2010 11 4 下午 7 14 ...

Страница 4: ...ratch from Film slides only on off normal and high options available in Film Mode only Setup Allows you to adjust hardware settings LCD display TV settings NTSC USA PAL Foreign countries Quality Size Quick View Interval Slide Show Effect Power Save Scanning Photos Slide the switch on the front of the unit to Photo To scan photos first select the size of the photos you wish to scan from the menu to...

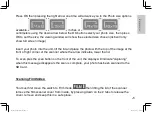
Страница 5: ...ce the photo with the top of the image at the front of right corner of the scanner where the arrow indicates lower the lid To scan pres the scan button on the front of the unit the display will indicate capturing when this message disappears the scan is complete your photo has been scanned to the SD Card Scanning Film Slides You must first move the switch to Film mode then lifting the lid of the s...

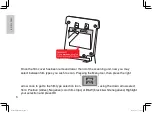
Страница 6: ...you wish to scan Pressing the Menu tool then press the right arrow once to get to the film type selection tool using the down arrow select from Positive slides Negative color film strips or B W black white negatives Highlight your selection and press OK Tab Tab Please remove white plate 3720093 多國manual indd 6 2010 11 4 下午 7 14 ...

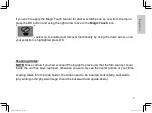
Страница 7: ...arrow once your selection is highlighted press OK Scanning Slides NOTE Make certain if you had scanned Photograph s previously that the film scanner cover inside the unit has been replaced otherwise you will only see the center portion of your films Loading slides into the slide holder the slides need to be inserted horizontally backwards any writing in the physical image should be backward and up...

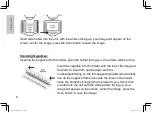
Страница 8: ...nsert the negative into the holder with the top of the image at the bottom insert film upside down with the numbering lettering on the film appearing backwards carefully line up the negative frame lines with the lines on the holder close the holder by bringing the top towards you this is then inserted into the unit with the white arrows facing up your image will appear on the screen center the ima...

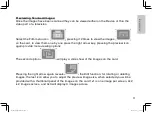
Страница 9: ...y pressing the preview icon again provide more viewing options The second option will play a slide show of the images on the card Pressing the right arrow again reveals the Edit function for rotating or deleting images the last icon allow you to adjust the preview image size when selected you will be provided with a thumbnail panel of the images on the card 1x1 is one image per screen 2x2 is 2 ima...

Страница 10: ...nner menu controls may now be viewed on your television screen allowing you to use the same menus and buttons to advance the images or run a slide show from the scanner s media card directly on your TV Viewing with a Computer Connect the USB cable to the back of the scanner connect the other end to your Computer s USB port the operating system will install the device as removable media you can the...

Страница 11: ... CONTENU DE L EMBALLAGE Scanner Guide d installation rapide imprimé Porte diapositives 1 pour bande de film 1 pour diapositives Des porte diapositives supplémentaires sont en vente ELEMENTS DU SCANNER 3720093 多國manual indd 1 2010 11 4 下午 7 14 ...

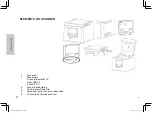
Страница 12: ...ide d installation rapide imprimé Porte diapositives 1 pour bande de film 1 pour diapositives Des porte diapositives supplémentaires sont en vente ELEMENTS DU SCANNER 2 1 Face avant 2 Face arrière Prise d alimentation CC Ports USB 2 0 Prise A V TV 3 Voyant d alimentation 4 Commutateur Photo Film 5 Fente pour porte film porte diapositive 6 Couvercle de l écran du scanner 3720093 多國manual indd 2 201...

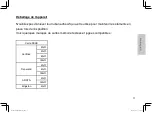
Страница 13: ... a être utilisé pour maintenir les éléments en place lors de l expédition Voici quelques marques de cartes mémoire testées et jugées compatibles Carte SDHC SanDisk 2GO 4GO 8GO 16GO Transcend 2GO 4GO 16GO ADATA 4GO 16GO Kingston 4GO 1 2 3720093 多國manual indd 3 2010 11 4 下午 7 14 ...

Страница 14: ...carte SD REMARQUE le menu ne sera disponible qu une fois une carte est insérée Une fois allumé l appareil affiche le mode menu sur le côté supérieur gauche de l écran Options de scannage et de visualisation Scanner Les options de scannage varient en fonction de la position du commutateur Film Photo 3720093 多國manual indd 4 2010 11 4 下午 7 14 ...

Страница 15: ...paramètres de taille des photos etc Scanner Permet de basculer entre le scannage et la visualisation des images en mode carte Visualiser Permet de basculer entre le scannage et la visualisation des images en mode carte 4x6 Permet de choisir la taille des images 4x6 3x5 etc 3720093 多國manual indd 5 2010 11 4 下午 7 14 ...

Страница 16: ... scannage Retouches magiques Supprime poussière et rayures des films et diapositives seulement activer désactiver options normale et approfondie disponibles dans le mode film seulement Configuration Permet de régler les paramètres du matériel écran LCD réglages du téléviseur NTSC USA PAL autres pays Qualité taille Visualisation rapide Intervalle Effets diaporama Economie d énergie 3720093 多國manual...

Страница 17: ...taille des photos à scanner Appuyez sur OK puis appuyez une fois sur la flèche de droite pour parcourir les options de taille de photos disponibles en pouces ou centimètres utilisez la flèche vers le bas située sous le bouton OK pour sélectionner la taille de votre photo puis appuyez sur OK pour confirmer la taille la 3720093 多國manual indd 7 2010 11 4 下午 7 14 ...

Страница 18: ...scanner appuyez sur le bouton Scan de la face avant de l appareil l écran indiquera Capture en cours lorsque ce message disparaît le scannage est terminé et la photo a été scannée dans la carte SD Scannage de film diapositives Vous devez d abord positionner le commutateur sur Film puis en soulevant le couvercle du scanner retirez la pochette de scannage de film de l intérieur en appuyant sur les 2...

Страница 19: ...r l outil Menu puis appuyez une fois sur la flèche vers la droite pour accéder à l outil de sélection de type de film à l aide de la flèche vers le bas Positive diapositives Négative bandes de film en couleur ou N B pour les négatifs en noir et blanc faites votre sélection et appuyez sur OK Tab Tab rétirer avant de scanner un film ou une diapositive 3720093 多國manual indd 9 2010 11 4 下午 7 15 ...

Страница 20: ... fois que votre sélection est en surbrillance appuyez sur OK Scannage de diapositives REMARQUE Assurez vous que si vous aviez scanné des photos auparavant que la pochette de scannage de film a été remplacé à l intérieur de l appareil autrement vous ne verrez que la partie centrale de vos films Chargement diapositives dans le support de diapositives les diapositives doivent être insérées horizontal...

Страница 21: ...ion correcte Top of the image goes here Le haut de l image doit être ici Insérez le porte diapositives dans l appareil avec les flèches vers le haut votre image apparaît sur l écran centrez l image appuyez sur le bouton Scan pour enregistrer l image Scannage de Négatifs 3720093 多國manual indd 11 2010 11 4 下午 7 15 ...

Страница 22: ...dans le support avec le haut de l image orienté vers le bas insérez le film à l envers avec les numéros lettres apparaissant sur le film en arrière alignez soigneusement les lignes du cadre du négatif avec les lignes du support fermez le support en ramenant le haut vers vous insérez ensuite ce dernier dans l appareil avec les flèches 3720093 多國manual indd 12 2010 11 4 下午 7 15 ...

Страница 23: ... elles peuvent être visualisées soit sur l appareil ou via le port vidéo d un téléviseur Sélectionnez l icône du menu Film en appuyant 2 fois sur l icône pour afficher les images se trouvant dans la carte pour les voir une à une appuyez sur la touche flèche vers la droite appuyez à nouveau sur l icône de visualisation pour obtenir plus d options de visualisation 3720093 多國manual indd 13 2010 11 4 ...

Страница 24: ...de l image lorsqu il est sélectionné un panneau de vignettes des images de la carte vous sera fourni avec 1x1 affichera une image par écran 2x2 affichera 2 images et 3x3 affichera 3 images Connexion à une prise de sortie Vidéo de téléviseur Réglez votre téléviseur sur le mode AV il se peut que vous deviez consulter votre guide d utilisation du téléviseur pour savoir comment s y faire chaque poste ...

Страница 25: ...pour faire avancer les images ou lancer un diaporama directement à partir de la carte du scanner sur votre téléviseur Visualisation avec un ordinateur Branchez le câble USB à l arrière du scanner branchez l autre extrémité à un port USB de l ordinateur le système d exploitation installera l appareil comme un dispositif amovible vous pouvez ensuite accéder aux images stockées sur la carte SD inséré...

Страница 26: ...16 3720093 多國manual indd 16 2010 11 4 下午 7 15 ...

Страница 27: ...os Soportes adicionales disponibles para comprar PARTES DEL ESCÁNER 1 Frontal de la unidad 2 Parte trasera de la unidad Conector del adaptador Puerto USB 2 0 Puerto A V para TV 3 LED de alimentación 4 Interruptor Foto Película 5 Ranura de inserción del soporte de negativos 6 Cubierta de la pantalla interna del escáner de películas 3720093 多國manual indd 1 2010 11 4 下午 7 15 ...

Страница 28: ...hesiva usada para aguantar los elementos en su sitio durante el transporte Marcas de tarjetas de memoria probadas y que resultaron compatibles Tarjetas SDHC SanDisk 2GB 4GB 8GB 16GB Transcend 2GB 4GB 16GB ADATA 4GB 16GB Kingston 4GB 3720093 多國manual indd 2 2010 11 4 下午 7 15 ...

Страница 29: ...moria SD NOTA No estará disponible el menú hasta que introduzca la tarjeta Una vez con alimentación la unidad mostrará el menú en pantalla en la esquina superior izquierda Opciones de los modos Escanear y Vista previa Escanear las opciones del modo escanear variarán dependiendo de la posición del interruptor Film Photo 3720093 多國manual indd 3 2010 11 4 下午 7 15 ...

Страница 30: ...ar cambia entre Escanear y Ver imágenes en el modo tarjeta Vista previa cambia entre Escanear y Ver imágenes en el modo tarjeta 4x6 Selecciona la información del tamaño de la foto 4x6 3x5 etc Tipo de película Seleccione Positivos para diapositivas Negativos para películas y B W para negatives en blanco y negro 3720093 多國manual indd 4 2010 11 4 下午 7 15 ...

Страница 31: ...normal alto solo disponible en modo Película Configuración Le permite ajustar la configuración del hardware Pantalla LCD ajustes de TV NTCS EE UU PAL Otros países Calidad Tamaño Vista rápida Intervalo Efecto de presentación Ahorro de energía Escanear fotos Desplace le interruptor situado en el frontal de la unidad a la posición Photo 3720093 多國manual indd 5 2010 11 4 下午 7 15 ...

Страница 32: ...ara poder seleccionar una de las opciones disponibles de tamaño de Foto pulgadas o centímetros usando la tecla de dirección abajo situada debajo del botón OK una vez la opción deseada aparece en pantalla pulse OK para seleccionarla la pantalla de visionado mostrará el tamaño elegido 4x6 sólo mostrará imágenes a pantalla completa 3720093 多國manual indd 6 2010 11 4 下午 7 15 ...
Страница 33: ...nidad en la pantalla aparecerá capturing capturando y cuando desaparezca este mensaje el escaneo está completo su foto ha sido guardada en la tarjeta SD Escanear Película Diapositivas Primero debe mover el interruptor a modo película luego levante la tapa del escáner retire la cubierta del escáner de película de su interior presionando hacia abajo las dos pestañas para soltar la cubierta sáquela y...

Страница 34: ...ego use la tecla de dirección DERECHA hasta llegar a la opción de selección de tipo de película ahora use la tecla de dirección ABAJO para seleccionar entre Positive Diapositivas Negative Negativos a color o B N Negativos en blanco y Negro Resalte su selección y pulse OK Tab Tab Quitar antes de escanear películas y diapositivas 3720093 多國manual indd 8 2010 11 4 下午 7 15 ...
Страница 35: ...AJO una vez que la opción deseada esté resaltada pulse OK Escanear diapositivas NOTA Si ha escaneado fotografías anteriormente asegúrese de quitar la cubierta del escáner de película de lo contrario sólo verá la parte central de su película Coloque la diapositiva en el soporte de negativos debe colocarla horizontalmente y hacia atrás cualquier escritura en la imagen física debe quedar hacia atrás ...

Страница 36: ...on Posición correcta Top of the image goes here Parte superior de la imagen aquí Introduzca el soporte de negativos en la unidad con las flechas hacia arriba su imagen aparecerá en la pantalla centre la imagen y pulse el botón ESCANEAR para guardar la imagen 3720093 多國manual indd 10 2010 11 4 下午 7 15 ...
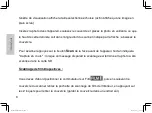
Страница 37: ... will be here La flechas estarán aquí Coloque la película de negativos en el soporte con la parte de arriba de la imagen en la parte de abajo coloque la película al revés con los números letras de la película hacia atrás y alinee cuidadosamente las líneas de marco del negativo con las líneas del soporte cierre 3720093 多國manual indd 11 2010 11 4 下午 7 15 ...
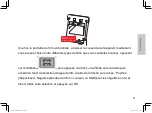
Страница 38: ...ista previa de imágenes escaneadas Una vez que haya escaneado las imágenes podrá verlas en el dispositivo o a través del puerto de vídeo de un televisor Seleccione el icono Película del menú púlselo 2 veces para ver las imágenes de la tarjeta para verlas una a una use la tecla de dirección DERECHA y pulsando el icono de vista previa otra vez aparecerán más opciones de visionado 3720093 多國manual in...

Страница 39: ...la vista previa y cuando lo selecciona le aparecerá un panel de miniaturas de las imágenes de la tarjeta donde 1x1 es una imagen por pantalla 2x2 es 2 imágenes a lo ancho y 3x3 mostrará 3 imágenes a lo ancho Conexión a un puerto de vídeo de una TV Seleccione el modo AV en el televisor deberá consultar el manual del usuario de su TV para saber cómo hacerlo ya que cada televisor lo hace de modo dife...

Страница 40: ...ar imágenes o ejecutar un presentación de imágenes desde la tarjeta de memoria directamente en su TV Visionado desde un PC Conecte el cable USB en la parte trasera del escáner conecte el otro extremo del cable en un puerto USB de su PC el sistema operativo instalará el dispositivo como disco extraíble Ahora puede acceder a las imágenes almacenadas en la tarjeta SD introducida para importarlas desd...

Отзывы: