34
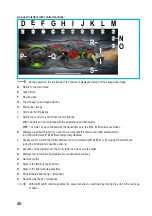
e) Setting up the transmitter and vehicle
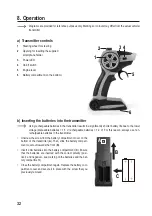
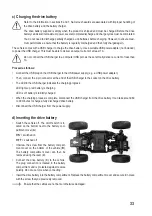
If you have not already done so, insert the batteries into the transmitter (see Section 8. b). Charge the drive
battery (see Section 8. c) and connect it to the vehicle (see Section 8. d).
Please note that the transmitter is automatically programmed to the vehicle with this model.
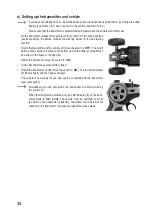
• On the transmitter, release the engine lever (
5
) so that it is in the centre position
(neutral position). In addition, release the steering wheel (
1
) for the steering
function.
• Switch the transmitter and the vehicle off (move the switch to ‘
OFF
’). The on/off
switch on the vehicle is located on the bottom next to the battery compartment,
see arrow in the figure to the right (
A
).
• Switch the vehicle on (move the switch to ‘
ON
’).
•
A red LED under the camera starts to flash.
• Switch the transmitter on (
B
) (move the switch to ‘
ON
’). The red LED indicator
(
3
) flickers briefly and then goes out again.
The vehicle is now ready for use and can be controlled with the transmitter
(see next section).
Alternatively, you can also switch the transmitter on before switching
the vehicle on.
When the transmitter is switched on, the LED indicator (
3
) on the trans-
mitter starts to flash rapidly. The vehicle must be switched on while
the LED on the transmitter is flashing. Otherwise, the vehicle will not
respond to the transmitter. If necessary, repeat the above steps.
A
B
Содержание 2354308
Страница 3: ...3 14 Technische Daten 22 a Fahrzeug 22 b Sender 22 c Fahrakku 23 d USB Ladegerät 23 Seite ...
Страница 25: ...25 14 Specifications 44 a Vehicle 44 b Transmitter 44 c Drive battery 45 d USB charger 45 Page ...
Страница 47: ...47 14 Données techniques 66 a Voiture 66 b Émetteur 66 c Accumulateur de propulsion 67 d Chargeur USB 67 Page ...
Страница 69: ...69 14 Technische gegevens 88 a Voertuig 88 b Zender 88 c Rijaccu 89 d USB oplader 89 Pagina ...
Страница 90: ...90 ...
Страница 91: ...91 ...

