background image

27

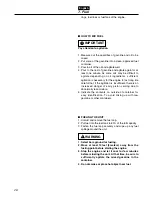
participer ainsi à la protection de l’environnement et
de votre santé.

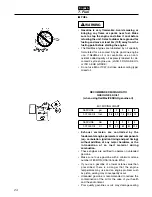
• De l’essence ou de l’huile de basse qualité risque

d’endommager les joints, les conduites d’essence ou
le réservoir d’essence du moteur.

COMMENT OBTENIR UN BON MELANGE

Faire attention à ne pas trop remuer le carburant.

1. Mesurer les volumes d’essence et d’huile à

mélanger.

2. Verser un peu d’essence dans un récipient à

carburant propre.

3. Verser ensuite toute l’huile, puis bien remuer le tout. 
4. Verser enfin le reste de l’essence, puis bien

mélanger l’ensemble pendant une minute environ.
Etant donné que certains types d’huiles sont plus
fluides que d’autres en fonction de leur composition,
un brassage énergique est nécessaire afin de
garantir une bonne marche du moteur pendant
longtemps. En effet, en cas de mélange insuffisant,
un risque majeur de problèmes au niveau des
cylindres  peut apparaître en raison d’un mélange
hétérogène.

5. Indiquer le contenu à l'extérieur du récipient pour

faciliter l'identification. Afin d'éviter d'effectuer un
mélange avec de l'essence pure ou avec d'autres
récipients.

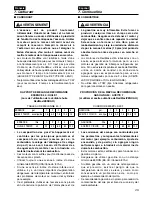
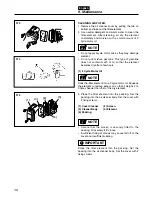
REMPLISSAGE DU RESERVOIR

1. Dévisser puis retirer le bouchon de carburant.

Déposer ce bouchon sur une surface non
poussiéreuse.

2. Remplir le réservoir de carburant à 80% de sa

capacité totale.

3. Visser fermement le bouchon du réservoir et

essuyer toute éventuelle éclaboussure d’essence
sur l’appareil.

1. Effectuer le remplissage sur une surface nue.
2. S’éloigner d’au moins 3 mètres du point de

remplissage avant de démarrer le moteur.

3. Arrêter le moteur et le laisser refroidir pendant

quelques minutes avant le remplissage de
carburant. Veiller alors à bien remuer le mélange
d'essence dans le récipient.

4. Ne pas fumer ou placer d'objet à la température

élevée à proximité du carburant.

AVERTISSEMENT

IMPORTANT

• Gasolinas o aceites de mala calidad puede dañar

los anillos de sellado, las líneas o el tanque de
combustible del motor.

COMO MEZCLAR EL COMBUSTIBLE 

Preste atención en la agitación.

1. Mida las cantidades de gasolina y aceite que va a

mezclar.

2. Coloque un poco de gasolina dentro de un depósito

de combustible aprobado y limpio.

3. Vierta en este todo el aceite y agítelo bien. 
4. Vierta el resto de la gasolina y agite la mezcla

nuevamente durante por lo menos un minuto. La
mezcla de algunos aceites puede resultar difícil,
dependiendo de los ingredientes del aceite, es
necesaria una agitación suficiente para beneficio de
la duración del motor. Tenga cuidado, si la agitación
es insuficiente, existe un aumento en el peligro de
atascamiento del pistón anticipado debido a una
mezcla anormalmente pobre.

5. Marque el contenido de los recipientes en la parte

exterior con el fin de facilitar su identificación. Para
evitar mezclar gasolina pura.

ABASTECIMIENTO DE LA UNIDAD

1. Desenrosque y retire la tapa del combustible. 
2. Coloque el combustible dentro del tanque a un 80%

de la capacidad total.

3. Fije en forma segura la tapa del combustible y limpie

cualquier derramamiento de combustible que se
encuentre al rededor de la unidad.

1. Seleccione un terreno al descubierto para el

reabastecimiento.

2. Aleje la unidad una distancia de por lo menos 3

metros (10 pies) del punto de abastecimiento
antes de poner en marcha el motor.

3. Detenga el motor y déjelo enfriar durante

algunos minutos antes de reabastecer la unidad.
En es momento, asegúrese de agitar lo
suficiente la gasolina mezclada en el depósito.

4. No fume ni coloque objetos calientes cerca del

combustible.

ADVERTENCIA

IMPORTANTE

7. Carburant

7. Combustible

Français

Español

Содержание EBZ5100Q

Страница 1: ...producto contienen sustancias químicas conocidas por el Estado de California como causantes de cáncer malformaciones en recién nacidos y otros problemas de reproducción Les échappements du moteur de ce produit contiennent des produits chimiques connus par l Etat de Californie comme étant responsables de cancers d anomalies congénitales et d autres atteintes à l appareil reproducteur Antes de usar ...

Страница 2: ...structions labeled as shown at left concern critical steps or procedures which must be followed in order to prevent accidents which could lead to serious bodily injury or death This mark is used to indicate instructions which must be followed without exception Instructions labeled as shown at left concern steps or procedures which if not followed correctly could lead to mechanical failure breakdow...

Страница 3: ... las etiquetas de advertencia pueden desprenderse o ensuciarse y tornarse ilegibles Si esto sucediera tome contacto con el distribuidor del cual adquirió el producto y solicite nuevas etiquetas luego pegue las etiquetas en los puntos necesarios NOTAS SOBRE LOS TIPOS DE ADVERTENCIA Las instrucciones señaladas con el símbolo que se muestra a la izquierda hacen referencia a pasos o procedimientos de ...

Страница 4: ...ester equipped Operating Engine Speed rpm 2200 to 5700 Fuel Consumption liter h fl oz h 0 93 31 4 Average Air Volume w std Pipe cu m min cfm 12 8 452 Max Air Volume w o Pipe cu m min cfm 18 1 639 Max Air Velocity m sec mph 71 159 Durability Period hrs 300 Noise Level 50 Feet ANSI B175 2 2000 dB A 68 Specifications are subject to change without notice 1 Frame 2 Shoulder Strap 3 Spark Plug Cap 4 Thr...

Страница 5: ...t Avec pare étincelles Régime du moteur tr min 2200 à 5700 Consommation de carburant litre h 0 93 Volume moyen d air avec conduite standard m3 min 12 8 Volume d air maximum sans conduite m3 min 18 1 Vitesse maximum de l air m sec 71 Longévité en nombre d heures 300 Niveau sonore 50 Feet ANSI B175 2 2000 dB A 68 Ces spécifications peuvent être modifiées sans préavis Español 2 Especificaciohes MODEL...

Страница 6: ...sing the blower until you are fully acquainted with all operations and have learned to use it correctly If warning label peel off or become soiled and impossible to read you should contact the dealer from which you purchased the product to order new labels and affix them in the required location s Never modify your machine We won t warrant the machine if you use the remodeled machine or you don t ...

Страница 7: ...la souffleurs a été modifiée ou utilisée de manière non conforme aux instructions de ce mode d emploi AVERTISSEMENT IMPORTANT 1 Lea el manual de propietario antes de usar esta máquina 2 Use elementos de protección para la cabeza ojos y oídos 3 El uso incorrecto de esta máquina puede causar accidentes lo cuales a su vez pueden ocasionar graves lesiones o la muerte Lea este manual detenidamente y pr...

Страница 8: ... choke Position Air cleaner 4 Symbols on the machine English IMPORTANT ENGINE INFORMATION THIS ENGINE CONFORMS TO 2008 1 U S EPA REGULATIONS FOR SMALL NONROAD ENGINES COMPLIANCE PERIOD CATEGORY A ENGINE FAMILY 8HQZS 0505BR EM 2 ENGINE DISPLACEMENT 50cc REFER TO OWNER S MANUAL FOR MAINTE NANCE SPECIFICATIONS AND ADJUSTMENTS USE JASO FD OR ISO L EGD GRADE 50 1 OIL MANUFACTURED 1 The year will be cha...

Страница 9: ...entes en la máquina 4 Symboles utilises sur la machine Français Español Utilise JASO FD ou ISO L EGD 50 1 Huile Information du moteur importante Ce moteur est conforme aux reglements 2008 1 U S EPA pour les petits moteurs du nonroad Période de l acquiescement CATEGORY A Type de moteur 8HQZS 0505BR EM 2 Cylindree du moteur 50cc Se fererer au manuel de l utilisateur pour les specifications d entreti...
Страница 10: ...he risk of injury associated with thrown objects always wear eye protection and foot protection Eye protection should meet the requirements of ANSI Z87 1 4 To reduce the risk of injury associated with the inhalation of dust use a face filter mask in dusty conditions 5 Wear sturdy rubber soled shoes or shoes with some other form of anti slip protection to help protect you against falling 6 To reduc...

Страница 11: ...e compréhension totale et suivre toutes les instructions de sécurité et d utilisation 2 Conserver ce mode d emploi à portée de la main pour le consulter au moindre doute Si une question reste sans réponse contacter le revendeur où vous avez acheté la débroussailleuse 3 Ne pas oublier de donner le manuel avec la machine en cas de revente ou de prêt 4 Joignez toujours le manuel du propriétaire quand...

Страница 12: ...r before operating this tool WORKING CIRCUMSTANCE 1 To reduce the risk of injury associated with exhaust fume inhalation do not operate in unventilated area The exhaust gases contain harmful carbon monoxide 2 Avoid using the blower where stable footing and balance are not assured AVOID NOISE PROBLEM Check and follow the local regulations as to sound level and hours of operations for blower 1 Opera...

Страница 13: ...sicas así como la exposición a las vibraciones durante largos períodos Para reducir los riesgos del fenómeno de Raynaud se recomiendan especialmente las siguientes precauciones a Conserve su cuerpo caliente No utilice el soplador durante las lluvias b Use guantes antivibratorios gruesos c Tome frecuentemente un descanso de más de 5 minutos en un lugar caliente d Mantenga firme el mango todo el tie...

Страница 14: ...g engine e Avoid spilling fuel or oil Always wipe unit dry before using f Move at least 10 ft 3 meters away from the fueling point before starting engine g Always store gasoline in a container approved for flammable liquids h Make sure the unit is properly assembled and in good operating condition BEFORE STARTING THE ENGINE Each time before starting the engine inspect the entire unit to see if eve...

Страница 15: ...T AVERTISSEMENT 3 Use los sopladores a la velocidad de regulador más baja posible mientras realiza el trabajo 4 Revise el equipo antes de utilizarlo especialmente el silenciador las entradas de aire y los depuradores de aire PLAN DE TRABAJO Cuando organice su calendario de trabajo asigne bastante tiempo al descanso Limite la cantidad de tiempo en la que puede utilizarse el producto de manera conti...

Страница 16: ...bles that may be damaged by the air blast or thrown debris 2 To reduce the risk of injury associated with thrown objects a Watch out for children pets open windows or freshly washed cars and blow debris safely away b Use the full blower nozzle extension so the air stream can work close to the ground c Do not allow bystanders in work area d Do not point the blower tube in the direction of people or...

Страница 17: ...siéreux humidifiez AVERTISSEMENT AVERTISSEMENT malla La presencia de obstáculos puede causar daños al ventilador y a la caja de espirales así como lesiones graves Inspeccione la montura de goma amortiguadora para determinar si está agrietada o dañada de alguna otra forma Tenga presente que si no se reemplaza la montura de goma si ésta se ha agrietado o dañado el motor podrá soltarse de su bastidor...

Страница 18: ...ain your product in proper working order perform the maintenance and checking operations described in the manual at regular intervals 2 Always be sure to turn off the engine and disconnect the spark plug before performing any maintenance or checking procedures The metallic parts and engine cover reach high temperatures immediately after stopping the engine 3 Examine the blower at intervals for loo...

Страница 19: ...do a Use los rastrillos y las escobas para aflojar los escombros antes del soplado b En condiciones polvorientas humedezca ligeramente las superficies o use el aditamento nebulizador cuando se disponga del agua c Conserve el agua utilizando el soplador de potencia en lugar de las mangueras para muchas aplicaciones de césped y de jardín incluso las áreas como las cunetas las pantallas los patios la...

Страница 20: ...er it in any way Doing so might result in the product becoming damaged during operation or the product becoming unable to operate properly TRANSPORTATION Drain the fuel from the fuel tank before transporting or storing the blower Secure the unit carefully to prevent movement when it is transported A unit that receives a strong shock during transport and unloading may malfunction STORAGE When stori...

Страница 21: ... à bien respecter la réglementation locale sólo los productos RedMax o productos que hayan sido certificados por RedMax para el uso con los productos RedMax 6 En caso de que deba sustituirse cualquier pieza o de que deban efectuarse trabajos de reparación o mantenimiento no descritos en este manual póngase por favor en contacto con un representante del servicio técnico autorizado de RedMax más cer...

Страница 22: ...nd the groove provided on the tube ends and twist the tube until connection is locked up A light lubricant may be used to ease assembly of flexible pipe to blower elbow NOTE F1 F2 e e h h h h h h e e e e e e e e e e e e e e e e e e e e e e e e e e e e e e e e e e e e e e e e e e e e e e e e e e e e e e e e e e e e e e e e e e e e e e e e e e e e e e e e e e e e e e e e e e e e e e e e e e g g g g ...

Страница 23: ...os de la manguera flexible con las abrazaderas y demás elementos proporcionados con el aparato 2 Alinee la parte saliente con la ranura que hay en los extremos del tubo y gire el tubo hasta que la conexión quede trabada Podrá usarse un lubricante liviano para facilitar la conexión del tubo flexible al codo del soplador NOTA e e h h h h h h e e e e e e e e e e e e e e e e e e e e e e e e e e e e e ...

Страница 24: ... Exhaust emission are controlled by the fundamental engine parameters and components eq carburation ignition timing and port timing without addition of any major hardware or the introduction of an inert material during combustion These engines are certified to operate on unleaded gasoline Make sure to use gasoline with a minimum octane number of 89 RON USA Canada 87AL If you use a gasoline of a lo...

Страница 25: ...u source d étincelles à proximité de l endroit où est entreposée l essence Arrêter le moteur puis le laisser refroidir avant de remplir le réservoir Remplir le réservoir à l extérieur sur une surface nue et éloigner le bidon d essence d au moins 3 mètres avant de mettre le moteur de la tronçonneuse en marche Les moteurs RedMax sont lubrifiés à l aide d une huile spécialement conçue pour les moteur...

Страница 26: ...e is an increased danger of early piston seizing due to abnormally lean mixture 5 Indicate the contents on outside of container for easy identification To avoid mixing up with raw gasoline or other containers FUELING THE UNIT 1 Untwist and remove the fuel cap 2 Put fuel into the fuel tank to 80 of the full capacity 3 Fasten the fuel cap securely and wipe up any fuel spillage around the unit 1 Sele...

Страница 27: ... d essence dans le récipient 4 Ne pas fumer ou placer d objet à la température élevée à proximité du carburant AVERTISSEMENT IMPORTANT Gasolinas o aceites de mala calidad puede dañar los anillos de sellado las líneas o el tanque de combustible del motor COMO MEZCLAR EL COMBUSTIBLE Preste atención en la agitación 1 Mida las cantidades de gasolina y aceite que va a mezclar 2 Coloque un poco de gasol...

Страница 28: ...ne failing to operate properly 5 In the case of storing the product for a long period of time clean the fuel tank after rendering it empty Next activate the engine and empty the carburetor of the composite fuel 6 In the case of scrapping the used mixed oil container scrap it only at an authorized repository site As lot details of quality assurance read the description in the section Limited Warran...

Страница 29: ...emploi risque d entraîner un refus de couverture par la garantie REMARQUE PARA CONTRIBUIR A LA VIDA ÚTIL DEL MOTOR EVITE 1 COMBUSTIBLE SIN ACEITE GASOLINA CRUDA Esto ocasionará rápidamente daños graves a las partes internas del motor 2 GASOHOL Este puede causar el deterioro de las piezas de caucho y o plásticas y una alteración en la lubricación del motor 3 ACEITE PARA USO EN MOTORES DE 4 TIEMPOS ...

Страница 30: ...e engine could be damaged by overheating 1 Push the primer bulb until fuel flows out in the clear tube F4 2 When the engine is cool close the choke F4 1 Choke Lever 2 Primer Bulb 3 OPEN 4 CLOSE 3 Shift the ignition switch to START I position and set the throttle lever in 1 3 open position F5 1 Full Throttle 2 About 1 3 Open 3 Idling 4 Ignition Switch 4 To start hold the top of the blower firmly wi...

Страница 31: ...rage Nepas relacher la ficelle de démarrage Rentrer la ficelle lentement Ceci évitera une usure IMPORTANT IMPORTANT BRAZO DE CONTROL Sostenga el extremo superior del brazo de control en la mano y mientras tira de él gire el brazo hacia adelante en el sentido contrario a las agujas del reloj en la dirección de la flecha hasta escuchar un clic Primera posición Si lo desea puede girar el brazo aún má...

Страница 32: ... Adjustment Screw STOPPING ENGINE 1 Move the throttle lever to the idling position and run the engine for a half minute 2 Shift the ignition switch to STOP O position 1 Ignition Switch If the engine won t stop when setting the ignition switch to the stop position close the choke lever and stop the engine In this case please repair the machine at your nealest servicing dealer F9 1 Choke Lever 2 OPE...

Страница 33: ...té funcionando abra gradualmente el estrangulador si estaba cerrado y permita que el motor funcione en marcha mínima durante un minuto para que se caliente Si el motor no arranca después de varios intentos debido a estrangulación excesiva abra el estrangulador y vuelva a tirar de la cuerda AJUSTE DE LA VELOCIDAD DE MARCHA MÍNIMA La velocidad de marcha mínima viene ajustada a 2200 rpm de fábrica Si...

Страница 34: ...on the end of the strap Loosening Pull up on the lower portion of the buckle with a finger and slide the end of the strap back up to the buckle EMERGENCY REMOVAL In an emergency pull up on the lower portion of both strap buckles to loosen the straps Move yourself away from the unit ...

Страница 35: ...nce tirer la partie sous les boucles des deux bretelles avec les doigts desserrer les bretelles et retirer l équipement CÓMO AJUSTAR LOS TIRANTES DE HOMBRO Para apretar Tire de un extremo de los tirantes Para aflojar Levante con el dedo la lengüeta situada debajo de la hebilla y empuje un extremo del tirante hacia el lado de la hebilla PARA SOLTAR EL EQUIPO EN CASO DE EMERGENCIA En caso de emergen...

Страница 36: ...eck the air cleaner every 25 hours of use or more frequently if used under dusty conditions A clogged air filter may increase fuel consumption while cutting down the engine power Never operate the blower without the air filter or with a deformed filter element because unfiltered dusty air may quickly ruin the engine WARNING Daily Every Every Every System Compornent Procedure or 25 hours 50 hours 1...

Страница 37: ...nto el soplador sin un filtro de aire o con un elemento del filtro roto o deformado debido a que el aire polvoriento sin filtrar dañará rápidamente el motor Compruebe el depurador de aire cada 25 horas de uso o con mayor frecuencia en caso de utilizar el soplador en ambientes polvorientos Un depurador de aire obstruido puede aumentar el consumo de combustible y reducir al mismo tiempo la potencia ...

Страница 38: ...2 Cycle Motor Oil Soak the filter element into a 2cycle motor oil Squeeze the element to remove excess oil so that it weighs 2 to 3 times heavier than that of the dry element 3 Place the filter element into the packing Set the packing into the air cleaner body Set the cover with 2 fixing screws 1 Cover Cleaner 2 Screen 3 Cleaner Body 4 Element 5 Packing Assure that the screen is securely fitted to...

Страница 39: ...ntage IMPORTANT REMARQUE REMARQUE REMARQUE rápidamente el motor LIMPIEZA DEL DEPURADOR DE AIRE 1 Retire la cubierta del depurador de aire tirando de la lengüeta en la parte inferior y retire el elemento de filtro 2 Use un detergente neutro y agua caliente para limpiar el elemento de filtro Una vez concluida la limpieza deje secar el elemento completamente al aire y luego humedézcalo con una pequeñ...

Страница 40: ...b REPLACEMENT PLUG IS A NGK CMR7H Note that using any spark plugs other than those designated may result in the engine failing to operate properly or in the engine becoming overheated and damaged To install the spark plug first turn the plug until it is finger tight then tighten it a quarter turn more with a socket wrench MUFFLER Inspect periodically the muffler for loose fasteners any damage or c...

Страница 41: ...fuseur sont convenablement attachés à l aide de quatre boulons F19 1 Couple de serrage 2 à 3 Nm IMPORTANT AVERTISSEMENT IMPORTANT FILTRO DE COMBUSTIBLE Un filtro de combustible puede causar una aceleración débil del motor Inspeccione periódicamente el filtro para ver si está obstruido con suciedad El filtro puede sacarse por la lumbrera de carga de combustible utilizando un gancho de alambre Desco...

Страница 42: ...wipe away any carbon buildup Wipe away any carbon buildup on the muffler exhaust vent and cylinder exhaust port at the same time 2 Tighten all screws bolts and fittings AIR INLET NET Blowing air is taken in from the air inlet net When air flow has dropped down during operation stop the engine and inspect the air inlet net for blocking by obstacles Note that failure to remove any such obstacles may...

Страница 43: ... en cas de pose de la bobine ou du rotor AVERTISSEMENT IMPORTANT de apriete 2 a 3 Nm Aunque sólo esté suelto un tornillo hay riesgo de incendio del motor 1 Perno 2 Perno 3 Parachispas 4 Difusor APAGACHISPAS El silenciador de escape está equipado con un amortiguador de chispas para evitar que salgan carbonillas calientes por el tubo de escape Revíselo periódicamente y límpielo siempre que sea neces...

Страница 44: ...der strap with new one Pass the upper end of the strap through the hanger making the FLAPPED SIDE OUTSIDE Put the end of the strap through the ring on the strap and then push the ring toward the hanger as close as possible 1 Ring The flap on the end of the strap works as a stopper Never install the strap with the flapped side inside or the unit may fall from the operator which could result in inju...

Страница 45: ...e de que el LADO CON LA ALETA QUEDE HACIA FUERA Pase el extremo de la correa a través del aro de la misma y luego empuje el aro hacia el colgador lo más que pueda 1 Aro La aleta en el extremo de la correa funciona como tope Nunca instale la correa de manera que el lado de la aleta quede hacia el interior de lo contrario el soplador podrá caerse causando lesiones al operador y o daños al mismo No a...

Страница 46: ...er VERIFICATION CAUSES PROBABLES ACTION réservoir de carburant carburant incorrect vidanger et remplacer le carburant vis de réglage de carburateur déréglé refaire le réglage silencieux cylindre dépôt de calamine retirer filtre à air colmaté de poussière nettoyer ailette de cylindre flasque de ventilateur colmaté de poussière nettoyer Si la machine nécessite des opérations d entretien plus élaboré...

Страница 47: ...t ou un remplacement vérifier si le nom du modèle et le numéro de série s appliquent à ceux précisés dans la liste des pièces utiliser ensuite le numéro de pièce figurant dans la liste des pièces 4 Le contenu décrit dans la liste des pièces peut être modifié dans un soucis d amélioration 5 Les pièces de la machine seront disponibles pendant sept 7 ans après l arrêt de fabrication de cette machine ...

Страница 48: ...48 Fig 1 BLOWER GROUP S N 70900101 and up 13 Parts List EBZ5100Q ...

Страница 49: ... BAND ASSY 2 26 848 L53 3521 NET COMP 1 27 1480 74710 CLIP 4 28 2750 32510 DAMPER UPPER 1 29 848 870 5040 WASHER 1 30 T4972 54010 SCREW 1 31 T4960 51631 SCREW M5x16 Large Washer 2 32 2750 32610 DAMPER LOWER 2 33 2750 32620 NUT M6 2 34 848 L5K 8510 TANK ASSY 1 35 848 L23 8510 CAP ASSY 1 36 4500 85300 HOLDER ASSY 1 37 4500 85220 PACKING 1 38 5601 85260 FILTER 1 39 848 L23 85N0 STOPPER 1 40 T4012 853...

Страница 50: ...50 13 Parts List EBZ5100Q Fig 2 ENGINE GROUP S N 70900101 and up ...

Страница 51: ... 38 1400 43230 NUT 1 39 1000 43240 KEY 1 40 T1108 71110 ROTOR 1 41 T1108 71200 COIL ASSY 1 42 T1108 72110 CAP 1 43 T1108 72120 SPRING 1 44 T1108 72130 TUBE 1 45 5500 72130 GROMMET 1 49 4820 72150 BOLT TORX 2 50 T1108 71240 CORD COMP 1 51 3699 91867 SPARKPLUG 1 Key Part Number Description Q ty 52 T4030 75100 RECOIL ASSY 1 53 1180 75221 SPRING 1 54 T4030 75120 REEL 1 55 T4030 75140 DOG 1 56 1861 751...

Страница 52: ...7 DIAPHRAGM 1 18 1752 81110 SCREW 2 Key Part Number Description Q ty 19 5500 81120 BRACKET 1 20 1751 81180 NUT 1 21 1918 81170 SCREW 1 23 1850 81530 SCREW 4 24 848 8J1 4150 JET 41 5 1 25 1751 81240 O RING 1 26 BODY 1 27 VALVE ASSY 1 28 848 HE2 0620 GASKET KIT 1 29 848 HE2 0630 REBUILD KIT 1 NOTE 26 BODY and 27 VALVE ASSY are not supplied as an individual part respectively but supplied as a CARBURE...

Страница 53: ... 25311 BRACKET 1 7 3495 25410 BOLT 1 8 3495 25420 SPRING 1 9 3495 25440 WASHER 1 10 848 864 6000 NUT 1 11 3495 25450 WASHER 2 12 T4017 25510 SWITCH 1 13 T4012 83110 CABLE COMP 1 14 T4012 25610 TUBE 1 16 2750 51501 GRIP ASSY 1 17 848 846 7000 WING BOLT 1 18 3495 51430 WING NUT 1 Key Part Number Description Q ty 19 3238 15230 WASHER 2 20 2750 51540 NUT 1 21 848 L3N 90C0 LABEL RECOIL 1 22 T4960 51631...

Страница 54: ...PART THAT IS EQUIVALENT IN PERFORMANCE AND DURABILITY MAY BE USED IN NON WARRANTY MAINTENANCE OR REPAIRS AND SHALL NOT REDUCE THE WARRANTY OBLIGATION OF THE COMPANY THE COMPANY IS LIABLE FOR DAMAGES TO OTHER ENGINE COMPONENTS CAUSED BY THE FAILURE OF A WARRANTED PART STILL UNDER WARRANTY THE WARRANTY DOES NOT APPLY TO THOSE UNITS WHICH HAVE BEEN DAMAGED BY NEGLIGENCE OF INSTRUCTION LISTED IN THE O...

Страница 55: ...durabilité peut être utilisée pour l entretien hors garantie ou les réparations hors garantie et ce sans réduire l obligation de garantie incombant à la société La société sera tenue responsable des dommages aux autres composants du moteur causés par la défaillance de pièce s garantie s en période de garantie La garantie ne s applique pas aux unités endommagées par suite de négligence dans la mise...

Страница 56: ...REEMPLAZO PROGRAMADO DE LA MISMA SEA REALIZADO PARA EL MANTENIMIENTO O REPARACIONES NO CUBIERTOS POR LA GARANTÍA SE PODRÁ USAR CUALQUIER PIEZA DE RECAMBIO QUE SEA EQUIVALENTE EN PRESTACIÓN Y DURABILIDAD SIN QUE ESTO REDUZCA LA OBLIGACIÓN DE GARANTÍA DE LA COMPAÑÍA LA COMPAÑÍA ES RESPONSABLE POR DAÑOS A OTROS COMPONENTES DEL MOTOR CAUSADOS POR EL FALLO DE UNA PIEZA CUBIERTA POR LA GARANTÍA DURANTE ...

Отзывы: