background image


User Manual for Mobile DVR 


 17


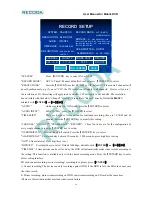
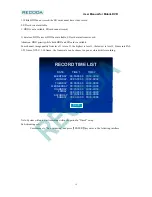
TIME: DVR will auto power on/off according to the preset time table. 


ACC: System will auto power on/off according to vehicle acc switch on/off signal. 

"DELAY POWER OFF": When this function is on, the DVR will continue making record for a while as per the 

configuration. When this function is off, the DVR will shut down when ACC is off. Press ‘enter’ key to select.   

“TIME”: off---Shut down system at once.    Press 

ENTER

key to select.   

"DELAY TIME": Press digit keys to select. The range is between 3 and 240mins. Use key 

Del

to cancel, 

number button to enter in. 

"POWER ON TIME":    Press digit keys to select.   

"POWER OFF TIME": Press digit keys to select. 

4.4.4.


Alarm Settings 

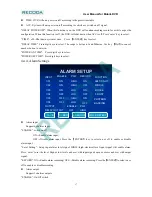
ALARM SETUP

ALARM SETUP

INPUT

ENABLE

RECORD

PWL

ON

ON

ON

OFF

I /01

I /02

I /03

I /04

HIGH

HIGH

LOW

LOW

ON

OFF

ON

OFF

RELAY OUTPUT

OUTPUT

OFF

ENABLE

PWL

HIGH

I /05

I /06

OFF

OFF

HIGH

LOW

ON

OFF

FUNCTION

LEFT/RIGHT

BRAKE

FRONT

POSTERN

MIDDLE

BACKING

SAVE

SPEED

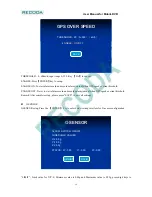
G-SENSOR

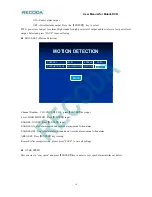
MOVE DETECT


Alarm input 

Support 6ch alarm input. 

"ENABLE": switch on/off.     

          ON---Enable alarm input;   

          OFF---Disable alarm input. Press the 

ENTER

 key to select on or off to enable or disable    

alarm input. 

"Level Setting ": Setup input alarm level signal. HIGH---high electrical level input signal will enable alarm. 

Press ‘enter’ to set the level. High or low level can be set with input signal; open or close can be set with output 

signal. 

"RECORD": ON---Enable alarm recording; OFF---Disable alarm recording. Press the

ENTER

to select on or 

off to enable or disable recording.     


Alarm output 

Support 1ch alarm outputs. 

“ENABLE”: On/Off switch.   

RECODA

Содержание M705 Series

Страница 1: ...User Manual for Mobile DVR 1 4CH Mobile DVR USER MANUAL M705 Series Ver 2 0 R E C O D A ...

Страница 2: ... 3 11 Video Records Playback 4 4 12 System Settings 4 4 1 13 Basic Settings 4 4 2 13 Recording Settings 4 4 3 16 Power Management 4 4 4 17 Alarm Settings 4 4 5 20 Security Settings 4 4 6 20 Network Settings 4 5 24 System Info 4 6 24 Management Tools 4 6 1 25 Log Management 4 6 2 26 SD Card Management 4 6 3 27 Default Settings 4 6 4 27 Config Management 4 6 5 28 System Upgrade 5 30 Installation gui...

Страница 3: ...6 34 Device Upgrade Guideline 6 1 34 M705X RFS crc Document system upgrade 6 2 35 M705X APP crc Application program upgrade 6 3 35 MCU upgrade 7 36 3G User Guideline 7 1 36 Working System Representation 7 2 36 Parameter Settings 7 2 1 36 Network Setting 7 2 2 38 Wireless setting 7 2 3 38 Statues check out 7 3 38 PC software setting 8 39 F A Q R E C O D A ...

Страница 4: ...CH alarm input Level input 1CH alarm output Relay output RS232 interface for remote control RJ45 10M 100M Ethernet port Video recording mode Auto alarm timed and manual recording The video file format is ASF The file can be played by general media player VLC or our customized software which support 1 channel or 4 channels synchronous playback Storage Maximum 1pcs 2 5 hard disk with removable hdd h...

Страница 5: ...User Manual for Mobile DVR 5 Dimensions 160 W x200 H x62 D mm Weight 2200g 1 2 Appearance Front view Back view R E C O D A ...

Страница 6: ... time period for playing video INFO To display system info under monitoring mode With the backward playing button the video files can be played with 2 4 8 16 times speed Press play button to get a normal speed play Play button With the forward playing button the video files can be played with 2 4 8 16 times speed forwardly Press play button to get a normal speed play Record button Stop button is t...

Страница 7: ...on means load successfully Lights off means load failure Flicker means video recording GPS GPS signal ERR Error prompt V Loss Video Loss HTR Heater SD SD card Light on means load successfully Lights off means load failure Flicker means video recording NET Network 1 4 2 Others IR Infrared receiving terminal LOCK HDD Lock device cannot to start without lock MIC MIC input EAR EAT output R E C O D A ...

Страница 8: ...CH of D1 2CH of CIF fps 1 to 25f s ch adjustable PAL or 30f s ch NTSC Video Quality 1 5 levels 1 is the highest level and 5 is the lowest level OSD Overlays information such as date time and vehicle ID vehicle number SD card REC Support two SD card recycle recording Automatically switch to the other one when the first SD card was full and the data will be automatically overwritten Recording Mode T...

Страница 9: ... wireless modules such as 3G and WIFI Optional Function G Sensor Built in G sensor is available with M705A and M705B Power Settings System auto power on off 1 Vehicle acc on off system auto power on after acc on system power off according to the delay time up to 240min default 5min after acc off 2 Preset time Only according to time preset table Others Power off protection With the power off protec...

Страница 10: ...according to record time record mode and record storage device etc Record Playback Max support 4 channels playback synchronous Others Communication Interface RS232 interface for remote control RJ45 10M 100M Ethernet port Wireless Transfer Built in 3G WEVDO CDMA200 TD SCDMA or optional GPRS WIFI and EDGE Module GPS and G Sensor built in Temperature Humidity Normal Temperature 0 50 Heater 25 50 Humi...

Страница 11: ...k Select Playback icon with left right up or down key and press enter key to get below interface REC SEARCH REC SEARCH REC TYPE ALL ALARM DISK SELECT SD HDD DATE 2009 05 27 START TIME 00 00 END TIME 23 59 31 31 30 30 29 29 28 28 27 27 26 26 25 25 24 24 23 23 22 22 21 21 20 20 19 19 18 18 17 17 16 16 15 15 14 14 13 13 12 12 11 11 10 10 09 09 08 08 07 07 06 06 05 05 04 04 03 03 02 02 01 01 SEARCH No...

Страница 12: ... end time default setting is 23 59 SEARCH Take curser move to SEARCH and press the Enter key to see the result SEARCH RESULT SEARCH RESULT TYPE RES START END CH SIZE Normal D1 15 30 16 00 1 154M Alarm D1 15 30 16 00 2 53M Normal CIF 15 30 16 00 3 100M Alarm CIF 15 30 16 00 4 98M DATE 2009 05 27 UP DOWN LAST FIRST Press direction keys to view recording information press Enter to play press ESC to r...

Страница 13: ...E The same setup as DATE OPR TIMEOUT All system Interface closed time default time is 30s range 30s 3600s Press digit keys to setup the operating closing time DEV NUM It refers to the device ID Press digit keys to setup the ID While the client uses only one remote control for multi device please setting with different device number and password Device number should be 5 number rename please push D...

Страница 14: ...IO Audio recording On Off switch press the ENTER to select AUDIO INPUT LINE IN MIC press the ENTER to select TIME SLICE There are 4 types of time period for continued recording they are 15 30 45 and 60 minutes Press the ENTER key to modify this setting CHANNEL QUALITY FRAME RATE RECORD Those four keys are for the configuration of every single channel press the ENTER key to set up OVERWRITTEN Overw...

Страница 15: ...e rate PAL 1 25 frame NTSC 1 30 frame the frame rate can be choose to open or closed while recording RECORD TIME LIST RECORD TIME LIST DATE TIME 1 TIME 2 EVERYDAY MONDAY TUESDAY WEDNESDAY THURSDAY FRIDAY SATURDAY SUNDAY 00 00 00 00 00 00 00 00 00 00 00 00 00 00 00 00 00 00 00 00 00 00 00 00 00 00 00 00 00 00 00 00 00 00 00 00 00 00 00 00 00 00 00 00 00 00 00 00 00 00 00 00 00 00 00 00 00 00 00 00 ...

Страница 16: ...VE Resolution CIF QCIF selectable Image quality Medium High Low Bit Rate 24 32 48 56 64 80 96 112 128 160 176 200 280 bits Press ENTER key to enter Default is 96 bit press ENTER key to enter Frame Rate 01 01 01 02 02 03 04 05 07 10 13 15 20 frame Default is 10f press ENTER key to enter Click SAVE to save the configuration 4 4 3 Power Management POWER SETUP POWER SETUP POWER MODE TIME ACC DELAY POW...

Страница 17: ...ARM SETUP ALARM SETUP INPUT ENABLE RECORD PWL ON ON ON OFF I 01 I 02 I 03 I 04 HIGH HIGH LOW LOW ON OFF ON OFF RELAY OUTPUT OUTPUT OFF ENABLE PWL HIGH I 05 I 06 OFF OFF HIGH LOW ON OFF FUNCTION LEFT RIGHT BRAKE FRONT POSTERN MIDDLE BACKING SAVE SPEED G SENSOR MOVE DETECT Alarm input Support 6ch alarm input ENABLE switch on off ON Enable alarm input OFF Disable alarm input Press the ENTER key to se...

Страница 18: ... CH2 CH3 CH4 AREA AREA ENABLE ENABLE LEVEL LEVEL CHANNEL CHANNEL SETUP SETUP SAVE Channel Number CH1 CH2 CH3 CH4 press ENTER key input Level HIGH MID LOW Press ENTER input ENABLE ON OFF Press ENTER input ENABLE ON start alarm record and records alarm journal when alarm ENABLE OFF Don t start alarm record and don t records alarm journal when alarm AREA SET Press ENTER key to setup Remark After comp...

Страница 19: ...NABLE OFF Never to start alarm record and records alarm journal when GPS speed overran threshold Remark After complete setup please press SAVE to save all settings G SENSOR GSENSOR setup Press the ENTER key to enter below setting interface for G sensor configuration G G SENSOR SENSOR THRESHOLD VALUES X 2 00 g Y 2 00 g Z 2 00 g ALARM SWITCH ON OFF STATUS X 0 00 Y 0 00 Z 0 00 SAVE ADJUST LIMIT Limit...

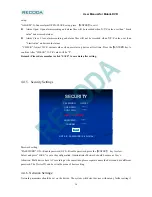
Страница 20: ...e do remember to click SAVE to save data after setting 4 4 5 Security Settings SECURITY SECURITY PASSWORD ON OFF USER PWD CONF PWD INPUT NOT SAME ADMIN PWD CONFIRM SAVE NOTICE PASSWORD IS 6 DIGITAL Password setting PASSWORD ON Enable password OFF Disable password press the ENTER key to select Select and press SAVE to save the configuration Administrator Password should be same as User s Attention ...

Страница 21: ...ateway MAC address etc and please set the server IP in same with net mask s Please make a reference on the above picture WAN CONNECT No need set up network on PC CENTER SET LAN CONNECT Server IP must keep same with device s and the port number is 5678 WAN CONNECT SERVER IP Set up WAN IP PORT NUMBER If user get online via router make a port mapping is necessary the port number is 5678 DOMAIN If use...

Страница 22: ...ht up down enter key to setup CENTER NUM Center number Press the Enter key to pop out keyboard window then use left right up down enter key to setup USER NAME Press the Enter key to pop up keyboard window then use left right up down enter key to setup PASSWORD Press the Enter key to pop up keyboard window then use left right up down enter key to setup Click SAVE to save all setup Link mode touch o...

Страница 23: ...key interface choose the correct letters by moving cursor and then press Enter to input them Click the SAVE after complete setup WIFI SET Move cursor to WIFI and then press ENTER to enter to the following interface WIFI SETUP WIFI SETUP WIFI WIFI ON OFF ON OFF ENCRYPT ENCRYPT ON OFF ON OFF TYPE TYPE WEP WEP IP IP 192 168 000 192 192 168 000 192 GATEWAY GATEWAY 192 168 000 001 192 168 000 001 SUBMA...

Страница 24: ... SD SD REMAINING REMAINING TOTAL TOTAL NO NO FIRMWARE VER V000001 HARDWARE VER V0001 MCU VER V0001 FIRMWARE VER Software version number HARDWARE VER Hardware version number MCU VER Single chip version number SD NUM Name of SD card Number Display SD and HDD Total CAPACITY Display SD Card and Hard disk s capacity LEFT CAPACITY Display SD Card and Hard disk s left capacity 4 6 Management Tools Manage...

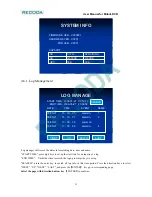
Страница 25: ... 37 alarm in 2 09 05 27 17 00 35 power on 09 05 27 17 30 56 alarm in 4 DATE TIME EVENT NAME UP DOWN LAST FIRST Log manager will record the alarm info including date time and name START TIME press digit keys to set up the start time for an inquiry of a log END TIME Until what time to search the logo press digit keys to setup SEARCH press the enter key to search all log info in this time period Pres...

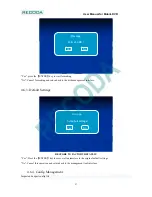
Страница 26: ...at the SD cards SD SELECT to select SD1 or HDD by pressing the enter key CANCEL Cancel disk management operations and return back to the management tool interface FORMAT Select the format button and press the enter key to enable below window for formatting SD cards Format SD card Yes No Message Yes press the ENTER key to start formatting No Cancel formatting and return back to the disk management ...

Страница 27: ... the disk management interface 4 6 3 Default Settings Default all settings Yes No Message RESTORE TO FACTORY DEFAULTS Yes Press the ENTER key to recover all parameters to the original default settings No Cancel this operation and return back to the management tool interface 4 6 4 Config Management Import and export config file R E C O D A ...

Страница 28: ... card or HDD 4 6 5 System Upgrade SYSTEM UPGRADE SYSTEM UPGRADE CURRENT VER T072101 T072701 V000001 V000001 CURRENT VER T072101 T072701 V000001 V000001 UPGRADE TYPE UPGRADE TYPE Uboot Uboot Kernel Kernel Rootfs Rootfs App App UPGRADE FROM SD HDD UPGRADE FROM SD HDD UPGRADE System current version Select matched version according to upgrade type Upgrade type Press Enter to choose the type such as Ap...

Страница 29: ...ton ENTER Preview time overlay Yes No select with button ENTER Vehicle Number overlay Yes No select with button ENTER GPS overlay on the record Yes No select with button ENTER PTZ MANAGE PTZ MANAGE SAVE CHANNEL CHANNEL CH1 CH2 CH3 CH4 CH1 CH2 CH3 CH4 ADDRESS ADDRESS 1 0 255 1 0 255 1 0 255 1 0 255 BAUDRATE BAUDRATE 4 CHANNEL 4 CHANNEL 600 1200 2400 4800 9600 600 1200 2400 4800 9600 19200 38400 576...

Страница 30: ...SERIAL 1 PTZ LED SCREEN SERIAL 2 PTZ LED SCREEN SERIAL 2 PTZ LED SCREEN SAVE 5 Installation guideline 5 1 M705A and M 705 B Pictures 5 1 1 M705A AV IN Connector Extent connector 705A device picure Without removable hard disk housing Power connector AV OUT Connector Signal transport board R E C O D A ...

Страница 31: ...node and the black one connect to the cathode the yellow cable connect to ignition cable when switch mode set up in ignition mode The device will power on when vehicle switch on by key automatically When vehicle switch off by key the device will be power off as well Remark 1 Please make sure the power level voltage between 12V 24V 2 Please make sure insulate all cables after complete connect cable...

Страница 32: ...e and cathode cables must over thanΦ1 5 Cable color Name Explanation Black BAT It is ground cable Red BAT It is power cable Yellow ACC It is ACC cable 5 2 2 GPS Antenna 5 2 3 AV input output cable It is picture for AV input output cable R E C O D A ...

Страница 33: ... Video input VIN1 VIN4 4 video input with BNC connector AV output VOUT 1 video output with BNC connector Audio input AIN1 AIN4 4 audio input with BNC connector Power output DC 12 V power output with DC connector 5 2 4 Alarm input and output cable R E C O D A ...

Страница 34: ...etely 2 Insert SD card or Hard disk when device in disconnect electricity statues 3 Enter to the system choose management and then select upgrade types upgrade via SD card or Hard disk and start upgrade after choose 4 The LCD will show that System is upgrading please do not make the device power off 5 When device upgrade complete it will re start and go back to monitoring statues R E C O D A ...

Страница 35: ...pgrade If user have to upgrade device again please be noted that the same version cannot be upgraded to it The correct upgrade sequence is file system upgrade application program upgrade and the last one is MCU upgrade When device re start during upgrading it means upgrade has finished automatically 6 4 Edition number Press key INFO on the remote control enter in the menu System info to check the ...

Страница 36: ...sor GPS Wireless network Remote Control 7 2 Parameter Settings 7 2 1 Network Setting NETWORK SETUP NETWORK SETUP IP ADDRESS 192 168 000 192 LOCAL NETWORK NETMASK 255 255 255 000 GATE WAY 192 168 000 001 MAC 00 44 53 75 55 56 SERVER IP 192 168 001 000 CENTER SETUP CONTROL PORT 5678 MEDIA PORT 5678 TYPE IP DOMAIN DOMAIN www 123 cn SAVE 3G DDNS WIFI Picture 1 R E C O D A ...

Страница 37: ...er which running Fclient in local area network Port map must be setting in router Please make a reference in picture 2 4 There are two types IP setting Domain and IP 5 If customer set it as Domain the user router must support DDNS Please make a reference in picture 3 Picture 2 Picture 3 R E C O D A ...

Страница 38: ...TRIGGER NO 2 VOICE FN OFF ON CALL NO 1 CALL NO 2 SAVE Picture 4 7 2 3 Statues check out 7 Press F1 key on remote control under preview interface to check out current statues It will show the information about 3G modules Such as whether 3G or SIM card exists or not Signal and dial up statues Please make a reference in picture 4 7 3 PC software setting Make Fclient software running first When device...

Страница 39: ...nects in a wrong way Problem 2 ERR indicator keep on light The following errors will cause the ERR indicator keep on light 1 Two SD cards didn t be inserted 2 The system partition under abnormal statues even the SD card be inserted it also can cause the equipments can not be identified 3 MCU not works 4 SD card cannot read and write in normal Problem 3 Channel indicator not works The following rea...

Страница 40: ... 3 medium statuses OFF ON and Flicker respectively meaning as follows OFF This HDD didn t be inserted or can not be identified by the equipments ON This HDD existence but it isn t the one that is recording image at present Flicker This HDD exists and it is the one that is recording image at present Problem 6 HDD and SD card indicator not works or keep flicker 1 No record task according to system s...

Страница 41: ... above device will not make a record as well 2 Overwritten function was OFF and the capacity of SD card less than 500M in this situation device will stop recording 3 The ERR light of front panel shine Can pass to look into a system information If SD card space shows in 0 please check whether SD card has been formatted before use and inserts or not 4 Record mode be set to OFF in each channel Please...

Страница 42: ...ave never chosen a record file or document path please choose the path that records file first before playback Problem 15 Remote control not works Probably of the reason is as follows 1 The remote control didn t pack battery 2 The remote control damages 3 The equipment breaks down Problem 16 During playback the map doesn t show Possible reason is as follows 1 Net cable did not connect to PC 2 Net ...

Отзывы: