background image

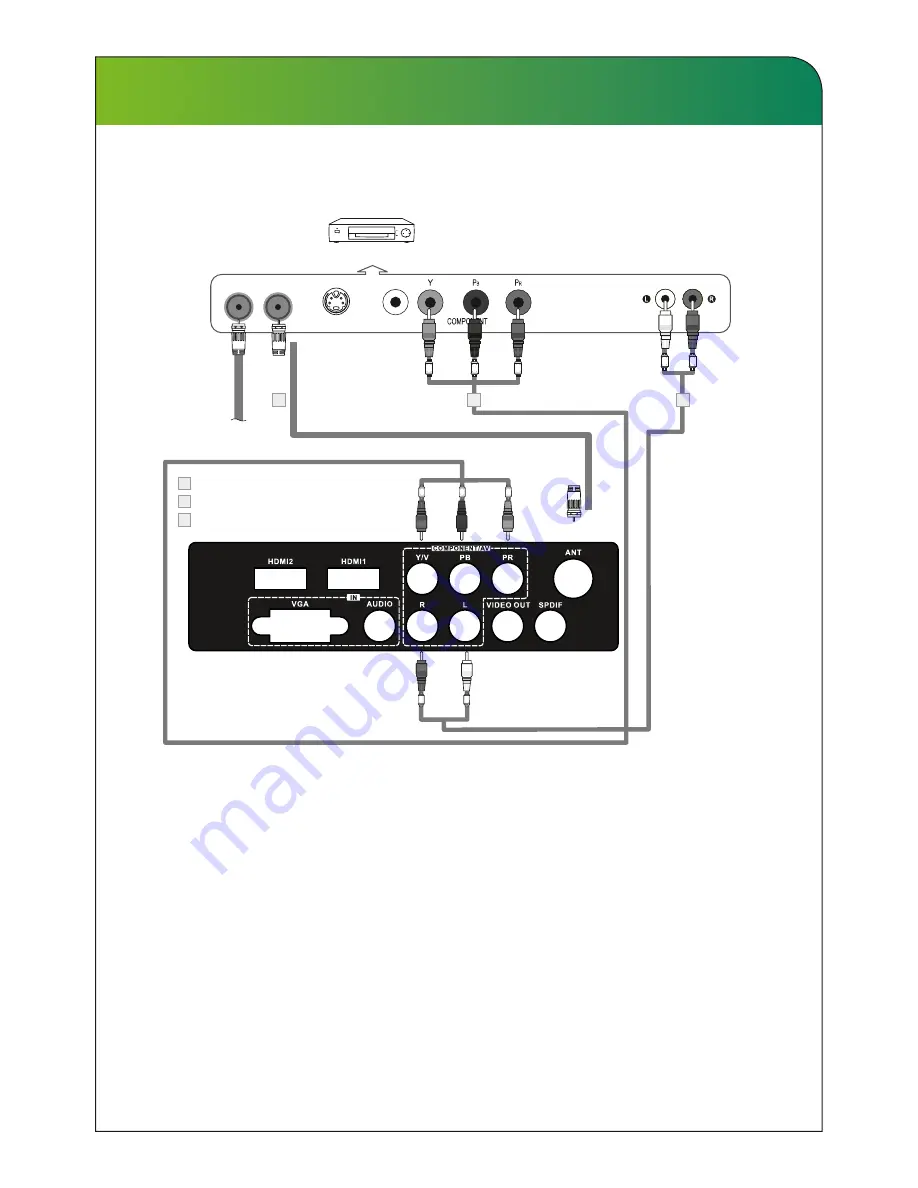
Connecting VCR

These instructions assume that you have already connected your TV to an antenna or a 

cable TV system. Skip step 1 if you have not yet connected to an antenna or a cable 

system. 

Follow the instructions in Viewing a VCR or Camcorder Tape to view your VCR tape. 
Each VCR has a different back panel configuration. When connecting a VCR, match the 
color of the connection terminal to the cable. 
1. Unplug the cable or antenna from the back of the TV.
2. Connect the cable or antenna to the ANT IN terminal on the back of the VCR.
3. Connect an RF Cable between the ANT OUT terminal on the VCR and the ANT IN 
    terminal on the TV.
4. 

Connect a Component Cable between the COMPONENT [Y, Pb, Pr] jacks on the DVD 

    player and COMPONENT [Y, Pb, Pr]


  jack on the TV. 

5. Connect Audio Cables between the AUDIO OUT jacks on the VCR and  the AUDIO  
    L and  AUDIO R jacks on the TV.

Note: 1. Whenever you connect an external device to your TV, make sure that power on 
              the unit is turned off. 
          2. When connecting an external device, match the color of the connection terminal 
              to the cable.

VCR Rear Panel

TV Rear Panel

White

Red

Red

White

ANT ANT OUT S-VIDEO

AUDIO OUT

Red

Blue

Green

VIDEO OUT

2

1

3

Audio Cable (Not supplied)

YPbPr cable(Not supplied) 

RF Cable (Not supplied)

1

2

3

External Connection

17

Red

Blue

Green

Содержание TVD32A1000T2

Страница 1: ......

Страница 2: ...ent This operating instructions can help you operate this TV set easily Read this manual before operating the unit for being WELCOME YOU TO PURCHASE OUR LED TV Welcome to high quality image world of our color LED TV familiar with its features and keep it for future reference ...

Страница 3: ... the set Use special caution in households where children are present The apparatus is not suitable for children under 3 year to operate Power supply cords should be routed safety to prevent life and property from dangerous with damaged cord Mains plug is used as the disconnect device It shall remain readily operable and should not be obstructed during intended use To be completely disconnected th...

Страница 4: ...impeded by covering the ventilation opening with items such as newspapers tablecloths curtains etc At least 10 cm space should be left around the apparatus for sufficient ventilation The product should be situated away from heat sources such as radiators heat registers stoves or other products including amplifiers that produce heat Place the apparatus in such a position that the screen is not expo...

Страница 5: ... use liquid cleaners or aerosol cleaners Use a damp cloth for cleaning Do not place the set on an unstable cart stand table or shelf The set may fall causing serious personal injury as well as damage to the product Use only with the cart stand tripod bracket or table specified by the manufacturer or sold with the apparatus An appliance and cart combination should be moved with care Quick stops exc...

Страница 6: ...ew of front and side panel Overview of back panel Overview of remote control Teletext General Description Installing Batteries in the Remote Control External Connection Antenna connection Connecting VCR Connecting a Camcorder Connecting a DVD Player Set Top Box Connecting a DVD Player Set Top Box via DVI Connecting DVD Player Set Top Box via HDMI Connecting Digital Audio System Connecting PC Suppo...

Страница 7: ...icial HDCP inside with legal unlimited use Embedded multimedia player support MPEG MKV Multi language OSD Auto tuning and fine tuning Programmable Auto On Off Multi language subtitle Support USB 2 0 HDMI 1 4 Input terminals used for external equipment connection 1 x ANTENNA jack 2 x HDMI inputs 2 x USB inputs 1 x COMPONENT input 1 x AV input 1 x Headphone output 1 x SPDIF output 1 x VIDEO output 1...

Страница 8: ...ution Power supply TV receive system Frequency range Video in Antenna Input Speaker output power Power consumption Standby consumption Work Temperature Model Controller power X2 5W 55W o o 0 C 40 C 0 5W 110 240V 50 60Hz 75 ohms unbalanced DC 3V Two AAA size batteries Digital 5 12 21 69 Analog 46 25MHz 855 25MHz PAL NTSC SECAM Digital DVB T DVB T2 Analog PAL D K B G I SECAM D K B G A1000 32 DTV DVB...

Страница 9: ...on This will prevent it from being damaged Assembling instruction 1 Fix the bracket and the stand with screws and cushions 2 Put the television on the table fix the stand and the unit with four screws given in the carton BACK CABINET BRACKET MACHINE SCREWS GLASS STAND TRIANGLE CUSHION SELF TAPPING SCREW Three screws for 32 Only for 32 model 4 x M4 12 3 x B ST4 30 BACK CABINET BRACKET MACHINE SCREW...

Страница 10: ... to tip over causing serious injuries or death Follow all safety precautions at the start of this manual For added stability install the anti fall device for safety purposes as follows ALTERNATIVELY To secure the TV to the table 1 Remove the screws from the center back of the stand put the screws into the clamps and then fasten the screws onto the stand again 2 Assemble the stand to the TV 3 Put t...

Страница 11: ...en wall mounting bracket 3 on the Nylon sleeves 2 with self tapping screws 4 on the wall 5 Fasten wall mounting screws 5 into the two screw holes on the rear cabinet 6 6 Tighten wall mounting bolt 7 on the bottom of the rear cabinet with screws 8 7 Left the TV and hang it on the wall by two people Note 1 Please mount your TV on the strength of the wall for withstanding the TV s weight 2 Be careful...

Страница 12: ...ncluding the on screen menu To use the more advanced features you must use the remote control INPUT Standby button Press button to toggle between normal and standby mode 7 POWER INDICATOR Red In standby mode Green In power on mode PROG Press to change programs In the on screen menu use the PROG buttons as up down arrow buttons INPUT MENU PROG VOL ...

Страница 13: ... TV with video devices such as DVD VCD player VCR and video camera to enjoy the high quality picture USB Headphone DVD player Blue ray disc player PC HDMI output PC Home theater system with digital input Audio system PC Camcorder VCR DVD player with component output ...

Страница 14: ... sleep timer Use your remote control to set the sleep timer Press SLEEP button on the remote control then press this button again to set sleep time off 10 20 30 60 90 120 180 240 min Press MENU button to exit when you have set the sleep timer After you have set sleep timer press SLEEP button again you will see the remaining time Notes The sleep timer you have set will be cancelled when the TV turn...

Страница 15: ...o set the audio source language In USB source the button is used to make language soundtrack switch video 23 Red Green Yellow Blue Command These four buttons are used to request linked buttons with the current menu page 24 Teletext buttons Detail operation please refer to Teletext in the next page 25 SOUND This button is used to select the sound mode 26 PICTURE This button is used to adjust user p...

Страница 16: ...n to enter or exit teletext mode Hold Press HOLD button to toggle Hold function on or off When Hold is switched on the page acquisition is stopped When Hold is switched off the page acquisition is started Size Press SIZE button one time to display the upper half of the screen in double height press the SIZE button two times to display the lower half of the screen in double height press three times...

Страница 17: ...or current subcode entry If the digit completes the entry a page request is started Press buttons to change the PROG PROG subcode pages Time This button is used to show the time of the Teletext Digital buttons 0 9 You can press them to enter the number of the Page required PROG PROG You can press them to change page upward or downward Mix Press MIX botton the teletext page changes transparent TV c...

Страница 18: ...a feeder ANT IN 75ohm coaxial cable Antenna cable Antennas with 300 flat twins Leads Antennas with 75 Round Leads External Connection Installing Batteries Point the remote towards the remote control sensor of the TV and use it within 8 meters Put the used batteries into the recyc ling bin since they can negatively affect the environment The batteries battery pack or batteries installed shall not b...

Страница 19: ...ect an RF Cable between the ANT OUT terminal on the VCR and the ANT IN terminal on the TV 4 Connect a Component Cable between the COMPONENT Y Pb Pr jacks on the DVD player and COMPONENT Y Pb Pr jack on the TV 5 Connect Audio Cables between the AUDIO OUT jacks on the VCR and the AUDIO L and AUDIO R jacks on the TV Note 1 Whenever you connect an external device to your TV make sure that power on the...

Страница 20: ...e camcorder 2 Connect Audio Cables between the AUDIO L and AUDIO R jacks on the TV and the AUDIO OUT jacks on the camcorder 3 Connect a Video Cable between the component IN Y on the TV and the VIDEO OUT jack on the DVD 4 Connect Audio Cables between the component IN AUDIO L and R jacks on the TV and the AUDIO OUT jack on the DVD Note 1 Whenever you connect an external device to your TV make sure t...

Страница 21: ...re that power on the unit is turned off 2 When connecting an external device match the color of the connection terminal to the cable White Red Red Blue Green White Red VIDEO OUT DVD Player Set Top Box AV cable not supplied TV Rear Panel Connecting a DVD Player Set Top Box Red Yellow White ...

Страница 22: ...VI HDMI Adapter between the HDMI 1 or HDMI 2 connector on the TV and the DVI connector on the DVD player Set Top Box 2 Connect Audio Cables between the PC AUDIO IN jack on the TV and the AUDIO OUT jacks on the DVD player Set Top Box Note 1 Whenever you connect an external device to your TV make sure that power on the unit is turned off 2 When connecting an external device match the color of the co...

Страница 23: ...igital audio 5 1 channels The difference between HDMI and DVI is that the HDMI device is smaller in size has the HDCP High Bandwidth Digital Copy Protection coding feature installed and supports multi channel digital audio Each DVD player STB has a different back panel configuration 1 Connect an HDMI Cable between the HDMI1 or HDMI2 connector on the TV and the HDMI connector on the DVD player Set ...

Страница 24: ...external device supporting 5 1 CH 1 Connect an Coaxial Cable between the SPDIF jacks on the TV and the Digital Audio Input jacks on the Digital Audio System When a Digital Audio System is connected to the SPDIF terminal Decrease the gain volume of the TV and adjust the volume level with the volume control Digital Audio System s Coaxial Cable Not supplied Digital Audio System 22 TV Rear Panel Black...

Страница 25: ... sure that power on the unit is turned off 2 When connecting an external device match the color of the connection terminal to the cable D Sub Cable Not supplied PC Audio Cable Not supplied PC 2 1 60Hz 60Hz 60Hz 60Hz 640x480 800X600 1024X768 1280X1024 External Connection Resolution Input VGA 60Hz 640x480 PC VGA SVGA XGA SXGA 75Hz 60Hz 75Hz 60Hz 75Hz 60Hz 800X600 1024X768 1280X1024 Vertical Frequenc...

Страница 26: ...ly switch off the power for this unit unplug the power cord plug for this unit 6 After switching off the unit you should wait at least 5 seconds before switching on again Status indication lamp Red In standby mode Green In power on mode Auto power off If there is no signal the TV will 10 minutes automatically enter standby mode after See Auto sleep pg 36 for more details Memory before turning TV o...

Страница 27: ...zed 3 Press RECALL key to return to previous channel press it again to return to current channel To quickly switch between two channels that are far apart tune to one channel then use the number keys to select the second channel Then use the RECALL button to quickly alternate between them RECALL is not activated if no channel has been changed after TV turning on 4 Select channels from Channel List...

Страница 28: ...program of each channel is listed under the time axis Press button to select the channel and press button to highlight the p rogram The selected program s background colour will change to Press INFO button to view the detailed white information Press OK to select the desired channel 3 Reminder blue button to reserve programs If the TV is in DTV mode Use the it will automatically turn to the reserv...

Страница 29: ...ote controller It will show the reminder list Reminder If you press the blue key on the remote controller It will show a command window and you can set the reserve programs Picture 1 Press MENU key to display the main menu on the screen 2 Press key to select Picture option 3 Press key to enter Picture submenu 4 You can also press the PICTURE key on the remote control to select one of the picture s...

Страница 30: ...s and darkness between objects and the background Brightness Adjusts the brightness of the picture Color Adjusts the colors making them lighter or darker Sharpness Adjusts the outline of objects to either sharpen them or make them more dull Tint Adjusts the color of objects making them more red or green for a more natural look Tint can only be adjusted when signal is NTSC Adjusting the Backlight Y...

Страница 31: ...l sound mode Music Provides clear and live sound for news Movie Provides live and full sound for movies Sports Emphasizes bass over other sounds User Selects your custom sound settings See User settings for Sound Sound Menu system instruction 29 Select Menu Return SOUND Sound Mode Standard Balance Surround Sound Off HDMI Sound HDMI Auto Volume Off SPDIF Mode PCM 0 User setting for Sound 1 Press ke...

Страница 32: ...I mode 1 Press key to select HDMI Sound option 2 Press key to select HDMI Sound mode HDMI or PC Auto Volume Each broadcasting station has its own signal conditions and it is inconvenient to adjust the volume every time the channel is changed Auto Volume automatically adjusts the volume of the desired channel by lowering the sound output when the modulation signal is high or by raising the sound ou...

Страница 33: ... Menu Return CHANNEL Color System PAL Auto Search DTV Manual Search ATV Manual Search Programme Edit Signal Information Please select country first Then select Start to update info Cancel Start Country selection Australia Tune Type DTV ATV Current CH You can see the current channel number and you can press button to choose the channel you want to modify Select the Color System option press on the ...

Страница 34: ...control to choose your favorite programs as soon as possible Rename green Rename some program from program list in ATV mode you want to Rename Press button to select the program that need to be renamed then press green button to enter rename state and press button to select the letter that need to be edited and press button to select a new letter repeat to rename the program 32 Select Menu Return ...

Страница 35: ...have set will be cancelled when the TV turns off or if a power failure occurs Notes When the time is less than 60 seconds remind information will be displayed on the screen Press any key button to cancel timer function Clock You can modify the time of your TV set but when you switch to DTV program the Clock is decided by the signal from your antenna Time Zone You can choose it to modify your time ...

Страница 36: ...e TV to self adjust to the incoming PC RGB video signal The fine coarse and position values are adjusted automatically H Position Set horizontal of picture position V Position Set vertical position of picture Clock Phase Remove or reduce picture noise Lock The lock feature requires a Password to be entered before any settings can be changed 1 Press MENU key to display the main menu on the screen 2...

Страница 37: ...Once the program is locked and Lock System is on password is needed to enter it Parental Guidance This option only used in DTV mode 1 Press key to select option Parental Guidance 2 Press key to select the lock level of the Parental Guidance off 4 18 Reset Select the Reset option and press OK or key to display a confirm box and select Yes or No Note Please use the Reset option with caution as it wi...

Страница 38: ...ct option Aspect Ratio 2 Press key to set the scale mode You can also press key on the remote Aspect control to select one of the scale modes Each source has different scale modes 16 9 4 3 Panorama Movie Subtitle Full view Full DeFinition Screen Saver This option is only used in ATV mode 1 Press key to select Screen Save option 2 Press to choose on or off RGB Range Change the brightness and satura...

Страница 39: ... Secondary Subtitle Language option 2 Press key to set Secondary Subtitle Language Hearing Impaired Specific Hearing Impaired subtitles can be activated subject to availability from broadcaster Note Only available in DTV mode Introduction This TV is embedded with one USB port digital media player It can find devices that support USB1 1 2 0 including flash disk USB hard disk and digital camera It s...

Страница 40: ...e entry photo option on the left the switch to the image preview area was selected in the image preview area in the right section then play image files Exit Key selected in the entry in the right image preview area select the entries to switch back to the left side of photo options the selected option in the entry on the left picture the switch back to the USB interface initialization Photo Play i...

Страница 41: ...the EXIT key to return to the previous menu as shown in Figure 7 PlayMode Shown as Figure 8 1 Filmstrip loop all the pictures 2 Single Repeat the current picture Music Shown as Figure 9 Set to open when the user is playing the most recently played directory s songs If the user is set to open when not playing a song recently the default entry to play current directory s music Stop Exit Slideshow Fi...

Страница 42: ... Upper and lower key on a the next one OK button Play Pause music Exit exit the music player interface return to music browsing interface Menu key enter the playback control menu Shown as Figure 14 Play Control Key operation Left Right Select Options Confirm the key the selected function key to enter the selected features live secondary menu items Exit exit the playback control menu Figure 10 Play...

Страница 43: ...ion Arrow keys up and down in the switch between different options OK key selected in the entry in the video options on the left the switch to the video preview area selected to the entry in the right side of the video preview area then play the video file Exit In the video preview on the right in the entry area select the entries to switch back to the left of the video options Selected to the ent...

Страница 44: ...use the video FB Fast back playing 2x 4x 8x 16x FF Fast forward playing 2x 4x 8x 16x Prev Play previous video Next play next video Switch Shown as Figure 21 1 Subtitles switch switch the currently playing video titles this option the user can switch the video comes with different titles select the OFF option the subtitles will not be displayed 2 Track switch switch the currently playing video trac...

Страница 45: ...lected video files Left Right keys Exit playlist and select other options Exit button Exit Playlists Info Shows the name of the video is playing resolution audio track subtitles program title version chapters Shown as Figure 29 Figure 24 Ad mpeg 00 00 03 00 04 07 FB FF Next PlayMode Prev Proportion Switch Play ByOrder Single PlayLoop Ad mpeg 00 00 03 00 04 07 Slow Stepping Set A Stop Playlist Info...

Страница 46: ...to the USB interface initialization Document Reading The Document Reading interface Shown as Figure 31 Key operation Up key Previous Page Down key Next Page Left right keys Previous file Next file Exit key Return to the text interface Menu key Enter the playback control menu As shown in Figure 32 Play Control menu Key operation Left Right Select Options Enter button the selected function key to en...

Страница 47: ...w the page select Enter option and enter the designated page click Exit to return to playback control menu Shown as Figure 32 Playlist displays text files can be played Shown as Figure 34 Info Show the name size of the text playing As shown in Figure 35 Up Down select OK Play Page s 0 0 Digital Media Player ...

Страница 48: ...46 Reference Troubleshooting 8 MUTE ...

Страница 49: ...ontact your dealer Owner s Instructions Remote Control Picture defects and the reason Reference VOL CH MENU ENTER 1 2 3 4 5 6 7 8 9 0 RECALL EX IT R G Y B MUTE INPUT POWER IN FO EPG LIST FAV M TS CC D FREEZE PICTURE SOUND ZOOM SLEEP AUDIO SUBTITLE SURROUND USB PLAY CONTROL PAGE UP PAGE DOWN TV YPBPR VGA HDMI ...

Страница 50: ......

Отзывы: