REBOTEC / BA No.: 02.07.081/01-12
GB
- 6 -
Caution – danger of falling!
To prevent the patient from
falling out of the chair, be sure
the
patient
is
seated
completely on the chair, and
not just on the edge.
For transporting the patient, be
sure he is leaned back against
the seat back and be sure he
uses the footrests.
11.2 Getting up
Before getting up, be sure the chair is stable and
secured against slipping away
(see 11.9)
and
tipping over, that the armrests are locked in
position, and the footrests are folded away to the
side or folded up.
The patient should then move his body forward
until his feet are flat on the floor.
The patient must then place
both hands on the armrests
and slowly lift himself up.
The patient must not lean too
far forwards, in order to avoid
falling.
The patient should have the
care worker assist him when
getting up.
Caution – danger of falling!
The patient must not stand on
the footrests when getting up
or leaving the chair.
11.3 Swivelling the armrests outwards
By pulling out the locking pin, the locking
mechanism is disengaged and the armrests may
be swivelled back. When swivelling the armrests
up, check to be sure that the armrests are properly
seated in the locking position of the backrest and
locked by the locking pin.
Check the locking mechanism on a regular basis
for impaired function arising from calcium deposits,
which can impair the movement.
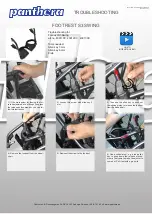
11.4 Adjusting the foot support height
The footrests are height-adjustable in stages. To
do this, unscrew the screws of the footrests on the
side using an SW6 Allen key. Select the
appropriate height and tighten the screws of the
foot support. Be sure the screw is securely
tightened.
11.5 Folding away the footrests
Next swivel the foot-plates upwards and lift the
footrests. The footrests can now be swivelled back
to the side.
11.6 Removing the footrests
Lift up the footrests approx. 10 cm and turn them
outwards 90°. Now you can lift the footrests up and
remove them.
11.7 Removing the seat
The seat can be removed from its receptacles for
the purpose of cleaning or exchanging simply by
pulling it up.
11.8 Removing the back cushion
The back cushion is fastened to the cross-brace or
backrest with studs. Press the buttons to remove
the back cushion.
11.9 Using the wheel locks
To lock the wheels, press the locking levers down
with your foot. The wheels are now locked and not
loose. Releasing the wheels is done by lifting up
the locking levers.
11.10 Handling the commode pan
Push the commode pan under the seat from
behind the chair. To remove the pan, lift it up
slightly and pull it out.
11.11 Adjusting the seat height
To allow adjustment of the seat height for the
patient or to allow driving over an elevated toilet
bowl, the chair is height adjustable.
The height adjustment is done through the 4 castor
wheels in the seat frame (2 stages: each 25 mm).
Caution: Danger of tipping!
Be sure that all four
wheels are set at the same height and that the
screws are securely tightened by hand.
Step 1
To do the adjustment, we recommend laying the
chair on its side. First remove the commode pan
and the seat cover.
2
4
3