background image

16

En

Owner’s manual

1.  Compass (Headless) mode button

2.  Throttle / Speed control (Left stick)

3.  Forwards / backwards trimming button

4.  Power indicator

5.  One key back home button

6.  Power switch

7.  Direction joystick / Roll control (Right stick) 

8.  Left / right trimming button

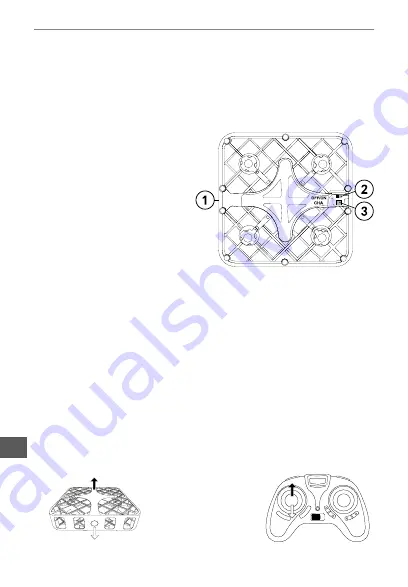
Drone

1.  Light

2.  Power switch

3.  Charging port

oPErating StEPS

1.  Turn on the drone.

2.  Put the left stick down, and turn on the remote control. 

3.  To pair the remote with the drone, push the left stick up and then 

back down. A beep will sound, which means the drone has been 

successfully paired. The device is ready to fly.

4.  Turn the drone and the remote control off after flying.

Flight control

Place the drone on a flat, horizontal surface. Make sure the drone’s light 

is facing away from you. Make sure the drone and you are both facing the 

same direction.

Push the left stick 

up to ascend the 

drone. Pull the 

left stick down to 

descend.

Содержание BOX FLYER

Страница 1: ...Instrukcja obs ugi EN User s manual Bedienungsanleitung DE PL Manual de utilizare RO model ZAB0114 Drone BOX FLYER...

Страница 2: ......

Страница 3: ...rmeiden sollte das Ger t nicht in k rzeren Abstand als 2 Meter 7 Meter von Menschen oder andere Hindernisse geflogen werden Betreiben Sie das Produkt nicht in der N he von Stromleitungen Nicht f r Per...

Страница 4: ...nziehen Hinweis Verwenden Sie Alkalibatterien Nicht alte und neue Batterien mischen Nicht verschiedene Batterietypen mischen Setzen Sie keine besch digten Batterien oder solche mit Leck ein da dies di...

Страница 5: ...den anschlie en Verbinden Sie die Drohne zum Aufladen nur mit einem kompatiblen USB Anschluss Verwenden Sie kein AC Netzger t Lassen Sie den Akku nicht vollst ndig entladen Laden Sie das Ger t mindest...

Страница 6: ...eln schieben Sie den linken Steuerkn ppel nach oben und wieder nach unten Ein Piep Ton ert nt als Anzeichen f r eine erfolgreiche Kopplung Das Ger t ist bereit zum fliegen 4 Schalten Sie die Drohne un...

Страница 7: ...liegen Schieben Sie den rechten Steuerkn ppel nach rechts um nach rechts zu fliegen Geschwindigkeitskontrolle Wenn Sie Ihre Drohne zum ersten Mal einschalten befindet sie sich automatisch im ersten Ge...

Страница 8: ...ppel um einen Flip in die gew nschte Richtung zu machen 3 Nach einem Flip wird die Drohne in den normalen Betriebszustand zur ckgesetzt F hren Sie die oben genannten Schritte erneut aus um einen weit...

Страница 9: ...tiviert wurde 2 Dr cken Sie erneut die Taste Eine Taste Heimkehrfunktion ODER dr cken Sie den rechten Steuerkn ppel vorw rts r ckw rts um die Funktion zu beenden Hinweis Die Drohne fliegt zu der Stell...

Страница 10: ...halten Sie die Taste links Trimmen gedr ckt Wenn Sie einen kurzen Piepton und schlie lich einen langen Piepton h ren lassen Sie die Taste los Diese Taste wird auf die urspr nglichen Einstellungen zur...

Страница 11: ...mit 4 Ersatz Rotorbl tter geliefert zwei A und zwei B Sie sehen den Buchstaben A und B auf dem Geh use setzen Sie die Rotorbl tter entsprechend auf den Motor REINIGUNG UND WARTUNG 1 Reinigen Sie das G...

Страница 12: ...mit dam normalem Haushaltsm ll entsorgt werden darf Entsorgen Sie dieses Ger t bitte getrennt von anderenAbf llen um der Umwelt bzw der menschlichen Gesundheit nicht durch unkontrollierte M llbeseiti...

Страница 13: ...vice should not be flown at shorter distance than 2 meters 7 feet from people or other obstacles Do not operate the product near power lines Not suitable for persons under 14 years old The users under...

Страница 14: ...crew Note Use alkaline batteries Do not mix old and new batteries Do not mix different types of batteries Do not insert damaged batteries or ones with signs of leakage as it may damage the drone Repla...

Страница 15: ...ntion to connect the charging plug correctly into the drone let the drone cool down after flying before connecting it for charging connect the drone only to compatible USB port for charging Don t use...

Страница 16: ...2 Put the left stick down and turn on the remote control 3 To pair the remote with the drone push the left stick up and then back down A beep will sound which means the drone has been successfully pai...

Страница 17: ...e left stick to change the speed The remote will issue a sound to signify which speed gear has been chosen one beep for speed 1 two beeps for speed 2 and three beeps for speed 3 Radical Flips Rolls Be...

Страница 18: ...ed will be always the heading forwarding direction for aircraft front of the drone will be dependant on the remote control In this way users don t have to always keep watching on the aircraft to class...

Страница 19: ...t and will fly further in that direction the device does NOT have an autoland function In order to land the drone control the device manually Trimming Manual trimming When your drone oversteers in any...

Страница 20: ...he long beep sound Perform the same trim resetting with remaining 3 buttons Auto trim function User can perform this function to automatically calibrate the drone 1 Push the left and right sticks simu...

Страница 21: ...its blades to ensure proper operation 5 Regularly check the drone and its accessories for damage If a damage is found do not use the device until it is repaired SPECIFICATION 6 axis gyro stabilizer Ra...

Страница 22: ...rom other types of wastes and recycle it responsibly to promote the sustainable reuse of material resources Household users should contact either the retailer where they purchased this product or thei...

Страница 23: ...h temperaturach lub w pobli u r de ciep a Aby unikn obra e uszkodze urz dzenia nie nale y u ywa w odleg o ci mniejszej ni 2 metry od ludzi lub przeszk d Nie nale y lata dronem w pobli u linii wysokieg...

Страница 24: ...Uwaga Nale y u ywa baterii alkalicznych Nie nale y umieszcza w pilocie starych i nowych baterii jednocze nie Nie nale y umieszcza w pilocie r nych typ w baterii jednocze nie Nie nale y u ywa baterii...

Страница 25: ...ypod czy dronadokompatybilnegoportuUSBwceluna adowania Nie nale y adowa urz dzenia za pomoc adowarek sieciowych Nie nale y doprowadza do ca kowitego roz adowania baterii drona nale y adowa urz dzenie...

Страница 26: ...parowanie Urz dzenie jest gotowe do pracy 4 Nale y wy czy drona i pilot zdalnego sterowania po zako czonym locie Sterowanie Nale y umie ci drona na p askiej poziomej powierzchni wiat o drona powinno...

Страница 27: ...sygnalizuje wybrany tryb sygna em d wi kowym jeden sygna najni sza pr dko dwa sygna y rednia pr dko trzy sygna y najwy sza pr dko Akrobacje Przed wykonaniem akrobacji dronem nale y si upewni e dron zn...

Страница 28: ...ki tej funkcji u ytkownik nie musi pami ta w kt r stron obr ci drona lub gdzie znajduje si prawy bok urz dzenia itd Funkcja powrotu do domu Po w czeniu funkcji powrotu do domu urz dzenie zacznie leci...

Страница 29: ...rowadzi l dowanie urz dzenia Kalibracja KOREKTA LOTU R czna kalibracja R czn korekt lotu mo na przeprowadzi zgodnie z ilustracjami poni ej Je li dron leci niezamierzenie w lewo nale y kilkukrotnie nac...

Страница 30: ...rz dzenie wyda d ugi sygna d wi kowy Nale y przeprowadzi kalibracj pozosta ych trzech przycisk w Automatyczna kalibracja Auto trim U ytkownik mo e wykorzysta t funkcj w celu przeprowadzenia automatycz...

Страница 31: ...i i wyczy ci drona W celu zapewnienia poprawnej pracy nale y usun zabrudzenia i jakiekolwiek cia a obce kt re znalaz y si na obudowie drona lub na mig ach 5 Nale y regularnie sprawdza czy dron i jego...

Страница 32: ...produktu od innego typu odpad w oraz odpowiedzialny recykling w celu promowania ponownego u ycia zasob w materialnych jako sta ej praktyki W celu uzyskania informacji na temat miejsca i sposobu bezpi...

Страница 33: ...aratul la o distanta mai mica de 2 m fata de alte persoane sau obstacole Nu utiliza i produsul n apropierea firelor electrice Nu este adecvat pentru persoane sub 14 ani Utilizatorii sub 18 ani pot uti...

Страница 34: ...urubul Nota Utiliza i baterii alcaline Nu amestecati baterii vechi cu baterii noi Nu amestecati diverite tipuri de baterii Nu introduce i baterii deteriorate sau care prezint urme de scurgeri deoarece...

Страница 35: ...rect mufa n dron l sa i drona s se r ceasc dup utilizare nainte de a o nc rca conecta i drona doar la un port USB compatibil pentru nc rcare Nu utiliza i adaptoare AC Nu l sa i bateria s se descarce c...

Страница 36: ...joystick ul st ng jos i porni i telecomanda 3 Pentru a asocia telecomanda cu drona mpinge i josystick ul st ng n sus apoi napoi n jos Se va auzi un sunet ceea ce nseamn c drona a fost asociat cu succ...

Страница 37: ...iza i la cea mai mic vitez Ap sa i joystick ul st ng pentru a schimba viteza Telecomanda va emite un sunet care semnific care treapt de vitez a fost aleas un beep pentru viteza 1 dou beep uri pentru v...

Страница 38: ...d este ini ializat modul headless va fi ntotdeauna direc ia pentru dron partea din fa a dronei va fi dependent de telecomand n acest fel utilizatorul nu va trebui s se uite mereu la dron pentru a veri...

Страница 39: ...ul nu are func ia de aterizare automat Pentru a ateriza controla i dispozitivul manual Reglarea Reglare manual a corec iei Dac drona deviaz ntr o direc ie oarecare efectua i reglarea de corec ie manua...

Страница 40: ...Efectua i aceea i resetare de direc ie cu cele 3 butoane r mase Func ia de reglare automat a direc iei Utilizatorul poate efectua aceast func ie pentru a calibra automat drona 1 mpinge i joystick ul s...

Страница 41: ...sigura func ionarea corect 5 Verifica i periodic dac drona i accesoriile sale sunt deteriorate Dac g si i deterior ri nu mai utiliza i dispozitivul p n nu este reparat SPECIFICA II Stabilizator girosc...

Страница 42: ...alte tipuri de reziduuri si s l reciclati in mod responsabil pentru a promova refolosirea resurselor materiale Utilizatorii casnici sunt rugati s ia legatura fie cu distribuitorul de la care au achizi...

Страница 43: ......

Страница 44: ...www rebelelectro com...

Отзывы: