

inStallation
1. Remove lens collar foot.
2. Use small Phillips screwdriver (we recommend "00"—
not included) to remove the four mounting screws on
the Nikon lens collar mount plate.
Seat tool firmly
and use care to prevent stripping head.
3. Lift off Nikon lens collar mount plate and put LCF-10P
in place on the collar (RRS logo should read in the
same direction as the Nikon logo).
4. Inspect Nikon nameplate on your lens to determine
if you own the
VR-II
or
VR-I
version of this lens, then
continue with corresponding instructions at right.
verSion vr-ii
5. Inspect the six replacement screws provided by
Really Right Stuff and select the four screws that are
all the same length. Use these screws to securely
install LCF-10P.
Seat hex key firmly and use care
to prevent stripping hex socket head.
verSion vr-i
5. Inspect the six replacement screws provided by
Really Right Stuff and select two of the longer
screws and two of the shorter screws.
6. Use the two longer screws to install the edge of the
LCF-10P that is closer to the front of the lens (above
the RRS logo).
7. Use shorter screws to install the edge of the LCF-10P
that is closer to the rear of the lens (below the RRS
logo).
Seat hex key firmly and use care to prevent
stripping hex socket head.
VR-I
nameplate is gold with black lettering and
reads:
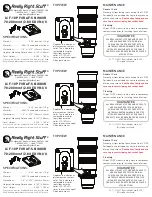
AF-S VR-NIKKOR 70-200mm 1:2.8G
VR-II
nameplate is black with gold lettering and
reads:
AF-S NIKKOR 70-200mm 1:2.8GII ED
Front of Lens
Rear of Lens
inStallation
1. Remove lens collar foot.
2. Use small Phillips screwdriver (we recommend "00"—
not included) to remove the four mounting screws on
the Nikon lens collar mount plate.
Seat tool firmly
and use care to prevent stripping head.
3. Lift off Nikon lens collar mount plate and put LCF-10P
in place on the collar (RRS logo should read in the
same direction as the Nikon logo).
4. Inspect Nikon nameplate on your lens to determine
if you own the
VR-II
or
VR-I
version of this lens, then
continue with corresponding instructions at right.
verSion vr-ii
5. Inspect the six replacement screws provided by
Really Right Stuff and select the four screws that are
all the same length. Use these screws to securely
install LCF-10P.
Seat hex key firmly and use care
to prevent stripping hex socket head.
verSion vr-i
5. Inspect the six replacement screws provided by
Really Right Stuff and select two of the longer
screws and two of the shorter screws.
6. Use the two longer screws to install the edge of the
LCF-10P that is closer to the front of the lens (above
the RRS logo).
7. Use shorter screws to install the edge of the LCF-10P
that is closer to the rear of the lens (below the RRS
logo).
Seat hex key firmly and use care to prevent
stripping hex socket head.
VR-I
nameplate is gold with black lettering and
reads:
AF-S VR-NIKKOR 70-200mm 1:2.8G
VR-II
nameplate is black with gold lettering and
reads:
AF-S NIKKOR 70-200mm 1:2.8GII ED
Front of Lens
Rear of Lens