Instructions for the Special Edition #SE-JM907 The Alison, Jr.
H: Dormers, Shingles
Page 19
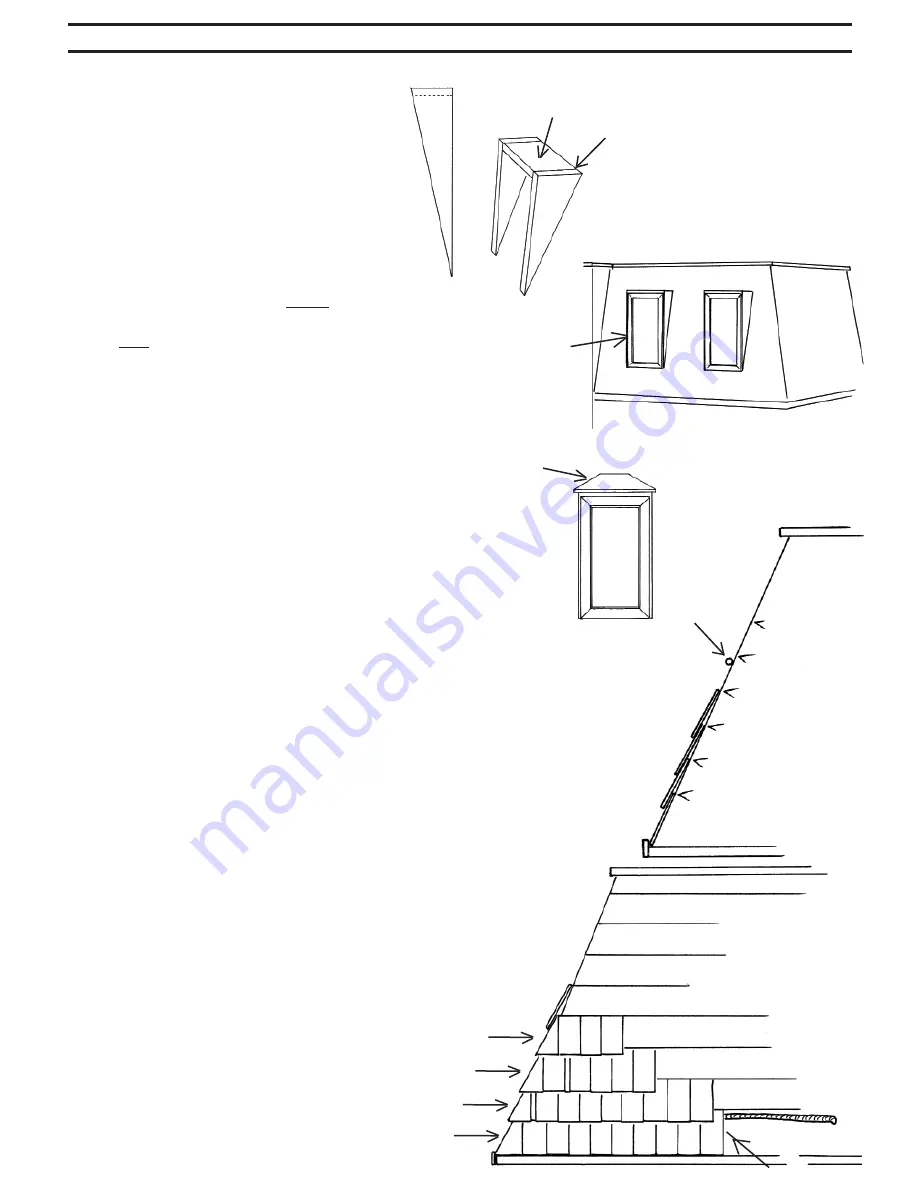
40. Glue and tape a Window Frame into the Dormer
body. Glue the Dormers to the Front Roof lined up with
the Dormer holes (Illustration #36). Check to make sure
the Dormers are straight up-and-down. Tape the Dor-
mers to the Roof from the inside.
41. Glue the Dormer Roofs to the tops of the Dormer
bodies centered side-to-side (Illustration #37).
Shingle The Roof:
Glue: Use a thick panel adhesive such as Liquid
Nails
Macco
available in a caulking gun tube at building
supply stores. Trim just a little of the end of the tube for
a tiny hole, to give a thin bead of glue. Always use good
ventilation with solvent based adhesives.
42. Apply a thin line of adhesive
1
/
8
” below the
lowest guideline all the way across one Side Roof. Press
the top edge of a Shingle into the line of glue, squeezing
out the excess. Hold the fi rst Shingle steady and press
another shingle into the adhesive, tight to the fi rst. Hold
the next Shingle and press in another... etc. all the way
across the roof, cutting the last shingle to fi t. Cut angled
Shingles for the corners before attaching them. The fi rst
row of Shingles is tight to the bottom, the rest line up
with the guidelines. Finish each row (the sides fi rst, then
the front) before starting the next row.
43. Continue up the roof one row at a time around
all the roofs. Start every other row with a half Shingle
so that the seam between Shingles is staggered back and
forth as you go up the roof. Cut the Shingles for the top
row so that each row will have the same reveal.
Where two roofs meet, shingle the side roofs fi rst,
then the front roof.
Flush
Bead of adhesive
Overlap covers
the squeezings
One shingle length
Illustration #37
Illustration #36
Window
Frame
Illustration #35
Flush
Dormer
Ceiling
Dormer
Side
Dormer
Side
Dormer
Roof
www.realgoodtoys.help has shingling demos
1” between guidlines
Bead of adhesive
1”
Guideline
1”
1”
One shingle length
1” Reveal
1” Reveal
1” Reveal
1” Reveal
Illustration #39
Illustration #38
The Dormers:
Preview:
In this section you will build and
install the Dormers.
39. Glue and tape the Dormer Sides to the
Dormer Ceiling, fl ush at the top edges.
(Illustration #35)
Pro Tip: Our Assembly Pro paints and in-
stalls the Dormer Sides/Ceiling before shin-
gling, and pre-paints and installs the Dormer
Roofs after the shingling is complete.


