background image

-31-

25

Stitch length

Stitch width

30

D

A

N

SK

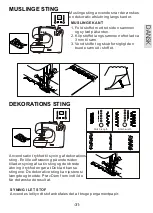
MUSLINGE STING

Muslinge sting anvendes når der ønskes 
en dekorativ afslutning langs kanter.

MUSLINGE KANT

1. Fold stoffet med ret siden sammen
    og sy tæt på kanten.
2. Klip stoffet langs sømmen efterlad ca
    3 mm til søm. 
3. Vend stoffet og skub forsigtigt den 
    buede søm ud i stoffet.

DEKORATIONS STING

SYNING I LET STOF

Anvendes let/tyndt stof anbefales det at bruge pergamentpapir.

Anvend satin trykfod til syning af dekorations 
sting. En lille udfræsning på undersiden 
tillader syning af satin sting og den brede
åbning i trykfoden gør at De klart kan se 
stingene. De dekorative sting kan justeres i 
længde og bredde. Prøv Dem frem indtil de 
får det ønskede resultat.

Содержание EVA Royal 8632

Страница 1: ...Brugsvejledning Instruction manual Eva Royal 8632 ...

Страница 2: ...E LISH NG ENGLISH DANSK DANSK ...

Страница 3: ... KNAPPER 11 BRUG AF FODPEDAL 12 STING OVERSIGT 13 SPOLING 14 ISÆTNING AF SPOLE 15 TRÅDNING AF SYMASKINEN 16 NÅLETRÅDER AUTOMATISK 17 KOM GODT IGANG 18 RETUR SYNING 19 SYNING I TYKT STOF 19 REGULERING AF TRÅDSPÆNDING 20 NÅL OG TRÅD GUIDE 21 STIKKE STING 22 ZIGZAG SYNING 23 FRIARMS SYNING 23 OVERLOCK STING 24 BLINDSTING 25 KNAPHULLER 26 27 6 STINGS ZIGZAG 28 PATCHWORK 29 APPLIKATION 29 LYNLÅS SYNING...

Страница 4: ...ldrig symaskinen hvis ventilationsåbningerne er blokerede Og hold ventilationsåbningerne på symaskinen og fodpedalen fri for støv og løse trævler 05 Tab aldrig noget ind i symaskinen eller isæt genstande i åbningerne på symaskinen 06 Anvend ikke symaskinen udendørs 07 Anvend ikke symaskinen hvor spray produkter bliver brugt eller hvor oxygen bliver administreret 08 Ved afbrydelse sæt tænd sluk kna...

Страница 5: ...gde knap 14 Sting bredde knap 13 Håndhjul 12 Spolestop 11 Spoleapparat 10 Trådrulleholder 9 Trådspændingsknap 8 Nål op ned positionsknap 7 Spole trådføring 6 Forlængerbord tilbehør ilagt 5 Hastighedsregulator 4 Start Stop knap 3 Hastigheds knap 2 Retur knap 1 Lampedæksel SYMASKINENS DELE DANSK ...

Страница 6: ...p 21 Ventilation 22 Fodpedal tilslutning 23 El tilslutning 24 El ledning 25 Fodpedal 26 Trådfører 27 Nåletrådearm 28 Nåletråder 29 Knaphulsarm 30 Trykfodsskrue 31 Stingplade 32 Spolehus dæksel 34 Trykfodsholder 35 Trykfod 36 Trådfører 37 Nåleholder skrue 38 Trykfodsløfter 39 Transportørsænker 33 Dækseludløser DANSK ...

Страница 7: ...en tag fat i venstre side træk i æsken for at afmontere æsken åbnes på bagsiden 1 Nåle 2 Spoler 3 Trådhætte stor 4 Trådhætte lille 5 Satin fod 6 Skruetrække til stingplade 7 Skruetrækker 8 Opsprætter m Børste 9 Olie 10 Knaphuls fod 11 Overlock fod 12 Lynlås fod 13 Blindstings fod TILBEHØR ...

Страница 8: ...ING AF TILBEHØRSÆSKE Ved brodering eller når materiale skal styres med hånd trykkes transportørknappen ind og skubbes bagud for at sænke transportøren Til almindelig syning skubbes transportør knappen ind og imod Dem selv dette hejser transportøren til sit højeste niveau TIP Transportørens normale position er højeste position For at åbne tilbehørsæsken tag fat i venstre side træk i æsken for at af...

Страница 9: ...gle trykfødder kræver at trykfodsholderen afmonteres før brug Afmontering hæv trykfodsholderen og løsen trykfodsholderskruen Påmontering Trykfodsholderen skubbes så langt op på trykfodsstangen som muligt Skruen tilspændes AFMONTERING AF TRYKFODSHOLDER 5 Sænk trykfodsholderen for at låse trykfoden fast 4 Placer trykfoden således at pinden passer op i slidsen på trykfodsholderen 3 Tryk på trykfodsud...

Страница 10: ...elnettet Tag altid stikket ud af stikkontakten efter brug og før rengøring vedligeholdelse af symaskinen Minimer risokoen for elektrisk stød FARE 5 Sluk for symaskinen ved at trykke på knappen OFF tag stikket ud af stikkontakten 4 En lampe indikerer at maskinen er tændt 3 Tryk på ON knappen Se illustration 2 Forbind kablet med symaskinen 1 Sæt stikket i stikkontakten Placer symaskinen på et fladt ...

Страница 11: ...yes syr maskinen langsomt og stopper når knappen slippes Tryk på start stop knappen for at starte og symaskinen syr igen fremad med normal hastighed C SY LANGSOM KNAP Symaskinen syr hurtigere når knappen skubbes til højre og langsommere når den skubbes til venstre Virker ikke når fodpedal er tilsluttet B HASTIGHEDSKNAP Nåle positionen hæves eller sænkes ved at trykke på denne knap Ved at trykke ig...

Страница 12: ...okeringen er fjernet tryk på fodpedalen og maskinen vil igen sy normalt SIKKERHEDSFUNKTION KONTROL KNAP FUNKTIONERNE Kontrolknap funktionerne ændres imens fodpedalen er tilsluttet maskinen Se forgående side Slip fodpedalen og maskinen stopper automatisk Syhastigheden øges ved at trykke hårdere på pedalen 3 Læg fodpedalen ved Deres fødder og tilslut strøm 2 Sæt stikket fra fodpedalen i symaskinen 1...

Страница 13: ... 03 STILKE STING 04 3 DOBBELT STIKKE STING 05 ZIGZAG STING 31 32 KNAPHULLER 06 6 STINGS ZIG ZAG 07 SATIN STITCH 08 3 DOBBELT ZIG ZAG 09 OVERLOCK STING 10 DOBBELT OVERLOCK 13 ELASTISK BLIND STING 14 FJER STING 15 ELASTISK STRIKVARE STING 16 30 NYTTE OG DEKORATIONS STING 12 BLIND STING 11 MUSLINGE STING DANSK STING Mønster vælger Sting bredde Sting længde ...

Страница 14: ...en rundt om spolen nogle gange 4 Før tråden om spoleguiden som illustreret 3 Før tråden gennem spoleguiden 2 Før tråden gennem trådførerguiden sæt en trådhætte stop på 1 Sæt en trådrulle på trådrulleholderen og SPOLING 2 Løft spolen ud med fingerspidserne 1 For at tage spolen ud af maskinen skub udløseren mod højre samtidig med at der trykkes ned på venstre hjørne af spoledækslet UDTAGNING AF SPOL...

Страница 15: ...r spoledækslet 3 Træk tråden mod venstre og langs indersiden af trådstrammerens fjerder B indtil den glider i slidsen C pas på at tråden ikke glider ud af slidsen A 2 Træk tråden ind i rillen A 1 Placer spolen i spolekapslen med trådretningen mod uret ISÆTNING AF SPOLE ...

Страница 16: ...en nederste del af guiden som vist på illustrationen nedenfor Se næste side for brug af den automatiske nåletråder 4 Før tråden igennem trådguiden 3 Sæt en trådrulle på trådrulleholderen og sæt en trådhætte på 2 Nål op ned knappen sættes til op position 1 Hæv trykfoden TRÅDNING AF OVERTRÅD TRÅDNING AF SYMASKINEN ...

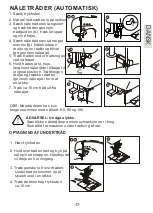
Страница 17: ...trykfoden ca 15 cm 1 Sænk trykfoden 2 Nål op ned sættes i op position 3 Sænk nåletråderen langsomt og træk tråden gennem trådguiden A træk let opad og mod højre 4 Sænk nåletråderen så meget som muligt Nåletråderen drejer og en trådkrog bliver ført gennem nåleøjet 5 Træk tråden under trådkrogen ved nåleøjet 6 Hold tråden løst hejs langsomt nåletråder tilbage til original position Trådkrogen drejer ...

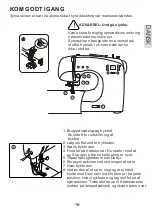
Страница 18: ... 7 Hæv trykfoden 8 Ved enden af et søm stop og drej hånd hjulet mod Dem selv indtil nålen er i højeste position Hæv trykfoden og tag stoffet ud af symaskinen Træk stoffet op til trådskæreren sidder på lampedækslet og skær tråden over Vær ekstra forsigtig opmærksom omkring nåleområdet mens De syr Symaskinen transporterer automatisk stoffet fremad ryk eller træk derfor ikke i stoffet ADVARSEL Undgå ...

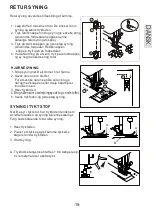
Страница 19: ...dal Returknappen slippes tryk igen på fodpedalen 4 Ved afslutning på et søm tryk på returknappen og sy nogle enkelte sting retur 1 Læg stoffet i maskinen hvor De ønsker retur syning og sænk trykfoden Retursyning anvendes til fæstning af sømme RETUR SYNING A Trykfods stangen kan løftes 1 trin længere op hvis materialet er ekstra tykt 3 Start syning 2 Placer et stykke pap af samme tykkelse bagerst u...

Страница 20: ...ÅDSPÆNDING TIL ZIGZAG SYNING Juster trådspændingen til et højere tal C Tråden er synlig på undersiden af stof Juster trådspændingen til et lavere tal B Tråden er synlig på oversiden af stof Over og undertråd skal være i balance i midten af stoffet Se illustration A Korrekt trådspænding Trådspændingen skal være korrekt justeret Trådspændingen reguleres ved at stramme eller løsne på trådspændingskna...

Страница 21: ...70 11 80 Bomuld 80 100 Silke 60 80 Syn 80 100 Let stof ren bomuld silke syntetisk stof crepe m fl Nåle str Tråd Stof type Anvend altid nål og tråd tykkelse som passer til stoffet der skal syes NÅL OG TRÅD GUIDE Transportøren fører automatisk stoffet fremad ryk eller træk derfor ikke i stoffet Det kan medføre at nålen knækker eller sting bliver ujævne ADVARSEL Undgå ulykke Som vist på tegningen ove...

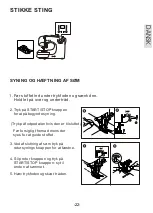
Страница 22: ...en af sømmet Tryk på fodpedalen hvis den er tilsluttet 3 Ved afslutning af søm tryk på retursynings knappen for at fæstne Før forsigtigt fremad mens der syes for at guide stoffet 2 Tryk på START STOP knappen for at påbegynde syning 1 Før stoffet ind under trykfoden og sænk den Hold let på over og undertråd STIKKE STING SYNING OG HÆFTNING AF SØM ...

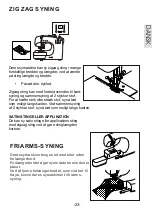
Страница 23: ...llige bredder og længder ved at ændre på sting længde og bredde Påsæt alm trykfod Zigzag sting kan med fordel anvendes til kant syning og sammensyning af 2 stykker stof For at hæfte strik eller stræk stof sy så tæt som muligt langs kanten Ved sammensyning af 2 stykker stof sy så tæt som muligt langs kanten SATIN STING ELLER APPLIKATION De kan sy satin sting eller applications sting med zigzag stin...

Страница 24: ... af tyndt eller fint stof BRUG AF ZIGZAG TRYKFOD Sæt dog ikke sting bredde under 5 da det kan ske at nålen rammer trykfoden og knækker Ved brug af disse sting bør overlock trykfoden anvendes ADVARSEL Undgå ulykke B Nogle sting syr stikke sting og trævlekant på samme tid Disse kan med fordel anvendes når der syes i trævlbar stof og stræk stof A Overlock sting anvendes til at forhindre stoffet trævl...

Страница 25: ...nvendes når man ikke ønsker at sting skal ses på retsiden af stoffet 1 Fold stoffet som vist på tegningen efterlad 5mm ca 3 16 tomme udover den foldede kant 2 Guiden A på blindstingsfoden sikrer at stoffet føres jævnt fremad når De syr blindsting Guiden A justeres ved at dreje på justeringsskruen B 3 Stoffet lægges under trykfoden så den ombukkede fold ligger til venstre for nålen Se tegning 4 Sæn...

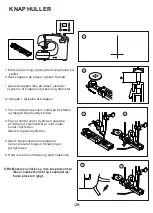
Страница 26: ...appen ikke på basen justeres skyderen til knappens tykkelse og diameter a længde tykkelse af knappen 3 Før overtråden gennem hullet på trykfoden og fastgør knaphulstrykfoden 4 Placer stoffet under trykfoden således at midten af liniemærket er midt under hullet i trykfoden Sænk knaphulstrykfoden 5 Sænk knaphulsarmen således at den er placeret bagved forhøjningen på trykfoden 6 Hold let ved overtråd...

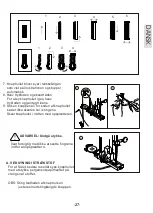
Страница 27: ...s med stinglængde knappen ADVARSEL Undgå ulykke Vær forsigtig med ikke at sætte fingrene ind foran opsprættern 7 Knaphullet bliver syet i rækkefølgen som vist på illustrationen og stopper automatisk 8 Hæv trykfoden og skær tråden For at sy knaphullet igen hæv trykfoden og gentag trinene 9 Stik en knappenål i for enden af knaphullet så der ikke skæres hul i stingene Skær knaphullet i midten med ops...

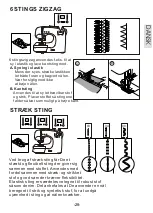
Страница 28: ... søm der kræver fleksibilitet Elastisk sting er særdeles velegnet til robust stof såsom denim Det anbefales at De anvender en nål beregnet til strik og syntetisk stof for at undgå ujævnhed i sting og at nålen knækker A Syning i elastik Mens der syes stræk elastikken let både foran og bagved nålen Vær forsigtig med ikke at bøje nålen B Kantsting Anvendes til at sy let trævlbar stof og strik Placer ...

Страница 29: ...re slags stof bliver patch work ekstra dekorativ PATCH WORK APPLIKATION 1 Læg applikationen på stoffet sy enten med satin sting eller appli kations sting Ved let trævlbar stof bukkes sømmet ca 5 mm 2 Sy langs kanten af applikationen Ret den lige del af stinget til således at det rammer kanten på applikationen så det synes håndlavet A Ved skarpe hjørner sættes nålen i laveste position og trykfoden ...

Страница 30: ...oppe ved lukningen Ved syning i venstre side skydes foden så nålen er i højre side Sy lynlåsen fast som beskrevet ovenfor PIPE SYNING Piping bruges som ekstra dekoration eller finish Brug lynlås trykfoden til at sy piping trykfoden sættes på højre side af nålen Læg pipingen mellem 2 stykker stof Sy så tæt som muligt op til pipingen Påsæt lynlås trykfoden til enten på højre eller venstre side af nå...

Страница 31: ... til søm 3 Vend stoffet og skub forsigtigt den buede søm ud i stoffet DEKORATIONS STING SYNING I LET STOF Anvendes let tyndt stof anbefales det at bruge pergamentpapir Anvend satin trykfod til syning af dekorations sting En lille udfræsning på undersiden tillader syning af satin sting og den brede åbning i trykfoden gør at De klart kan se stingene De dekorative sting kan justeres i længde og bredd...

Страница 32: ...børsten OBS dryp en dråbe symaskine olie som vist på illustration ved pil A 5 Indsæt spolekasel ved at anbringe fremspinget 3 op imod fjederen 4 Monter stingpladen For at sikre det bedste resultat ved syning er det nødvendigt at rengøre og vedligholde de grundlæggende dele Afbryd altid maskinen ved smøring eller anden service Fjern altid over og undertråd fra maskinen VEDLIGEHOLDELSE ...

Страница 33: ...r ikke hævet Nåletråderen tråder ikke gen nem nåleøjet Juster trådspændingen Tråd overtråden om Tråd spolen om Trådspændingen justeret forkert Overtråden er ikke trådet korrekt Spolen er ikke trådet korrekt Uregelmæssige sting Juster trådspændingen Udskift nåI Tråd spolen om Tråd overtråden om Trådspænding for stram Uskarp nål Spolen er ikke trådet korrekt Maskinen er ikke trådet korrekt Stof rynk...

Страница 34: ...G THE BOBBIN CASE 14 THREADING THE BOBBIN 15 TREADING THE MACHINE 16 NEEDLE THREADER AUTOMATIC 17 GETTING STARTED 18 REVERSE STITCHING 19 SEWING HEAVY FABRICS 19 REGULATING THREAD TENSION 20 NEEDLE AND THREAD GUIDE 21 STRAIGHT STITCH SEWING 22 ZIGZAG SEWING 23 FREE ARM SEWING 23 OVERLOCKING 24 BLIND HEM STITCHING 25 BUTTONHOLES 26 27 MULTI STITCH ZIGZAG 28 PATCHWORK 29 APPLIQUE 29 INSERTING ZIPPER...

Страница 35: ...dropped or damaged or dropped into water Return the appliance to the nearest authorized dealer or service centre for examination repair electrical or mechanical adjustment 4 Never operate the appliance with any air openings blocked Keep ventilation openings of the sewing machine and foot controller free from the accumulation of lint dust and loose cloth 5 Never drop or insert any object into any o...

Страница 36: ...Stitch Width Button 13 Hand Wheel 12 Bobbin Winder Stop 11 Bobbin winder Shaft 10 Spool pin 9 Thread Tension Regulator 8 Needle Up Down Button 7 Bobbin Winder Tension disc 6 Extension Table Accessory Case 5 Speed Control Lever 4 Start Stop Button 3 Slow Button 2 Reverse Stitch Button 1 Face Plate MAIN PARTS E LISH NG ...

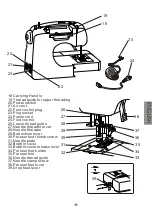
Страница 37: ...trol plug 23 Plug socket 24 Power cord 25 Foot control 26 Lower thread guide 27 Needle threader lever 28 Needle threader 29 Buttonhole lever 30 Presser foot thumb screw 31 Needle plate 32 Bobbin cover 34 Presser foot holder 35 Presser foot 36 Needle thread guide 37 Needle clamp screw 38 Presser foot lever 39 Drop feed lever 33 Bobbin cover release lever E LISH NG ...

Страница 38: ... cap small 5 Satin foot 6 Needle plate screwdriver 7 Screwdriver 8 Buttonhole opener with brush 9 Oiler 10 Buttonhole Foot 11 Overcasting Foot 12 Zipper Foot 13 Blind hem Foot Some accessories are provided in the accessory case ACCESSORIES To open the accessory case grab hold of the left side and pull open the case at the back ...

Страница 39: ...mbroidery and monogramming so that you not the feed dogs are moving the fabric not in use Cover the machine with dust cover when it is DUST COVER A REMOVING THE EXTENSION TABLE Hook your finger to the bottom of extension table and slide to the left To attach insert to the right B OPENING THE ACCESSORY CASE To open the accessory case grab hold of the left side and pull open the case at the back E L...

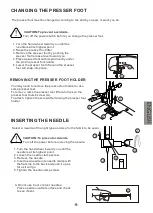
Страница 40: ...THE PRESSER FOOT HOLDER INSERTING THE NEEDLE Select a needle of the right type and size for the fabric to be sewn CAUTION To prevent accidents Turn off the power before removing the needle 1 Turn the hand wheel toward you until the needle is at its highest point 2 Loosen the needle clamp screw 3 Remove the needle 4 Insert new needle into needle clamp with the flat side to the back and push it up a...

Страница 41: ...is turned on To disconnect turn the power switch to the off position then remove plug from outlet WARNING To reduce the risk of burns fire electric shock or injury to persons Do not unplug by pulling on the cord To unplug grasp the plug not the cord DANGER To reduce the risk of electric shock Never leave the machine unattended when plugged in Always unplug this machine from the electric outlet imm...

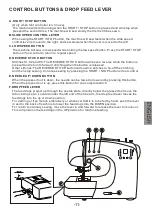
Страница 42: ... the button is released Other stitches The REVERSE STITCH button will sew 3 4 stitches to tie off the stitching and then stop sewing Continue sewing by pressing the START STOP button or foot control When the presser foot is down the needle can be raised or lowered by pressing this button When the presser foot is up press this button for one complete stitch The feed dogs project up through the need...

Страница 43: ...oller plug into receptacle on machine 3 Place foot controller at your feet and turn on power switch Sew faster by increasing the pressure on the controller To stop remove your foot from the controller CONTROL BUTTON FUNCTIONS The control button functions change whilst the foot controller is connected See previous page WARNING To reduce the risk of burns fire electric shock or injury to persons 1 H...

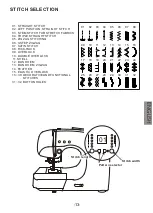
Страница 44: ...idth Stitch length 01 STRAIGHT STITCH 02 LEFT POSITION STRAIGHT STITCH 03 STEM STITCH FOR STRETCH FABRICS 04 TRIPLE STRAIGHT STITCH 05 ZIGZAG STITCHING 31 32 BUTTONHOLES 06 3 STEP ZIGZAG 07 SATIN STITCH 08 RICK RACK 09 OVERLOCK 10 DOUBLE OVERLOCK 13 BLIND HEM ZIGZAG 14 FEATHER 15 ELASTIC OVERLOCK 16 30 DECORATIVE AND FUNCTIONAL STITCHES 12 BLIND HEM 11 SHELL ...

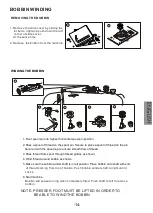
Страница 45: ... thread on the spool pin Secure to place a 3 Pass thread from spool through thread guides as shown 4 Wind thread around bobbin as shown 5 Make sure the bobbin winder shaft is in left position Place bobbin onto shaft with end 6 Start machine Secure it with the spool cap to ensure smooth flow of thread of thread coming from top of bobbin Push bobbin winder shaft to right until it clicks Bobbin will ...

Страница 46: ...with the thread unwinding counter clockwise 2 Draw thread into notch A 3 Pull thread toward the left and along the inside of spring B until it slips into notch C being sure that thread does not slip out of notch A 4 Pull thread out about 10 inches and replace the slide cover E LISH NG ...

Страница 47: ...e needle thread guide and through the needle eye Refer to next page for instructions on how to use the needle threader 4 Pass thread through thread guide 3 Place a spool of thread onto spool pin and set the spool cap 2 Press the needle up down button and set needle in up position 1 Raise the presser foot lifter THREADING THE UPPER THREAD THREADING THE MACHINE ...

Страница 48: ...ver Hook will turn and pass thread through needle eye while making a loop 7 Pull thread out about 10 inches from needle eye Note The needle threader is used forneedle sizes 80 90 and 100 CAUTION To prevent accidents Do not lower the threader lever while machine is operating DRAWING UP THE BOBBIN THREAD 1 Raise the presser foot 2 Hold the upper thread loosely and press needle up down button The han...

Страница 49: ... you have reached the end of a seam stop sewing and turn the hand wheel toward you to bring the needle to highest position Raise the presser foot and pull the fabric out from under the foot to the back of the machine Cut the threads in the thread cutter on the left side of the machine 5 Regulate the speed while sewing 6 Stop machine when you reach end of seam 7 Raise the presser foot lifter CAUTIO...

Страница 50: ... Stop the machine when you reach a corner 2 Lower needle into the fabric To lower the needle you can either use the needle up down button or turn the handwheel toward you 3 Raise the presser foot 4 Use the needle as pivot and turn fabric 5 Lower the presser foot and resume sewing SEWING HEAVY FABRIC When sewing heavy fabrics the toe end of presser foot tends to lift up and sewing can not be starte...

Страница 51: ...ately in the middle of fabric B When bobbin thread appears on top side of fabric Turn the tension dial to a lower number C When upper thread appears on the bottom side of fabric Turn the tension dial to a higher number D Thread Tension for Zigzag Stitches To sew zigzag stitches the thread tension should be set to a slightly weaker tension than when sewing straight stitches You will obtain a nicer ...

Страница 52: ...press on fabric with hands It will cause needle breakages or poor quality stitches FABRIC THREAD AND NEEDLE TABLE Select size of thread and needle in accordance with fabric to be sewn Light Weight thin georgette organdy viole taffeta silk etc Medium Weight gingham pique linen cotton satin thin corduroy velvet Heavy Weight gabardine tweed denim corduroy Stretch double knit tricot spandex jersey Ctn...

Страница 53: ...foot control is used press the pedal 3 When you reach the end of seam press the reverse button to sew 3 4 stitches Place hand lightly on the fabric while sewing to guide the fabric 2 Lower the presser foot lever and press START STOP button to start sewing 1 Position the fabric under the presser foot Hold upper and bobbin thread loosely Straight stitch patterns should be selected according to the t...

Страница 54: ...arious decorative patterns SATIN STITCHING When you sew the satin stitch by shorte ning the stitch length attach the satin foot E LISH NG Your machine can be used either as a flat bed or as a free arm model With the extension table in position it provides a working surface as a standard flat bed model By removing the extension table just pull it off to the left as shown the machine converts into a...

Страница 55: ...FOOT when sewing other patterns and width that needle could hit the presser foot and break the stitch width below 5 0 It is possible Patterns do not change Overcasting foot should be used for sewing CAUTION To prevent accidents B Some stitches can sew overcasting and regular stitches at the same time Therefore it is convenient to use when sewing easy to ravel and stretch fabrics A Overcasting stit...

Страница 56: ...abric when blind hem stitch ing The guide A is adjusted by turning the adjusting screw B 3 Place fabric so that the straight stitches are on the protruding hem edge and the zigzag stitches just catch one thread of the folded edge Turn the screw so that the guide barely touches the folded edge of fabric 4 Lower the presser foot and sew hem guiding fabric evenly along the guide 5 Turn the fabric ove...

Страница 57: ... the hole of buttonhole foot and bring upper and bobbin threads to the left 4 Position fabric under presser foot so that the center line mark is in the center of the buttonhole foot Lower the foot 5 Reset presser bar lifter up down for BH presser foot touch the buttonhole lever Now start switch show green light Note Machine will not start to sew if buttonhole lever is not lowered properly or butto...

Страница 58: ...to return to original position 9 Cut center of buttonhole being careful not to cut stitches on either side Use a pin as a stopper CAUTION To prevent accidents When using seam ripper do not put your finger in the path of ripper A WHEN SEWING STRETCH FABRIC It is suggested that you use interfacing on the backside of the fabric Note Density of buttonhole legs may be adjusted with stitch length contro...

Страница 59: ... Overcast Stitching Used for easy to ravel and knit fabrics Needle should fall on extreme edge of fabric It assures you of a stitch that is strong and flexible and will give with the fabric without breaking Good for easy to ravel and knit fabrics It is good for joining durable fabrics such as denims We recommend that you use a needle for knit and synthetic fabrics to prevent stitch skippings and t...

Страница 60: ... 29 19 14 A E LISH NG ...

Страница 61: ...ot snapped on to the left side of the ankle Place the piping between two layers of fabric Stitch with the piping next to the foot so the stitching is tight against the cord INSERT ZIPPERS AND PIPING ZIPPERS Pin or baste zipper tape to fabric and place it under the foot Smooth the threads toward the back and lower the foot To sew left side of the zipper guide the edge of the zipper along the zipper...

Страница 62: ...n you may adjust the length and width of pattern Experiment with fabric scraps until you get the desired length and width SEWING LIGHT WEIGHT FABRICS When sewing light weight fabrics it is suggested that you use interfacing on the backside of the fabric This stitch is used to sew edge on women and children s wear and table cloths SCALLOP HEM 1 Fold the fabric right sides together in and sew along ...

Страница 63: ... the plug from the socket outlet CLEANING THE FEED DOGS AND HOOK AREA 1 Raise the needle to its highest position 2 Remove the needle plate 1 3 Remove the bobbin case 2 4 Clean the feed doge and hook area with the lint brush NOTE Put drop of sewing machine oil on the hook race as indicated by the arrows A 5 Replace the bobbin case with the projection 3 positioned against the spring 4 Replace the ne...

Страница 64: ...edle is not raised Threader does not thread needle eye Readjust thread tension Rethread machine Rethread the bobbin Tension not adjusted properly Machine not properly threaded Bobbin threaded incorrectly Machine makes loose stitches or loops Readjust thread tension Insert new needle Rethread the bobbin Rethread machine Thread tension too tight Blunt needle Bobbin threaded incorrectly Machine not p...

Страница 65: ...r local and national laws for improper disposal of this product Please consult the web or a competent national or local body for the return and collections systems available to you and the locations of your nearest recycling points If you purchase a new product direct from us we will take your old product back irrespective of the brand if it is a like for like sale As an individual you can make a ...

Страница 66: ...Royal Consul Europe Ringvejen 59 DK 7900 Nykøbing Mors Danmark Tlf 45 96 69 16 00 Fax 45 96 69 16 01 E mail rce royal consul dk Website www royal consul dk ...

Отзывы: