background image

Содержание EVA Royal 8000

Страница 1: ...Model8000 BRUGSANVISNING INSTRUCTION MANUAL GEBRAUCHSANLEITUNG ...

Страница 2: ...ldrig symaskinen hvis ventilationsabningerne er blokerede Og hold ventilationsabningerne pa symaskinen og fodpedalen fri for stev og I se trrevler 05 Tab aldrig noget ind i symaskinen eller is t genstande i abningerne pa symaskincn 06 Anvend ikke symaskinen udend rs 07 Anvend ikke symaskinen hvor spray produkter bliver brugt eller hvor oxygen bliver administreret 08 Ved afbrydelse sret trendlsluk ...

Страница 3: ... or damaged or dropped into water Return the appliance to the nearest authorized dealer or service center for examination repair electrical or mechanical adjustment 4 Never operate the appliance with any air openings blocked Keep ventilation openings of the sewing machine and foot controller free from the accumulation of lint dust and loose cloth 5 Never drop or insert any object into any opening ...

Страница 4: ...erstopft ist Halten Sie die Liiftungsoffnungen der Nahmasc und des FuBanlassers fTei von Stoffstreifen Staub und losen Kleidungsstucken 5 Lassen Sie nie irgendwelche Gegenstande in irgendeine Offnung fallen oder steeken Sie sie nie hinein 6 Verwenden Sie das Gerat nicht im Frcicn 7 Arbeiten Sie nicht an einem Ort wo Sprayprodukte oder Sauerstoff verwendet werden 8 Bevor Sie den Steeker aus der Ste...

Страница 5: ...r med tvillingenal 3 stings Zig Zag Blindstings syning DobbeIt sikkerhedss0m Lynsting Muslinges0m Dekorations sting Lingeri S0m 7 8 9 10 11 12 13 14 15 16 17 18 19 20 21 22 23 24 25 26 27 28 29 30 31 32 31 32 33 34 33 34 35 36 35 36 37 38 37 38 39 40 39 40 41 42 41 42 43 44 43 44 45 46 47 48 49 50 51 52 51 52 53 54 53 54 Overlock syning DobbeIt overlocksting Strrekke overlocksting Sildeben sting F...

Страница 6: ... needle Three step zigzag Blind hem stitching Double action stitch Lightning stitch Shell tuck Stitch Decomtive stitches Lingerie stitch 7 8 9 10 11 12 13 14 15 16 17 18 19 20 21 22 23 24 25 26 27 28 29 30 31 32 31 32 33 34 33 34 35 36 35 36 37 38 37 38 39 40 39 40 41 42 41 42 43 44 43 44 45 46 47 48 49 50 51 52 51 52 53 54 53 54 Overlock stitches Double overlock stitch Stretch overlock stitch Her...

Страница 7: ...2 Entfemen und einsetzen der Presserfup 27 28 Satin Stich 73 74 R ulierung der Fadenspannung 29 30 APPLIKATION 73 74 NAHEN BEGINNEN STICKEN 75 76 Stichzeigen und Indikator 31 32 FLICKEN 77 78 Stichlangenregulierung 31 32 REINIGEN DER MASCIDNE 79 80 Rlickwarts zuriick nahen 33 34 GLiiHBIRNE 79 80 Regulierung des Presserfupdrukes 33 34 Garn und Nadel Tabelle 83 Stich breite 35 36 Funktionsstiirungen...

Страница 8: ......

Страница 9: ...en 17 On Off knap 17 Power light switch 16 Stichwahlknopf lB Stik 18 Terminal box 17 On Off Knopf 19 Returknap 19 Reverse stitch lever lB Steckdose 20 Trykfodstryk regulering 20 Pressure regulator 19 Riickwarts Stichknopf 21 Larnpedreksel 21 Face cover 20 Regulierung des 22 Tnidskrerer 22 Thread cutter Nahfupdrukes 23 Automatisk naletnider 23 Automatic needle threader 21 Kopfdeckel 24 Tnidferer fo...

Страница 10: ... G 0 CD G Io j J 4 9 ...

Страница 11: ...in cap 4 Schlol3 zur Fadenrolle 6 Spolepind 5 Screwdriver 5 Schraubenzieher 7 Opsprretter samt berste 6 Extra spool pin 6 Fadenrollenhalter 8 Olie 7 Buttonhole opener with 7 Nahttrenner und Biirste 9 Quiltelineal brush 8 01 10 Lynlas trykfod 8 Oil 9 Stepp Lineal II Knaphulstrykfod 9 Quilting guide 10 Reil3verschlul3ful3 12 Blindstings trykfod 10 Zipper foot 11 Knopflochful3 II Buttonhole foot for ...

Страница 12: ...1 3 2 4 11 ...

Страница 13: ...es for your free arm sewing machine sewing tubular items blind hem on legs of pants or cuff doll or child clothes embroidery on sleeves or cuff and any hard to reach areas To open the accessory storage area lift up on the top and pull the cover towards you as illustrated 12 BEVORNAHEN Die Maschine kann zum normalen nahen verwendet werden und kann auch leicht zu einer Freiarmmaschine verandert werd...

Страница 14: ...OFF ON 13 ...

Страница 15: ...Your machine will not operate unless the switch is turned on Polarized plug information To reduce the risk of electric shock this plug is intended to fit in a polarized outlet only one way If the plug does not fit fully in the outlet reverse the plug If it still does not fit contact a qualified electrician to install the proper outlet Do not modify the plug in any way Turning the switch on automat...

Страница 16: ...15 ...

Страница 17: ...in Secure it with the spool cap A leaving a gap between the spool cap and the reel ofthread to allow the reel to rotate freely For twin needle sewing place the extra spool pin supplied with the accessories Presser foot lever There are three positions for your presser foot I Lower the presser foot to sew 2 Raise the lifter to the middle position to insert or remove fabric 3 Lift to its highest posi...

Страница 18: ...nO a at 17 ...

Страница 19: ...foot control to start the machine After the bobbin winds a few turns stop the machine and cut the thread near the hole 7 Start the machine again The bobbin winder will stop by itselfwhen the bobbin is full 8 Push the bobbin shaft to the left Remove the bobbin from the shaft and cut the thread CAUTION Do not put your fingers near the needle as it may move a little when starting to wind the bobbin N...

Страница 20: ...19 ...

Страница 21: ...ad lunrung counter clockwise 2 Draw the thread into the notch A 3 Draw the thread clockwise until it slips into B 4 Pull the thread about 15 cm 6 attach the bobbin cover plate 20 Einfadeln der Spule Einsetzen in die Spulekapsel I SelZen Sie die Spule in die Spulenkapsel mit dem Faden gegen den Uhrzeigersinn 2 Ziehen Sie den Faden in die Rille A 3 Ziehen Sie den Faden mit dem Uhrzeigersinn bis er h...

Страница 22: ...1 2 4 3 21 ...

Страница 23: ...ing path lead the thread through either side of the tension disc and pull the thread down 8 Continue guiding the thread down to the check spring inside and lead it across from right to left 3 9 Pull the thread upward and slip into the slotted hole of the take up lever from right to left 4 IO Draw the thread down through the lower thread guides 5 and 6 Il Pass the thread through the needle eye ofth...

Страница 24: ...CD 23 ...

Страница 25: ...ss the lever down holding the end ofthread 2 3 The threader automatically swings to the threading position 3 4 Guide the thread in front of the needle and pull it upward 4 5 Release the lever and the thread will be pull through the eye ofthe needle forming a loop 5 6 Pull the thread completely through 6 24 Automatische Nadeleinradelung Setzen Sie die Nadel mit Hilfe des Handrades in hochste Positi...

Страница 26: ...25 ...

Страница 27: ...lete tum with your right hand 2 Pull the upper thread slowly and the lower thread will be brought up in a loop Draw the end ofthe lower thread out of the needle plate 3 Pull out both threads to about 15 cm 6 and place them towards the rear of the machine under the presser foot 26 Heraufholen das Unterfaden I Halten Sie das Fadenende des Oberfadens in der linken Hand 2 Drehen Sie das Handrad langsa...

Страница 28: ...1 J t 2 2 o x X 27 ...

Страница 29: ...and take out the needle With the flat side away from you towards the back of the machine insert a new needle into the groove ofthe needle bar Push the needle into the clamp until it reaches stopper A and tighten the needle clamp screw firmly Always use a straight needle with a sharp point Using defective or worn needles not only causes stitch skipping breakage ofneedles or snapping of thread it al...

Страница 30: ...x 29 Indstillings markering Setting mark Einstellung markierung CD ...

Страница 31: ...he bottom side ofthe fabric To decrease the upper thread tension lower the presser foot and tum the tension dial to a lower number To increase the upper thread tension lower the presser foot and tum the tension dial to a higher number Always check the balance ofthe upper and the lower tensions by test sewing using the same fabric needle thread and stitch pattern you plan to use Correct combination...

Страница 32: ...31 ...

Страница 33: ...ntil the required stitch appears in the stitch indicator window Illustration I Stitch indicator window 2 Stitch selector Stitch length dial 3 The stitch length dial is used to set the length of the stitches Choose the stitch length according to the thickness and type of fabric used For the shortest stitch turn the dial between I and O For the longest stitch turn the dial to 4 32 NAHEN BEGINNEN Sti...

Страница 34: ...33 ...

Страница 35: ...ards As soon as the lever is released the machine will sew forwards again Pressure regulator This dial regulates how hard the presser foot is pushing down on the fabric To little pressure may cause poor feeding ofthe fabric skipped stitches or difficulty in guiding the fabric as you sew Too much pressure may result in one layer feeding ahead of another or feed teeth or presser foot marks on the fa...

Страница 36: ... 35 Free arm Freiarm ...

Страница 37: ...at pattern no 2 for straight stitching By moving the zigzag width dial you can set the needle at any position you select For center position set the zigzag width dial at 3 Drop feed control Free hand embroidery and darning are best carried out with the feeding mechanism disengaged This allows the material to be moved freely under the needle To lower the feed dog press down and towards the back ont...

Страница 38: ...1 2 3 37 ...

Страница 39: ...he left side ofthe sewing machine or on the presser bar Turning corners To turn a corner stop sewing at equal distances from the edge of the fabric same as the width of the seam Stop with the needle in the fabric Raise the presser foot Using the needle as a pivot turn the fabric Lower the presser foot and continue sewing The edge ofthe fabric should align with the proper seam allowance guide line ...

Страница 40: ...NaIeretning Direction of needle Nadelrichtung 1 Stofretning Direction of cloth Stoffrichtung 39 J Stofretning Direction of cloth ...

Страница 41: ...e perpendicular to the seam so that it penetrates the cloth properly Improper setting causes the de flection and possible breakage of the needle For sewing ofvery thick cloth sew slowly maintaining the cloth perfectly flat by hand Breaking a needle is not a mechanical problem but simply misuse Presser foot lever In order to obtain additional clearance when using very thick materials firmly push up...

Страница 42: ...Sting Zig zag Sting vrelger bredde Iamgde _ Stitch Zigzag Stitch selector Width length Stich Zickzack Stich Wahler Breite Gro e WVV 2mm Imm VW 3mm 2mm VV 5mm 4mm 41 ...

Страница 43: ...ing at middle needle position Sewing at left needle position Zigzag sewing Set machine as shown To prevent seam ends unravelling set machine for straight stitch and sew in reverse at beginning and ending of seam Three different width ofzigzag patterns can be selected as illustrated as examples Thread Tension for Zigzag Stitch For zigzag stitch the correct tension Is that the upper thread appears s...

Страница 44: ...43 4 r 4 r L I_tJJ ...

Страница 45: ...not set the stitch width dial beyond 4 to prevent the needle hitting the needle plate causing it to break NOTE The needle threader cannot be used to thread the twin needle Turning corners with a twin needle I Sew until you have reached the corner Stop with the needle out of the fabric Using the hand wheel bring the needle down so that the left side needle is just piercing the fabric Raise the pres...

Страница 46: ...A A I 45 ...

Страница 47: ...ly recommended for over edging all types of fabrics For light weight material set machine as shown narrow zigzag It is also a good idea for mending tears sewing towel patching patchwork and attaching flat elastic For thick and elastic and also very fme material set the machine on tricot stitch as shown Sew in the same way as above 46 Dreifach Zickzack stich Die Stich ist sehr stabil Er macht 3 leu...

Страница 48: ...1 3 Smm 0 2 I 3 vrang side wrong side Iinke Seite ret side right side gericht Seite 2 afstandsskrue 1 4 _ guide Lineal semfold I t folded edge falten Kante 00 X 0X 47 ...

Страница 49: ...aterial as shown and place it under the presser foot For a neater finish it is preferable to baste or iron hem before sewing Sew carefully so that straight stitches are made on hem edge and slanting stitches pierce only one or two threads of fold A Correct seam B Needle is catching edge of fold too much C Needle is not catching edge of fold at all 48 Blindsaum Stellen Sie die Maschine wie gezeigt ...

Страница 50: ... _ 49 ...

Страница 51: ... seam allowance ofthe other piece Sew along the open edge on the right side Tum the work and sew along the open edge on the wrong side Patchwork will be very attractive as decoration if sewn with the double action stitch Place the patches overlapping each other 5mm and sew with double action stitching 50 Dreifach Stretch stich Dieser Stich ist ideal zum Niihen von iibergreifenden Flachniihten auf ...

Страница 52: ...51 ...

Страница 53: ...ttern is desired use four point shell sticth Set the machine as shown I Place the fabric under the presser foot so that the straight stitches are sewn on the seam line and the zigzag stitches are sewn slightly over the folded edge 2 This stitch requires a tighter upper thread tension than normal Note Certain fabrics might require to be cut on the bias to obtain the shell effects 52 Blitz Stich Ein...

Страница 54: ...53 ...

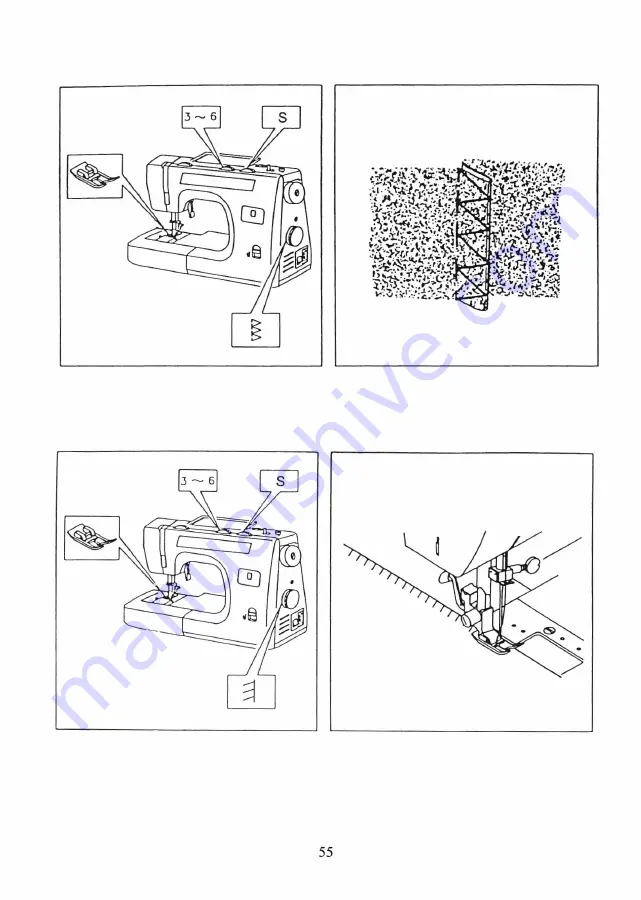
Страница 55: ... for decoration of women s blouse nightwear children clothes curtains and all home decor Lingerie stitch Lingerie stitch is for seaming and overcastting sheer soft fabrics in one operation it also produces a delicate shell hem on lingerie and other fine garments Seam and overcast in one Place the right sides ofthe fabric together and position under the presser foot so that the zig zag part ofthe s...

Страница 56: ...55 ...

Страница 57: ...fabrics with right sides together and sew To prevent edges from fraying position the fabric under the foot so that the stitches are made over the edge In some case over locking stitches can be used for over casting Press the seam open and stitch each side separately near the edge of the seam allowance 56 Overlock Stich Overlock Stich Scrag Overlock Stich Mit den Overlock Stich ist es moglich zu na...

Страница 58: ...57 ...

Страница 59: ... in garments Simply stitch elastic into place making sure it is evenly spaced To do this mark the correct length piece into quarters and then match these markings with center front and side seams Stretch overlock stitch Set machine as shown Use this stitch in preference to regular overlock stitch for over casting stretch or knit fabrics where strength and flexibility are required 58 Doppelter Over...

Страница 60: ...59 ...

Страница 61: ...used for joining fabric pieces and embroidery Feather stitch Set machine as shown The pleasing appearance of this stitch enables it to be used for top stitching or attaching lace or inset panels when making lingerie 60 Griitenstich Einstellen der Maschine Abb Ein vielseitiger Stich der zum Zusammennahen und zum Sticken benutzt werden kann Federstich Einstellen der Maschine Abb Dieser dekorative st...

Страница 62: ... t 61 ...

Страница 63: ...decorative stitch Triple straight stitch Set machine as shown Triple straight stitch is as reinforced straight seam which can be used for joining seam in stretch fabrics Reinforced straight stitch is stronger than ordinary straight stitching Reinforced straight stitch is also preferable for sleeve insertion and for crotch seams which are subject to considerable strain even in non stretch fabrics 6...

Страница 64: ...2 Knapholder Button carrier Knopfhalter 3 63 ...

Страница 65: ...e foot so that the needle pierces the fabric at the beginning of the buttonhole 6 Lower the buttonhole lever and presser foot 7 Push the buttonhole lever and presser foot Push the buttonhole lever away from you 8 Sew at moderate speed until the buttonhole is complete Note Where the buttonholes are completed be sure to push up the buttonhole lever as far as it can go Continue at next page 64 KNOPFL...

Страница 66: ...4 4 5 6 3 2 e r Udgangspunkt 1 65 Starting point Beginnung D O D D ...

Страница 67: ... forward Cutting buttonholes Stick a needle or pin through bar tacks to prevent over cutting Cut buttonhole along center with buttonhole cutter Adjusting stitch balance Stitch length difference in forward and reverse stitches of the buttonhole may be balanced with the buttonhole stitch adjuster 66 Vorherigseite 64 Das Knopflochniihen wird in Reihenfolge 1 2 3 und 4 Abb vorgenommen Halten Sie die M...

Страница 68: ...y y y 67 ...

Страница 69: ...ead a little For twin needle threading see p 44 Insert the quilting guide under the spring plate on the holder Mark first line with pencil or tailor s chalk and sew From second line just sew following seam of first line using guide Moving guide in direction of arrow can adjust interval between seams 68 VERSCHIEDENE NAHFUPEN Stepplineal Einstellen der Maschine wie gezeigt Das Stepplineal benutzt ma...

Страница 70: ...2 69 ...

Страница 71: ...e to right of foot Inserting Zips To sew down the right side attach left side of zipper foot to presser foot holder so that the needle passed through the opening on the left side ofthe foot To sew down the left side attach right side of foot to the foot holder Piping To pipe soft cover cord with a bias strip of fabric and pin or tack it to main piece of fabric Attach right side of zipper foot to t...

Страница 72: ... O 3cm _ 1 8 Med stikkesting With straight stitch Mit Geradc stich J f t I 1 71 Med zig zag sting With zigzag stitch Mit Zickzack Stitch ...

Страница 73: ...de edge into scroll pulling six thread ends towards back Sew a few stitches as shown Keep guiding material holding raw edge about O 6cm 1 4 in front of foot A With straight stitch B With zigzag stitch 72 Saumfaltenfup Schlagen Sie die Stoffkante ca 3 mm urn und legen Sie diese unter den FuJ3 Sichern Sie die gefaltete Kante mit einigen Stichen abo Ziehen Sie das Nabgut heraus und pressen Sie den Sa...

Страница 74: ... 73 _ 7 I I ...

Страница 75: ...for sheer materials to avoid puckering APPLIQUE Set machine as shown Draw design on material to be used as an applique and cut it out Place cut out on base material and baste it Sew around the outline with zigzag stitch adjusting stitch length and width according to shape and size ofcut out and type ofbase material To change direction at comers or to sew very small circles stop machine positioning...

Страница 76: ...1 2 3 4 75 ...

Страница 77: ...up the lower thread by turning hand wheel towards you while holding upper thread lightly Lower the presser foot lifter Hold the lower thread then make two or three stitches cut off excess threads Start sewing along outline of design with satin stitch Continue sewing guiding the hoop by hand To finish filling sew several rows of straight or zigzag stitches Lay typewriting paper underneath when embr...

Страница 78: ...77 ...

Страница 79: ...when starting sewing Sew along the edge ofthe patch on the right side Trim away the worn part close to the seam on the wrong side Mending a rip Set machine in the same way as for patching Sew the edges oftear together first Then sew two more seams on either side A piece of gauze can be placed underneath to reinforce the rip 78 FLICKEN Einstellen der Maschine wie gezeigt Setzen Sie den Flicken aufd...

Страница 80: ...79 ...

Страница 81: ...n case 2 4 Clean the feed dogs and shuttle area with the lint brush Note Put a drop of sewing machine oil on the shuttle race as indicated by the arrow 5 Replace the bobbin case with the projection 3 positioned against the spring 4 Replace the needle plate CHANGING LIGHT LAMP Disconnect from mains supply before changing a bulb Do not use a bulb ofmore than 15 watts Remove the face cover unscrew th...

Страница 82: ...syntetisk eller Tynd uld stof Bomuld med 90 polyester Kraftig bomuld 50 Silke Tweed 40 til 50 bomuld 90 Gabardine 40 til 50 syntetisk eller Gardin staf Bomuld medpolyester 100 Generelt anvendes fin triid og nale til syning i tyndt stof og tykkere tdid og niil til syning i kraftigt stof Test altid stof og nales10rrelse pa en stykke af det stof som skal bruges til syning Brug altid samme triid som o...

Страница 83: ... coating Cotton covered Polyester Drapery Upholstery Fabric In general fine threads and needles are used for sewing thin fabrics and thicker threads and needles are used for sewing heavy fabrics Always test thread and needle size on a small piece of fabric which will beused for actual sewing Use the sarne thread for needle and bobbin 9 or II II or 14 14 or 16 When sewing stretch very fine fabric a...

Страница 84: ...ich 50 Seide Tweed 140 his 50 90 Garhadine Baumwolle oder Mantelstoffe 140 his 50 100 Ockor und Synthetik Mohelstoffe Baumwolle mit Polyester Generell werden feine Game und Nadel fiir das Nahen von dunnen Stoffen verwendet starkere Game und Nadeln werden fiir schwere Stoffverwendet Testen Sie immer Gam und Nadel starke auf einem Stoffrestjenes Stoffes da Sie nahen wollen Benutzen Sie das selbe Gam...

Страница 85: ...igtig i Er den spids 2 Kontroller om forholdet mil trad er rigtig 3 Kontroller om traden er den angivne type 4 Er tradsprendingen indstillet rigtig 5 Kontroller om spolekapslen er rigtig sat i 6 Trrek ikke i stoffet under syningen 7 Spolehuset er samlet forkert Fejlsting I Kontroller om nalen er rigtig sat i 2 Er maskinen tradet rigtig 84 3 Passer forholdet mil trad 4 Brug en god kvalitetstnid Und...

Страница 86: ... P 82 Incorrect threading of upper or lower thread P 21 22 P 19 20 The thread makes loops Incorrect setting of bobbin case P 19 20 Incorrect threading P 2 1 22 Unbalance tension of upper and lower thread P 29 30 The material not fed Incorrecting setting of stitch length Follow recommended length correctly Lint on the feed dog P 79 80 Breaking needle Needle not correctly inserted P 27 28 Needle ben...

Страница 87: ... genaht Langsam Nahen wenn Kn6pfe etc in der Nahe sind ehlstiehe I Nadel falseh eingesetzt oder verbogen 27 28 2 Greifer besehadigt Servicewerkstan aufsuehen 3 Falsche Nadel verwendet 27 28 4 Nieht riehtig eingefadelt 21 22 Iaht zieht sich beim I Falsehe Fadenspannung 29 30 Iahen zusammen 2 Falsehe Nadel 27 28 3 Falseher Stich fur den Stoff Testen Sie vor dem Nahen zuerst den Stich auf einem Probe...

Страница 88: ...Ringvejen 59 7900 Nyk0bing Mors Denmark 941000001 ...

Отзывы: