background image

4-Source Audio/Video Switcher 

with Remote Control

VH911N User's Manual 

Voltee el libro para instrucciones en españo

l

Safety Information
Caution: 

To reduce the risk of electric shock, do not remove cover (or back). No user serviceable parts inside. 

Refer servicing to qualified service personnel.

Warning:

 To reduce the risk of fire or electric shock, do not expose this product to rain or moisture. The 

apparatus shall not be exposed to dripping or splashing. No objects filled with liquids, such as vases, shall be 

placed on the apparatus.

This symbol indicates "dangerous voltage" 

inside the product that presents a risk of 

electric shock or personal injury.

This symbol indicates important instructions 

accompanying the product.

Product Information


Keep your sales receipt to obtain warranty parts and service and for proof of purchase. Attach it here and record 

the model number in case you need it. This number is located on the product. 

Model Number: ______________________________Purchase Date: ____________________________
Dealer/Address/Phone: ________________________________
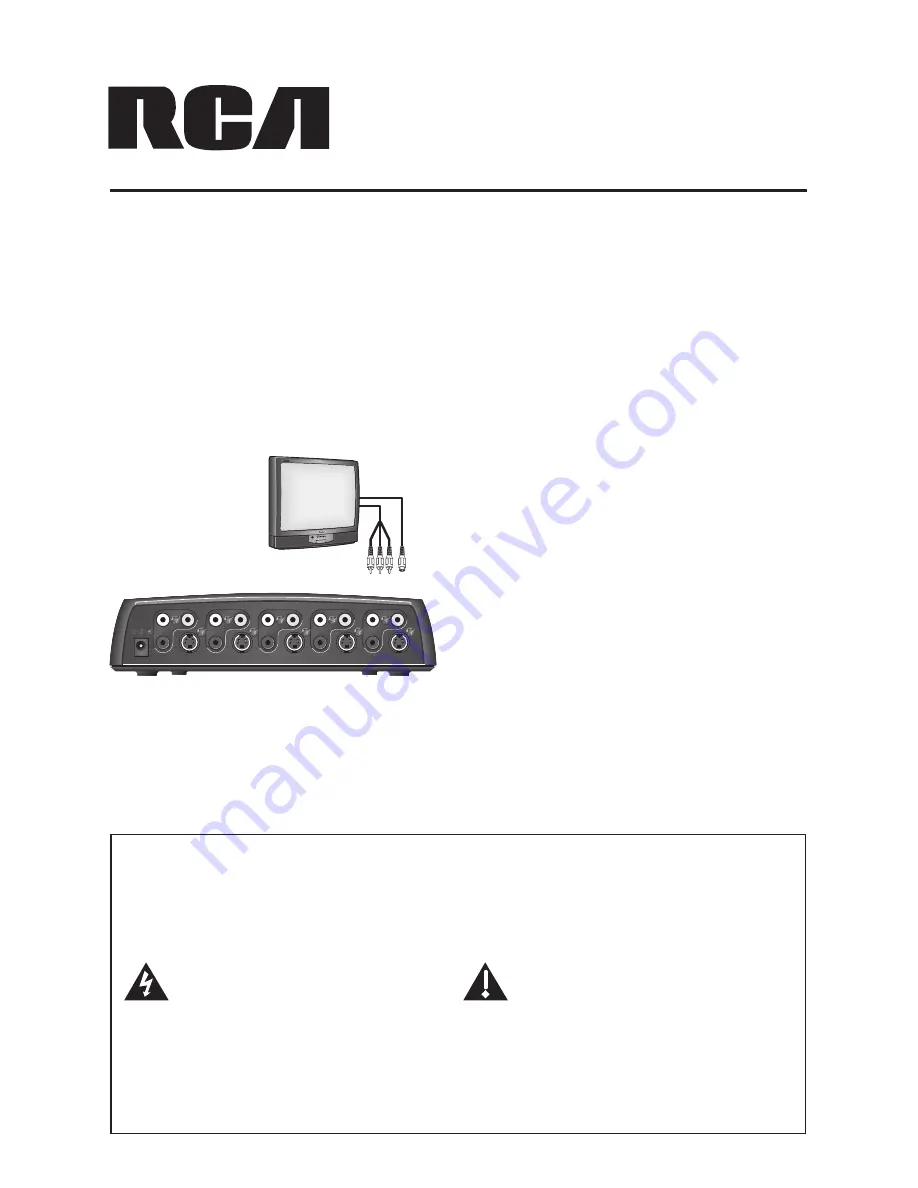
Installation

This switcher lets you manage up to four video sources through one video input on 

your TV. The back panel of the switcher has four inputs and one output. Connect the 

switcher to your TV first. 

Important:

  Use 

either

  composite  video  (the  yellow  jacks) 

or

  S-Video  on  all  of  your 

connections. If all of your components (including your TV) offer S-Video connections, 

use all S-Video connections. Otherwise, use all composite video connections.

Connecting to your TV

1.  Make the video connection. 

Connect EITHER an S-Video cable or 

a composite video cable to the cor-

responding OUT VIDEO jack on the 

switcher's back panel. Connect the 

other end of the cable to the TV's video 

input jack.

2.  Make the audio connection. 

Connect a stereo audio cable to the 

OUT AUDIO R and L jacks on the 

switcher's back panel. Connect the 

other end of the cable to your TV's 

audio input jacks. 

TELEVISION

OR

DC 9V

200mA

AUDIO  IN 1  VIDEO

AUDIO  IN 2  VIDEO

AUDIO  IN 3  VIDEO

AUDIO  IN 4  VIDEO

AUDIO  OUT  VIDEO

L

R

S

L

R

S

L

R

S

L

R

S

L

R

S

  Make sure you match the color coding at the end of the cables with the color cod-

ing on the jacks—match red with red and white with white.

Содержание VH911 - Video Switch

Страница 1: ...________ Dealer Address Phone ________________________________ Installation This switcher lets you manage up to four video sources through one video input on your TV The back panel of the switcher has four inputs and one output Connect the switcher to your TV first Important Use either composite video the yellow jacks or S Video on all of your connections If all of your components including your T...

Страница 2: ... the cable to the component s audio output jacks Make sure you match the color coding at the end of the cables with the color coding on the jacks match red with red and white with white 3 Repeat the video and audio connection steps for your other input components on IN2 IN3 and IN4 As you connect your components to the input jacks note which component you have connected to each jack in the space p...

Страница 3: ...ower unit is intended to be correctly oriented in a vertical or floor mount position Using the switcher Once you ve installed the switcher you re ready to start using it Getting Started Make sure your TV and components are turned on Make sure you re watching the correct input on the TV for example if you ve connected the switcher to the VID input on your TV you need to tune to this input in order ...

Страница 4: ...art as a guide Press Interval 1st 2 5 seconds 2nd 5 seconds 3rd 7 5 seconds 4th 10 seconds 5th 12 5 seconds 6th 15 seconds 7th 17 5 seconds 8th 20 seconds Troubleshooting Most difficulties you encounter with the switcher can be fixed by trying one of the following solutions Problem Switcher won t turn on Make sure the power adapter is properly connected to the switcher and plugged into the wall Pr...

Страница 5: ... have them in the right place for example if you think your DVD player is plugged into input 3 confirm that the cables from DVD player are connected to the video and audio input jacks marked IN3 on the back of the switcher Make sure the device connected to the input you want to see is turned on and transmitting a signal For example if you want to watch your DVD player make sure the DVD player is o...

Страница 6: ...by an AC adapter not provided with the product THE EXTENT OF THE COMPANY S LIABILITY UNDER THIS WARRANTY IS LIMITED TO THE REPAIR OR REPLACEMENT PROVIDED ABOVE AND IN NO EVENT SHALL THE COMPANY S LIABILITY EXCEED THE PURCHASE PRICE PAID BY PURCHASER FOR THE PRODUCT This Warranty is in lieu of all other express warranties or liabilities ANY IMPLIED WARRANTIES INCLUDING ANY IMPLIED WARRANTY OF MERCH...

Страница 7: ... sido suministrado con el producto EL ALCANCE DE LA RESPONSABILIDAD DE LA COMPAÑÍA BAJO ESTA GARANTÍA ESTÁ LIMITADO A LA REPARACIÓN O EL REEMPLAZO PROVISTO ARRIBA Y EN NINGÚN CASO DEBERÁ LA RESPONSABILIDAD DE LA COMPAÑÍA EXCEDER EL PRECIO DE COMPRA PAGADO POR EL COMPRADOR DE ESTE PRODUCTO Esta Garantía reemplaza cualesquiera otras responsabilidades o garantías expresas CUALESQUIERA GARANTÍAS IMPLÍ...

Страница 8: ...ado en la entrada 3 confirme que los cables provenientes del lector de DVD estén acoplados a los conectores de entrada de audio y video marcados IN3 en la parte posterior del conmutador Cerciórese de que el dispositivo conectado a la entrada que desea ver esté encendido y transmita una señal Por ejemplo si desea ver su lector de DVD cerciórese de que el lector de DVD esté encendido y que se esté r...

Страница 9: ...segundos 3ro 7 5 segundos 4to 10 segundos 5to 12 5 segundos 6to 15 segundos 7mo 17 5 segundos 8to 20 segundos Resolución de Problemas La mayoría de dificultades que puede encontrar con el conmutador pueden solucionarse intentando una de las siguientes soluciones Problema El conmutador no enciende Asegúrese que el adaptador de potencia esté debidamente conectado al conmutador y enchufado en la pare...

Страница 10: ...ared o protector contra sobrecargas Importante Este adaptador de potencia ha sido diseñado para quedar correctamente orientado en posición vertical o montaje en el piso Cómo utilizar el conmutador Una vez haya instalado el conmutador estará listo para utilizarlo Para Empezar Asegúrese que el TV y los componentes estén encendidos Asegúrese de haber sintonizado la entrada correcta en el TV por ejemp...

Страница 11: ...le a los conectores de salida de audio del componente Asegúrese de hacer corresponder la codificación por colores en el extremo de los cables con la codificación por colores en los conectores aparee el rojo con el rojo y el blanco con el blanco 3 Repita los pasos para la conexión de video y audio para los demás componentes de entrada en IN2 IN3 e IN4 Cuando acople los componentes a los conectores ...

Страница 12: ...onder la codificación por colores en el extremo de los cables con la codificación por colores en los conectores aparee el rojo con el rojo y el blanco con el blanco Conmutador de audio video de 4 fuentes con control remoto Guía del Usuario de VH911N See Reverse For English Información de Seguridad Precaución Para reducir el riesgo de un choque eléctrico no retire la tapa ni la parte posterior No c...

Отзывы: