background image

42

Features and Controls

Setting Movie Rating Limits

You set movie rating limits by blocking movies rated above a specified
level.

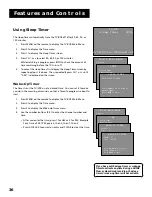
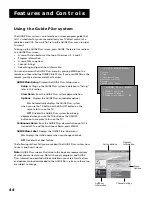
To access the V-Chip Movie Rating Limit menu:

1.

Press MENU to access the TV/VCR Main Menu.

2.

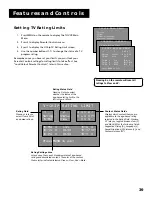
Press 4 to display the Parental Controls menu.

3.

Press 2 for the V-Chip Movie Rating Limit screen.

4.

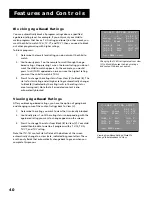
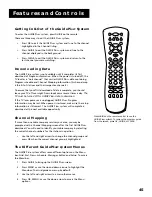
Use the number buttons (1-2) to change the status of a movie
rating.

Remember: You must lock your Parental Controls settings for rating
limits to take effect.

Blocking Movie Ratings

If you only want your child to watch movies that have a PG rating and
lower (in other words, movies rated PG and G), then you could
automatically block out all other movies with higher ratings.

To block movies:

1.

Determine the lowest level rating you do not want the child to
watch.

2.

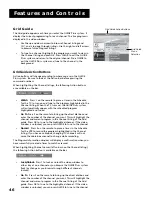
Continuously press 1 until the lowest rating you do not want the
child to watch appears as the rating. (In the example above, you
would keep pressing 1 until the rating status scrolled to PG-13,
since the highest rating you want the child to watch is PG.)

3.

Press 2 to change the status from View to Block. All higher
ratings’ status will automatically change to Block.

Remember: You must lock your Parental Controls settings for rating
limits to take effect.

Viewing Movie Ratings

After you block movie ratings, you have the option of going back and
changing some of the rating statuses back to View.

1.

Determine the movie ratings you want to change to View.

2.

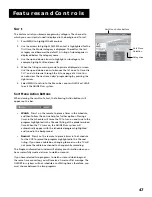
Continuously press 1 until the rating you want to change appears
on the screen.

3.

Press 2 to change the status from View to Block.

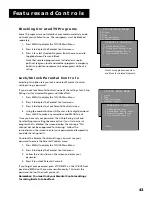
For example, if movies with a rating of PG-13 and higher are
blocked, you can change the rating status button corresponding
with NC-17. Your child would then be able to watch all movies
with a G, PG, and NC-17 rating.

Change the status from View to Block and
all higher-rated movies will also be
blocked.

Viewing Movie Ratings: Pressing 2 on the
remote changes the status back to View.

TV/VCR MAIN MENU

1 Screen
2 Time
3 Timer Recordings
4 Parental Controls
5 Setup
6 GUIDE Plus+ Menu

2
0 Exit

PARENTAL CONTROLS

1 V-Chip Rating Limit
2 V-Chip Movie Rating Limit

0 Exit

V-CHIP MOVIE RATING LIMIT

 Rating            Status
 1   NR            2 View

NR     View    PG-13   View
X      View    PG      View
NC-17  View    G      View
R      View

Press MENU to exit

V-CHIP MOVIE RATING LIMIT

 Rating            Status
 1   NR            2 Block

NR     Block   PG-13   Block
X      Block   PG      View
NC-17  Block   G      View
R      Block

Press MENU to exit

V-CHIP MOVIE RATING LIMIT

 Rating            Status
 1   PG-13         2 View

NR     Block   PG-13   Block
X      Block   PG      View
NC-17  Block   G       View
R      Block

Press MENU to exit

Pressing 0 on the remote will reset all
ratings to View and V.

Содержание T13066

Страница 1: ...tv v crtv vcrtv vcrtv vcrtv vcrtv vcrtv vcrtv vcrtv vcrtv vcrtv vcrtv vcr tv vcrtv vcrtv vcrtv vcrtv vcrtv v crtv vcrtv vcrtv vcrtv vcrtv vcrtv vcrtv vcrtv vcrtv vcrtv vcrtv vcr tv vcrtv vcrtv vcrtv vcrtv vcrtv v crtv vcrtv vcrtv vcrtv vcrtv vcrtv vcrtv vcrtv vcrtv vcrtv vcrtv vcr tv vcrtv vcrtv vcrtv vcrtv vcrtv v crtv vcrtv vcrtv vcrtv vcrtv vcrtv vcrtv vcrtv vcrtv vcrtv vcrtv vcr tv vcrtv vcrtv...

Страница 2: ...moisture To reduce the risk of electric shock do not remove cover or back No user serviceable parts inside Refer servicing to qualified service personnel This symbol indicates dangerous voltage inside the product that presents a risk of electric shock or personal injury This symbol indicates important instructions accompanying the product WARNING RISK OF ELECTRIC SHOCK DO NOT OPEN Caution To preve...

Страница 3: ...Only 6 Connection E Attaching to a VCR for Copying Tapes 7 Connection F Attaching a Camcorder for Copying Tapes 7 Step 5 Connect the G LINK Cable 8 Find the Remote Control Sensor 8 Step 6 Plug in the TV VCR 9 Step 7 Turn on the TV VCR 9 Step 8 Set Up the GUIDE Plus System 9 Step 9 Set Up the Rest of the TV VCR 12 Select the Language 12 Put Channels into Memory Auto Channel Search 12 Set the Signal...

Страница 4: ...g Age Based Ratings 40 Viewing Age Based Ratings 40 Blocking Specific Content Themes 41 Viewing Specific Content Themes 41 Setting Movie Rating Limits 42 Blocking Movie Ratings 42 Viewing Movie Ratings 42 Blocking Unrated TV Programs 43 Lock Unlock Parental Controls 43 Using the GUIDE PIus System 44 Getting In Out of the GUIDE PIus System 45 Downloading Data 45 Channel Mapping 45 The Different GUI...

Страница 5: ...features andcontrolsofyourTV VCR Thereferencesectioninthebackofthebook containstroubleshootingtips careandcleaning i n s t r u c t i o n s a c c e s s o r yo r d e r i n gi n f o r m a t i o n a n dy o u r wa r r a n t y Well ify ourT V VCR souto fthebo x let sget s t a r t e d 3 Using the Menu System Using the remote Setup and connections Using the Remote 1 Features and Controls Operating Instruc...

Страница 6: ...out of your grasp Step 4 Choose a Hookup Answer the questions to choose the appropriate hookup for your TV VCR 1 How does your TV VCR receive signals Choose one answer from below Dipole antenna Use Connection A Outside antenna Use Connection B Cable System Go to question 2 2 What type of Cable TV system do you have Choose one answer from below Cable without a box Use Connection B Cable box to unsc...

Страница 7: ... ANTENNA jack on the back of the TV VCR 4 Plug the TV VCR power cord into the back of the TV VCR 5 Go to Step 5 Connect the G LINK Cable Once you have plugged in your TV VCR adjust the length and position of the antenna rods for the best reception For viewing VHF channels extend the rods fully For UHF viewing shorten the rods Connection B Attaching to an Outside Antenna Set top Antenna or Cable Sy...

Страница 8: ... cords of TV VCR and cable box 3 Place the A B switch in the B position to watch premium channels Place the A B switch in the A position to watch other channels when cable box is not needed 4 Go to Step 5 Connect the G LINK Cable IN FROM ANTENNA AUDIO INPUT VIDEO OUT IN Cable from Cable System Coaxial Cable Back of TV VCR Cable Box G LINK IN FROM ANTENNA AUDIO INPUT VIDEO B A OUT IN Cable from Cab...

Страница 9: ...ion 2 Plug in TV VCR s power cord 3 For further instructions see the section Copying and Editing Tapes Press 00 on the remote to select the line audio video inputs on the TV VCR to receive the signal from the camcorder If your camcorder has stereo AUDIO OUT jacks you may need a Y adapter to hear both channels The unauthorized recording of television programs and other materials may infringe upon t...

Страница 10: ...our cable box you need to use the remote control that came with the cable box to locate the sensor To do this 1 Turn off the cable box 2 Hold the remote control not the one that came with your TV VCR but the one that came with the cable box so it is touching the front of the component 3 Slowly move the remote control across the front of the cable box while you press the power button on and off You...

Страница 11: ...CR Press POWER on the front of the TV VCR or press TV or VCR on the remote The indicator in the POWER button on the front of the TV VCR will light when the TV VCR is on The first time you turn on the TV VCR you will be asked to set up the GUIDE Plus system Step 8 Set up the GUIDE PIUS System You can set up the GUIDE Plus system to display your local program listings and control your cable box If y...

Страница 12: ...ete GUIDE Plus setup the G LINK cable must be properly attached to your cable box if you have one See Step 5 Connect the G LINK Cable later in this section Select Yes if the cable box changed to channel 9 or No if it did not If you select No the system will try another code If the GUIDE Plus system cannot recognize your cable box after several tries a screen stating Cable Box test failed Please co...

Страница 13: ...nished the GUIDE Plus setup Remember Leave your cable box turned ON to download program information Downloading may take 24 hours Press OK to leave the GUIDE Plus Setup and return to the TV s Main Menu See the section Features and Controls for more details about the GUIDE Plus system To Get Out of the GUIDE Plus System Press OK to exit the GUIDE Plus system and tune to the highlighted channel Pres...

Страница 14: ...re lets you select English Spanish or French as the language for your on screen displays 1 Press MENU on the remote to display the TV VCR Main Menu 2 Press 1 to display the Screen menu 3 Press 3 to toggle the menu language between English Spanish and French The default menu language when you first turn on the TV VCR is English Put Channels into Memory Auto Channel Search 1 Press MENU on the remote...

Страница 15: ...nter the channel number you are trying to receive After changing the Signal Type you may need to run the Auto Channel Search again Add or Remove Channels from the TV VCR s Memory This feature is not available if you are using a cable box and have set up the GUIDE Plus system regardless of whether or not you use the GUIDE Plus system 1 Press MENU on the remote to display the TV VCR Main Menu 2 Pres...

Страница 16: ... or 2 for PM Example For a time of 1 07 PM press 0 then 1 then 0 then 7 then 2 5 Use the number buttons on the remote to enter the date The day of the week will automatically appear after you enter the year Press CLEAR on the remote at any time to change incorrect entries 6 Press MENU on the remote to start the clock To exit and return to TV viewing follow the on screen instructions To display the...

Страница 17: ... Controls Operating Instructions 3 4 Reference Using your Universal Remote Thissectiondefinesthebuttonsoftheremoteandhowto programittocontrolothercomponents Theuniversalremotecanbeprogrammedtocontrolmost brandsofremotecontrollableVCRs satellitereceivers and cableboxes IfyouhaveanRCA GE orPROSCAN component youpro babl ydon tneedt oprogramita tall 1 5 ...

Страница 18: ...sing CH or v adjusts tracking VOL and Volume Down and Up Decreases or increases the TV VCR s volume SPEED Tape Speed Selects a recording speed SP LP or SLP See the section Recording Features for more details including definitions of SP LP and SLP GO BACK Returns you to the previous channel Light Icon Lights some of the remote buttons The buttons remain lit as long as any button is pressed within a...

Страница 19: ...viewing however if you have set a GUIDE Plus system timed recording that recording will interrupt the TV VCR recording STOP Stops functions such as record play rewind fast forward and pause PAUSE Pauses the tape during playback Pauses the tape during recording to prevent recording of unwanted scenes TRACKING and Tracking Down and Up Lets you manually adjust tracking to reduce the streaks that may ...

Страница 20: ...ode search 1 Turn on the device you want to control VCR SAT etc 2 Press and hold the button you want to program VCR1 VCR2 etc While holding the device button press and hold ON OFF until the red light on the remote turns on then release both buttons 3 Press and release PLAY then wait 5 seconds or until the LED stops flashing At this point the remote is searching for the correct code to program If a...

Страница 21: ...omponent responds to the remote commands Using the Remote to Control a Device Once the remote has been programmed successfully you are ready to use it to control your devices To operate the device 1 Press the device button TV VCR1 VCR2 DVD AUX or SAT CABLE to set the remote to control the device Note that the SAT CABLE button will only work if you have set up the GUIDE Plus system and are using a ...

Страница 22: ...2087 2088 2089 2090 2091 2107 2115 2120 2125 Radioshack Realistic 2002 2011 2013 2014 2021 2022 2023 2026 2029 2049 2050 2096 2131 Radix 2014 Randex 2014 Ricoh 2128 Runco 2104 Samsung 2005 2013 2015 2033 2053 2112 Sanky 2131 2104 Sansui 2010 2092 2111 2123 Sanyo 2011 2013 2023 Scott 2012 2015 2025 2032 2035 2038 2065 2093 2116 Sears 2011 2014 2021 2023 2048 2049 2050 2051 2055 2056 2107 2118 Sharp...

Страница 23: ...VCRcan do Itincludesinformationon Playingatape Usingtheplaybackfeatures Recording Copyingandeditingtapes Setup and connections Interactive Setup 1 2 Using the Menu System Using the remote 3 4 Features and Controls 5 Setup and connections Using the Remote 1 2 Features and Controls Operating Instructions 3 4 Reference 5 ...

Страница 24: ... its end during playback it will automatically rewind back to the beginning of the tape and eject the tape Pressing the remote s ON OFF button while the tape is rewinding will not stop the tape The tape will continue to rewind until it reaches its beginning and then the TV VCR will turn off 6 Press FORWARD on the remote to advance the tape If the VCR is playing a tape when the FORWARD button is pr...

Страница 25: ...visually search a picture during pause mode Sound is turned off during picture search Picture search works best for tapes recorded in SLP speed 1 During playback press FORWARD on the remote to search forward or REVERSE to search in reverse 2 Press PLAY to return to normal playback Slow Motion only available on model T19067 You can view the picture in slow motion during PAUSE mode There are three s...

Страница 26: ...nter automatically resets to 0 00 00 whenever a tape is inserted or when CLEAR is pressed while the time counter is displayed For example if a 30 minute program was recorded at the beginning of the tape and you wanted to record another program after it you should 1 Insert the pre recorded tape 2 Press INFO twice to display the time counter and fast forward the tape until 30 minutes appears on the ...

Страница 27: ... remote go to the place on the tape that you want to be the end of the section that plays continuously Remember the numbers on the time counter 2 55 is the end time for Auto Repeat in the example to the right 3 Press MENU to display the TV VCR Main Menu 4 Press 5 to display the Setup menu 5 Press 3 to display the Auto Repeat menu 6 Using the number buttons enter the amount of time you want the tap...

Страница 28: ...f the beginning or end of the tape is reached during the search the message End of tape appears To Select a Specific Index Number for Index Playback 1 Insert the pre recorded tape and press STOP 2 Press SEARCH on the remote to display the Index Search screen 3 Use the number buttons 0 9 on the remote to enter the number of the index mark for which you want the TV VCR to search 4 Press FORWARD to s...

Страница 29: ...screen The current time counter is displayed 7 Press REVERSE or FORWARD on the remote to return to 0 00 00 The tape rewinds or fast forwards to the 0 00 00 and begins playing Blank Search The TV VCR will search for blank portions of the tape that are more than six seconds in length 1 Insert the pre recorded tape and press STOP 2 Press SEARCH on the remote three times to display the Blank Search sc...

Страница 30: ... you to prevent recording short passages of unwanted material Press PAUSE during recording to temporarily stop and start recording While the tape is paused the front panel indicator light inside the REC button will flash The TV VCR will automatically switch from pause to stop after a few minutes to prevent tape wear Automatic Head Cleaner The TV VCR has an automatic head cleaner system When a cass...

Страница 31: ...y in progress they will be interrupted and the GUIDE Plus system timed recording will begin as scheduled Express recording lets you record up to four hours or to the end of the tape without programming the timer You can begin recording immediately The TV VCR will stop automatically at the end of the recording To use express recording 1 Insert a tape with safety tab in place The TV VCR will turn on...

Страница 32: ...ly program recorded at same time every day 3 Weekdays program recorded at same time Monday through Friday 4 Weekly program recorded at same time once a week 5 Use the number buttons to enter the channel number start time end time and start date of the recording After you enter the start time press 1 for AM or 2 for PM Example For a time of 5 07 PM press 5 then 0 then 7 and then 2 Repeat for end ti...

Страница 33: ...cel the timer through the GUIDE Plus system Copying and Editing Tapes Use another VCR or camcorder as the playback VCR and the TV VCR as the recording VCR 1 Turn on the VCR or camcorder and the TV VCR 2 Press 00 on TV VCR s remote to select the line input VIDEO 1 or VIDEO 2 Pressing 00 once tunes the TV VCR to the AUDIO VIDEO 1 input jacks on the rear of the TV VCR Pressing 00 twice tunes the TV V...

Страница 34: ...n locate the next segment you want to copy on the playback VCR or camcorder by using FORWARD REVERSE or PLAY Press PAUSE on the playback VCR or camcorder Press PAUSE at the same time on both the VCR or camcorder and the TV VCR s remote to resume copying 8 Press STOP on both the VCR or camcorder and the TV VCR s remote when you are finished The unauthorized recording of television programs and othe...

Страница 35: ...atures and controls with which your TV VCR is equipped In this section you will learn how to use On screen displays The GUIDE Plus Menu system Parental controls including V Chip rating limits Setup and connections Using the Remote 1 2 Features and Controls Operating Instructions 3 4 5 Reference ...

Страница 36: ...st Video 1 Press MENU on the remote to display the TV VCR Main Menu 2 Press 1 to display the Screen menu 3 Press 1 to display the Picture Quality menu 4 Press CH or v to select the function you want to adjust Select Color to adjust color intensity Select Tint to adjust for natural flesh tones Select Contr contrast to adjust picture contrast Select Brite brightness to adjust picture brightness Sele...

Страница 37: ...ailable on all channels Check your TV program listings for CC closed caption broadcasts To View Closed Captions 1 Press MENU on the remote to display TV VCR Main Menu 2 Press 1 to display the Screen menu 3 Press 2 to display the Closed Captioning menu 4 Press 1 to change the Display There are three choices Off On and On When Muted Each time you press 1 the Display will change on the Closed Caption...

Страница 38: ... the Time menu 3 Press 2 to display the Wake Up Timer menu 4 Use the number buttons 0 9 to enter the channel number and time After you enter the time press 1 for AM or 2 for PM Example For a time of 5 07 PM press 5 then 0 then 7 then 2 Press GO BACK to correct an entry and CLEAR to clear the time Ch 08 Sleep Timer 0 30 2 12 00 Sat 08 43AM SLP TV VCR MAIN MENU 1 Screen 2 Time 3 Timer Recordings 4 P...

Страница 39: ... up timer the unit automatically turns off after 60 minutes if no buttons are pressed Note When the wake up timer turns on the TV VCR the volume level does not change from when the TV VCR was last turned off 6 To cancel the wake up timer first display the Wake Up Timer menu by repeating steps 1 3 above Then clear the setting by pressing CLEAR and press MENU to exit The timer is also canceled if ME...

Страница 40: ...ram may include mild fantasy violence FV or comedic violence or may frighten children under the age of 7 All Children This program is designed to be appropriate for all children The themes and elements in this program are designed for a young audience including children from ages 2 6 This program is not expected to frighten younger children Parental Controls and V Chip The Parental Controls menu a...

Страница 41: ...Field Pressing 3 7 lets you toggle between View V and Block B for the following fields Suggestive Dialog D Language L Sexual Situations S Violence V and Fantasy Violence FV Rating Status Field Pressing 2 lets you select whether the status of the age based rating limit to the left is View or Block Rating Field Pressing 1 lets you select from a list of age based ratings Rating Settings Area Lets you...

Страница 42: ...ing Age Based Ratings After you block age based ratings you have the option of going back and changing some of the content ratings back to View V 1 Determine the rating you want to view that is currently blocked 2 Continually press 1 until the rating status corresponding with the age based rating you want to change appears on the screen 3 Press 2 to change the status from Block B to View V Your ch...

Страница 43: ...Block letters will turn red Remember You must lock your Parental Controls settings for rating limits to take effect Viewing Specific Content Themes After you block specific content themes you have the option of going back and changing some of the content themes back to View V 1 Determine the rating you want to change to View V 2 Continuously press 1 until the rating status corresponding with the c...

Страница 44: ...ngs for rating limits to take effect Viewing Movie Ratings After you block movie ratings you have the option of going back and changing some of the rating statuses back to View 1 Determine the movie ratings you want to change to View 2 Continuously press 1 until the rating you want to change appears on the screen 3 Press 2 to change the status from View to Block For example if movies with a rating...

Страница 45: ...become active If you try to access a program that is blocked the screen displays the message This channel has not been approved for viewing Follow the instructions on the screen to enter your password and temporarily override the rating limits To unlock the Parental Controls settings you must use your password to access the Parental Controls menu 1 Press MENU to display the TV VCR Main Menu 2 Pres...

Страница 46: ... displays the GUIDE Plus system when you use the TV button or the ON OFF button on the remote to turn on the TV Off Disables the GUIDE Plus system from being displayed when you use the TV button or the ON OFF button on the remote to turn on the TV Continuous Demo Runs the GUIDE Plus demonstration until it is turned off To end the Continuous Demo press MENU GUIDE Plus Label Displays the GUIDE Plus ...

Страница 47: ...sure the setup information is still correct The GUIDE Plus system will complete a download at the next available opportunity Channel Mapping If more than one cable company services your area you may be prompted with a Channel Mapping screen after the first GUIDE Plus download You will need to identify your cable company by selecting the correct channel numbers for the stations in question Use the ...

Страница 48: ...o To Press 2 on the remote to bring up the direct dial box and enter the number of the channel you want This will highlight the channel and current program in the Channel listing of the Grid guide Press OK to tune to the highlighted channel If the video window is unlocked you can press GUIDE to tune to the channel Record Press 3 on the remote to place a timer in the Schedule for the VCR to record ...

Страница 49: ...ults of a Sort the following Action buttons will appear on the bar Watch Press 1 on the remote to place a timer in the Schedule and then follow the on line help for further options Placing a timer in the Schedule will cause the TV to turn on and tune to the program highlighted in the Channel listing at the predetermined time When the TV turns on the GUIDE Plus system will automatically appear with...

Страница 50: ...m within the Channel listing 3 Select Watch or Record from the Action buttons The timer is then automatically logged into the Schedule menu 4 If you select Record make sure to place a blank tape in the VCR and leave the VCR turned off The Program information window will display a confirmation when you have successfully created a timer to watch or record If you have selected two programs to watch o...

Страница 51: ...rmation You can access these messages from the Messages menu on the Menu bar To read messages 1 Press MENU on the remote to select the Menu bar 2 Use the arrows to highlight the Messages menu selection 3 Highlight the message you wish to read by using the up and down arrows 4 Press INFO to display the full text of the message If the text continues beyond the screen press INFO to view the next page...

Страница 52: ...n the remote to highlight the Menu bar 2 Press 5 to select the Setup menu selection 3 Use the up and down arrows to select Setup View Demo or Options Setup Displays the GUIDE Plus system Setup screens See the subsection Step 8 Set Up the GUIDE Plus System in the section Setup and Connections for more details View Demo Runs the GUIDE Plus system demonstration Options Displays the GUIDE Plus autodis...

Страница 53: ...ls Operating Instructions 3 4 Getting Assistance This section provides information you may need for guidance while using your TV VCR It gives you specific information about the front panel and back panel care and cleaning information a limited warranty and an index Reference 5 ...

Страница 54: ...emote Sensor Receives signals from the remote Aim remote at this sensor with no objects between them REW Rewind Rewinds the tape when the TV VCR is stopped Searches the picture in reverse during playback STOP EJECT Stops normal functions such as record play rewind fast forward or pause Press when a tape is stopped to eject the cassette TIMER Indicator Lights when a timer program has been set and a...

Страница 55: ...anel s Audio Video jacks are disabled when you connect a device to the front panel s Audio Video jacks Troubleshooting Sometimes problems can be easily solved by checking a few basic things Check below before you call for help or take your TV VCR to an Authorized RCA VCR Service Center No power Plug TV VCR into an operating outlet Check connections Make sure the wall outlet is not controlled by a ...

Страница 56: ...ter not working Press INFO on remote to display time counter on screen The time counter does not advance during unrecorded portions of tape When an unrecorded segment of tape is encountered the time counter will hold its count until recorded material is detected again A minus will appear in front of the time counter if you rewind the tape farther back than a counter reading of 0 00 00 Device conne...

Страница 57: ...ber displayed on screen does not change when I press CH or v The on screen channel number will always be the same as the channel number you ve selected on the switch found on the rear of the cable box channel 2 3 or 4 regardless of the channel displayed on the cable box the channel you re viewing The channel number displayed on the cable box should change when you press CH or v TV VCR turns off au...

Страница 58: ...neup If you move or if any of your information changes follow these steps 1 Press MENU on the remote to display the TV VCR Main Menu 2 Press 6 then 1 to set up the GUIDE Plus system 3 Press 5 then 1 to initiate Auto Channel Search If the GUIDE Plus system appears when you play a tape press the GUIDE or CLEAR button on the remote The GUIDE Plus system will disappear in approximately one minute if y...

Страница 59: ...s or call 1 800 336 1900 Show the Authorized Service Center representative your sales receipt or other evidence of purchase date What your warranty does not cover Customer instruction Your Owner s Manual clearly describes how to install adjust and operate your TV VCR Any additional information should be obtained from your dealer Installation and related adjustments Signal reception problems not ca...

Страница 60: ...Coaxial cables are shielded so they are less susceptible to hum or interference from adjacent cables Most audio video connections between components can be made with shielded audio and video cables that have RCA type phono connectors Screw on Coaxial Connector Standard Audio Video cable with RCA type phono plugs such as No VH83 Round 75 ohm coaxial cable Push on Connector Flat 300 ohm twin lead ca...

Страница 61: ...bbing Cable 6 ft VH83 5 95 Stereo VCR Dubbing Cable 6 ft VH84 9 95 S Video Cable 6 ft VH976 7 95 S Video Cable 12 ft VH913 14 95 2 way Signal Splitter VH47 3 95 Amplified Antenna ANT200 49 95 Antenna Mixer 193984 11 15 Remote Control CRK76TRL1 243300 33 10 Audio Video Adapter 228449 4 45 Accessory Order Form Detach Here Please complete other side also Remote Control replacements or spares can be o...

Страница 62: ...terCard or Discover Card by filling in below USE YOUR CREDIT CARD IMPORTANT Copy complete account number from your VISA card IMPORTANT Copy complete account number from your MasterCard My card expires My card expires Copy Number above your name on MasterCard AUTHORIZED SIGNATURE Credit card order will not be processed without signature Name Street Apt City State Zip Print or type your name and add...

Страница 63: ...6 L Language Selecting 12 Limited warranty 57 Lock parental controls 43 M Memory Adding and removing channels 13 Channel 12 Menus GUIDE Plus system 9 Movie rating limits 42 N News GUIDE Plus system 48 O On screen displays 34 Outside antenna 5 P Parental controls 38 Lock Unlock 43 Pause 23 Recording 28 Picture Search 23 Play Auto 25 Play a tape 22 R Rating limits 39 Content themes 41 Movie 42 Unrat...

Страница 64: ...arca s Registrada s Printed in Thailand TOCOM 15392230 The following materials were used in printing this publication Please do not send any products to the Indianapolis address listed in this manual or on the carton This will only add delays in service for your product 60 RECYCLED PAPER MINIMUM 20 POST CONSUMER ...

Отзывы: