background image

23

EN

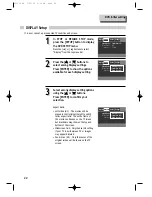
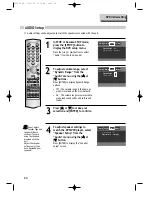
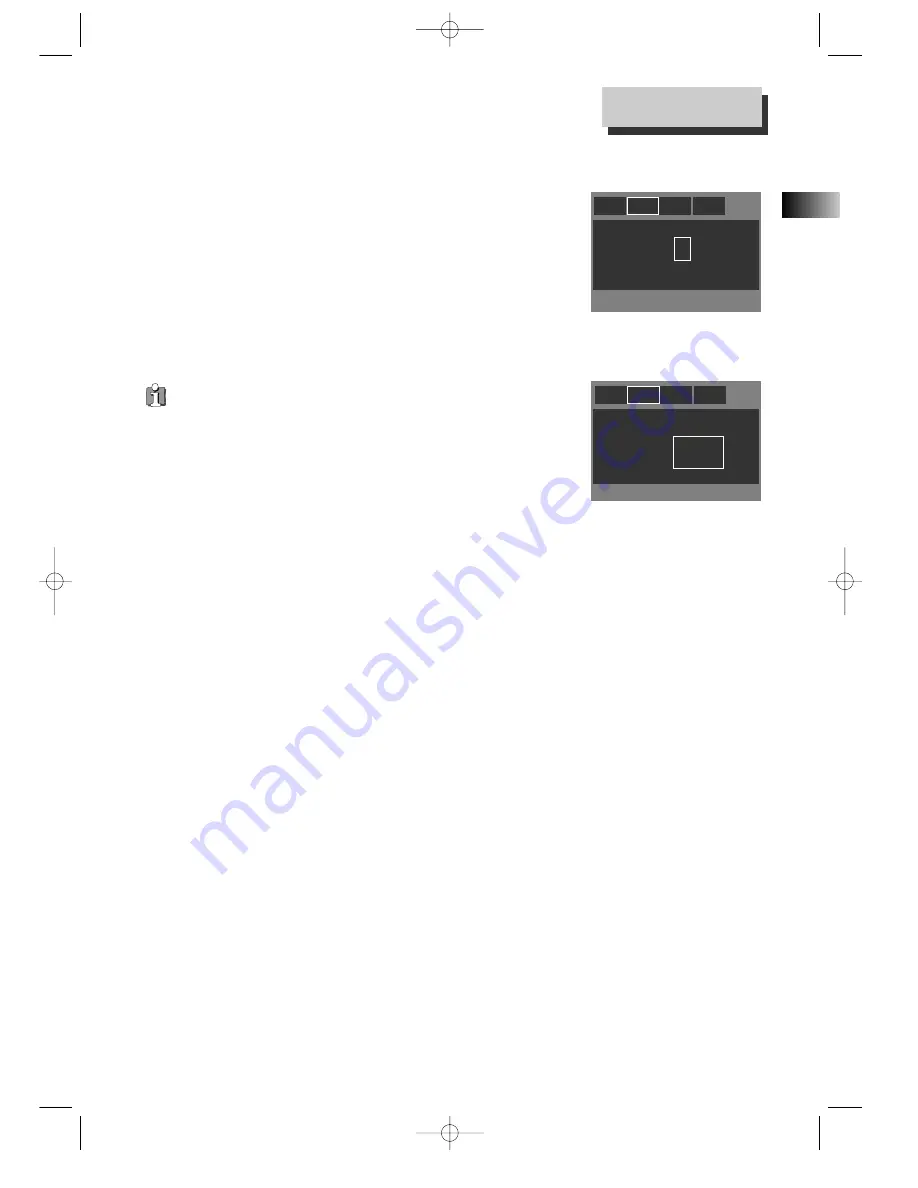
Aspect Ratio :  Letter Box (4:3)

Screen Saver : 

Video Out : 

Aspect Ratio :  Letter Box (4:3)

Screen Saver :  Off

Video Out : 

Off

>On

Progressive
Component

>S-Video

Display Audio Ratings

Language

Display Audio Ratings

Language

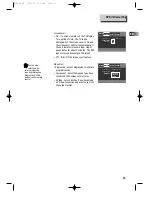
Screen Saver:
• On - If a screen remains on the TV display

for a period of time, the TV can be
damaged. Set the screen saver to On and
the screensaver will start automatically if
the unit remains in resume stop, stop or
pause status for about 5 minutes. The DVD
logo moves continuously on the screen.

• Off - Turns off the screen saver feature.

Video Out:
• Progressive - Select Progressive to activate

progressive scan.

• Component - Select Component you have

connected the Component Out jacks.

• S-Video - Select S-Video if you have made

a S-Video connection and want to set it as
the output format.

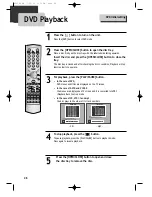
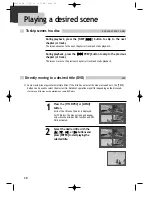
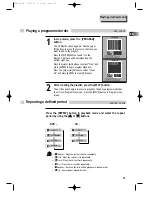
DVD initial setting

You can also

select and de-

select progressive

scan by pressing and

holding the P-SCAN

button on the remote

control. 

RTD300 EN  7/25/03  2:36 PM  Page 27

Содержание RTD300

Страница 1: ...9 Mexico D F Telefono 55 25 81 53 20 R F C CTM 980723 KS5 0151 EXPORTER Thomson Inc P O Box 1976 Indianapolis IN 46206 1976 2003 Thomson Inc Trademark s Registered Marca s Registrada s Marque s Deposée 55814590 EN F E www rca com www rca com LatinAmerica Printed in China Impreso en China RTD300 EN 7 25 03 2 36 PM Page 2 ...

Страница 2: ...n u a l RTD300 It is important to read this instruction book prior to using your new product for the first time Es importante leer este manual antes de usar por vez primera su euipo RTD300 EN 7 25 03 2 36 PM Page 3 ...

Страница 3: ...TD300 Electrical current consumption Power Supply 120V 60Hz Power consumption 95 Watts IMPORTER Comercializadora Thomson de México S A de C V Miguel de Cervantes Saavedra No 57 Col Ampliación Granada C P 11529 Mexico D F Telefono 55 25 81 53 20 RFC CTM 980723 KS5 FCC Information For Your Safety The AC power plug is polarized one blade is wider than the other and only fits into AC power outlets one...

Страница 4: ...nguage SUBTITLE language and 3D AUDIO 36 ZOOM Multi Angle and Digest play 37 About mp3 discs 38 Displaying menus in a disc 39 Recording 40 Timer Recordings 42 Watching and Recording Cable TV 45 Presetting the radio stations 46 Listening to the radio 47 Speaker Setup for enjoying the surround sound effect 48 Delay Time Setting 50 Setting the sound level 52 About DVD 53 Basic information about VCR a...

Страница 5: ...orwards the current video tape in VCR mode Search forward at different speeds x2 x4 x8 etc in DVD mode Searches forward when activated during video tape and DVD playback Tuning Scans all available radio stations Record button In VCR mode starts recording of a TV program or program from another sources except DVD A Operation Display Window Displays device operations For more information see Operati...

Страница 6: ...ep time indicator 6 6 Playback disc indicator 7 7 Dolby Digital indicator 8 8 Prologic II indicator 9 9 Playback indicator 0 0 Pause indicator A A DTS indicator B B DSP indicator C C PBC Playback Control indicator D D FM Stereo indicator E E Mute indicator F F Random playback indicator G G Repeat playback indicator 1 8 9 10 11 12 13 14 15 16 17 7 2 3 4 5 6 RTD300 EN 7 25 03 2 36 PM Page 7 ...

Страница 7: ... the unit to a TV or monitor with a COMPONENT 480i or 480p input Note VCR signal is only available from Composite Video Out jack and RF Out You must always connect these to the TV in order to set up and use your unit 7 7 Subwoofer Pre Output Jack Connect an active subwoofer to improve bass performance especially in a large room 8 8 A V Output Jack 9 9 A V Input 2 Jack A V Input 1 Jack A A Connecti...

Страница 8: ...resetted stations S DVD Angle VCR Record Speed button T Stop MEMORY Enter the number of a selected chapter track station or channel button U DVD PREVIOUS move to the previous chapter or track Next Move to the next chapter or track button VCR Frame Advance button in pause mode V DVD SOUND FIELD button W DVD AUDIO Language Select VCR AUDIO Select button RADIO Set FM Mode to Stereo or Mono sound X DV...

Страница 9: ... SCAN INPUT 1 2 3 4 5 6 7 8 0 9 VCR POWER DVD TV VOL VOL TUNING SEARCH OPE N CL OSE TRA CKIN G CLEA R SETU P ENT ER OK ZOO M REC PRO GRA M MEM ORY SEA RCH SUB TITL E AUD IO SOU ND FIEL D REP EAT A B DELA Y LEVE L MUT E CLK CNT TV V CR TV INPU T SLEE P STEP SPE ED A NGL E CH P RES ET DISPLAY FM AM MENU TITLE P BC 100 P SCA N INPU T 1 2 3 4 5 6 7 8 0 9 VCR POW ER DVD TV VOL VOL TUN ING SEA RCH 6 1 X...

Страница 10: ... to the AUDIO OUT L white and R red jack on the DVD Video player and the AUDIO IN jacks on the TV AUDIO VIDEO S VIDEO ANT INPUT S VIDEO INPUT A V INPUT COMPONENT INPUT CAUTION CAUTION TO REDUCE THE RISK OF ELECTRIC SHOCK DO NOT REMOVE COVER OR BACK NO USER SERVICEABLE PARTS INSIDE REFER SERVICING TO QUALIFIED SERVICE PRESONNEL RISK OF ELECTRIC SHOCK DO NOT OPEN 20 18 16 14 12 10 8 6 4 3 21 19 17 1...

Страница 11: ...e yellow cable Video Cable from the Audio Video Composite Cable connect the Video Out yellow jack on the DVD Video player to the Video IN jack on the TV Connect the TV to the DVD Video player with the RF cable provided with the unit Plug one end of the RF cable into the RF OUT jack on the rear panel of the DVD Video and the other end to the ANT IN jack on the TV Optional DVD only If your TV has co...

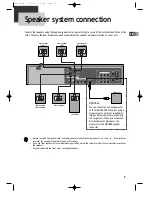
Страница 12: ...nent to and to If the cords are reversed the sound will be distorted and will lack bass If you use front speakers with low maximum input rating adjust the volume carefully to avoid excessive output on the speakers Do not disassemble the front cover of supplied speaker Front speaker right Front speaker left Rear speaker left surround Rear speaker right surround Center speaker Subwoofer Subwoofer Op...

Страница 13: ...2 2 Press the VCR INPUT button on the remote control to select among VIDEO 1 VIDEO 2 or VIDEO 3 on the TV screen Select the one that pertains to the video equipment that you want to record 3 3 Press PLAY on the additional video equipment that you want to record 4 4 Press the REC button on the unit to begin recording contents from the selected video equipment 5 5 Press the Pause button on the unit ...

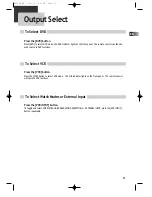
Страница 14: ...t VCR Press the DVD button Press DVD to select DVD mode the DVD indicator lights on the front panel The remote control can then be used to access DVD functions Press the VCR button Press the VCR button to select VCR mode The VHS indicator lights on the front panel The remote control will operate VCR functions To Select Watch Modes or External Input RTD300 EN 7 25 03 2 36 PM Page 15 ...

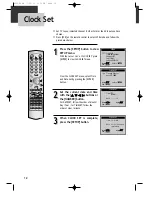
Страница 15: ...utton For DATE SET follow the order of Month Day Year for TIME SET follow the order of Hour Minute CLOCK SET TIMER RECORDINGS CHANNEL SET FUNCTIONS LANGUAGE SELECT Move 5 5 Select ENTER End SETUP Time and Date Set Auto DST ON Move 5 5 Select ENTER End SETUP CLOCK SET Time hh mm Date 20 Move 2 2 3 3 Input 5 5 End SETUP Time 11 01 AM Date 05 24 2003 Sat mm dd yy Move 2 2 3 3 Input 5 5 End SETUP OPEN...

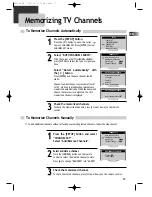
Страница 16: ...Automatic Channel Set process is completed the first memorized channel is displayed 2 2 3 3 1 1 2 2 3 3 Check the memorized channels To check the memorized channels press CH up or down on the remote control To add additional channels without affecting your existing stored channels follow the steps below Press the SETUP button and select CHANNEL SET Select Add Remove Channels Select and store a cha...

Страница 17: ...E CHANNELS CHANNEL SET Auto Channel Search Add Remove Channels Signal Type CABLE Channel Change CH3 Follow the procedures below to delete stored channels You can set the viewing mode on your VCR choose either CABLE cable system connection or ANTENNA antenna connection Press the SETUP button and select CHANNEL SET Select Channel Change Press ENTER to set the exclusive video channel CH3 or CH4 To se...

Страница 18: ...atedly in Pause mode Each time you press this button the next frame is displayed To Adjust Display This product includes an Automatic Tracking function that adjusts the display automatically for clearer pictures During automatic display adjustment Adjusting Display is displayed on the TV screen Manual adjustments can also be used to improve the following poor picture in Playback mode streaks on th...

Страница 19: ... inserted 2 2 Move the cursor down to select Auto TV VCR and press ENTER to select between ON and OFF Select ON if you want the VCR to switch to VCR mode when the VCR is turned on or when a cassette is inserted This cuts off other incoming signals that may cause interference Note This is only applicable if you have connected the RF cable to the ANT IN jack on your TV and RF OUT jacks on your VCR Y...

Страница 20: ... not enter a specific index number the VCR will locate the next index mark and begin playback Press STOP to stop index searching Using advanced features 1 1 2 2 FUNCTIONS Auto Play ON Auto TV VCR ON Index Search Go To Search INDEX SEARCH Press REW or FF to begin searching or Enter a specific index number End SETUP When you record a programs the VCR places an index mark at the start of each recordi...

Страница 21: ... the beginning of the tape FUNCTIONS Auto Play ON Auto TV VCR ON Index Search Go To Search GO TO SEARCH Current tape counter is 2 17 18 Press REW or FF to go to 00 Marking a tape for zero search 1 1 Use PLAY REW or FF to reach for the point on the tape where you want to mark as 0 00 00 2 2 Press the DISPLAY button to display the tape counter on the screen 3 3 Press CLEAR to reset the tape counter ...

Страница 22: ...pril Because the clock automatically changes from 2 00 AM to 3 00 AM forward one hour remember to include the extra hour for timer recording falling within this time frame In the Autumn daylight saving time ends on the last Sunday in October The VCR clock automatically changes from 2 00 AM to 1 00 AM back one hour Therefore it can affect your recording length You may select the language of the VCR...

Страница 23: ...hannel When recording a stereo signal the recording is in Hi Fi mode SAP is only available for areas with such station services Programs are broadcasted in mono or stereo sound or with a SAP Press AUDIO repeatedly to select among STEREO MONO and SAP The following guidelines will help you decide on the best method for recording programs Choose Select Stereo reception for normal recordings and for r...

Страница 24: ...s the 5 5 or buttons to move the cursor to the preferred language and press ENTER to confirm Note If the selected language is not available on a disc the disc s default language will be chosen instead Audio English Subtitle English DVD Menu English OSD Language English Default English French Spanish Audio English Subtitle English DVD Menu English OSD Language English Default English French Spanish...

Страница 25: ...nfirm your selection Aspect Ratio Letterbox 4 3 The movies will be played in their original height to width ratio aspect ratio The entire frame of the movie can be seen on the TV screen but black bars may show on the top and bottom of the screen Widescreen 16 9 Only choose this setting if your TV is a widescreen TV or Images may appear distored Pan Scan 4 3 Only the center of the original screen w...

Страница 26: ...cally if the unit remains in resume stop stop or pause status for about 5 minutes The DVD logo moves continuously on the screen Off Turns off the screen saver feature Video Out Progressive Select Progressive to activate progressive scan Component Select Component you have connected the Component Out jacks S Video Select S Video if you have made a S Video connection and want to set it as the output...

Страница 27: ...tion and ENTER to confirm To adjust speaker settings to match the DVD VCR player select Speaker Setup from the Audio menu using the 5 5 or button Press ENTER to display the Speaker Setup screen 1 1 2 2 Dynamic Range Speaker Setup Off On OPEN CLOSE TRACKING CLEAR SETUP ENTER OK ZOOM REC PROGRAM MEMORY SEARCH SUBTITLE AUDIO SOUND FIELD REPEAT A B DELAY LEVEL MUTE CLK CNT TV VCR TV INPUT SLEEP STEP S...

Страница 28: ... buttons To adjust the Level setting for the speaker you have selected above press the 1 1 or buttons To adjust the Delay setting for the speaker you have selected above press the 7 71 1 or 7 7 buttons Note For additional speaker setting information refer for to Speaker Setup on page 48 5 5 6 6 Speaker Setup LEFT Type Small Level 0 0 dB Delay 0 ms CENTER Type Small Level 0 0 dB Delay 0 ms RIGHT Ty...

Страница 29: ...ll be asked to enter the password if a password has been assigned The rating list appears on the screen There are 8 rating levels from 1 suitable for general audience to 8 for mature audience only The initial password is 3308 In case you forget newly input password you can use 3308 as a password Parental Lock can only be activated if A password has been set and the unit is in Lock mode the disc ha...

Страница 30: ...le A password is required to play discs with ratings higher then the level selected To return to DVD settings select Default from the Ratings menu by pressing the 5 5 or buttons and select Reset Display Audio Ratings Language Password Unassigned Parental 8 ADU Default Reset Reset 5 5 RTD300 EN 7 25 03 2 36 PM Page 31 ...

Страница 31: ...playback mode Press again to resume playback Track 001 00 03 12 Track 002 00 03 54 Track 003 00 02 08 Track 004 00 03 16 Track 005 00 03 11 Track 006 00 04 48 Track 007 00 03 48 Track 008 00 03 02 Track 009 00 04 23 Track 010 00 04 14 Track 011 00 04 50 Track 012 00 03 30 Track List Use 5 arrows to find a track Press ENTER to start playing a track CD T 001 015 E 00 02 05 000 001 CD01 002 A Track00...

Страница 32: ... for mp3 discs For slow forward or slow reverse playback press the 4 or buttons in pause mode You can watch the desired screen in the slow motion Slow reverse playback is not available for video CDs The indicator appears For a still picture press the PAUSE button in Playback mode to watch the desired screen in Pause status DVD initial setting RTD300 EN 7 25 03 2 36 PM Page 33 ...

Страница 33: ...DVD During playback press the NEXT 7 7 button to skip to the next chapter or track The screen advances to the next chapter or track and starts playback During playback press the 7 71 1 PREV button to skip to the previous chapter or track The screen moves to the previous chapter or track and starts playback Some movie discs may contain multiple titles If the disc has a movie title menu included on ...

Страница 34: ...s the 2 or 3 buttons to select Clear All and press ENTER to clear CD Playlist After creating the playlist press the PLAY button Then titles and chapters track are played in the above programmed order To exit from Program Play mode press the SETUP button in Program menu screen Press the REPEAT button in playback mode and select the repeat period by using the 5 5 or buttons DVD CD 1 1 2 2 Playing a ...

Страница 35: ...epeat playback end position B is set and a defined segment from A to B will be played repeatedly To search with a title number select the title window with the 2 2 or 3 3 buttons Enter the title number to be searched using the NUMBER buttons or the 5 or buttons To search with a chapter number select the chapter window with the 2 2 or 3 3 buttons Enter the chapter number to be searched using the NU...

Страница 36: ...the screen to the right appears The display shows the current track elapse time and the total disc time Enter the track time to be searched using the NUMBER buttons 3 3 After entering the track number or the track time to be searched press the ENTER button Playback starts from the selected position Playing a desired scene 001 _ _ _ _ 0 VCD CD T T 3 3 4 4 To search with a time select the time windo...

Страница 37: ... Press the DISPLAY button the third time The display shows the subtitle language selected and the repeat playback mode To exit from Display mode press the DISPLAY button again 2 2 3 3 During playback press the DISPLAY button The display shows the current track number audio selection repeat playback mode and the time elapsed To exit Display mode press the DISPLAY button again 001 020 01 46 03 T C 1...

Страница 38: ...y mp3 File press the ENTER button Confirming the current mp3 disc mode Confirming the current PLAY mode on screen 000 001 CD01 002 A Track001 mp3 003 A Track002 mp3 004 A Track003 mp3 005 A Track004 mp3 006 A Track005 mp3 007 A Track006 mp3 008 A Track007 mp3 009 A Track008 mp3 Track List Use 5 arrows to find a track Press ENTER to start playing a track MP3 T 000 199 E 00 00 52 CD01 MP3 RTD300 EN ...

Страница 39: ... or buttons to select the desired subtitle language Press the SUBTITLE button to confirm your selection English ENG French FRE Spanish SPA etc Sound Fields and Graphics Equalizer can be set to create digital sound effects that resemble sounds in a real environment Different modes will give you different feel of size and type of listening environment To toggle among sound field selections press the...

Страница 40: ...s the ANGLE button to display angle information available on the DVD disc If a DVD disc includes multi angle information press the 5 or buttons to select the desired angle Press the ANGLE button to confirm your selection The angle screen appears on the display to show the current angle number and the total number of angles available If this feature is not available on the DVD disc Not available is...

Страница 41: ...button on the remote control during playback to skip to the beginning of the next file Press the 4 PREV button on the remote control during playback to skip to the beginning of the previous file To select a track Input the track number using the numeric buttons to select and play the desired song The ability of this unit to read mp3 discs is dependent on the followings The Bit Rate must be within ...

Страница 42: ...MENU button to display menus on a disc Menus may vary from disc to disc For VCD2 0 select PBC ON mode by pressing the TITLE PBC button This function is not available for CD and VCD1 1 Move the cursor to the desired item with arrow 5 5 2 2 or 3 3 buttons and press ENTER or PLAY to select the item DVD VCD2 0 RTD300 EN 7 25 03 2 36 PM Page 43 ...

Страница 43: ... pause recording press the PAUSE button When the unit remains in pause mode for 5 minutes the recording is stopped automatically To stop recording press the STOP button 1 1 To watch another TV channel while recording press the TV VCR button Change the TV channel with the CHANNEL buttons on your TV 2 2 To play DVD during video recording insert a DVD disc Load the desired DVD disc into the disc comp...

Страница 44: ... press the STOP button Twice recording for 30 mins from current time 3 times recording for 1 hour 9 recording for 4 hours 10 returns to continuous recording Pressing REC once 3 3 To stop recording press and hold the STOP button more than 5 seconds To start recording the current TV program while it is being watched follow the procedures below The recording time increases by 30 minutes every time RE...

Страница 45: ...g Select the date start time and end time for recording with the NUMBER buttons Turn on the TV Make sure that current time is set correctly on the DVD VCR Insert a recordable tape with its safety tab in place Prior to the setting press the VCR button select VCR mode SETUP CLOCK SET TIMER RECORDINGS CHANNEL SET FUNCTIONS LANGUAGE SELECT Move 5 Select ENTER End SETUP TIMER RECORDINGS Make a New Prog...

Страница 46: ...the CLEAR button on the position of the details to delete Press the PROGRAM button in VCR mode You can set the Timer Program Before timer program setting clock must be set to the correct time and video mode must be selected Timer Recordings PROGRAM1 ONE TIME TIMER RECORDINGS Make a New Program Review Cancel Programs Move 5 Select ENTER End SETUP If a recordable tape is not inserted in Stop mode un...

Страница 47: ...y tab with a screw driver If you wish to record on a cassette without a safety tab cover the hole with cellophane tape Inserting video cassettes Firmly insert the cassette into the cassette compartment with the label side up An inverted cassette cannot be inserted Removing video cassettes Press EJECT on the front panel and the VCR will eject the tape Pull the cassette out gently Audio visual mater...

Страница 48: ...Recording on page 42 CH3 or CH4 EXTERNAL INPUT where the converter connected channel is set should be entered as the video channel Enter the date and time of the cable program for TIMER RECORDINGS Adjust Converter Set converter to the cable TV channel to be recorded For example to record CH48 select CH48 with the CONVERTER CHANNEL SELECT buttons If TIMER RECORDING is set to record converter channe...

Страница 49: ...ndication starts to change then release Scanning stops when the DVD Receiver has tuned to a station Press the MEMORY button A preset number shows on the display Press the PRESET or button to select the preset number you want Press the MEMORY button again The station is stored Tune to a station with a weak signal Press the TUNING or button repeatedly in step 2 to tune to the station manually To cle...

Страница 50: ...ant Adjust the volume by rotating the VOLUME knob on the front panel or pressing the VOL or VOL buttons repeatedly until the desired volume level is reached To turn off the radio Press POWER to turn the unit off or select another function mode DVD VCR VIDEO 1 or VIDEO 2 To listen to non preset radio stations Use manual or automatic tuning in step 2 For manual tuning press the TUNING or buttons rep...

Страница 51: ...marks of Dolby Laboratories Confidential Unpublished works Copyright 1992 1997 Dolby Laboratories All rights reserved Manufactured under license from Digital Theater Systems Inc US Pat No 5 451 942 and other worldwide patents issued and pending DTS and DTS Digital Surround are trademarks of Digital Theater Systems Inc Copyright 1996 2000 Digital Theater Systems Inc All rights reserved If the room ...

Страница 52: ...nd motion and atmosphere required for surround playback For optimum sound effects do not place the rear speakers too far behind the listening position Install them at or above the height of the listener s ears It is also effective to point the rear speakers toward a wall or ceiling to further dis perse the sound If the room is small and the listeners area is near the rear wall set the rear speaker...

Страница 53: ...ch speaker is as follows In Dolby Digital mode Center delay time 0ms Rear delay time 5ms In Dolby Pro Logic mode Center delay time no setting Rear delay time 15 30ms If the rear delay time is set in Dolby Digital mode in the Dolby Pro Logic mode the delay time will be set automatically The delay time is 1 msec per foot If the center and rear speakers are further than the front speak ers from the l...

Страница 54: ...isplay window Press the DELAY button to select the desired speaker to set Each time you press the DELAY button it changes in the following order FL Front Left CT Center FR Front Right SR Surround Right SL Surround Left Press the 5 5 or buttons to change the delay time Repeat steps 2 3 to adjust the sound Delay of the other channels 3 3 4 4 RTD300 EN 7 25 03 2 36 PM Page 55 ...

Страница 55: ... Subwoofer SR Surround Right Adjust the sound level the same way as described in Setting the sound level of the desired channel above so that all the speak er s sound level is same from the listener s position If you adjust the sound level when operating the test tone it will be paused in the current speaker channel In Dolby Digital and Dolby Pro Logic mode use the test tone function to adjust the...

Страница 56: ...Video DVD ROM Impossible DVD RAM Impossible Photo CD Impossible Playable Disc Terms related with DVD About DVD DVD A DVD abbreviation of Digital Versatile Disc or Digital Video Disc can include 135 minutes of video information And for audio it can hold up to 8 kinds of languages and 32 kinds of subtitle languages By using MPEG 2 video compression and digital 3D surround sound DVD realizes high def...

Страница 57: ...ce as well as uncompromised sound quality Bitstream Digital audio data that is decoded into an analog signal for subsequent output to speakers Lt Rt It indicates L R of Dolby Digital 2CH Downmix output Downmix DOWNMIX is reproducing the proper audio when audio format recorded on a disc differs from the output audio channel configuration For example with just one stereo speaker system you can hear ...

Страница 58: ... cable system Safety tab The plastic tab at the back of a video tape cassette which when removed prevents accidental erasure of a recording SP Standard play the recording speed to use when the best picture quality is of prime importance and when total recording time is not If a VCR is moved from a cool place to a warm and damp place or a place facing a direct cool wind from air conditioner and oth...

Страница 59: ...o the appropriate jacks Some contaminants may be in the connection terminal Check the distance between the remote control and the unit Remove any obstacles between the unit and the remote Battery may be weak or exhausted Make sure you have selected the correct mode e g when you operate DVD press the DVD button to select DVD mode Unplug the power plug and plug it in again Dolby Digital sound can on...

Страница 60: ...his case pull out an outlet and then push the tape smoothly A safe mode to protect the videotape is operated automatically Pull out the tape and insert it again If the product has been in use for a long time a videotape may not be ejected because the film might be stretched In this case pull out the power plug for about 10minutes and then press the 0 button Check your antenna s connection TV chann...

Страница 61: ...Make sure the clock is right Make sure the timer recording info is right Make sure the safety tab on the tape is not broken If it is use scotch tape to tape it Make sure the cable data output code connection is correct Were a converter manufacturer setup and output channel right Did you enter a password Please cancel it Make sure the player is turned on You may not memorize channels Please check y...

Страница 62: ...4 69 CH Cable 1 125 Signal type NTSC COLOR Antenna Input output U V mixed 75Ω unbalanced VIDEO input 1 0 Vp p unbalanced RCA JACK AUDIO input 8 8dBm RCA JACK VHF output 3 or 4 CH Playable tape Very high dense tapes with VHS marks Playable disc DVD VIDEO CD CD 12mm CD 8mm MP3 CD R CD RW Tape speed SP 33 35mm s SLP 11 12mm s Playtime SP 2hrs SLP 6hrs use of T 120 tape Clock display 12 hrs AM PM Time...

Страница 63: ... the same time if disposed of in fire or if an attempt is made to charge a battery not intended to be recharged Safety precautions Never open the cabinet under any circumstances Any repairs or internal adjustments should be made only by a trained technician Never operate this product with the cabinet removed Do not touch the player with wet hands If any liquid enters the player cabinet take the pl...

Страница 64: ...oduct Registration Please complete and mail the Product Registration Card packed with your product It will make it easier to contact you should it ever be necessary The return of the card is not required for warranty coverage Limitation of Warranty THE WARRANTY STATED ABOVE IS THE ONLY WARRANTY APPLICABLE TO THIS PRODUCT ALL OTHER WARRANTIES EXPRESS OR IMPLIED INCLUDING ALL IMPLIED WARRANTIES OF M...

Страница 65: ... has been modified or incorporated into other products or is used for institutional or other commercial purposes A unit purchased or serviced outside Canada Acts of nature such as but not limited to lightning damage Product Registration Please complete and mail the Product Registration Card packed with your product It will make it easier to contact you should it ever be necessary The return of the...

Отзывы: