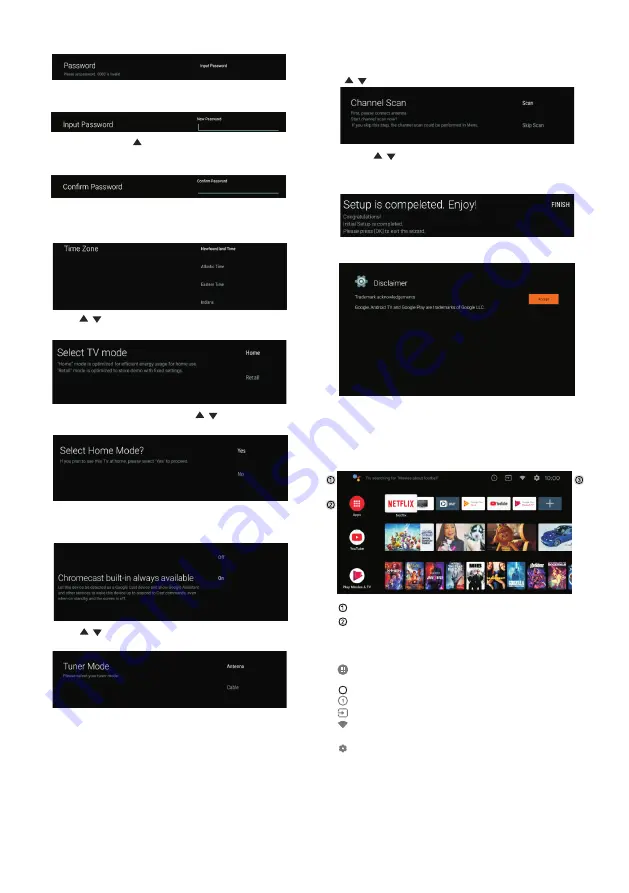
HOME SCREEN
Press the HOME button to go to the HOME page.
Press
to
select
the
time
zone
you
want
,
and
press
OK
to
select
.
/
P
to
select
whether
to
search
,
select
can to
search
,
select
kip
Scan
to
skip
the
search
.
ress
/
"S
"
"S
"
P
OK
to
complete
the
setup
.
ress
P
the
OK
to
agree
to
Disclaime
(
Disclaimer
).
After
setting
is
complete
,
You
can
watch
TV
.
ress
For
selecting
the
mode
,
press
key
to
select
Home mode
and
press
OK
to
confirm
.
/
Confirm
the
selected
mode
again
,
select
es
to
confirm
the
selected
mode
,
and
select
o
to
return
to
the
previous
step
.
"Y "
"N "
Press to turn on or off the always available
features of chrome cast.
/
To
select
the
Tuner
mode
for
searching
,
press
to
select
and
press
OK
to
confirm
.
/
Used
to
set
your
device
'
s
password
to
ensure
security
and
privacy
.
Press
OK
to
pop
the
soft
keyboard
,
and
use
the
remote
control
to
enter
the
4
-
digit
password
automacically
jump
to
the
next
interface
.
Confirm
the
password
again
and
keep
it
consistent
.
Use
the
remote
control
to
enter
the
password
and
complete
the
password
confirmation
.
Open the google assistant or start a voice search.
Among the applications installed on the TV, the
icons for the favourite applications are shown inside
here.(Favourite applications can be added/deleted/
changed its order by users.)
Apps:
Click to jump to Apps screen where all the
installed applications are listed.
Notification:
Display the notifications.
Inputs:
Icon to select an input source.
Network&Internet:
Icon to Setup Network, Such
as wifi.
Settings:
Various
settings
can
be
configured
here.
For details on the settings,see the next explanation.
3
15
Содержание RTAQ5033
Страница 3: ...IMPORTANT SAFETY INSTRUCTIONS Stand screws set x1 2 ...
Страница 5: ...IMPORTANT INFORMATION 4 ...
Страница 6: ...ATTACTHING OR REMOVING THE STAND 4 5 ...
Страница 7: ...200mm x 200mm IDENTIFYING FRONT AND REAR PANEL 12 12 6 ...
Страница 8: ...7 ...
Страница 9: ...CONNECTION SUGGESTIONS OPTICAL USB USB HDMI 4 HDMI 2 HDMI 3 AV IN RF LAN 8 ...
Страница 10: ...OPTICAL USB USB HDMI 4 HDMI 2 HDMI 3 AV IN RF LAN 9 Y Y W R W R Y W R ...
Страница 11: ...OPTICAL USB USB HDMI 4 HDMI 2 HDMI 3 AV IN RF LAN 10 HDMI ...
Страница 12: ...Optical OPTICAL OPTICAL OPTICAL OPTICAL USB USB HDMI 4 HDMI 2 HDMI 3 AV IN RF LAN 11 ...
Страница 23: ...HOW DO I CLEAN THE TV 22 ...
Страница 27: ...FCC COMPLIANCE STATEMENT 26 ...
Страница 34: ...FIXATION OU ENLÈVEMENT DU SUPPORT 4 5 ...
Страница 35: ...IDENTIFICATION DES PANNEAUX AVANT ET ARRIÈRE 200mm x 200mm 12 12 6 ...
Страница 36: ...7 ...
Страница 37: ...OPTICAL USB USB HDMI 4 HDMI 2 HDMI 3 AV IN RF LAN SUGGESTIONS DE CONNEXION 8 ...
Страница 38: ...OPTICAL USB USB HDMI 4 HDMI 2 HDMI 3 AV IN RF LAN Y Y W R W R Y W R 9 ...
Страница 39: ...OPTICAL USB USB HDMI 4 HDMI 2 HDMI 3 AV IN RF LAN HDMI 10 ...
Страница 40: ...OPTICAL USB USB HDMI 4 HDMI 2 HDMI 3 AV IN RF LAN 11 ...
Страница 51: ...NETTOYAGE DU TÉLÉVISEUR 22 ...
Страница 52: ...SPÉCIFICATIONS 50 3840x2160 3000 1 HDCP1 4 2 2 250 10W 10W 18 138W 100 240V 50 60Hz M N MTS 23 ...
Страница 56: ...27 ...


